Page 124 of 250

Downloaded from www.Manualslib.com manuals search engine
NU761_2_G2-FRA.qxd 4/11/05 10:48 Page 2.24
2.24
EMERGENCY BRAKE ASSIST
This system is complementary to
ABS and helps reduce vehicle
stopping distances.
Operating principle
The system is for detecting an
emergency braking situation. In this
case, the braking assistance
immediately develops maximum
power and may trigger ABS
regulation.
ABS braking is maintained as long
as the brake pedal is not released.
Hazard warning lights switching
on
Depending on the vehicle, these
may light up in the event of sudden
deceleration.This function is an
additional aid in case of
critical driving conditions
to enable the vehicle
behaviour to be adapted to suit the
driving conditions.
However, the function does not take
the place of the driver. I t does not
increase the vehicle’s limits and
should not encourage you to drive
more quickly.
Therefore, it can under no
circumstances replace the vigilance
or responsibility of the driver when
manoeuvring the vehicle (the driver
must always be ready for sudden
incidents which may occur when
driving).
NU761_2_G2-ENG.qxp 03-Jan-06 20:48 Page 2.24 (Black/Process Black\
plate)
Page 133 of 250
Downloaded from www.Manualslib.com manuals search engine
1
NU761_2_G2-FRA.qxd 4/11/05 10:48 Page 2.33
PARKING PROXIMITY SENSOR (continued)
Temporary deactivation of the
system
Press switch 1to deactivate the
system.
The warning light built into the
switch lights up to remind you that
the system has been deactivated.
Pressing the switch again will
reactivate the system and switch off
the warning light.
The system is automatically
reactivated after the ignition is
switched off and the engine
restarted.
Prolonged deactivation of the
system
You can deactivate the system
permanently by pressing the switch
for longer than approximately three
seconds.
The warning light built into the
switch remains lit permanently.
Once deactivated, the system can be
reactivated by pressing the button
again for longer than approximately
three seconds.
2.33
NU761_2_G2-ENG.qxp 03-Jan-06 20:48 Page 2.33 (Black/Process Black\
plate)
Page 146 of 250
Downloaded from www.Manualslib.com manuals search engine
12345 67 813 12 11 10
14 9
NU761_2_G3-FRA.qxd 4/11/05 10:51 Page 3.08
3.08
CLIMATE CONTROL
The controls
1
- “Clear view” button to demist
and de-ice the windows.
2 - “Clear view” function indicator
light.
3 - Switching the air conditioning
on and off.
4 and 7- Air temperature adjustment. 5
- Display.
6 - Switching automatic mode on
and off.
8 and 10- Air distribution adjustment
for the passenger
compartment.
9 and 11- Ventilation speed
adjustment. 12
- Heated rear screen and heated
door mirrors (depending on
vehicle).
13 - Heated rear screen indicator
light.
14 - Air recirculation control.
Information and advice for use Refer to the end of the section on
heating/air conditioning.
Buttons 1and 12are
supplemented by operating
warning lights ( 2and 13):
- indicator light lit up, the function is switched on,
- indicator light off, the function is switched off.
NU761_2_G3-ENG.qxp 1/5/2006 5:28 PM Page 3.08 (Black plate)
Page 151 of 250
Downloaded from www.Manualslib.com manuals search engine
13 12
NU761_2_G3-FRA.qxd 4/11/05 10:51 Page 3.13
3.13
CLIMATE CONTROL (continued)
Rear screen de-icing/demisting
Press button 12: operating warning
light 13lights up.
This function permits rapid
demisting/de-icing of the rear screen
and de-icing of the door mirrors
(depending on version). To exit this function
, press button
12 again. If this does not occur,
demisting stops automatically.
NU761_2_G3-ENG.qxp 1/5/2006 5:28 PM Page 3.13 (Black plate)
Page 152 of 250
Downloaded from www.Manualslib.com manuals search engine
12 613 12 11
NU761_2_G3-FRA.qxd 4/11/05 10:51 Page 3.14
3.14
CLIMATE CONTROL (continued)
This function rapidly demists/de-
ices the windscreen, the front side
windows and the door mirrors
(depending on the vehicle).
It imposes automatic operation of
the air conditioning, inhibits
recirculation and activates heating of
the rear screen (indicator light 13).
Press button 12if you do not want
rear screen heating to be activated,
indicator light 13goes out.
“Clear view” Function
Press button 1, operating indicator 2
lights up.
The AUTO button indicator light
(on the display) switches off. Note.:
if you wish to reduce the air
flow (which may produce a certain
amount of noise in the passenger
compartment), press button 11.
To exit this function , press either:
- button 1again,
- button 6 (the AUTO warning light
on the display illuminates).
NU761_2_G3-ENG.qxp 1/5/2006 5:28 PM Page 3.14 (Black plate)
Page 193 of 250

Downloaded from www.Manualslib.com manuals search engine
3
4
2
1
NU761_2_G5-FRA.qxd 4/11/05 11:09 Page 5.05
5.05
CHANGING A WHEEL
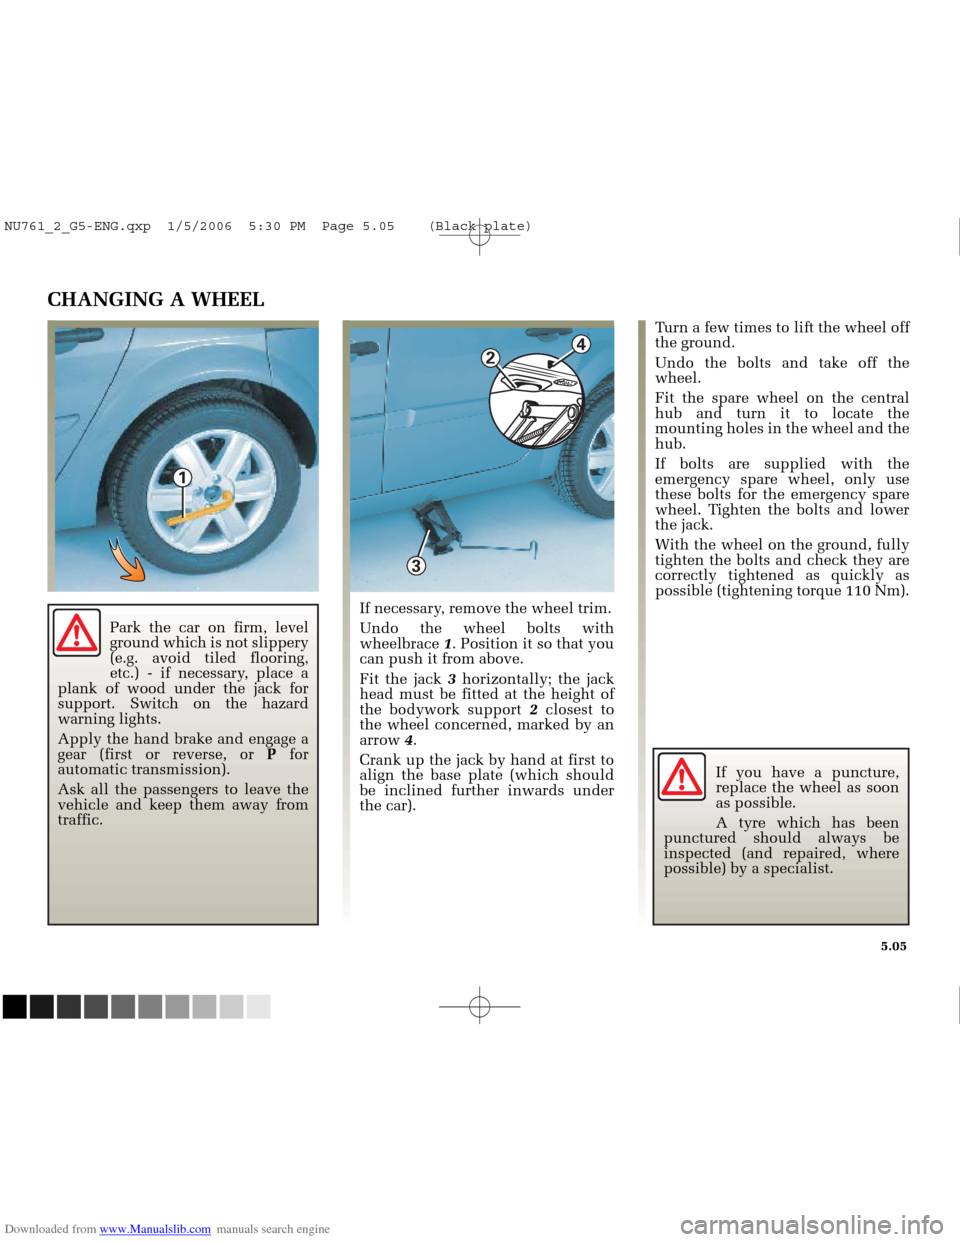
If necessary, remove the wheel trim.
Undo the wheel bolts with
wheelbrace 1. Position it so that you
can push it from above.
Fit the jack 3horizontally; the jack
head must be fitted at the height of
the bodywork support 2closest to
the wheel concerned, marked by an
arrow 4.
Crank up the jack by hand at first to
align the base plate (which should
be inclined further inwards under
the car). Turn a few times to lift the wheel off
the ground.
Undo the bolts and take off the
wheel.
Fit the spare wheel on the central
hub and turn it to locate the
mounting holes in the wheel and the
hub.
If bolts are supplied with the
emergency spare wheel, only use
these bolts for the emergency spare
wheel. Tighten the bolts and lower
the jack.
With the wheel on the ground, fully
tighten the bolts and check they are
correctly tightened as quickly as
possible (tightening torque 110 Nm).
If you have a puncture,
replace the wheel as soon
as possible.
A tyre which has been
punctured should always be
inspected (and repaired, where
possible) by a specialist.
Park the car on firm, level
ground which is not slippery
(e.g. avoid tiled flooring,
etc.) - if necessary, place a
plank of wood under the jack for
support. Switch on the hazard
warning lights.
Apply the hand brake and engage a
gear (first or reverse, or Pfor
automatic transmission).
Ask all the passengers to leave the
vehicle and keep them away from
traffic.
NU761_2_G5-ENG.qxp 1/5/2006 5:30 PM Page 5.05 (Black plate)
Page 197 of 250
Downloaded from www.Manualslib.com manuals search engine
2
1
NU761_2_G5-FRA.qxd 4/11/05 11:09 Page 5.09
5.09
HALOGEN HEADLIGHTS: ACCESS
Access to the left-hand
headlight unit
With the engine switched off
Turn cover 1by one quarter of a turn
(in an anti-clockwise direction).
Access to the right-hand
headlight unit
With the engine switched off
Unclip cover 2.
In both cases, once the bulb has
been changed, ensure that covers 1
and 2 are correctly refitted.
The bulbs can be accessed by
removing blanking covers
1and 2
located in the wheel arches.
However, due to their reduced
accessibility (sometimes requiring
the removal of bodywork or
mechanical components), we advise
you to have your bulbs replaced by
your Renault Dealer .
Take care when working in
the engine compartment as
the engine cooling fan may
start to operate at any
moment without warning.
Risk of injury.
NU761_2_G5-ENG.qxp 1/5/2006 5:30 PM Page 5.09 (Black plate)
Page 208 of 250

Downloaded from www.Manualslib.com manuals search engine
NU761_2_G5-FRA.qxd 4/11/05 11:09 Page 5.20
5.20
BATTERY: troubleshooting
To avoid all risk of sparks:
- Ensure that any consumers(courtesy lights etc.) are switched
off before disconnecting or
reconnecting the battery.
- When charging, stop the charger before connecting or disconnecting
the battery.
- Do not place metal objects on the battery to avoid creating a short
circuit between the terminals.
- Never disconnect a battery less than twenty seconds after the
engine has been switched off.
- Make sure that you reconnect the battery terminals after refitting. Handle the battery with care
as it contains sulphuric acid
which must not come into
contact with the eyes or
skin. If it does, wash the affected
area with plenty of cold water.
Ensure that naked flames, red hot
objects and sparks do not come into
contact with the battery as there is a
risk of explosion.
Take care when working in the
engine compartment as the engine
cooling fan may start to operate at
any moment without warning.
Risk of injury.
NU761_2_G5-ENG.qxp 1/5/2006 5:30 PM Page 5.20 (Black plate)