Page 14 of 417

13 Introduction
Product information
�Product information
Please observe the following in your own
best interest:
We recommend using genuine
Mercedes-Benz parts as well as conversion
parts and accessories explicitly approved
by us for your vehicle model.
We have tested these parts to determine
their reliability, safety and special suitabili-
ty for Mercedes-Benz vehicles.We are unable to make an assessment for
other products and therefore cannot be
held responsible for them, even if in indi-
vidual cases an official approval or authori-
zation by governmental or other agencies
should exist. Use of such parts and acces-
sories could adversely affect the safety,
performance or reliability of your vehicle.
Please do not use them.Genuine Mercedes-Benz parts as well as
conversion parts and accessories ap-
proved by us are available at an authorized
Mercedes-Benz Center where you will re-
ceive comprehensive information, also on
permissible technical modifications, and
where proper installation will be per-
formed.
Page 89 of 417

88 Safety and SecurityPerformance enhancement systemThe Airbrake switch is on the upper part of
the center console.Airbrake modes1Manual
2Automatic
3Test
4Airbrake switch�
Switch on the ignition (
�page 40).
The system runs a self-test to ensure
correct operation of the Airbrake.Test mode
The test mode allows you to check that the
Airbrake is functioning correctly.
This mode can only be activated when the
vehicle is at standstill.
�
Slide Airbrake switch4 to
position3.
The Airbrake swings upwards to an an-
gle of 62°.
�
Release the Airbrake switch.
The Airbrake returns to its initial posi-
tion.Manual mode
In this mode, the Airbrake is set to an angle
of 30°. The driver downforce mode en-
hances handling in all conditions.
�
Slide the Airbrake switch4 to
position1.
The Airbrake swings upwards to an an-
gle of 30° and stays in this position.iIn manual mode, the Airbrake automat-
ic function is activated in an emergency
braking situation, see “Automatic
mode” (
�page 89).
!Before deactivating manual mode,
check the Airbrake for any objects
which may have become lodged, e.g.
branches or leaves, and remove them.
Otherwise the Airbrake can no longer
function correctly.
Page 118 of 417

117 Controls in detail
Control system
�Control system
The control system is activated as soon as
the SmartKey in the starter switch is
turned to position1. The control system
enables you to�
call up information about your vehicle
�
change vehicle settings
For example, you can use the control sys-
tem to find out when your vehicle is next
due for service, to set the language for
messages in the instrument cluster dis-
play, and much more.
The control system relays information to
the multifunction display.
Multifunction display
The multifunction display consists of the
display fields in the speedometer and the
tachometer. In its default state, the left
display field shows the trip and main
odometer, while the present outside tem-
perature appears in the right display field.
This default setting is referred to as the
standard display.Standard display1Main odometer
2Trip odometer
3Current gear selector lever posi-
tion/gear range
4Outside temperature
5Automatic transmission shift program
mode
6Clock
Warning!
G
A driver’s attention to the road and traffic
conditions must always be his/her primary
focus when driving.
For your safety and the safety of others, se-
lecting features through the multifunction
steering wheel should only be done by the
driver when traffic and road conditions per-
mit it to be done safely.
Bear in mind that at a speed of just 30 mph
(approximately 50 km/h), your vehicle is
covering a distance of 44 feet (approximate-
ly 14 m) every second.
Page 127 of 417

126 Controls in detailControl systemResetting all settings
You can reset all the functions of all sub-
menus to the factory settings.�
Press the reset button in the instru-
ment cluster for approximately three
seconds.
In the right display you will see the re-
quest to press the reset button again to
confirm.
�
Press the reset button again.
The functions of all the submenus will
reset to factory settings.Submenus in the Settings menu
�
Press button k or j.
In the right display you see the collec-
tion of submenus.
�
Press button ç.
The selection marker moves to the next
submenu.
The submenus are arranged by hierarchy.
Scroll down with the ç button, scroll up
with the æ button.
Move within the submenus with the k
or j button to the individual functions.
The settings themselves are made with
button æ or ç.Resetting the functions of a submenu
For each submenu you can reset all the
functions to the factory settings.
�
Move to a function in the submenu.
�
Press the reset button in the instru-
ment cluster for approximately three
seconds.
In the right display you will see the re-
quest to press the reset button again to
confirm.
�
Press the reset button again.
All functions of the submenu will reset
to factory settings.
iThe settings you have changed will not
be reset unless you confirm the action
by pressing the reset button a second
time. After approximately five seconds,
the
Settings...
menu reappears in
the multifunction display.
For safety reasons, the
Light circuit
Headlamp mode
in the
Lighting
sub-
menu is not reset while driving.
Page 142 of 417

141 Controls in detail
Control system
Dialing a number from the phone book
If your telephone is ready to receive calls,
you may select and dial a number from the
phone book at any time.�
Press button ÿ or è repeatedly
until you see the
TEL
menu in the left
display.
In the right display you will see the
standby message.
�
Press button j or k.
The control system reads the phone
book which is stored in the telephone.
This may take up to 30 seconds. In the
right display you will see the message Please wait!
.
When the message
Please wait!
dis-
appears, the phone book has been
loaded.
�
Press button j or k repeatedly
until the desired name appears in the
right display.
The stored names are displayed in
ascending or descending alphabetical
order.
�
Press button í.
The system dials the selected phone
number.
�
If the connection is successful, the
name of the party you called and the
duration of the call will appear in the
display.
�
If no connection is made, the control
system stores the dialed number in the
redial memory.
iIf you press and hold j or k for
longer than one second, the system
scrolls rapidly through the list of names
until you release the button again.
Cancel the quick search mode by
pressing ì.
Page 149 of 417
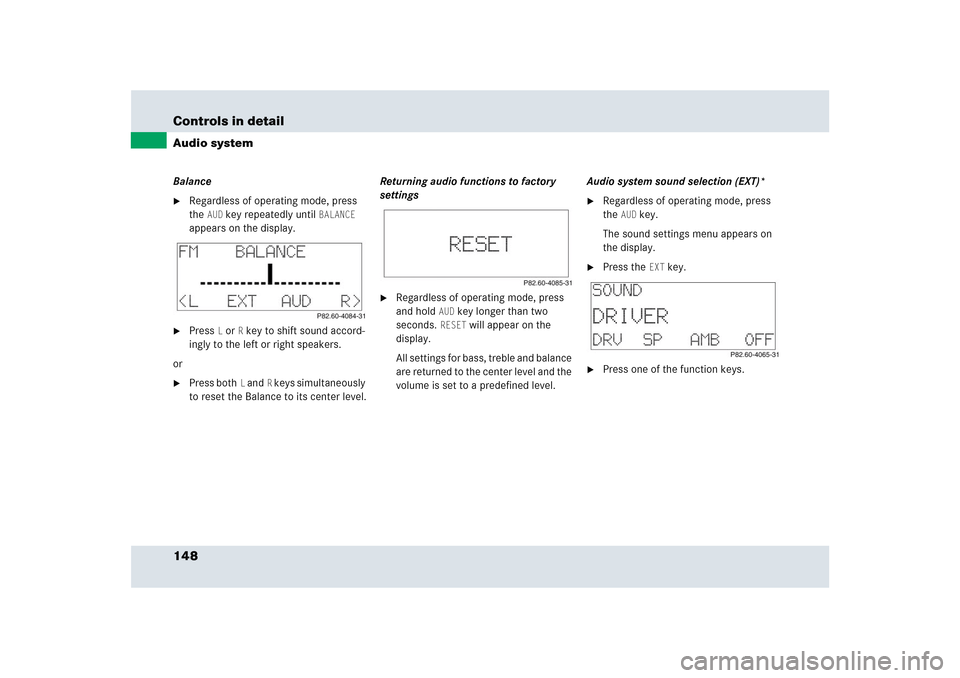
148 Controls in detailAudio systemBalance�
Regardless of operating mode, press
the
AUD
key repeatedly until
BALANCE
appears on the display.
�
Press
L or
R key to shift sound accord-
ingly to the left or right speakers.
or
�
Press both
L and
R keys simultaneously
to reset the Balance to its center level.Returning audio functions to factory
settings
�
Regardless of operating mode, press
and hold
AUD
key longer than two
seconds.
RESET
will appear on the
display.
All settings for bass, treble and balance
are returned to the center level and the
volume is set to a predefined level.Audio system sound selection (EXT)*
�
Regardless of operating mode, press
the
AUD
key.
The sound settings menu appears on
the display.
�
Press the
EXT
key.
�
Press one of the function keys.
Page 153 of 417

152 Controls in detailAudio systemWeather band�
Press the
WB key.
The weather band station last selected
is tuned in.
�
Select the desired weather band
station with buttons4 to7.
If a station cannot be tuned in, a scan
is automatically started.
�
Pressf or ebutton. The next
receivable weather band station is
tuned in.
Cassette operation
Playing cassettes�
Press3 button.
The display panel folds down and the
cassette compartment becomes ac-
cessible.
�
Insert cassette into the cassette com-
partment until it engages and tap it
gently.
The cassette will be pulled in automati-
cally. The system switches to cassette
mode. Side 1 will be played and
SIDE 1
appears in the display. Side 1 is the
side of the cassette which is facing up-
ward. The cassette deck will automati-
cally detect the type of tape.
�
Fold display panel back up and press
gently on the display panel frame to
lock it in place.
or
�
If a cassette is already in the
mechanism, pressj button.!Do not press directly on the display
face. Otherwise the display will be
damaged.
Page 154 of 417

153 Controls in detail
Audio system
Track selection�
Press the
TRK
key.
The current track will be displayed as
SIDE 1
or
SIDE 2
.
�
You can switch sides at any time.
The side will be changed automatically
at the end of the tape.Cassette eject
�
Press eject button3.
The display folds down and the cas-
sette is ejected. The system will switch
back to radio mode automatically.
�
Fold display panel back up and press
gently on the display panel frame to
lock it.Track search
Track search forward
�
Pressf button.SEEK FWD
will appear in the display.
Track search will run the tape forward
to the start of the next track and switch
to Play.
iA warning signal will sound after 20
seconds if the display panel is left in
the down position. Fold display panel
back up. If the display panel is not
closed, a warning signal will sound and
the radio will be muted.
!Do not press directly on the display
face. Otherwise the display will be
damaged.iThe cassette will not be ejected when
the system is switched off or switched
to another operating mode.
iThe beginning of a track can only be
found if there is pause of at least
four seconds between tracks.