Page 134 of 417

133 Controls in detail
Control system
�
Move the selection marker with button
æ or ç to the
Lighting
sub-
menu.
�
Press button j or k repeatedly
until you see this message in the left
display:
Headlamps delayed
switch-off
.
The selection marker is on the current
setting.
�
Press æ or ç to select the de-
sired lamp-on period.
You can select:�
0 s
, the delayed switch-off feature
is deactivated
�
15 s
, 30 s
, 45 s
or
60 s
, the delayed
switch-off feature is activated
�
Turn the exterior lamp switch to
positionU before turning off the en-
gine (
�page 105).
The headlamps delayed switch-off fea-
ture is activatedYou can temporarily deactivate the de-
layed switch-off feature:
�
Before leaving the vehicle turn the
SmartKey in the starter switch to
position0.
�
Then turn it to position2 and back
to0.
The delayed switch-off feature is deac-
tivated. It will reactivate as soon as you
reinsert the SmartKey in the starter
switch.
iYou can reactivate this function within
ten minutes by opening a door.
Page 135 of 417
134 Controls in detailControl systemInterior lighting delayed switch-off
Use this function to set whether and for
how long you would like the interior light-
ing to remain lit during darkness after the
SmartKey is removed from the starter
switch. �
Move the selection marker with button
æ or ç to the
Lighting
sub-
menu.
�
Press button j or k repeatedly
until you see this message in the left
display:
Int. lighting delayed
switch-off
.
The selection marker is on the current
setting.
�
Press æ or ç to select the de-
sired lamp-on time period. You can se-
lect:�
0 s
, the delayed switch-off feature
is deactivated
�
5 s
, 10 s
, 15 s
or
20 s
, the delayed
switch-off feature is activatedVehicle submenu
Access the
Vehicle
submenu via the
Set-
tings
menu. Use the
Vehicle
submenu to
make general vehicle settings.
The following functions are available:
Function
Page
Set station selection mode
(radio)
135
Set automatic locking
135
Tire inflation pressure display
136
Page 138 of 417

137 Controls in detail
Control system
Fuel consumption statistics after start�
Press button ÿ or è repeatedly
until you see the first function of the
Trip computer menu.
�
Press button j or k repeatedly
until you see this message in the left
display:
After start.
1Distance driven since start
2Average speed since start
3Time elapsed since start
4Average fuel consumption since startFuel consumption since last reset
�
Press button ÿ or è repeatedly
until you see the first function of the
Trip computer menu.
�
Press button j or k repeatedly
until you see this message in the left
display:
From reset.
1Distance driven since last reset
2Average speed since last reset
3Time elapsed since last reset
4Average fuel consumption since last re-
set
iAll statistics stored since the last en-
gine start will be reset approximately
four hours after the SmartKey in the
starter switch is turned to position0 or
removed from the starter switch.
Resetting will not occur if you turn the
SmartKey back to position1 or2 with-
in this time period.
Page 146 of 417
145 Controls in detail
Audio system
Item
Page
1
CD mode selector
156
2
Manual tuning
(radio)
149
Fast forward/reverse
(cassette, CD)
154,
158
Speed dialing memory
(telephone)
163
3
Radio mode selector
149
4
Display panelCassette compartment be-
hind display panel
Item
Page
5
Alpha-numeric keypadBand selection,
station buttons (radio)
149
CD selection (CD)
158
Telephone number entry, re-
trieving speed dialing mem-
ory (telephone)
161
6
Scanning (radio, cassette,
CD)
151,
154,
158
7
Function button
150
8
Light-emitting diode
Item
Page
9
Function keys
a
Cassette eject
153
b
Cassette mode selector
152
c
Telephone mode selector
160
d
Seek tuning (radio)
150
Track search (cassette, CD)
153,
158
Speed dialing memory
(telephone)
163
e
On/off
146
Volume
146
Page 147 of 417
 and the
function buttons (left side of radio panel)
are r")
146 Controls in detailAudio systemButton and soft key operation
In these instructions, the alpha-numeric
keypad (right side of radio panel) and the
function buttons (left side of radio panel)
are referred to as “buttons”. The four keys
below the display panel are referred to as
“soft keys”.
Operation
Switching on/off
Switching on:�
Turn SmartKey in starter switch to
position1 or2.
or
�
Press control knoba.
Switching off:
�
Remove SmartKey from starter switch.
or
�
Press control knoba.Adjusting the volume
�
Turn control knoba.
The volume will increase or decrease
depending on the direction turned.
Adjusting audio functions
Press the AUD key to call up the bass, tre-
ble, balance and fader functions in the var-
ious operating modes. Settings for bass
and treble are stored separately for the AM
and FM frequency bands, cassette mode
and CD mode.
!Do not press directly on the display
face. Otherwise the display will be
damaged.
iIf the radio is switched on without the
SmartKey in the starter switch, it will
automatically switch off again after ap-
proximately 30 minutes.
iThe volume setting can be selected
separately for the telephone and audio
system.
Page 148 of 417
147 Controls in detail
Audio system
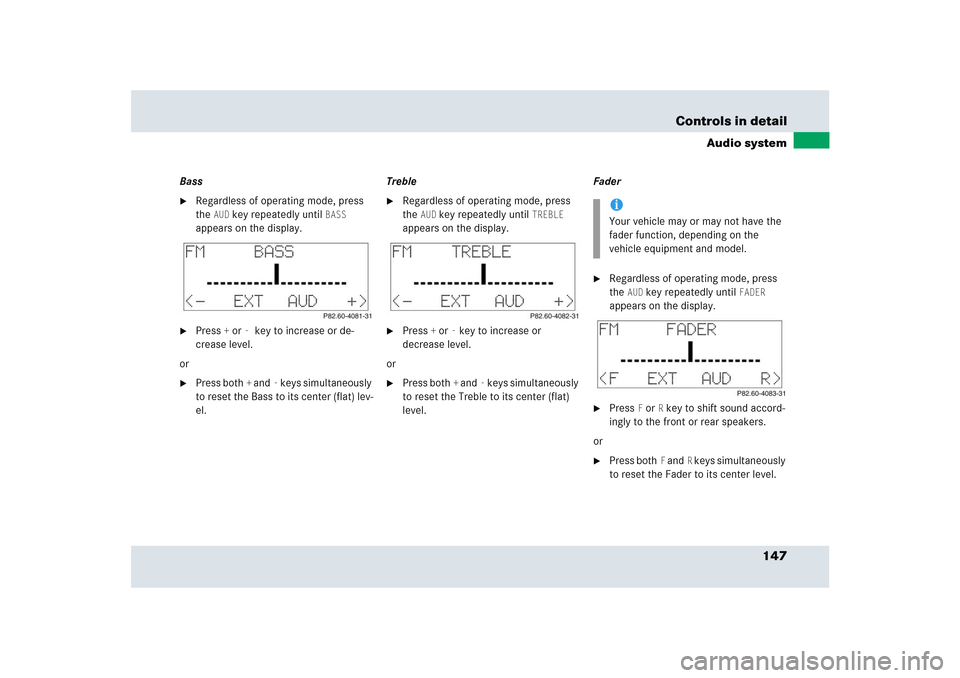
Bass�
Regardless of operating mode, press
the
AUD
key repeatedly until
BASS
appears on the display.
�
Press
+ or
- key to increase or de-
crease level.
or
�
Press both
+ and
- keys simultaneously
to reset the Bass to its center (flat) lev-
el.Treble
�
Regardless of operating mode, press
the
AUD
key repeatedly until
TREBLE
appears on the display.
�
Press
+ or
- key to increase or
decrease level.
or
�
Press both
+ and
- keys simultaneously
to reset the Treble to its center (flat)
level.Fader
�
Regardless of operating mode, press
the
AUD
key repeatedly until
FADER
appears on the display.
�
Press
F or
R key to shift sound accord-
ingly to the front or rear speakers.
or
�
Press both
F and
R keys simultaneously
to reset the Fader to its center level.
iYour vehicle may or may not have the
fader function, depending on the
vehicle equipment and model.
Page 149 of 417
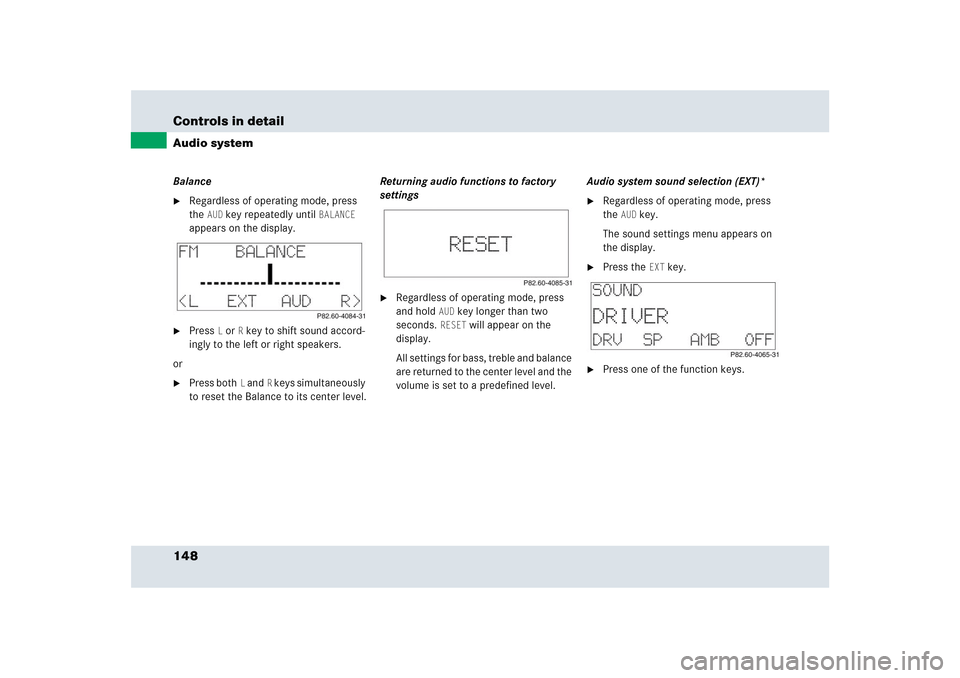
148 Controls in detailAudio systemBalance�
Regardless of operating mode, press
the
AUD
key repeatedly until
BALANCE
appears on the display.
�
Press
L or
R key to shift sound accord-
ingly to the left or right speakers.
or
�
Press both
L and
R keys simultaneously
to reset the Balance to its center level.Returning audio functions to factory
settings
�
Regardless of operating mode, press
and hold
AUD
key longer than two
seconds.
RESET
will appear on the
display.
All settings for bass, treble and balance
are returned to the center level and the
volume is set to a predefined level.Audio system sound selection (EXT)*
�
Regardless of operating mode, press
the
AUD
key.
The sound settings menu appears on
the display.
�
Press the
EXT
key.
�
Press one of the function keys.
Page 150 of 417

149 Controls in detail
Audio system
You can select from among the
following settings:�
DRV
: The tone level is set to the
Driver position; sound is directed
toward the passengers.
�
SP: The tone level is set for Speech,
optimizing the sound for the spoken
word.
�
AMB
: The tone level is set for
Ambience, producing a
three-dimensional sound.
�
OFF
: The audio system sound
selection is turned off.
Telephone muting
The radio will switch to telephone mode
when a call is incoming. The current audio
source is muted.
Radio operation
Selecting radio mode�
Pressb button.
�
You can now receive radio stations
over the analog FM, AM or WB station
frequencies.
Analog station frequencies
Selecting the band
You can select from among FM, AM or WB
frequency bands.
Weather band (
�page 152).
�
Press FM, AM or WB key repeatedly un-
til desired band has been selected.The FM, AM and WB frequency bands
are called up one after the other.
The frequency band currently selected
appears in the upper left-hand corner
of the display.
Selecting a station
The following options are available for
selecting a station:
�
Direct frequency band input
(�page 150)
�
Manual tuning (
�page 150)
�
Automatic seek tuning (
�page 150)
�
Scan tuning (
�page 151)
�
Preset buttons (
�page 151)
�
Automatic station memory (Autostore)
(�page 151)
iFM frequency band:
FM 87.7......107.9 MHz
AM frequency band:
MW (medium wave) 530......1710 KHz


149
Fast forward/reverse
(cassette, CD)
154,
158
Speed dialing memory
(telephone)
163
3
Radio mode select")