Page 152 of 417

151 Controls in detail
Audio system
Scan tuning�
Starting scan tuning�
Select desired frequency band.
�
Press2 button.SC will appear on the display. The
radio briefly tunes in all receivable
stations on the band selected. The
first scan cycle will tune in only the
stations with a strong signal. The
second scan cycle will tune in every
receivable station.
�
Ending scan tuning�
Press2 button ord, c,
f or ebutton.SC disappears from the display.Manual station memory (Presets)
You can store ten AM and ten FM stations.
�
Storing stations�
Tune in the desired station.
�
Press and hold desired station
button4 toM until a brief
signal tone is heard.
The frequency is stored on the
selected station button.
The frequency band and station
button number are shown in the up-
per left-hand corner of the display.
�
Retrieving a station from memory�
Press desired station button4
toM.Automatic station memory (Autostore)
The Autostore memory function provides
an additional memory level. The station
memory for manually stored stations is not
overwritten.
�
Calling up Autostore memory level�
Briefly press the
AS key.
AS is highlighted in the display.
The radio finds the ten stations with
the strongest signals. These
stations are stored on the station
buttons4 toM in order of
signal strength.
�
Retrieving a station from memory�
Press desired station button4
toM.
�
Leaving the Autostore memory level�
Press the
AS key.
The highlighted
AS in the display
disappears.
Page 153 of 417

152 Controls in detailAudio systemWeather band�
Press the
WB key.
The weather band station last selected
is tuned in.
�
Select the desired weather band
station with buttons4 to7.
If a station cannot be tuned in, a scan
is automatically started.
�
Pressf or ebutton. The next
receivable weather band station is
tuned in.
Cassette operation
Playing cassettes�
Press3 button.
The display panel folds down and the
cassette compartment becomes ac-
cessible.
�
Insert cassette into the cassette com-
partment until it engages and tap it
gently.
The cassette will be pulled in automati-
cally. The system switches to cassette
mode. Side 1 will be played and
SIDE 1
appears in the display. Side 1 is the
side of the cassette which is facing up-
ward. The cassette deck will automati-
cally detect the type of tape.
�
Fold display panel back up and press
gently on the display panel frame to
lock it in place.
or
�
If a cassette is already in the
mechanism, pressj button.!Do not press directly on the display
face. Otherwise the display will be
damaged.
Page 154 of 417

153 Controls in detail
Audio system
Track selection�
Press the
TRK
key.
The current track will be displayed as
SIDE 1
or
SIDE 2
.
�
You can switch sides at any time.
The side will be changed automatically
at the end of the tape.Cassette eject
�
Press eject button3.
The display folds down and the cas-
sette is ejected. The system will switch
back to radio mode automatically.
�
Fold display panel back up and press
gently on the display panel frame to
lock it.Track search
Track search forward
�
Pressf button.SEEK FWD
will appear in the display.
Track search will run the tape forward
to the start of the next track and switch
to Play.
iA warning signal will sound after 20
seconds if the display panel is left in
the down position. Fold display panel
back up. If the display panel is not
closed, a warning signal will sound and
the radio will be muted.
!Do not press directly on the display
face. Otherwise the display will be
damaged.iThe cassette will not be ejected when
the system is switched off or switched
to another operating mode.
iThe beginning of a track can only be
found if there is pause of at least
four seconds between tracks.
Page 156 of 417

Switching on the skip blank function�
Press the
SB key.
SB is highlighted in the display.
If the system does not detect a sound")
155 Controls in detail
Audio system
Skipping blank sections (skip blank)
Switching on the skip blank function�
Press the
SB key.
SB is highlighted in the display.
If the system does not detect a sound
signal, the cassette will automatically
fast forward to the next sound signal.
Switching off the skip blank function
�
Press the
SB key.
The highlighted
SB in the display disap-
pears.Dolby NR
1 (noise reduction system)
To enable optimum sound reproduction of
cassettes recorded using Dolby B NR, the
Dolby NR system should be switched on.Switching on
�
Press the
NR key.
NR is highlighted in the display.
Switching off
�
Press the
NR key.
The highlighted
NR in the display disap-
pears.
1DOLBY and the double-D symbolÙ are trade-
marks of Dolby Laboratories Licensing Corpora-
tion.
The Dolby noise reduction system is manufactured
under license from Dolby Laboratories Licensing
Corporation.iThe Dolby NR function should be
switched off when playing cassettes
not recorded with Dolby B NR.
Page 160 of 417
159 Controls in detail
Audio system
�
Ending scan�
Press2, d, c, f or
ebutton.
Random play
The random play function (RDM) plays the
tracks on the current CD in random order.
�
Switching on random play�
Press the
RDM
key.
RDM
is highlighted in the display.
�
Switching off random play�
Press the
RDM
key.
The highlighted RDM
in the display
disappears.Repeat
The repeat function (RPT) repeats the cur-
rent track.
�
Switching on repeat:�
Press the
RPT
key.
RPT
is highlighted in the display.
�
Switching off repeat:�
Press the
RPT
key.
The highlighted RPT
in the display
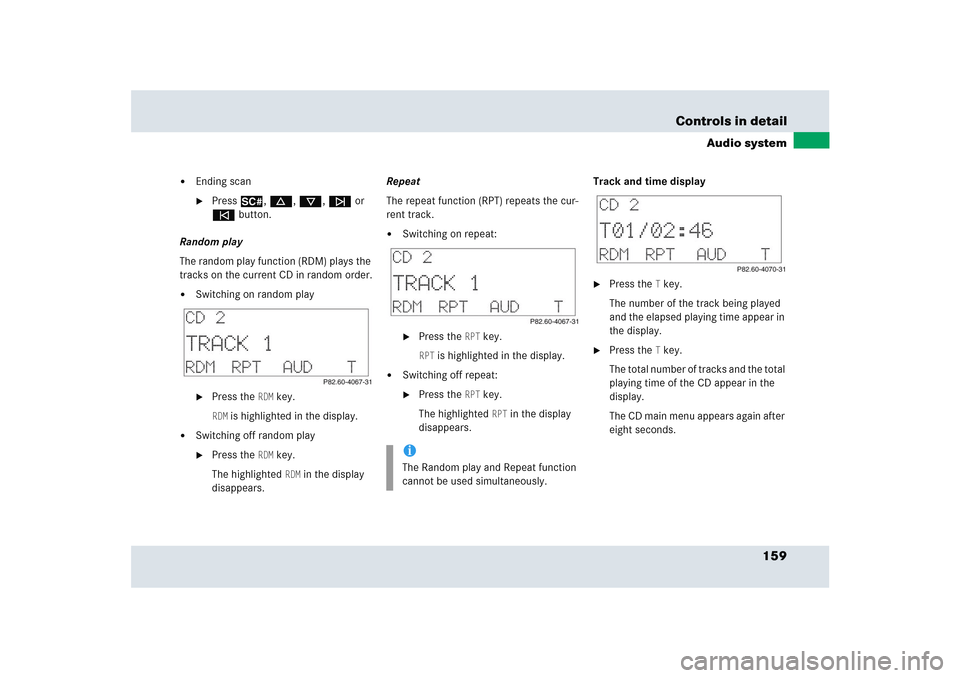
disappears.Track and time display
�
Press the
T key.
The number of the track being played
and the elapsed playing time appear in
the display.
�
Press the
T key.
The total number of tracks and the total
playing time of the CD appear in the
display.
The CD main menu appears again after
eight seconds.
iThe Random play and Repeat function
cannot be used simultaneously.
Page 161 of 417

160 Controls in detailAudio systemTelephone operationVarious car telephone functions and oper-
ating steps for the car telephone can be
performed and displayed via the audio sys-
tem.
Further operating instructions not covered
here can be found in the operating
instructions for the multifunction steering
wheel and the telephone.
Switching on the telephone
�
Pressh button.
If you have programmed an unlock
code for the telephone, you must enter
the code now.
�
Enter the code using buttons4
toM.
�
If necessary, correct number entered
with the
CLR
key. Press key briefly to
delete the last digit entered; press key
and hold to delete the complete num-
ber.
�
Press the
OK key after entering correct
code.
The telephone is unlocked. If you have
entered the wrong code, you must re-
peat the entering procedure with the
correct code.
Switching off the telephone
�
Pressh button repeatedly until PHONE OFF
appears in the display.
The receiving symbol in the display
disappears.
Adjusting the volume
�
Turn control knoba during tele-
phone operation.
The volume increases or decreases de-
pending on the direction in which the
knob is turned.
Warning!
G
Please do not forget that your primary re-
sponsibility is to drive the vehicle. A driver’s
attention to the road must always be
his/her primary focus when driving. For
your safety and the safety of others, we rec-
ommend that you pull over to a safe location
and stop before placing or taking a tele-
phone call.
If you choose to use the telephone
1 while
driving, please use the hands-free device
and only use the telephone when road,
weather and traffic conditions permit. Some
jurisdictions prohibit the driver from using a
cellular telephone while driving a vehicle.
Bear in mind that at a speed of just 30 mph
(approximately 50 km/h), your vehicle is
covering a distance of 44 feet
(approximately 14 m) every second.
1Observe all legal requirements.
iThe volume can be adjusted separately
for the telephone and radio.
Page 162 of 417
161 Controls in detail
Audio system
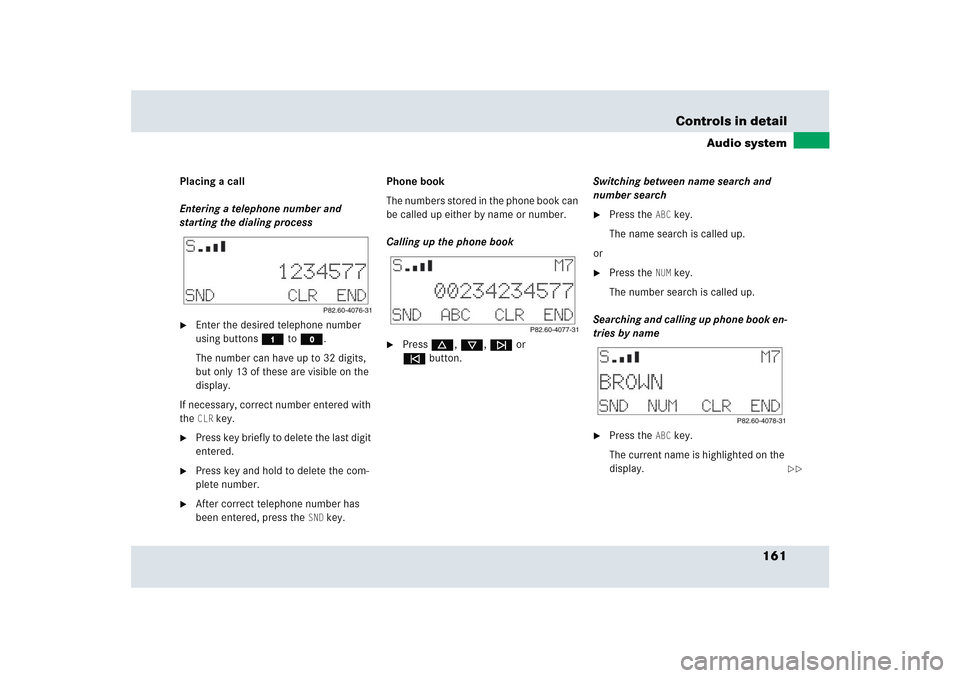
Placing a call
Entering a telephone number and
starting the dialing process�
Enter the desired telephone number
using buttons4 toM.
The number can have up to 32 digits,
but only 13 of these are visible on the
display.
If necessary, correct number entered with
the CLR
key.
�
Press key briefly to delete the last digit
entered.
�
Press key and hold to delete the com-
plete number.
�
After correct telephone number has
been entered, press the
SND
key.Phone book
The numbers stored in the phone book can
be called up either by name or number.
Calling up the phone book
�
Pressd, c, f or
ebutton.Switching between name search and
number search
�
Press the
ABC
key.
The name search is called up.
or
�
Press the
NUM
key.
The number search is called up.
Searching and calling up phone book en-
tries by name
�
Press the
ABC
key.
The current name is highlighted on the
display.
��
Page 163 of 417

162 Controls in detailAudio system�
Press either thed or cbutton.
The stored entries are selected accord-
ing to the alphabetical order of the ini-
tial letter.
or
�
Press either thef or ebutton.
The stored entries are selected in
increments of four.
or
�
Press the desired numerical key2
to9.
The stored entries are selected accord-
ing to the alphabetical order of the ini-
tial letters (e.g. for B -Brown, press
button2 twice).Searching and selecting phone book en-
tries by number
�
Press the
NUM
key.
The current number is marked in the
display.
�
Press either thed or cbutton.
The stored entries are selected
according to numerical order.
or
�
Press either thef or ebutton.
The stored entries are selected in
increments of 5 (e.g. Entry
M5, Entry
M10
, etc.)Starting dialing process
�
Once you have selected a number,
press the
SND
key.
Repeat dialing
If the number dialed is busy, you can again
place calls to the last ten telephone num-
bers dialed using the repeat dialing func-
tion.
iSeveral characters and symbols cannot
be shown on the display for technical
reasons. They have been replaced with
spaces.
��