Page 370 of 464

370 Practical hintsWhere will I find...?Vehicle jackThe vehicle jack is located in the storage
compartment underneath the trunk floor.
Storage position�
Remove vehicle jack from its
compartment.
�
Push crank handle up.
Operational position�
Turn crank handle clockwise until it
engages (operational position).
Before storing the vehicle jack in its
compartment:
�
It should be fully collapsed.
�
The handle must be folded in (storage
position).
Warning!
G
The jack is designed exclusively for jacking
up the vehicle at the jack take-up brackets
built into both sides of the vehicle. To help
avoid personal injury, use the jack only to lift
the vehicle during a wheel change. Never
get beneath the vehicle while it is supported
by the jack. Keep hands and feet away from
the area under the lifted vehicle. Always
firmly set parking brake and block wheels
before raising vehicle with jack.
Do not disengage parking brake while the
vehicle is raised. Be certain that the jack is
always vertical (plumb line) when in use,
especially on hills. Always try to use the jack
on level surface. Make sure the jack arm is
fully seated in the jack take-up bracket. Al-
ways lower the vehicle onto sufficient
capacity jackstands before working under
the vehicle.
Page 371 of 464
371 Practical hints
Where will I find...?
Setting up the collapsible wheel chock
The collapsible wheel chock serves to ad-
ditionally secure the vehicle, e.g. while
changing the wheel.
1Tilt the plate upward
2Fold the lower plate outward
3Insert the plate
�
Tilt both plates upward1.
�
Fold the lower plate outward2.
�
Guide the tabs of the lower plate all the
way into the openings of the base
plate3.
Spare wheel with collapsible tire
The spare wheel is stored in the storage
compartment underneath the trunk floor.
1Spare wheel
2Vehicle tool kit (under collapsible tire,
together with wheel bolts for spare
wheel with collapsible tire)
3Retaining screw�
Loosen retaining screw3by turning it
counterclockwise.
�
Remove spare wheel1.
�
Take off the wheel bolts for spare
wheel1.
Page 372 of 464

372 Practical hintsWhere will I find...?Storing the spare wheel with
collapsible tire
If you wish to store the spare wheel after
use, carry out the following steps. Other-
wise the spare wheel will not fit the storage
compartment.�
Unscrew the valve cap from the valve
of the collapsible tire.
�
Take the valve extractor from the vehi-
cle tool kit (
�page 369).
�
Unscrew the valve insert from the valve
and allow the air to escape.
�
Screw the valve insert back into the
valve.
�
Screw the valve cap back on the valve.
�
Pull the protective wrap provided with
the vehicle tool kit over the spare
wheel.
�
Store the spare wheel and the valve ex-
tractor in the storage compartment un-
derneath the trunk floor.
�
Pierce the protective wrap with retain-
ing screw3.
�
Secure the spare wheel by turning re-
taining screw3 clockwise.
!Make sure the collapsible tire is dry
when storing it.iIt may take a few minutes for the col-
lapsible tire to deflate completely.
Warning!
G
The dimensions of the spare wheel with col-
lapsible tire are different from those of the
road wheels. As a result, the vehicle han-
dling characteristics change when driving
with a spare wheel with collapsible tire
mounted.
The spare wheel with collapsible tire should
only be used temporarily, and should be re-
placed with a regular road wheel as quickly
as possible.
Page 373 of 464
373 Practical hints
Where will I find...?
In the case of a flat tire, you may
temporarily use the spare wheel with col-
lapsible tire when observing the following
restrictions:�
Do not exceed a vehicle speed of
50 mph (80 km/h).
�
Drive to the nearest tire repair facility
to have the flat tire repaired or
replaced as appropriate.
�
Do not operate vehicle with more than
one spare wheel with collapsible tire
mounted.
For more information, see “Rims and tires”
(
�page 413).
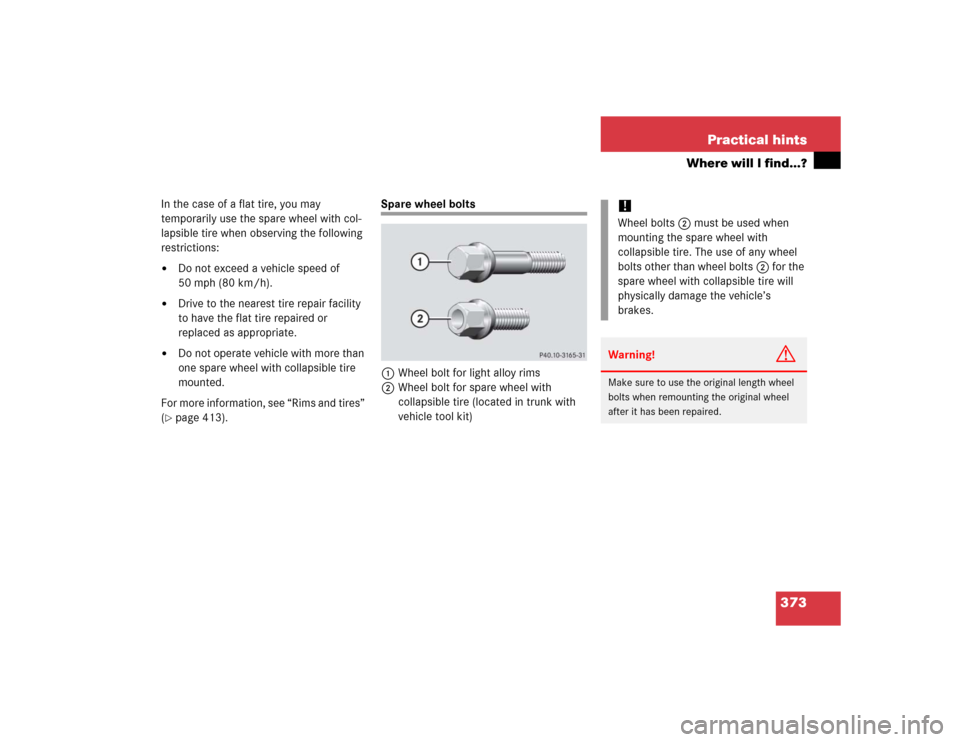
Spare wheel bolts
1Wheel bolt for light alloy rims
2Wheel bolt for spare wheel with
collapsible tire (located in trunk with
vehicle tool kit)
!Wheel bolts2 must be used when
mounting the spare wheel with
collapsible tire. The use of any wheel
bolts other than wheel bolts2 for the
spare wheel with collapsible tire will
physically damage the vehicle’s
brakes. Warning!
G
Make sure to use the original length wheel
bolts when remounting the original wheel
after it has been repaired.
Page 374 of 464
374 Practical hintsUnlocking/locking in an emergencyUnlocking the vehicle
If you are unable to unlock the vehicle with
the SmartKey, open the driver’s door and
the trunk using the mechanical key. Removing the mechanical key
1Mechanical key locking tab
2Mechanical key
�
Move locking tab1 direction of arrow.
�
Slide mechanical key2 out of the
housing.Unlocking the driver’s door
1Unlocking
�
Insert the mechanical key into the
driver’s door lock until it stops.
�
Turn the mechanical key counterclock-
wise to position1.
The driver’s door is unlocked.
iUnlocking the driver’s door and/or the
trunk with the mechanical key will
trigger the anti-theft alarm system.
To cancel the alarm, do one of the
following:�
Press buttonŒor‹on the
SmartKey.
�
Insert the SmartKey in the starter
switch.
Page 375 of 464
 is required to open the
trunk lid.
The trunk lid lock is located")
375 Practical hints
Unlocking/locking in an emergency
Unlocking and opening the trunk
A minimum height clearance of
5.78 ft (1.76 m) is required to open the
trunk lid.
The trunk lid lock is located next to the
handle above the rear license plate recess.Trunk lid lock1Unlocking in an emergency
�
Fully insert the mechanical key into the
trunk lid lock.
�
Turn the mechanical key counterclock-
wise to position1 until it stops,
and simultaneously
�
pull the trunk lid handle and lift lid.
�
Turn the mechanical key back and re-
move it from the trunk lid lock.
Locking the vehicle
If you are unable to lock the vehicle with
the SmartKey, do the following:�
Close the passenger door and the trunk
lid.
�
Press the central locking switch in the
upper part of the center console
(�page 98).
�
Check to see whether the lock button
on the passenger door has moved
down.
�
If necessary, push it down manually.
The passenger door is locked.
�
Exit the vehicle and close the driver’s
door.
!Always make sure there is sufficient
overhead clearance.
��
Page 384 of 464
 / High beam
flasher bulb (Bi-Xenon* headlamps)�
Turn bulb socket3 with the bulb
counterclockwise and remove.
�")
384 Practical hintsReplacing bulbsHigh beam/high beam flasher bulb
(Halogen headlamps) / High beam
flasher bulb (Bi-Xenon* headlamps)�
Turn bulb socket3 with the bulb
counterclockwise and remove.
�
Pull the bulb out of bulb socket3.
�
Press the new bulb into bulb socket3.
�
Place bulb socket3 back into the
lamp and turn it clockwise.Front turn signal bulb
�
Turn bulb socket2 with the bulb
counterclockwise and remove.
�
Press gently onto the bulb and turn it
counterclockwise out of bulb
socket2.
�
Press the new bulb gently into bulb
socket2 and turn it clockwise.
�
Place bulb socket2 back into the
lamp and turn it clockwise.
Parking and standing lamp bulb
�
Turn bulb socket4 with the bulb
counterclockwise and remove.
�
Pull the bulb out of bulb socket4.
�
Press the new bulb into bulb socket4.
�
Place bulb socket4 back into the
lamp and turn it clockwise.
Replacing bulbs for rear lamps
Before you start to replace a bulb for a rear
lamp, do the following first:�
Turn the exterior lamp switch to
positionM (
�page 106).
�
Open the trunk lid (
�page 95).
Tail lamp unit
1Bulb socket for rear fog lamp (driver’s
side only)
2Bulb socket for turn signal lamp
3Bulb socket for backup lamp
Page 389 of 464
.
�
Take the collapsible tire, wheel wrench,
wheel bolts, jack, and electric air pump
out of the trun")
389 Practical hints
Flat tire
Preparing the vehicle
Prepare the vehicle as described
(�page 388).
�
Take the collapsible tire, wheel wrench,
wheel bolts, jack, and electric air pump
out of the trunk (
�page 369).Lifting the vehicle
�
Prevent the vehicle from rolling away
by blocking wheels with wheel chocks
(not included) or other sizeable ob-
jects.
One wheel chock is included with the
vehicle tool kit (
�page 369).
When changing wheel on a level sur-
face:
�
Place the wheel chock in front of
and another sizable object behind
the wheel that is diagonally oppo-
site to the wheel being changed.
When changing wheel on a hill:
�
Place the wheel chock and another
sizable object on the downhill side
blocking both wheels of the other
axle.
Warning!
G
The jack is designed exclusively for jacking
up the vehicle at the jack take-up brackets
built into either side of the vehicle. To help
avoid personal injury, use the jack only to lift
the vehicle during a wheel change. Never
get beneath the vehicle while it is supported
by the jack. Keep hands and feet away from
the area under the lifted vehicle. Always
firmly set parking brake and block wheels
before raising vehicle with jack.
Do not disengage parking brake while the
vehicle is raised. Be certain that the jack is
always vertical (plumb line) when in use, es-
pecially on hills. Always try to use the jack
on level surface. Be sure the jack arm is fully
seated in the jack take-up bracket. Always
lower the vehicle onto sufficient capacity
jackstands before working under the vehi-
cle.