Page 146 of 474
144 Controls in detailControl systemMultifunction steering wheel
The displays in the multifunction display
and the settings in the control system are
controlled using the buttons on the multi-
function steering wheel.
1
Multifunction display in the speed-
ometerOperating the control system
2
Selecting the submenu or setting
the volumeæ
up/to increase
ç
down/to decrease
3
Telephone*s
to take a call
t
to end a call
4
Menu systemsè
for next menu
ÿ
for previous menu
5
Moving within a menuj
for next display
k
for previous display
Page 151 of 474

149 Controls in detail
Control system
Select radio station�
Turn on the radio. Refer to separate
COMAND operating instructions.
�
Press buttonè orÿ repeatedly
until you see the currently tuned sta-
tion in the multifunction display.
1Waveband
2Station frequency
�
Press buttonk orj repeatedly
until the desired station is found.Select satellite radio* station
(USA only)
The satellite radio is treated as a radio ap-
plication.
�
Select satellite radio with the corre-
sponding key on the COMAND control
panel (SAT).
�
Press buttonè orÿ repeatedly
until you see the currently tuned sta-
tion in the multifunction display.
1SAT mode and preset number
2Channel name or number
�
Press buttonk orj repeatedly
until the desired channel is found.
iYou can only store new stations using
the corresponding feature on the radio.
Refer to separate COMAND operating
instructions.
You can also operate the radio in the
usual manner.
iAdditional optional satellite radio
equipment and a subscription to satel-
lite radio service provider are required
for satellite radio operation. Contact an
authorized Mercedes-Benz Center for
details and availability for your vehicle.
For more information, refer to separate
COMAND operating instructions.
Page 152 of 474
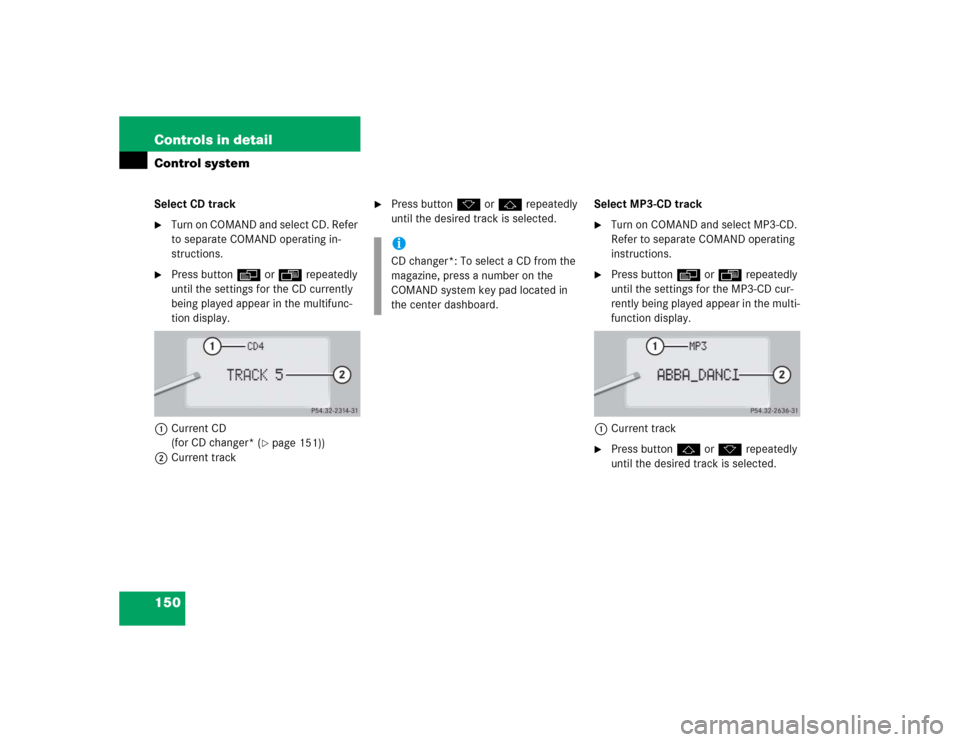
150 Controls in detailControl systemSelect CD track�
Turn on COMAND and select CD. Refer
to separate COMAND operating in-
structions.
�
Press buttonè orÿ repeatedly
until the settings for the CD currently
being played appear in the multifunc-
tion display.
1Current CD
(for CD changer* (
�page 151))
2Current track
�
Press buttonk orj repeatedly
until the desired track is selected.Select MP3-CD track
�
Turn on COMAND and select MP3-CD.
Refer to separate COMAND operating
instructions.
�
Press buttonè orÿ repeatedly
until the settings for the MP3-CD cur-
rently being played appear in the multi-
function display.
1Current track
�
Press buttonj ork repeatedly
until the desired track is selected.
iCD changer*: To select a CD from the
magazine, press a number on the
COMAND system key pad located in
the center dashboard.
Page 153 of 474

151 Controls in detail
Control system
CD changer* operating mode
General notes
Should excessively high temperatures oc-
cur while in CD mode,
CD TEMP HIGH
will
appear on the multifunction display and
muting will take place. The unit will then
switch back to the last operating mode
used until the temperature has decreased
to a safe operating level.
Should excessively low temperatures oc-
cur while in CD mode,
CD TEMP LOW
will ap-
pear on the multifunction display, but the
CD will continue to play.
Handle CDs carefully to prevent interfer-
ence during playback. Avoid fingerprints
and dust on CDs. Do not write on CDs or
apply any label or other material to them.
Only use original CDs. Using copied CDs
may create problems during playback.Clean CDs from time to time with a com-
mercially available cleaning cloth. No sol-
vents, anti-static sprays, etc. should be
used for cleaning. Replace the CD in its
case after use. Protect CDs from heat and
direct sunlight.
Only use CDs, which bear the label shown
and that conform to the compact disc dig-
ital audio standard (IEC 60908).
Use of CDs which do not meet this stan-
dard may cause damage to the CD chang-
er. Do not play single-CDs (80 mm) with an
adapter.For information on operating the CD
changer, refer to separate COMAND oper-
ating instructions.
!Your CD drive has been designed to
play CDs which correspond to the IEC
60908 standard.
If you insert thicker data carriers,
e.g. ones that have data on both sides
(one side with DVD data, the other side
with audio data), they cannot be eject-
ed and will damage the drive.
Page 161 of 474

159 Controls in detail
Control system
Vehicle status message memory menu
Use the vehicle status message memory
menu to scan malfunction and warning
messages that may be stored in the sys-
tem. Such messages appear in the multi-
function display and are based on
conditions or system status the vehicle’s
system has recorded.
�
Press buttonè orÿ repeatedly
until the vehicle status message mem-
ory appears in the multifunction dis-
play.
No vehicle status messages
If no conditions are recorded in the memo-
ry, the message in the multifunction dis-
play is:
NO MESSAGESVehicle status messages have been re-
corded
If conditions have occurred causing status
messages to be recorded, the number of
messages appears in the multifunction dis-
play:
1Number of messages
�
Press buttonk orj.
The stored messages will now be dis-
played in the order in which the mal-
functions have occurred. See the
“Practical hints” section for malfunc-
tion and warning messages
(�page 347).
Should the vehicle’s system record any
conditions while driving, the number of
messages will reappear in the multifunc-
tion display when the SmartKey in the
starter switch is turned to position0 or re-
moved from the starter switch. If you press
the reset buttonJ in the instrument clus-
ter (�page 140), the next message will be
displayed immediately.
Warning!
G
Malfunction and warning messages are only
indicated for certain systems and are inten-
tionally not very detailed. The malfunction
and warning messages are simply a remind-
er with respect to the operation of certain
systems and do not replace the owner’s
and/or driver’s responsibility to maintain
the vehicle’s operating safety by having all
required maintenance and safety checks
performed on the vehicle and by bringing
the vehicle to an authorized Mercedes-Benz
Center to address the malfunction and
warning messages (
�page 347).
iThe vehicle status message memory
will be cleared when you switch on igni-
tion. You will then only see high-priority
messages in the multifunction display.
These are highlighted in red color
(�page 347).
Page 175 of 474
.
Your vehicle’s t")
173 Controls in detail
Automatic transmission
�Automatic transmission
For more information on driving with an
automatic transmission, see “Automatic
transmission” (
�page 46).
Your vehicle’s transmission adapts its gear
shifting process to your individual driving
style by continually adjusting the shift
points up or down. These shift point adjust-
ments are performed based on current
operating and driving conditions.
If the operating conditions change, the
automatic transmission reacts by
adjusting its shift program.
Gearshift pattern for automatic
transmission
The automatic transmission selects indi-
vidual gears automatically, depending on:�
the gear selector lever
positionD(
�page 177) with
gear ranges (�page 176)
�
the selected program mode:
(C/S) (
�page 179)
or
(M/C/S) (S 55 AMG only)
(
�page 183)
�
the position of the accelerator pedal
(�page 180)
�
the vehicle speed
iDuring the brief warm-up, transmission
upshifting is delayed. This allows the
catalytic converter to heat up more
quickly to operating temperature.
Page 176 of 474

or (
M")
174 Controls in detailAutomatic transmission1Current gear range/gear selector lever
position
2Current program mode
The current gear range/gear selector lever
position and program mode (
C/S)
or (
M/C/S) appear in the tachometer
display.When the gear selector lever is in
positionD, you can influence transmission
shifting by:
�
limiting the gear range
�
changing gears manually
Warning!
G
It is dangerous to shift the gear selector
lever out ofP orN if the engine speed is
higher than idle speed. If your foot is not
firmly on the brake pedal, the vehicle could
accelerate quickly forward or reverse. You
could lose control of the vehicle and hit
someone or something. Only shift into gear
when the engine is idling normally and when
your right foot is firmly on the brake pedal.
!Allow engine to warm up under low
load use. Do not place full load on the
engine until the operating temperature
has been reached.
Shift into reverse gearR or parking
positionP only when the vehicle is
stopped.
Avoid spinning of a drive wheel for an
extended period when driving off on
slippery road surfaces. This may cause
serious damage to the drivetrain which
is not covered by the Mercedes-Benz
Limited Warranty.
Page 178 of 474
")
176 Controls in detailAutomatic transmissionGear ranges
With the gear selector lever in positionD,
you can limit the transmission’s gear range
by pressing the gear selector lever to the
left (D-), and reverse the gear range limit
by pressing the gear selector lever to the
right (D+).
The selected gear range appears in the
tachometer display (
�page 174). If you
press on the accelerator when the engine
has reached its rpm limit, the transmission
will upshift beyond any gear range limit
selected.
Effect
ï
The transmission shifts through
sixth gear only (applies to
vehicles with 7-speed automatic
transmission only).
î
The transmission shifts through
fifth gear only (applies to
vehicles with 7-speed automatic
transmission only).
é
The transmission shifts through
fourth gear only.
è
The transmission shifts through
third gear only.
With this selection you can use
the braking effect of the engine.
Effect
ç
The transmission shifts through
second gear only.
Allows the use of engine’s
braking power when driving:�
on steep downgrades
�
in mountainous regions
�
under extreme operating
conditions
æ
The transmission operates in
first gear only.
For maximum use of engine’s
braking effect on very steep or
lengthy downgrades.