Page 248 of 474
246 Controls in detailUseful featuresOpening storage compartment�
Press button1 and lift the armrest lid.Opening storage tray
The tray contains a coin holder.
�
Press button2 and lift the armrest.Compartment for glasses
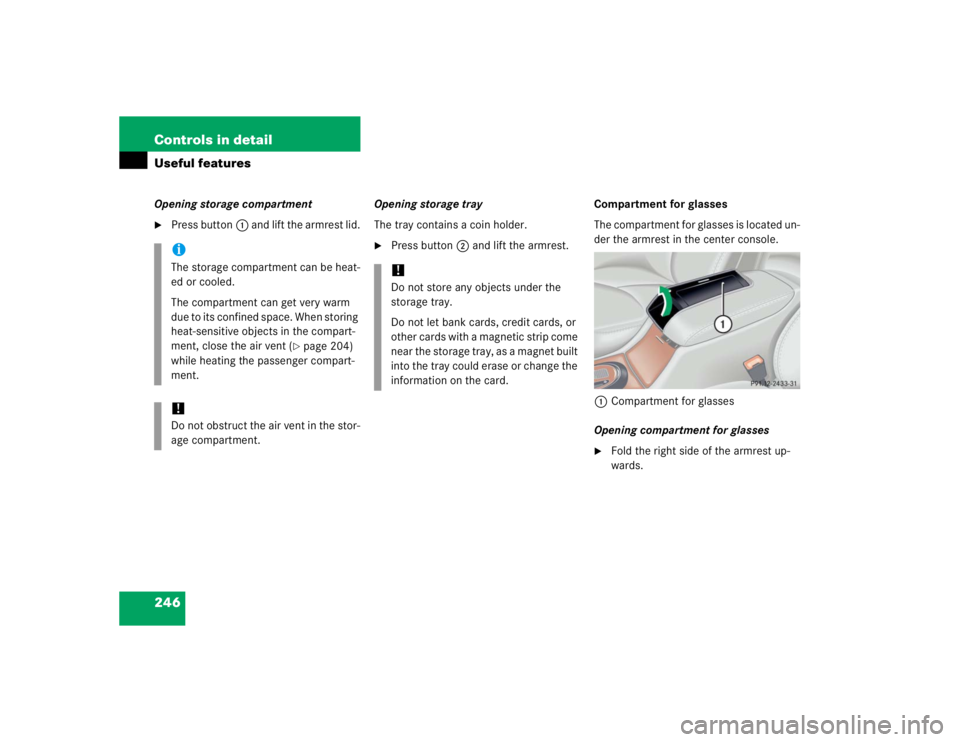
The compartment for glasses is located un-
der the armrest in the center console.
1Compartment for glasses
Opening compartment for glasses
�
Fold the right side of the armrest up-
wards.
iThe storage compartment can be heat-
ed or cooled.
The compartment can get very warm
due to its confined space. When storing
heat-sensitive objects in the compart-
ment, close the air vent (
�page 204)
while heating the passenger compart-
ment.
!Do not obstruct the air vent in the stor-
age compartment.
!Do not store any objects under the
storage tray.
Do not let bank cards, credit cards, or
other cards with a magnetic strip come
near the storage tray, as a magnet built
into the tray could erase or change the
information on the card.
Page 249 of 474
247 Controls in detail
Useful features
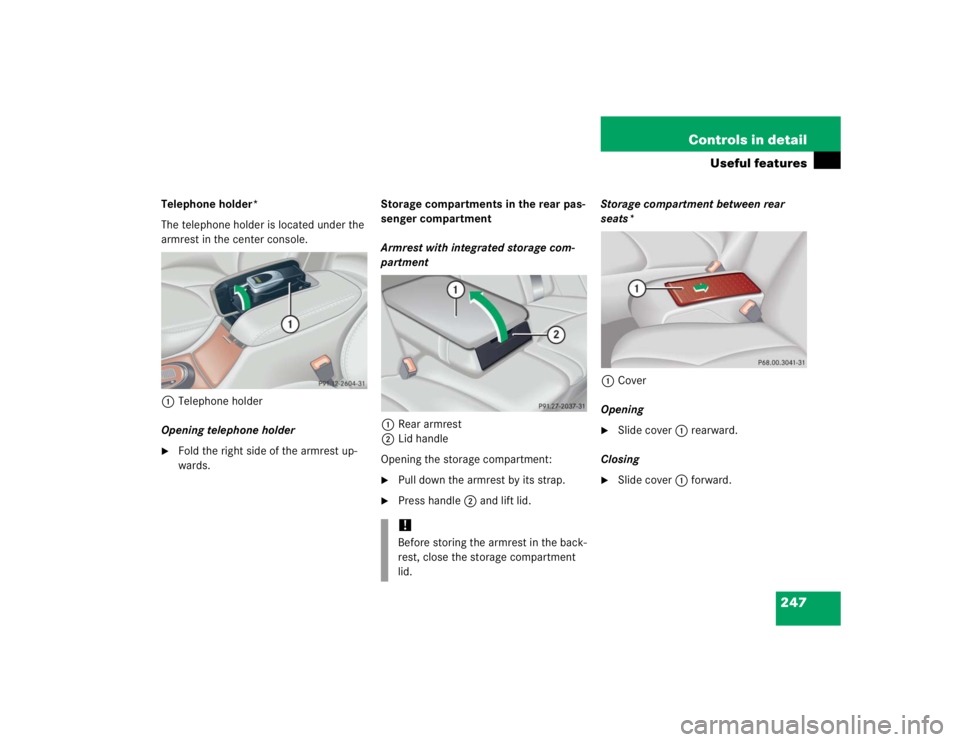
Telephone holder*
The telephone holder is located under the
armrest in the center console.
1Telephone holder
Opening telephone holder�
Fold the right side of the armrest up-
wards.Storage compartments in the rear pas-
senger compartment
Armrest with integrated storage com-
partment
1Rear armrest
2Lid handle
Opening the storage compartment:
�
Pull down the armrest by its strap.
�
Press handle2 and lift lid.Storage compartment between rear
seats*
1Cover
Opening
�
Slide cover1 rearward.
Closing
�
Slide cover1 forward.
!Before storing the armrest in the back-
rest, close the storage compartment
lid.
Page 253 of 474

251 Controls in detail
Useful features
Ashtrays
Center console ashtray
1Cover plate
2Button for disengaging ashtray
Opening ashtray�
Briefly touch cover plate1.
The ashtray opens automatically.Removing ashtray insert
�
Secure vehicle from movement by set-
ting the parking brake. Move the gear
selector lever to positionN.
Now you have more room to take out
the insert.
�
Push sliding button2 to the right.
The ashtray is disengaged and slides
out a short way.
�
Remove insert from ashtray frame.
Reinstalling the ashtray insert
�
Install insert by pushing it back into the
frame until it engages.Rear door ashtray
Opening ashtray
�
Lightly touch the back of the ashtray.
Removing ashtray insert
�
Pull the ashtray back slightly and re-
move the insert (see arrows).
Reinstalling the ashtray insert
�
Position the insert and press down
while sliding forward.
Warning!
G
Remove front ashtray only with vehicle
standing still. Set the parking brake to se-
cure vehicle from movement. Move gear se-
lector lever to positionN. With gear selector
lever in positionN turn off the engine.
Page 254 of 474

252 Controls in detailUseful featuresCigarette lighters
1Center console cigarette lighter�
Make sure the ignition is switched on.
All the lamps in the instrument cluster
should come on.
�
Push in cigarette lighter1.
The lighter will pop out automatically
when hot.1Rear door lighters
�
Make sure the ignition is switched on.
All the lamps in the instrument cluster
should come on.
�
Lightly touch the back of the ashtray to
open it (
�page 251).
�
Push in cigarette lighter1.
The lighter will pop out automatically
when hot.
Warning!
G
Never touch the heating element or sides of
the lighter; they are extremely hot. Hold the
knob only.
When leaving the vehicle, always remove the
SmartKey or SmartKey with KEYLESS-GO*
from the starter switch, take it with you, and
lock the vehicle. Do not leave children unat-
tended in the vehicle, or with access to an
unlocked vehicle. Unsupervised use of vehi-
cle equipment may cause an accident
and/or serious personal injury.iThe lighter socket can be used to ac-
commodate electrical accessories up
to a maximum 85 W.
iOperation of the rear door lighters is
only possible, if the override switch
(�page 78) is deactivated.
Page 348 of 474

346 Practical hintsWhat to do if …?Lamp in center consoleLamp
Problem
Possible cause
Suggested solution
5
8
The indicator lamp comes
on.
A BabySmart
TM1
child seat is installed
on the front passenger seat. Therefore
the passenger front air bag is switched
off.
1BabySmart
TM is a trademark of Siemens Automotive Corp.
The indicator lamp comes
on if there is no
BabySmart
TM child seat
installed on the front pas-
senger seat.
The system is malfunctioning.
�
Have the system checked as soon as
possible by an authorized Mercedes-Benz
Center.
The indicator lamp does
not come on with a
BabySmart
TM child seat
properly installed on the
front passenger seat.
The system is malfunctioning.
�
Make sure there is nothing between seat
cushion and child seat and check
installation of the child seat.
�
If the front passenger front air bag off
indicator lamp remains out, have the
system checked as soon as possible by an
authorized Mercedes-Benz Center.
�
Do not use the BabySmart
TM restraint to
transport children on the front passenger
seat until the system has been repaired.
Page 386 of 474
 is required to open the trunk lid.
The trunk lid lock is located next to the
hand")
384 Practical hintsUnlocking/locking in an emergencyUnlocking the trunk
A minimum height clearance of 6 ft.
(1.85 m) is required to open the trunk lid.
The trunk lid lock is located next to the
handle above the rear license plate recess.
1Unlocking and opening�
Insert the mechanical key into the
trunk lid lock until it stops.
�
Turn the mechanical key counterclock-
wise to position1.
The trunk unlocks and opens.
Locking the vehicle
If you are unable to lock the vehicle with
the SmartKey or the SmartKey with
KEYLESS-GO*, do the following:�
Close the passenger doors and the
trunk lid.
�
Press the central locking switch in the
center console (
�page 113).
�
Check to see whether the locking
knobs on the passenger doors have
moved down.
�
If necessary push them down manually.
Except for the driver's door, the vehicle
should now be locked.1Unlocking
�
Remove the mechanical key out of the
SmartKey (
�page 383).
�
Insert the mechanical key into the driv-
er’s door lock until it stops.
�
Turn the mechanical key clockwise to
position1.
The driver’s door is locked.
!The trunk lid swings open upwards au-
tomatically. Always make sure that
there is sufficient overhead clearance.
Page 439 of 474

Active, computer-controlled system
that hydraulically adjusts the suspen-
sion at all four wheels in response to
various driving situations.
ABS
(A
n")
437 Technical terms
ABC
(A
ctive B
ody C
ontrol)
Active, computer-controlled system
that hydraulically adjusts the suspen-
sion at all four wheels in response to
various driving situations.
ABS
(A
ntilock B
rake S
ystem)
Prevents the wheels from locking up
during braking so that the vehicle can
continue to be steered.
ADS
(A
daptive D
amping S
ystem)
Automatically adapts the optimum sus-
pension damping to prevailing driving
conditions.
Airmatic
Automatically selects the optimum sus-
pension tuning and ride height for your
vehicle. Airmatic consists of two com-
ponents:
�
Adaptive Damping System
�
Vehicle level controlAlignment bolt
Metal pin with thread. The centering
pin is an aid used when changing a tire
to align the wheel with the wheel hub.
BabySmart
TM air bag deactivation
system
This system detects if a special system
compatible child restraint seat is in-
stalled on the front passenger seat. The
system will automatically deactivate
the passenger front air bag when such
a seat is properly installed (the
58indicator lamp in the center
console comes on). See an authorized
Mercedes-Benz Center for availability.
BabySmartTM compatible child seats
Special restraint system for children.
The sensor system for the passenger
seat prevents deployment of the pas-
senger front air bag if a BabySmart
TM
compatible child seat is installed. See
an authorized Mercedes-Benz Center
for availability.BAS
(B
rake A
ssist S
ystem)
System for potentially reducing braking
distances in emergency braking situa-
tions. The system is activated when it
senses an emergency based on how
fast the brake is applied.
Bi-xenon headlamps
Headlamps which use an electric arc as
the light source and produce a more in-
tense light than filament headlamps.
Bi-xenon headlamps produce low beam
and high beam.
CAC
(C
ustomer A
ssistance C
enter)
Mercedes-Benz customer service cen-
ter, which can help you with any ques-
tions about your vehicle and provide
assistance in the event of a break-
down.
Page 448 of 474

446 IndexBattery, SmartKey with KEYLESS-GO*
Check lamp 101
Replacing 388
Battery, vehicle 294, 403
Charging 404
Disconnecting 404
Reconnecting 405
Reinstalling 404
Removing 404
Bead 322
Bi-Xenon headlamps 437
Block heater (Canada only) 327
Blocking
Rear window operation 78
Brake assist system (BAS) 437
Brake fluid 284, 431
Brake lamp bulbs 390
Brake lamp, high mounted 390
Brake pads
Message in display 357
Brakes 274
Warning lamp 339
Break-in period 272Bulbs, replacing 389
Additional turn signals 390
Backup lamps 390
Brake lamps 390
Fog lamps 390
Front lamps 390
High beam 390
High mounted brake lamp 390
License plate lamps 390, 395
Low beam 390
Parking and standing lamps 390
Parking lamps 390, 394
Rear fog lamp 390, 395
Rear fog lamps 394
Side marker lamps 390, 394
Standing lamps 390, 394
Tail lamp assemblies 390
Tail lamp unit 395
Turn signal lamps 390C
CAC (Customer Assistance Center) 437
Calling up
Distronic* settings 156
Maintenance service indicator 329
Range (distance to empty) 158
CAN system 438
Canceling
Cruise control 215
Cargo tie-down hooks 241
Catalytic converter 281
CD changer* 151
CD mode 151
CD operation
Selecting tracks 150
Center console 27
Air bag off indicator lamp 346
Front passenger front air bag off indica-
tor lamp 346