Page 193 of 474
.
�
Press")
191 Controls in detail
Good visibility
Rear window sunshade*
The switch is located on the upper part of
the front center console.
1Rear window sunshade switch�
Switch on ignition (
�page 34).
�
Press switch 1 briefly to raise the sun-
shade.
�
Press switch 1 briefly to lower the
sunshade.
Always raise the sunshade fully for its sup-
port against the window frame.
Rear door window sunshade*�
To raise sunshade pull on the tab and
engage in holder.
�
To lower sunshade disengage tab and
guide retraction.
Warning!
G
When operating the rear window sunshade,
be sure that there is no danger of anyone be-
ing harmed by the raising or lowering proce-
dure.
The raising or lowering procedure can be im-
mediately reversed by pressing switch1.Warning!
G
When leaving the vehicle, always remove the
SmartKey or SmartKey with KEYLESS-GO*
from the starter switch, take it with you, and
lock the vehicle. Do not leave children unat-
tended in the vehicle, or with access to an
unlocked vehicle. Unsupervised use of vehi-
cle equipment can cause an accident
and/or serious personal injury.
!Always guide the sunshade. Do not let
it snap back abruptly, as the retractor
could be damaged.
Page 206 of 474

204 Controls in detailAutomatic climate controlVentilated storage compartment
Depending on vehicle model and configu-
ration, your vehicle is equipped with a stor-
age compartment under the front armrest
(�page 245) which can be ventilated
when the automatic air conditioning is
switched on. If so equipped, the switch is
located inside the storage compartment in
the front. The air temperature is about the
same as that of the center air vents.
The air volume is dependent on the setting
of:
�
Air distribution control
�
Air volume control
�
Air vents in the dashboard
The air temperature is about the same as
that of the dashboard air vents. It cannot
be regulated separately.Switching ventilation on
�
Open the storage compartment in front
of the armrest, see “Storage compart-
ment in front of armrest” (
�page 245).
�
Push upper portion of switch.
Switching ventilation off
�
Open the storage compartment in front
of the armrest, see “Storage compart-
ment in front of armrest” (
�page 245).
�
Push lower portion of switch. Rear passenger compartment adjust-
able air vents
Rear center console air vents
1Left center air vent, adjustable
2Right center air vent, adjustable
3Thumbwheel for center air vents with
adjustable booster blower
!Do not obstruct the air vent in the stor-
age compartment.iThe compartment can get very warm
due to its confined space. When storing
heat sensitive objects in the compart-
ment, close the air vent while heating
the passenger compartment.
Page 207 of 474

205 Controls in detail
Automatic climate control
To open center air vents and to adjust the
booster blower:�
Turn thumbwheel3.Rear side air vents
4Rear side air vent, right and left
5Air volume control for rear side air vent
To open rear side air vents:
�
Turn thumbwheel5 towards the win-
dow.Rear passenger compartment climate
control*
The automatic climate control is operation-
al whenever the engine is running. You can
operate the climate control system in ei-
ther the automatic or manual mode. The
system cools or heats the interior depend-
ing on the selected interior temperature
and the current outside temperature.
The automatic climate control system is
adjustable individually for the rear passen-
ger compartment.
The control panel is located in the rear cen-
ter console.
Nearly all dust particles, pollutants and
odors are filtered out before outside air en-
ters the passenger compartment through
the air distribution system.
iThe booster blower allows air volume
speed to the rear passenger compart-
ment to be increased at four different
levels.
The temperature at the air vents for
rear passenger compartment1
and2 is the same as at the dashboard
center air vents.
Page 227 of 474

225 Controls in detail
Driving systems
The distance warning function on/off but-
ton and thumbwheel for setting distance
are located on the lower part of the front
center console.
1Distance warning function on/off but-
ton
2Thumbwheel for setting distanceIncreasing distance
Increasing the distance setting causes Dis-
tronic to maintain a greater following dis-
tance to the vehicle ahead.
�
Turn thumbwheel2 towards¯.
Decreasing distance
Decreasing the distance setting causes
Distronic to maintain a shorter following
distance to the vehicle ahead.
�
Turn thumbwheel2 towards®.Distance warning function
When Distronic is deactivated, this func-
tion will continue to warn you when recog-
nizing a stationary obstacle or a slower
vehicle moving in the vehicle’s path and
the danger of a collision exists:
�
The distance warning lampl in the
instrument cluster comes on.
�
An intermittent warning sounds.
If these warnings are issued, you must
brake manually to maintain a safe distance
and avoid a collision with the vehicle
ahead.
When pressing the brake pedal, the warn-
ing sound stops. The warning sound also
stops when the distance to the vehicle
ahead is sufficient again without applying
the brake pedal. In this case the distance
warning lampl also extinguishes.
Page 232 of 474

230 Controls in detailDriving systemsVehicle level control with Airmatic
Your vehicle automatically adjusts its ride
height to:�
reduce fuel consumption
�
increase vehicle safety
The vehicle chassis ride height is raised or
lowered according to the selected level
setting and to the vehicle speed:
�
With increasing speed, ride height is re-
duced by up to approximately ¾ in
(20 mm).
�
With decreasing speed, the ride height
is again raised to the selected vehicle
level.The following vehicle level settings can be
selected when the vehicle is stationary:
Select the “Raised” level setting only when
required by current driving conditions.
Otherwise:
�
Fuel consumption may increase
�
Handling may be impairedThe switch with the indicator lamps is lo-
cated on the upper part of the front center
console.
1Indicator lamp
2Vehicle level control switch
�
Briefly press switch2 to change from
one level setting to the other.
The message:AIRMATIC
VEHICLE RISING! appears in the multifunction display
when changing from normal level to
raised level.
iThese height adjustments are so small
that you may not notice any change.
LevelNormal
For driving on normal roads.
The indicator lamp is off.
Raised
For driving on rough roads or
with snow chains.The indica-
tor lamp is on.
Warning!
G
To help avoid personal injury, keep hands
and feet away from wheel housing area, and
stay away from under the vehicle when low-
ering the vehicle chassis.
Page 235 of 474

233 Controls in detail
Driving systems
The following vehicle level settings can be
selected when the vehicle is stationary:
The button with the indicator lamps is lo-
cated on the upper part of the front center
console.
1Indicator lamps
2Vehicle level control button
�
Briefly press button2 to change from
one level setting to the next. When ve-
hicle is at level 2, pressing the button
will return the vehicle to normal level.
The message:ACTIVE BODY CONTROL
VEHICLE RISING! appears in the multifunction display.
The display switches off when the vehi-
cle is raised.
Vehicle level
when stationary
Use for
Ride height increase
over normal
Automatic lowering
Indicator lamps
Normal
Normal operation
None
Max. approx. 0.6 in (15 mm)
Both lamps off
Raised level1
Driving with snow chains
(�page 327)
Max. 0.4 in (10 mm)
1
1Dependent on load
Max. approx. 1.0 in (25 mm)
One lamp lit
Raised level 2
Very rough road surface
conditions
Max. 0.8 in (20 mm)
1
Max. approx. 1.4 in (35 mm)
Both lamps lit
Page 240 of 474

238 Controls in detailDriving systemsAs your vehicle approaches an object, one
or more distance segments will illuminate,
depending on the distance. When the
eighth distance segment illuminates, you
have reached the minimum distance.�
Front area: An intermittent acoustic
warning will sound as the first red dis-
tance segment illuminates and a con-
stant acoustic warning lasting a
maximum of two seconds will sound for
the second red distance segment. The
signal is canceled when the gear selec-
tor lever is placed in position P.
�
Rear area: An intermittent acoustic
warning will sound as the first red dis-
tance segment illuminates and a con-
stant acoustic warning lasting a
maximum of two seconds will sound for
the second red distance segment. The
signal is canceled when the gear selec-
tor lever is placed in position D orP.Switching the Parktronic system
on/off
The Parktronic system can be switched off
manually.
The Parktronic button is located in the up-
per part of the front center console.
1Indicator lamp
2Parktronic buttonSwitching off the Parktronic system
�
Press button 2.
Indicator lamp 1 comes on.
Switching on the Parktronic system
�
Press button 2 again.
Indicator lamp 1 goes out.iThe Parktronic system is automatically
switched on when the ignition is
switched on (
�page 34).
Page 247 of 474
245 Controls in detail
Useful features
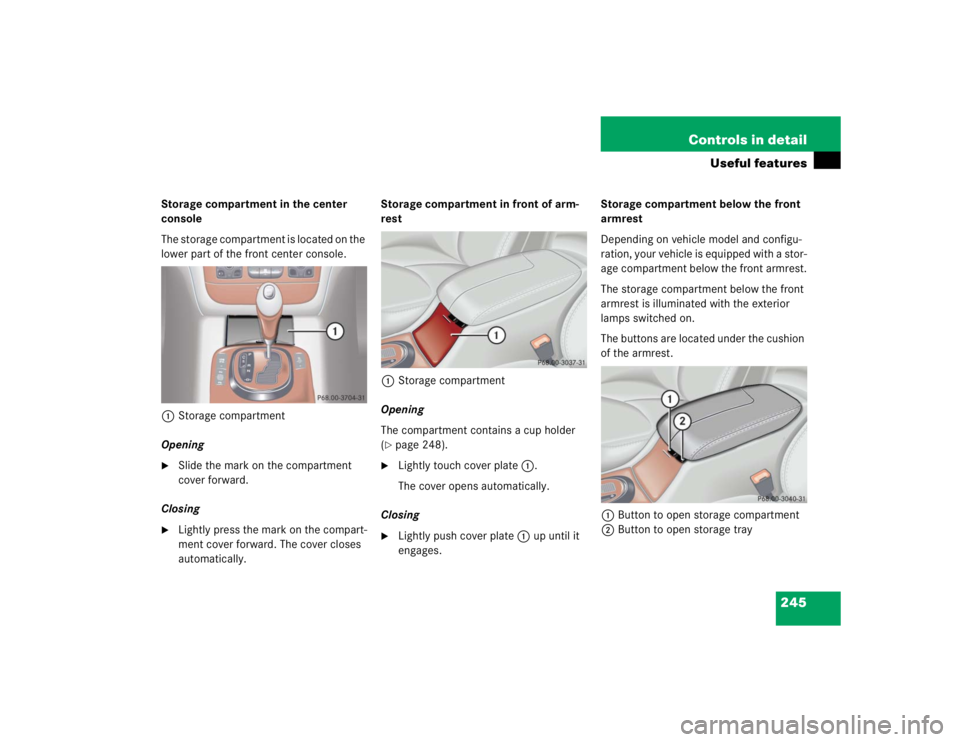
Storage compartment in the center
console
The storage compartment is located on the
lower part of the front center console.
1Storage compartment
Opening�
Slide the mark on the compartment
cover forward.
Closing
�
Lightly press the mark on the compart-
ment cover forward. The cover closes
automatically.Storage compartment in front of arm-
rest
1Storage compartment
Opening
The compartment contains a cup holder
(
�page 248).
�
Lightly touch cover plate1.
The cover opens automatically.
Closing
�
Lightly push cover plate1 up until it
engages.Storage compartment below the front
armrest
Depending on vehicle model and configu-
ration, your vehicle is equipped with a stor-
age compartment below the front armrest.
The storage compartment below the front
armrest is illuminated with the exterior
lamps switched on.
The buttons are located under the cushion
of the armrest.
1Button to open storage compartment
2Button to open storage tray