Page 126 of 356
124 Controls in detailAutomatic transmission
Driving tips
Accelerator position
Your driving style influences the
transmission’s shifting behavior:
Less throttle Earlier upshifting
More throttle Later upshifting
Kickdown
Use kickdown when you want maximum
acceleration.�
Press the accelerator past the point of
resistance.
The transmission shifts into a lower
gear.
�
Ease on the accelerator when you have
reached the desired speed.
The transmission shifts up again.
!Coasting the vehicle, or driving for any
other reason with gear selector lever
inN can result in transmission damage
that is not covered by the
Mercedes-Benz Limited Warranty.Warning!
G
Getting out of your vehicle with the gear
selector lever not fully engaged in positionP
is dangerous. Also, positionP alone is not
intended to or capable of preventing your
vehicle from moving, possibly hitting people
or objects.
Always set the parking brake in addition to
shifting to positionP (
�page 54).
When parked on an incline, turn the front
wheels towards the road curb.
Warning!
G
Do not park this vehicle in areas where com-
bustible materials such as grass, hay or
leaves can come into contact with the hot
exhaust system, as these materials could be
ignited and cause a vehicle fire.Warning!
G
When leaving the vehicle, always remove the
key from the steering lock, take it with you
and lock the vehicle. Do not leave children
unattended in the vehicle, or with access to
an unlocked vehicle. Children could move
the gear selector lever from positionP,
which could result in an accident and / or
serious personal injury.
Page 127 of 356
125 Controls in detail
Automatic transmission
Stopping
When you stop briefly, e.g. at traffic lights:�
Leave the transmission in gear.
�
Hold the vehicle with the brake.
When you stop longer with the engine
idling or on an uphill gradient:
�
Move the gear selector lever to
positionP.
�
Set the parking brake.Maneuvering
When you maneuver in tight areas,
e.g. when pulling into a parking space:
�
Control the vehicle speed by gradually
releasing the brakes.
�
Accelerate gently.
�
Never abruptly step on the accelerator.
Working on the vehicle
Towing a trailer
If you tow a trailer, note the following
points:�
Manually shift to a lower gear range
(4,3, 2, 1), if the transmission hunts
between gears on inclines
(�page 122).
A lower gear range and reduction of
speed reduces the change to overload
or overheat the engine.
�
At very steep inclines switch transfer
case to LOW RANGE mode
(�page 127).
For more information on trailer towing, see
the “Operation” section (
�page 211).
Warning!
G
When working on the vehicle, set the
parking brake and move gear selector lever
to positionP. Otherwise the vehicle could
roll away.
Page 130 of 356

128 Controls in detailGood visibilityFor more information, see “Windshield
wipers” (
�page 51) and “Mirrors”
(
�page 41).
Rear view mirrors
Interior rear view mirror, antiglare
position
1Lever
�
Tilt the mirror to the antiglare night po-
sition by moving lever1 towards the
windshield.
The interior rear view mirror is dimmed.
Automatic antiglare rear view mirrors*
The reflection brightness of the exterior
rear view mirror on the driver’s side and
the interior rear view mirror will respond
automatically to glare when:
�
the automatic antiglare function is acti-
vated (
�page 129)
�
the ignition is switched on
�
incoming light from headlamps falls on
the sensor in the interior rear view
mirror
The rear view mirror will not react if
�
reverse gear is engaged
�
the interior light is turned on
Warning!
G
The automatic antiglare function does not
react if incoming light is not aimed directly
at sensors in the interior rear view mirror.
The interior rear view mirror and the exterior
rear view mirror on the driver’s side do not
react, for example, if the cargo compart-
ment is fully loaded.
Glare can endanger you and others.Warning!
G
In the case of an accident, liquid electrolyte
may escape from the mirror housing if the
mirror glass breaks.
Electrolyte has an irritating effect. Do not al-
low the liquid to come into contact with
eyes, skin, clothing, or respiratory system.
In case it does, immediately flush affected
area with water, and seek medical help if
necessary.
Page 131 of 356
129 Controls in detail
Good visibility
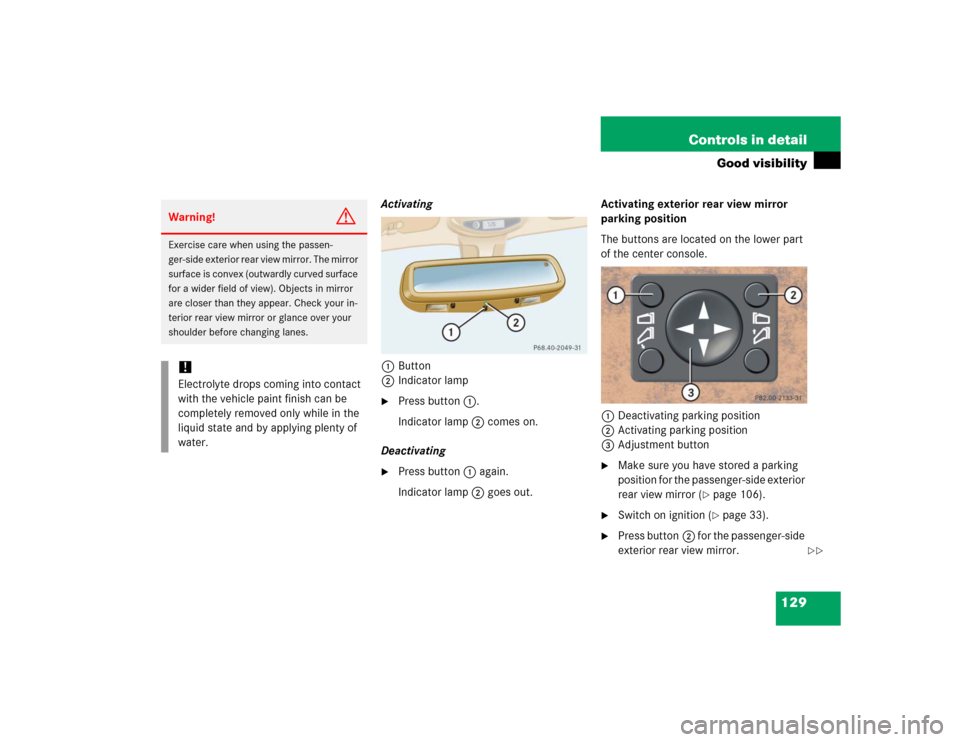
Activating
1Button
2Indicator lamp�
Press button1.
Indicator lamp2 comes on.
Deactivating
�
Press button1 again.
Indicator lamp2 goes out.Activating exterior rear view mirror
parking position
The buttons are located on the lower part
of the center console.
1Deactivating parking position
2Activating parking position
3Adjustment button
�
Make sure you have stored a parking
position for the passenger-side exterior
rear view mirror (
�page 106).
�
Switch on ignition (
�page 33).
�
Press button2 for the passenger-side
exterior rear view mirror.
Warning!
G
Exercise care when using the passen-
ger-side exterior rear view mirror. The mirror
surface is convex (outwardly curved surface
for a wider field of view). Objects in mirror
are closer than they appear. Check your in-
terior rear view mirror or glance over your
shoulder before changing lanes.!Electrolyte drops coming into contact
with the vehicle paint finish can be
completely removed only while in the
liquid state and by applying plenty of
water.
��
Page 136 of 356
134 Controls in detailGood visibilitySun visors
The sun visors protect you from sun glare
while driving.
1Mirror cover
2Mounting
�
Swing sun visors down when you expe-
rience glare.
�
To use mirror, lift cover1 up.Illuminated vanity mirrors
�
Turn the key in steering lock to
position1 (
�page 33).
�
Lift cover up.
The lamp switches on.
Warning!
G
Do not use the vanity mirror while driving.
Keep the mirrors in the sun visors closed
while vehicle is in motion. Reflected glare
can endanger you and others.
iIf sunlight enters through a side win-
dow, disengage sun visor from
mounting2 and pivot to the side.
Page 137 of 356
135 Controls in detail
Good visibility
Rear window defroster
The rear window defroster uses a large
amount of power. To keep the battery
drain to a minimum, switch off the defrost-
er as soon as the rear window is clear. The
defroster is automatically deactivated
after approximately 6 to 17 minutes of
operation depending on the outside tem-
perature.
Activating�
Switch ignition on.
�
Press buttonF (
�page 137).
The indicator lamp on the button
comes on.
Deactivating
�
Press buttonF again.
The indicator lamp on the button goes
out.
Warning!
G
Any accumulation of snow and ice should be
removed from the rear window before driv-
ing. Visibility could otherwise be impaired,
endangering you and others.!If the rear window defroster switches
off too soon and the indicator lamp
starts flashing, this means that too
many electrical consumers are operat-
ing simultaneously and there is insuffi-
cient voltage in the battery. The system
responds automatically by deactivating
the rear window defroster.
As soon as the battery has sufficient
voltage, the rear window defroster au-
tomatically turns itself back on.
Page 140 of 356

138 Controls in detailAutomatic climate controlThe automatic climate control is operation-
al whenever the engine is running. You can
operate the climate control system in ei-
ther the automatic or manual mode. The
system cools or heats the interior depend-
ing on the selected interior temperature
and the current outside temperature.
Nearly all dust particles, pollutants and
odors are filtered out before outside air en-
ters the passenger compartment through
the air distribution system.Warning!
G
When operating the automatic climate con-
trol, the air that enters the passenger com-
partment through the air vents in the
footwell can be very hot or very cold (de-
pending on the set temperature). This may
cause burns or frostbite on unprotected skin
in the immediate area of the air vents.
Always keep sufficient distance between un-
protected parts of the body and the footwell
air vents. If necessary, change the air flow
using the air distribution controls to direct
the air away from the footwell air vents
(�page 140).
Warning!
G
Follow the recommended settings for heat-
ing and cooling given on the following pag-
es. Otherwise the windows could fog up,
impairing visibility and endangering you and
others.
iSevere conditions (e.g. strong air pollu-
tion) may require replacement of the fil-
ter before its scheduled interval. A
clogged filter will reduce the air volume
to the interior.
If the vehicle interior is hot, ventilate
the interior before driving off.
Keep the air intake grille in front of the
windshield free of snow and debris.
Do not touch the interior temperature
sensor to maintain a precise tempera-
ture.
The set value is indicated by a lighted
segment on the control wheels.
Page 142 of 356
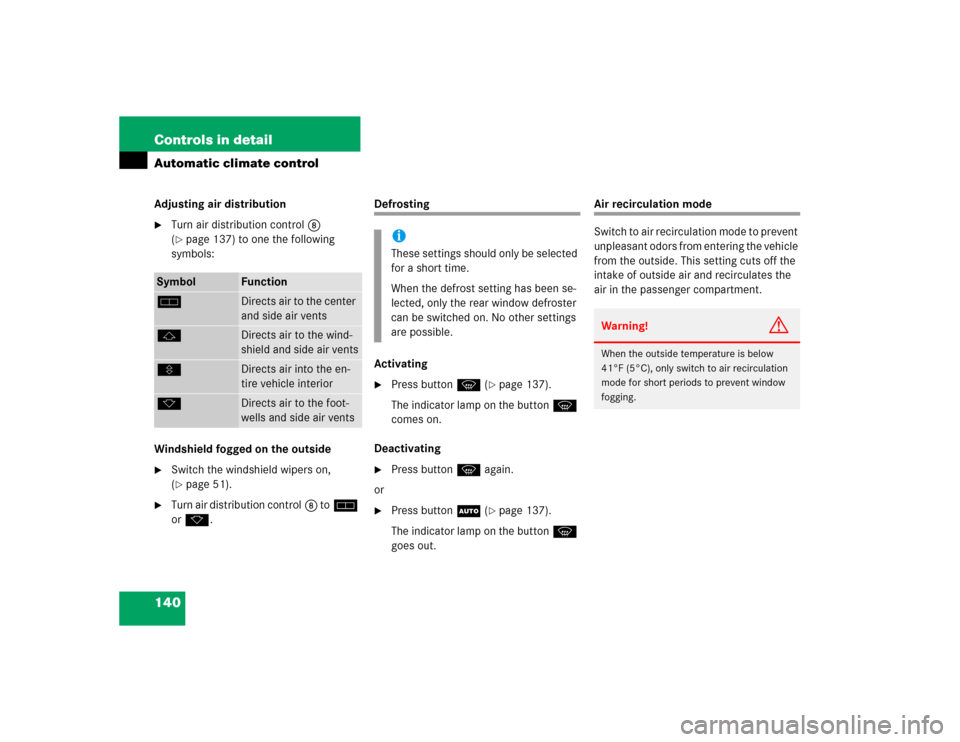
140 Controls in detailAutomatic climate controlAdjusting air distribution�
Turn air distribution control8
(�page 137) to one the following
symbols:
Windshield fogged on the outside
�
Switch the windshield wipers on,
(�page 51).
�
Turn air distribution control8 toh
ork.
Defrosting
Activating�
Press buttonP (
�page 137).
The indicator lamp on the buttonP
comes on.
Deactivating
�
Press buttonP again.
or
�
Press buttonU (
�page 137).
The indicator lamp on the buttonP
goes out.
Air recirculation mode
Switch to air recirculation mode to prevent
unpleasant odors from entering the vehicle
from the outside. This setting cuts off the
intake of outside air and recirculates the
air in the passenger compartment.
Symbol
Function
h
Directs air to the center
and side air vents
j
Directs air to the wind-
shield and side air vents
V
Directs air into the en-
tire vehicle interior
k
Directs air to the foot-
wells and side air vents
iThese settings should only be selected
for a short time.
When the defrost setting has been se-
lected, only the rear window defroster
can be switched on. No other settings
are possible.
Warning!
G
When the outside temperature is below
41°F (5°C), only switch to air recirculation
mode for short periods to prevent window
fogging.