Page 283 of 356

281 Practical hints
Replacing bulbs
License plate lamp
1License plate lamp
2Screw�
Loosen both screws2.
�
Remove license plate lamp1.
�
Replace the tubular bulb.
�
Reinstall license plate lamp1.
�
Retighten screws2.High mounted brake lamp
1Cover
2Tab
�
Press gently on both sides of cover1
in direction of arrows.
�
Fold it backwards and remove.
�
Press tab2 on the reflector and re-
move it.
�
Press gently onto the bulb and turn
counterclockwise out of the bulb sock-
et.
�
Press the new bulb gently into the bulb
socket and turn clockwise until it en-
gages.
�
Reinstall the reflector on the left side
first and let it engage on the right side.
�
Align cover1 with its tabs in the slots
and press gently onto cover1 until it
engages.iVehicles with an exterior spare-wheel
rack*:
You cannot replace the LEDs of the
high mounted brake light with an exte-
rior spare-wheel rack installed. Have
therefore the high mounted brake light
checked and, if necessary, the LEDs re-
placed by an authorized
Mercedes-Benz Light Truck Center.
Page 284 of 356

282 Practical hintsReplacing bulbsAdjusting headlamp aim
VVertical centerline
HHeadlamp mounting high, measured
from the center
Correct headlamp adjustment is extremely
important. To check and readjust a head-
lamp, follow the steps described:
�
Park the vehicle on a level surface
25 feet (7.6 m) from a vertical test
screen or wall.
�
Switch the headlamps on
(�page 107).
If the beam does not show a beam pattern
as indicated in the figure left, then follow
the steps below:
�
Open hood (
�page 222).
2Headlamp vertical adjustment screw
3Headlamp vertical adjustment screw
�
Always turn adjustment screws2
and3 simultaneously for vertical ad-
justment until the headlamp is adjust-
ed as shown1. Turn clockwise for
upward movement and counterclock-
wise for downward movement.
Graduations:
screw2: 0.50° pitch
screw3: 0.67° pitch
The left and right headlamps must be ad-
justed individually.
iHigh beam adjustments simultaneous-
ly aim the low beam.
Vehicle should have a normal trunk
load.
iIf it is not possible to obtain a proper
headlamp adjustment, have the system
checked at an authorized
Mercedes-Benz Light Truck Center.
Page 289 of 356
287 Practical hints
Flat tire
Lowering the vehicle�
Lower vehicle by turning crank coun-
terclockwise until vehicle is resting ful-
ly on its own weight.
�
Remove the jack.
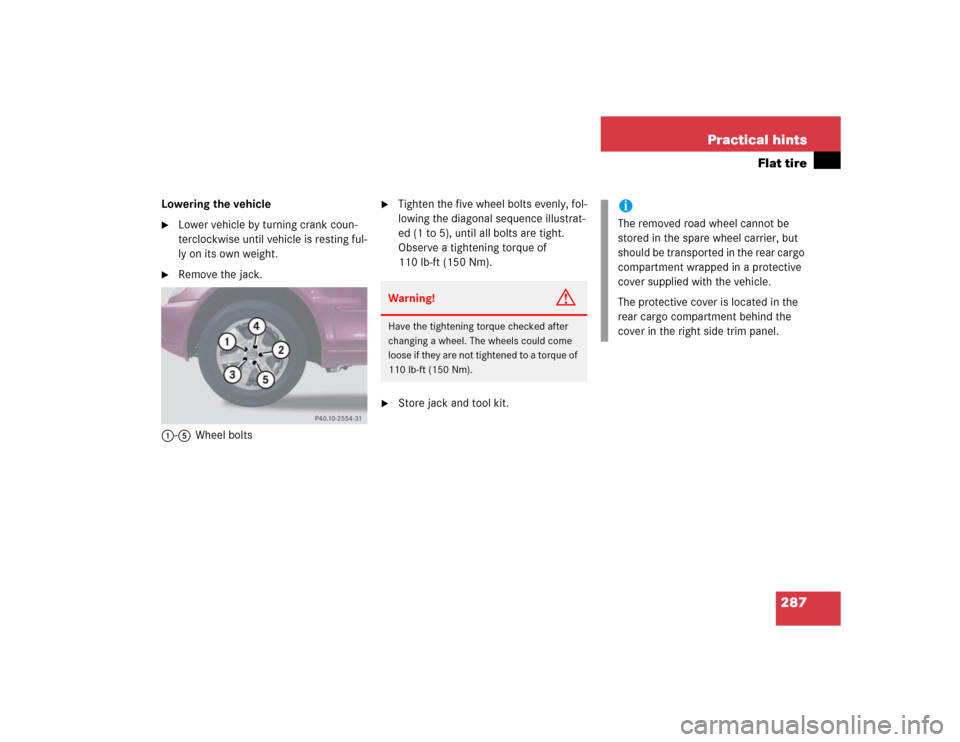
1-5Wheel bolts
�
Tighten the five wheel bolts evenly, fol-
lowing the diagonal sequence illustrat-
ed (1 to 5), until all bolts are tight.
Observe a tightening torque of
110 lb-ft (150 Nm).
�
Store jack and tool kit.Warning!
G
Have the tightening torque checked after
changing a wheel. The wheels could come
loose if they are not tightened to a torque of
110 lb-ft (150 Nm).
iThe removed road wheel cannot be
stored in the spare wheel carrier, but
should be transported in the rear cargo
compartment wrapped in a protective
cover supplied with the vehicle.
The protective cover is located in the
rear cargo compartment behind the
cover in the right side trim panel.
Page 292 of 356
290 Practical hintsBattery
Batteries contain materials that can harm
the environment if disposed of improperly.
Large 12 volt storage batteries contain
lead. Recycling of batteries is the preferred
method of disposal. Many states require
sellers of batteries to accept old batteries
for recycling.
iThe following procedures must be car-
ried out following any interruption of
battery power (e.g. due to reconnec-
tion):�
Set the clock (
�page 119).
�
Set the date in trip computer
(�page 189).
�
Calibrate the compass
(�page 191).
�
Resynchronize the ESP
(�page 252).
�
Resynchronize side power windows
(�page 148).
�
Resynchronize tilt / sliding
sunroof*(
�page 152).
Page 301 of 356
299 Practical hintsFuses
Fuse box in front passenger footwell
The fuse box is located in the front
passenger compartment.
1Lock
2CoverRemoving / installing cover
�
Open passenger-side door.
�
Turn both locks1
90°counterclockwise.
�
Remove cover2 in direction of arrow.
�
Install cover2 in reverse order.
Page 335 of 356

333 Index
Cleaning
Cup holder 244
Gear selector lever 244
Hard plastic trim items 244
Headlamps 133
Headliner 244
Instrument cluster 244
Leather upholstery 245
Light alloy wheels 244
MB Tex upholstery 245
Plastic and rubber parts 245
Seat belts 244
Steering wheel 244
Windows 243
Windshield 51
Wiper blades 243
Clock 26, 119
Closing
Glove box 167
Hood 223
Liftgate 92
Power tilt/sliding sunroof* 271
Rear quarter windows* 149
Side windows 147
Tilt/sliding sunroof* 150Closing tilt/sliding sunroof*
In an emergency 271
Cockpit 22, 323
Combination switch
High beam flasher 50
Turn signals 50
Windshield wipers 51
Compass 190
Calibrating 191
Setting compass zone 191
Compass zone 191
Consumer information 320
Control and operation of radio
transmitters 216
Coolant 227, 316
Adding 228
Anticorrosion/antifreeze
quantity 316
Checking level 227
Indicator lamp 256
Temperature 218
Temperature gauge 118Coolant level
Checking 227
Crossing obstacles 209
Cruise control 153, 323
Canceling 154
Driving downhill 154
Driving uphill 154
Fine adjustment 155
LOW RANGE mode 155
Saving current speed 154
Setting speeds 155
Cruise control lever 153
Cup holder 169
Cleaning 244
In front seat armrest 170
In instrument panel 169
In rear center console 170
Customer Assistance Center (CAC) 323
Page 347 of 356

345 Index
Saving current speed 154
Seat belt force limiter 67
Seat belt height adjustment 46
Seat belts 64
Cleaning 244
Fastening 43
Height adjustment 46
Proper use of 45, 66
Safety guidelines 62
Warning lamp 260
Seat heater*
Switching off 99
Switching on 98
Seats 95
Adjusting 35
Heater* 98
Manual 36
Rapid seat heating* 99
Rear 99
Split rear bench seat 100
Securing cargo
Cargo tie-down rings 161Selector lever 26
Lock 47
Position 26, 120
Self-test
BabySmart
TM airbag deactivation
system 70
Tele Aid* 175
Service
Calling up the service indicator 238
Major service (Service B) 237
Minor service (Service A) 237
Overdue 238
Parts 302
Types 238
When due 237
Service and Warranty Booklet
Loss of 303
Service and warranty information 10
Service indicator 237
Calling up 238
Clearing 237, 238
Service indicator (FSS)
Display messages 263Service life (tires) 232
Service System see FSS
Setting
Cruise control 154
Higher speed in cruise control 155
Hours (clock) 119
Lower speed in cruise control 155
Minutes (clock) 119
Slower speed in cruise control 155
Speed in cruise control 155
Setting date
Trip computer* 189
Setting illumination time 110
Setting language
Trip computer* 193
Shift lock 326
Shifting
Gear selector lever positions 123
Into optimal gear range (automatic
transmission) 121
Side impact airbags 64
Side marker bulb
Replacing 278
Side marker lamps
Replacing bulbs 274, 275
Page:
< prev 1-8 9-16 17-24