Page 6 of 356

ContentsAnti-theft systems................................ 83
Immobilizer..................................... 83
Anti-theft alarm system .................. 83
Tow-away alarm,
glass breakage sensor.................... 84Controls in detail............................... 87
Locking and unlocking ......................... 88
Remote control with folding key ..... 88
Opening the doors
from the inside ............................... 90
Opening the liftgate........................ 91
Closing the liftgate ......................... 92
Automatic central locking .............. 93
Locking and unlocking
from the inside ............................... 94Seats ................................................... 95
Removing and installing
front seat head restraints............... 95
Rear seat head restraints ............... 96
Heated seats* ................................ 98
Rear seats ...................................... 99
Third row seats* .......................... 102
Memory function* ............................. 105
Storing positions into memory ..... 106
Recalling positions
from memory ............................... 106
Storing exterior rear
view mirror parking position......... 106
Lighting.............................................. 107
Combination switch ..................... 107
Fog lamps .................................... 111
Hazard warning flasher ................ 113
Interior lighting............................. 114
Instrument cluster ............................. 117
Instrument cluster illumination .... 117
Coolant temperature gauge ......... 118
Display in the speedometer ......... 118
Resetting trip odometer ............... 119
Tachometer .................................. 119
Outside temperature indicator ..... 119
Setting the clock .......................... 119Automatic transmission ..................... 120
One-touch gearshifting ................ 121
Gear ranges ................................. 122
Gear selector lever position ......... 123
Driving tips................................... 124
Towing a trailer ............................ 125
Emergency operation
(Limp Home Mode) ...................... 126
Transmission control –
LOW RANGE mode ............................ 127
Switching on LOW RANGE mode.. 127
Switching off LOW RANGE mode . 127
Good visibility .................................... 128
Rear view mirrors ......................... 128
Electrically folding
exterior rear view mirrors............. 130
Windshield wipers ........................ 131
Headlamp cleaning system* ........ 133
Rear window wiper....................... 133
Sun visors .................................... 134
Rear window defroster ................. 135
Page 28 of 356
26 At a glanceInstrument cluster
Item
Page
5
Photo sensor
(adjusts the brightness of
the digital displays located
in 1, 4 and 8)
6
Right indicator lamps
with:WLow wind-
shield/headlamp
washer system fluid
level warning lamp
260
7Front passenger air-
bag switched off
249
‡Front fog lamp
switched on
112
Item
Page
_Steering wheel ad-
justment not locked
260
260
1Supplemental Re-
straint System
(SRS) indicator
lamp
262
ÉBrake warning lamp
250
#Charge indicator
lamp
261
AHigh beam head-
lamp indicator
50
Item
Page
7
Knob for setting clock
119
8
Tachometer with:
Display for Selector
lever position
122
Clock
119
9
KRight turn signal
indicator lamp
a
LLeft turn signal
indicator lamp
Page 36 of 356
34 Getting startedUnlockingFor more information, see “Remote control
with folding key” (
�page 88).
iThe key can only be withdrawn in
position0.
If necessary, move steering wheel
slightly to allow the key to be turned
clockwise to position1.
A warning sounds when the driver’s
door is opened and the key is in steer-
ing lock position0 or1.
The key can only be removed from the
steering lock with the gear selector le-
ver in positionP.!To prevent accelerated battery dis-
charge and a possible dead battery, al-
ways remove the key from the steering
lock when the engine is not in opera-
tion.
Page 112 of 356
.
�
Turn combination switch to
positionD.
�
Press and hold the upper part of fog
lamps switc")
110 Controls in detailLightingSetting illumination time
1Fog lamps switch�
Switch on ignition (
�page 33).
�
Turn combination switch to
positionD.
�
Press and hold the upper part of fog
lamps switch1 until the clock in the
instrument cluster displays the actual
illumination time.
�
Release fog lamps switch1.
�
Press the upper part of fog lamps
switch1 again.
Each time the switch is pressed, the
illumination time increases by
15 seconds. You can set the illumina-
tion time between 0 (off) and
60 seconds.
The time is factory-set to 0 seconds.
Approximately five seconds after
pressing the switch, the illumination
time is adopted and the clock is dis-
played again.
�
Turn the combination switch to
positionU before turning off the en-
gine (
�page 107).
The night security illumination is acti-
vated.Deactivating night security illumination
temporarily
You can temporarily deactivate the
delayed shut-off feature.
�
Before exiting the vehicle, turn the key
in the steering lock to position0.
�
Then turn it to position2 and back to
position0.
The delayed shut-off feature is deacti-
vated. It will reactivate as soon as you
reinsert the key in the steering lock.
Page 119 of 356
117 Controls in detail
Instrument cluster
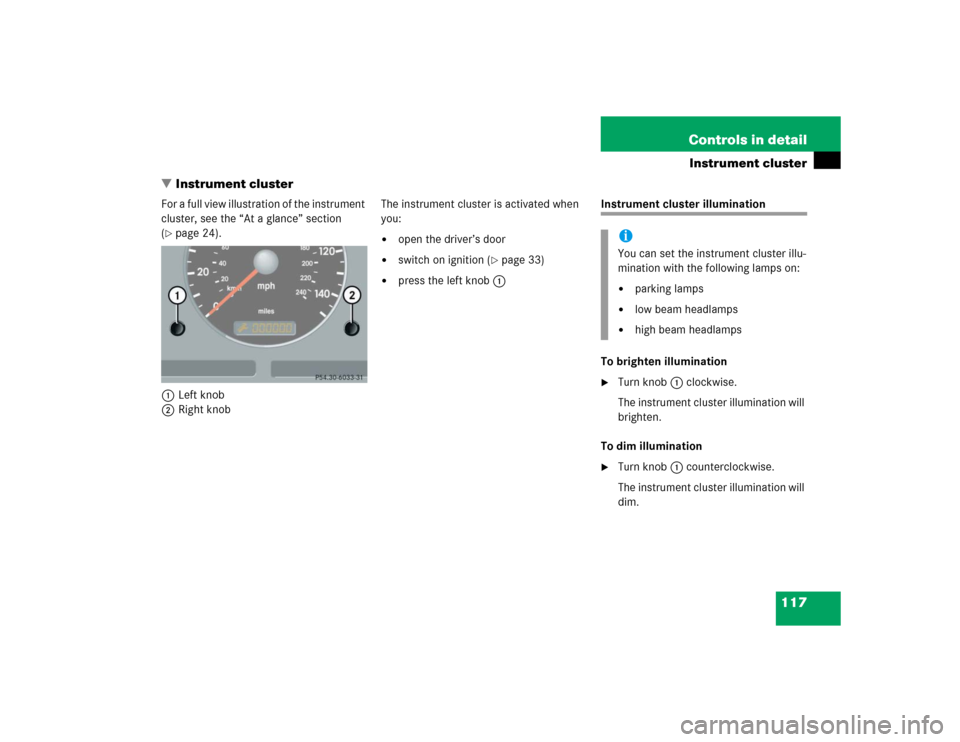
�Instrument cluster
For a full view illustration of the instrument
cluster, see the “At a glance” section
(�page 24).
1Left knob
2Right knobThe instrument cluster is activated when
you:
�
open the driver’s door
�
switch on ignition (
�page 33)
�
press the left knob1
Instrument cluster illumination
To brighten illumination�
Turn knob1 clockwise.
The instrument cluster illumination will
brighten.
To dim illumination
�
Turn knob1 counterclockwise.
The instrument cluster illumination will
dim.iYou can set the instrument cluster illu-
mination with the following lamps on:�
parking lamps
�
low beam headlamps
�
high beam headlamps
Page 121 of 356
 re-
peatedly until you see the trip odome-
ter display.
�
Press and hold the left knob1 until
the")
119 Controls in detail
Instrument cluster
Resetting trip odometer�
Press the left knob1 (
�page 117) re-
peatedly until you see the trip odome-
ter display.
�
Press and hold the left knob1 until
the trip odometer is reset.
Tachometer
To help protect the engine, the fuel supply
is interrupted if the engine is operated
above its specified limit.
Outside temperature indicator
The outside temperature is displayed in
the instrument cluster (
�page 24).
When moving the vehicle into colder ambi-
ent temperatures (e.g. when leaving your
garage), you will notice a delay before the
lower temperature is displayed.
A delay also occurs when ambient temper-
atures rise. This prevents inaccurate tem-
perature indications caused by heat
radiated from the engine during idling or
slow driving.
Setting the clock
Hour�
Pull out the right knob2 in the instru-
ment cluster (
�page 117) and turn it
counterclockwise.
Minutes
�
Pull out the right knob2 in the instru-
ment cluster (
�page 117) and turn it
clockwise.
Warning!
G
The outside temperature indicator is not de-
s i g n e d t o s e r v e a s a n i c e - w a r n i n g d e v i c e a n d
is therefore unsuitable for that purpose.
Indicated temperatures just above the freez-
ing point do not guarantee that the road sur-
face is free of ice. The road may still be icy,
especially in wooded areas or on bridges.
iTo set the clock by a single hour or a
few minutes, turn knob2 just a few
degrees in the direction indicated for
hours or minutes.
Page 169 of 356

167 Controls in detail
Useful features
�Useful features
Storage compartments Glove box
1Glove box lid release
2Glove box lid
Opening the glove box
�
Grab in recess and pull lid release1.
The glove box lid2 opens downward.
Closing the glove box
�
Push glove box lid up to close.Storage compartment under front
passenger seat*
The storage compartment is lockable with
its separate key.
1Lock cylinder
2Handle
Locking and unlocking the storage com-
partment
�
Turn the key clockwise.
The storage compartment is locked.
�
Turn the key counterclockwise.
The storage compartment is unlocked.
Warning!
G
To help avoid personal injury during a colli-
sion or sudden maneuver, exercise care
when stowing objects in the vehicle. Put lug-
gage or cargo in the cargo compartment if
possible. Do not pile luggage or cargo higher
than the seat backs.
Always use partition net when transporting
cargo. Partition net cannot secure hard or
heavy objects.
Parcel nets cannot secure hard or heavy ob-
jects.
Keep compartment lids closed. This will help
to prevent stored objects from being thrown
about and injuring vehicle occupants during
an accident.
iThe opened glove box is illuminated
with the key in steering lock position1
(�page 33).
Page 266 of 356
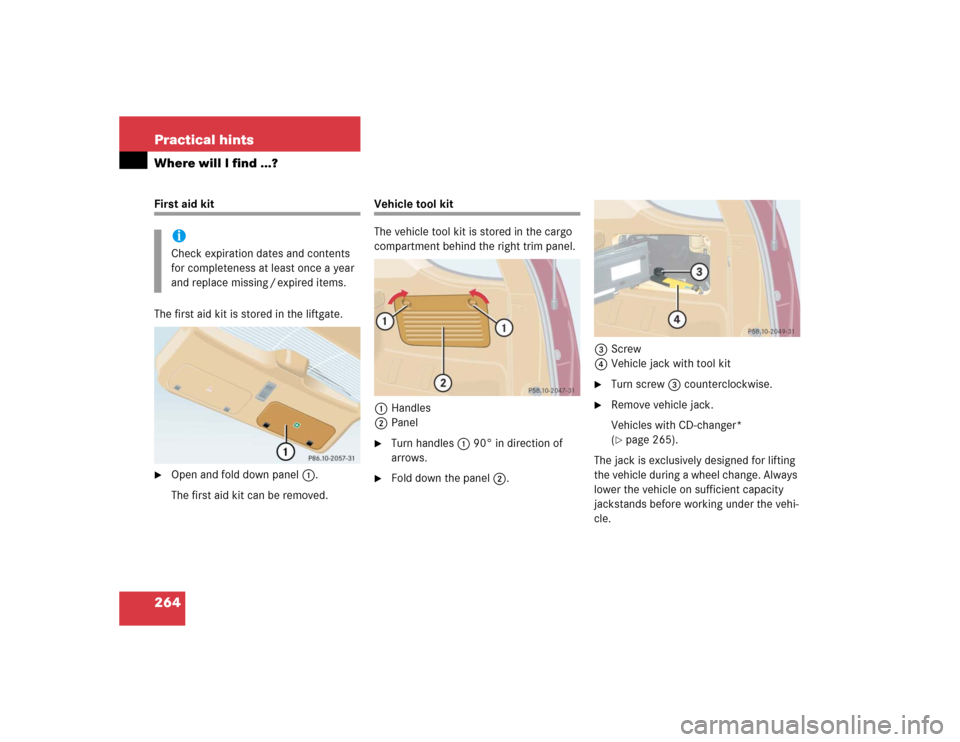
264 Practical hintsWhere will I find ...?First aid kit
The first aid kit is stored in the liftgate.�
Open and fold down panel1.
The first aid kit can be removed.
Vehicle tool kit
The vehicle tool kit is stored in the cargo
compartment behind the right trim panel.
1Handles
2Panel�
Turn handles1 90° in direction of
arrows.
�
Fold down the panel2.3Screw
4Vehicle jack with tool kit
�
Turn screw3 counterclockwise.
�
Remove vehicle jack.
Vehicles with CD-changer*
(�page 265).
The jack is exclusively designed for lifting
the vehicle during a wheel change. Always
lower the vehicle on sufficient capacity
jackstands before working under the vehi-
cle.
iCheck expiration dates and contents
for completeness at least once a year
and replace missing / expired items.

6
Right indicator lamps
with:WLow wind-
shield/headlamp
washer syst")