Page 271 of 356
269 Practical hints
Unlocking / locking in an emergency
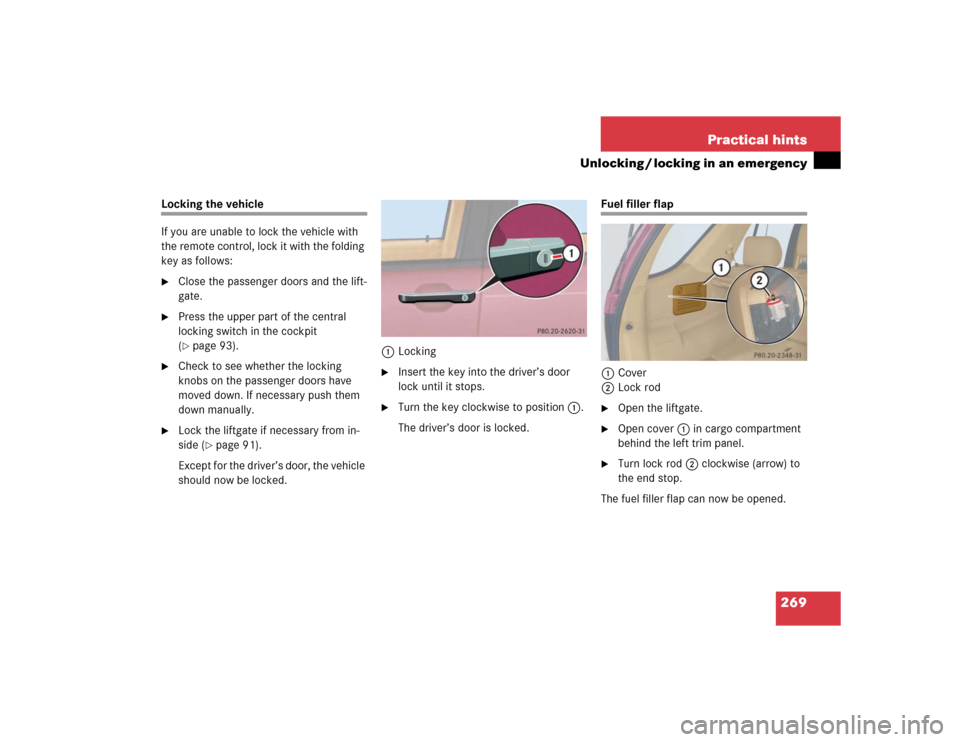
Locking the vehicle
If you are unable to lock the vehicle with
the remote control, lock it with the folding
key as follows:�
Close the passenger doors and the lift-
gate.
�
Press the upper part of the central
locking switch in the cockpit
(�page 93).
�
Check to see whether the locking
knobs on the passenger doors have
moved down. If necessary push them
down manually.
�
Lock the liftgate if necessary from in-
side (
�page 91).
Except for the driver’s door, the vehicle
should now be locked.1Locking
�
Insert the key into the driver’s door
lock until it stops.
�
Turn the key clockwise to position1.
The driver’s door is locked.
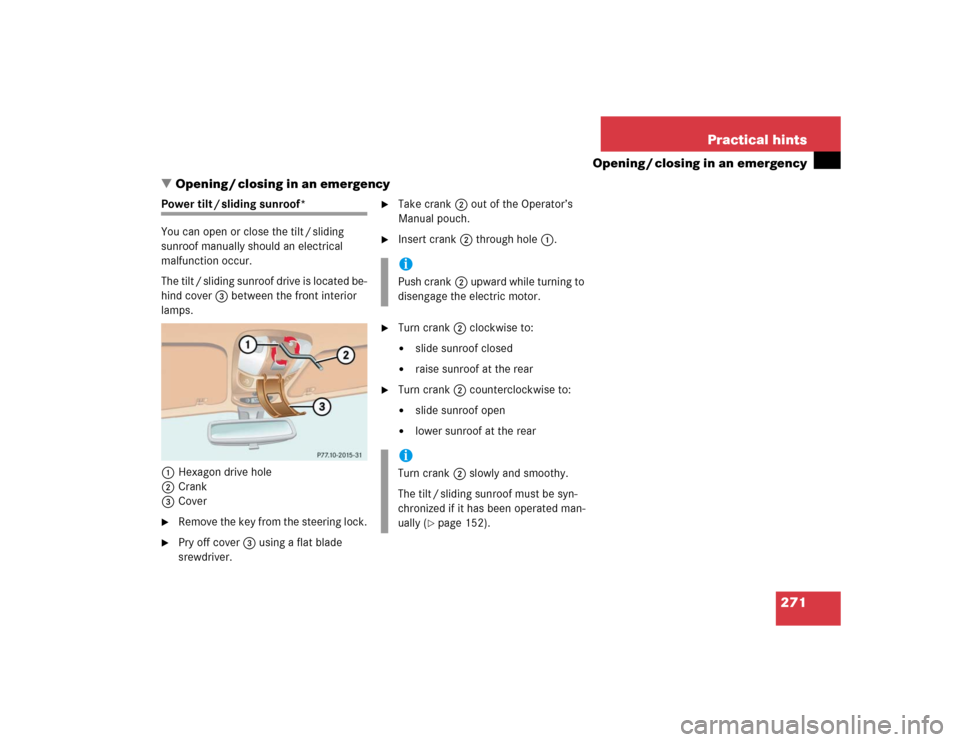
Fuel filler flap
1Cover
2Lock rod�
Open the liftgate.
�
Open cover1 in cargo compartment
behind the left trim panel.
�
Turn lock rod2 clockwise (arrow) to
the end stop.
The fuel filler flap can now be opened.
Page 272 of 356
270 Practical hintsUnlocking / locking in an emergencyManually unlocking the transmission gear selector lever
In the case of power failure the transmis-
sion gear selector lever can be manually
unlocked, e.g. to tow the vehicle.
1Pin
�
Insert a pin1, e.g. ball point pen, into
the covered opening below the
position D of the shift pattern.
�
Perform the following two steps simul-
taneously:�
Push the pin down.
�
Move gear selector lever from
positionP.
�
Remove pin1.
The cover returns to its closed position
after moving the gear selector lever to
positionD.iThe gear selector lever is locked again
when moving it to positionP.
Page 273 of 356
271 Practical hints
Opening / closing in an emergency
�Opening / closing in an emergency
Power tilt / sliding sunroof*
You can open or close the tilt / sliding
sunroof manually should an electrical
malfunction occur.
The tilt / sliding sunroof drive is located be-
hind cover3 between the front interior
lamps.
1Hexagon drive hole
2Crank
3Cover�
Remove the key from the steering lock.
�
Pry off cover3 using a flat blade
srewdriver.
�
Take crank2 out of the Operator’s
Manual pouch.
�
Insert crank2 through hole1.
�
Turn crank2 clockwise to:�
slide sunroof closed
�
raise sunroof at the rear
�
Turn crank2 counterclockwise to:�
slide sunroof open
�
lower sunroof at the rear
iPush crank2 upward while turning to
disengage the electric motor.iTurn crank2 slowly and smoothy.
The tilt / sliding sunroof must be syn-
chronized if it has been operated man-
ually (
�page 152).
Page 274 of 356
272 Practical hintsReplacing key batteriesIf the batteries in the remote control are
discharged, the vehicle can no longer be
locked or unlocked. It is recommended to
have the batteries replaced at an autho-
rized Mercedes-Benz Light Truck Center.Batteries contain materials that can harm
the environment if disposed of improperly.
Recycling of batteries is the preferred
method of disposal. Many states require
sellers of batteries to accept old batteries
for recycling.Warning!
G
Keep the batteries out of reach of children.
If a battery is swallowed, seek medical help
immediately.
iWhen replacing batteries, always
replace both batteries.
The required replacement batteries are
available at any Mercedes-Benz Light
Truck Center.
Page 275 of 356

273 Practical hints
Replacing key batteries
Remote control
Replacement batteries: Lithium, type
CR 2025 or equivalent.
1Release button
2Battery cover�
Unfold the key by pressing release
button1.
�
Pull off battery cover2 in direction of
arrow.
�
Remove the batteries.
�
Using a lint-free cloth, insert new bat-
teries under the contact spring with the
plus (+) side facing up.
�
Press battery cover2 onto housing
until locked in place.
�
Push each button to assure proper op-
eration of the remote control.
If remote control does not function cor-
rectly after replacing the batteries, the
system may have to be resynchronized.Synchronizing remote control
�
Turn key in steering lock to position2
(�page 33), then to position0 and re-
move.
�
Within ten seconds, push and hold
button‹ while pushing
buttonΠfive times.
�
Release the button, and press‹,
Œ orŠ once.
The remote control is resynchronized.
�
Recheck all of the remote control func-
tions.
iWhen inserting the batteries, make
sure they are clean and free of lint.
iIf it is not possible to resynchronize the
remote control, have the system
checked at an authorized
Mercedes-Benz Light Truck Center.
Page 278 of 356
276 Practical hintsReplacing bulbsHave the LEDs and bulbs for the following
lamps replaced by an authorized
Mercedes-Benz Light Truck Center:�
Additional turn signals in the exterior
rear view mirrors
�
Xenon*-lamps
�
Front fog lamps (vehicles with sport
package*)
�
High mounted brake lamp (only vehi-
cles with an exterior spare-wheel
rack*)
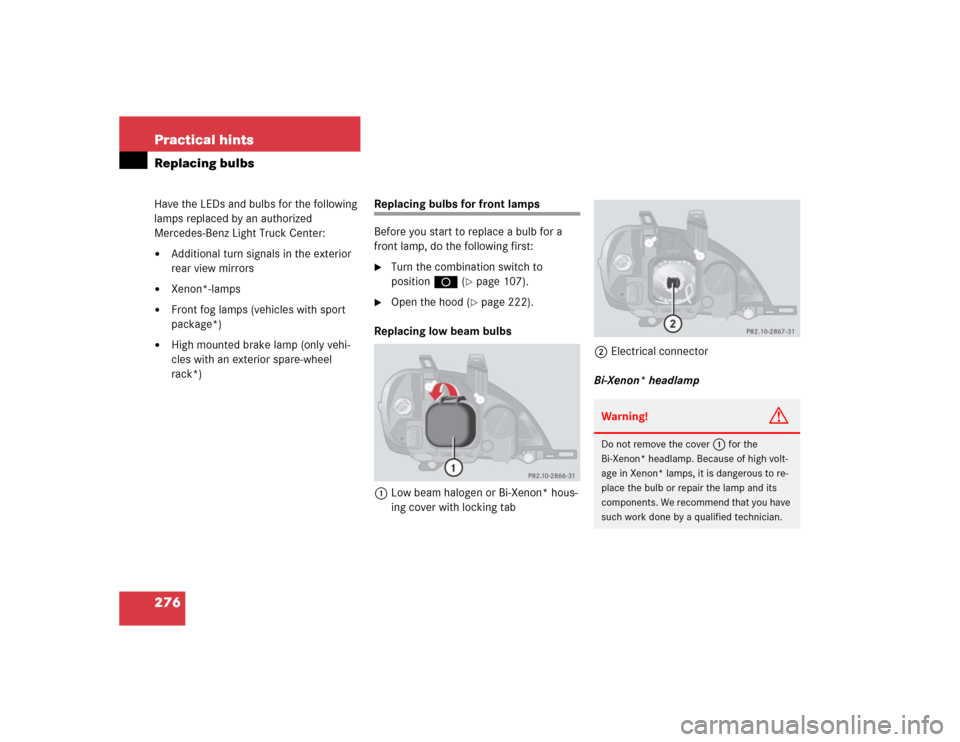
Replacing bulbs for front lamps
Before you start to replace a bulb for a
front lamp, do the following first:�
Turn the combination switch to
positionD (
�page 107).
�
Open the hood (
�page 222).
Replacing low beam bulbs
1Low beam halogen or Bi-Xenon* hous-
ing cover with locking tab2Electrical connector
Bi-Xenon* headlamp
Warning!
G
Do not remove the cover
1
for the
Bi-Xenon* headlamp. Because of high volt-
age in Xenon* lamps, it is dangerous to re-
place the bulb or repair the lamp and its
components. We recommend that you have
such work done by a qualified technician.
Page 280 of 356
�
Turn housing cover1")
278 Practical hintsReplacing bulbsHigh beam halogen bulb (vehicles with
halogen bulbs: high beam and high
beam flasher; vehicles with Xenon*
headlamps: high beam flasher only)�
Turn housing cover1 counterclock-
wise and remove it.
�
Pull electrical connector2 off.
�
Unclip the retainer spring on the bulb
socket and take out the bulb.
�
Insert the new bulb so that its socket
locates in the recess of the lamp hous-
ing.
�
Clip on the retainer spring.
�
Plug electrical connector2 onto the
bulb.
�
Align housing cover1 and turn it
clockwise.Parking / standing lamp bulb
�
Turn housing cover1 counterclock-
wise and remove it.
�
Pull out bulb socket3 with the bulb.
�
Press gently onto the bulb and turn
counterclockwise out of bulb
socket3.
�
Press the new bulb gently into bulb
socket3 and turn clockwise until it
engages.
�
Press bulb socket3 back into the
lamp.
�
Align housing cover1 and turn it
clockwise.Turn signal bulb / side marker bulb
1Bulb socket
�
Twist bulb socket1 counterclockwise
and pull out.
�
Push bulb into socket, turn counter-
clockwise and remove.
�
Insert new bulb in socket, push in and
twist clockwise.
�
Reinstall the bulb socket1.
Page 281 of 356
279 Practical hints
Replacing bulbs
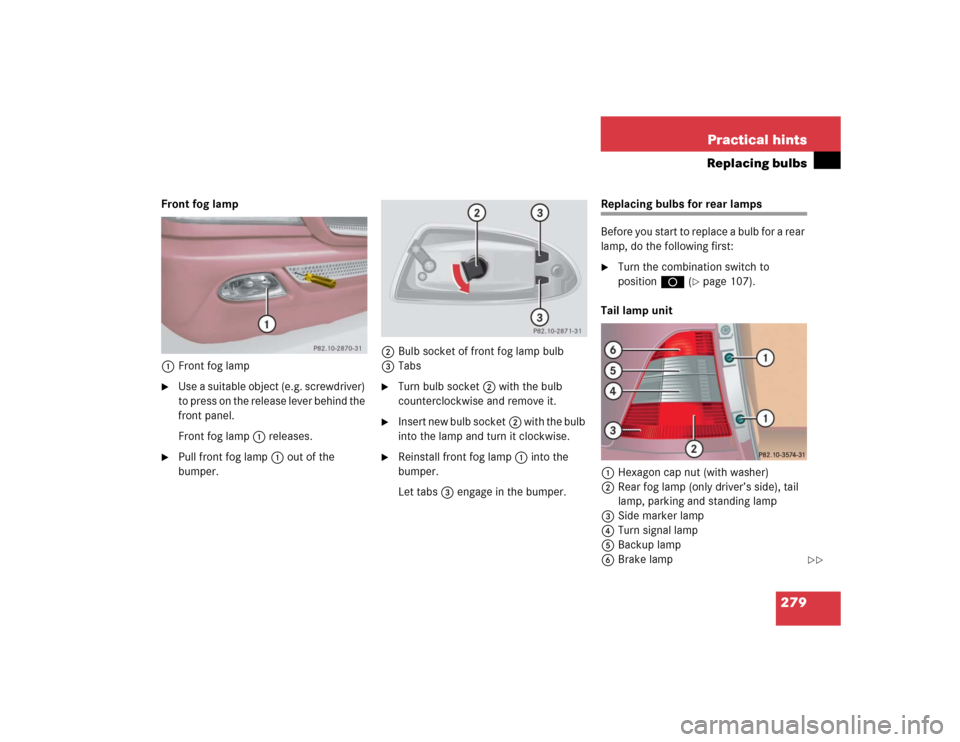
Front fog lamp
1Front fog lamp�
Use a suitable object (e.g. screwdriver)
to press on the release lever behind the
front panel.
Front fog lamp1 releases.
�
Pull front fog lamp1 out of the
bumper.2Bulb socket of front fog lamp bulb
3Tabs
�
Turn bulb socket2 with the bulb
counterclockwise and remove it.
�
Insert new bulb socket2 with the bulb
into the lamp and turn it clockwise.
�
Reinstall front fog lamp1 into the
bumper.
Let tabs3 engage in the bumper.
Replacing bulbs for rear lamps
Before you start to replace a bulb for a rear
lamp, do the following first:�
Turn the combination switch to
positionD (
�page 107).
Tail lamp unit
1Hexagon cap nut (with washer)
2Rear fog lamp (only driver’s side), tail
lamp, parking and standing lamp
3Side marker lamp
4Turn signal lamp
5Backup lamp
6Brake lamp
��