Page 304 of 416
304 Practical hintsWhat to do if …Display symbol
Display message
Possible cause
Possible solution
3
ELEC. BRAKE BOOST.
VISIT WORKSHOP!
The EBB has detected a malfunction and
has switched off.
The brake system is still functioning nor-
mally but without the EBB available.
�
Continue driving with added cau-
tion.
�
Have the system checked at an au-
thorized Mercedes-Benz Light Truck
Center as soon as possible.
Failure to follow these instructions in-
creases the risk of accident.
;
(USA only)
!
(Canada only)
PARK. BRAKE
RELEASE BRAKE!
You are driving with the parking brake
set.
�
Release the parking brake
(�page 50).
Page 312 of 416

312 Practical hintsWhat to do if …Display symbol
Display message
Possible cause
Possible solution
.
3RD BRAKE LIGHT
CHECK LIGHT!
The high mounted brake lamp is malfunc-
tioning. This message will only appear if
all light emitting diodes have stopped
working.
�
Visit an authorized Mercedes-Benz
Light Truck Center as soon as
possible.
ADD. TURN SIG., L
CHECK LIGHT!
The left turn signal in the exterior rear
view mirror is malfunctioning. This mes-
sage will only appear if all light emitting
diodes have stopped working.
�
Have the LEDs replaced as soon as
possible.
ADD. TURN SIG., R
CHECK LIGHT!
The right turn signal in the exterior rear
view mirror is malfunctioning. This mes-
sage will only appear if all light emitting
diodes have stopped working.
�
Have the LEDs replaced as soon as
possible.
AUTOM. LIGHT ON
REMOVE KEY!
You have left the SmartKey in the starter
switch.
�
Remove the SmartKey from the starter
switch.
BRAKE LIGHT
DRIVE TO WORKSHOP!
Brake lamp illumination is delayed or
lamp is permanently on.
�
Visit an authorized Mercedes-Benz
Light Truck Center as soon as
possible.
BRAKE LIGHT, L
CHECK LIGHT!
The left brake lamp is malfunctioning.
�
Visit an authorized Mercedes-Benz
Light Truck Center as soon as
possible.
Page 313 of 416

313 Practical hints
What to do if …
Display symbol
Display message
Possible cause
Possible solution
.
BRAKE LIGHT, R
CHECK LIGHT!
The right brake lamp is malfunctioning.
�
Visit an authorized Mercedes-Benz
Light Truck Center as soon as
possible.
FRONT FOGLIGHT, L
CHECK LIGHT!
The left front fog lamp is malfunctioning.
�
Replace the bulb as soon as possible.
FRONT FOGLIGHT, R
CHECK LIGHT!
The right front fog lamp is malfunctioning.
�
Replace the bulb as soon as possible.
FR. L. PARK. LAMP
CHECK LIGHT!
BACK-UP LIGHT ON!
The left parking lamps are malfunction-
ing. A backup bulb is being used.
�
Replace the bulb as soon as possible.
FR. R. PARK LAMP
CHECK LIGHT!
BACK-UP LIGHT ON!
The right parking lamps are malfunction-
ing. A backup bulb is being used.
�
Replace the bulb as soon as possible.
HIGH BEAM, L
CHECK LIGHT!
The left high beam lamp is malfunction-
ing.
�
Replace the bulb as soon as possible.
HIGH BEAM, R
CHECK LIGHT!
The right high beam lamp is malfunction-
ing.
�
Replace the bulb as soon as possible.
Page 318 of 416
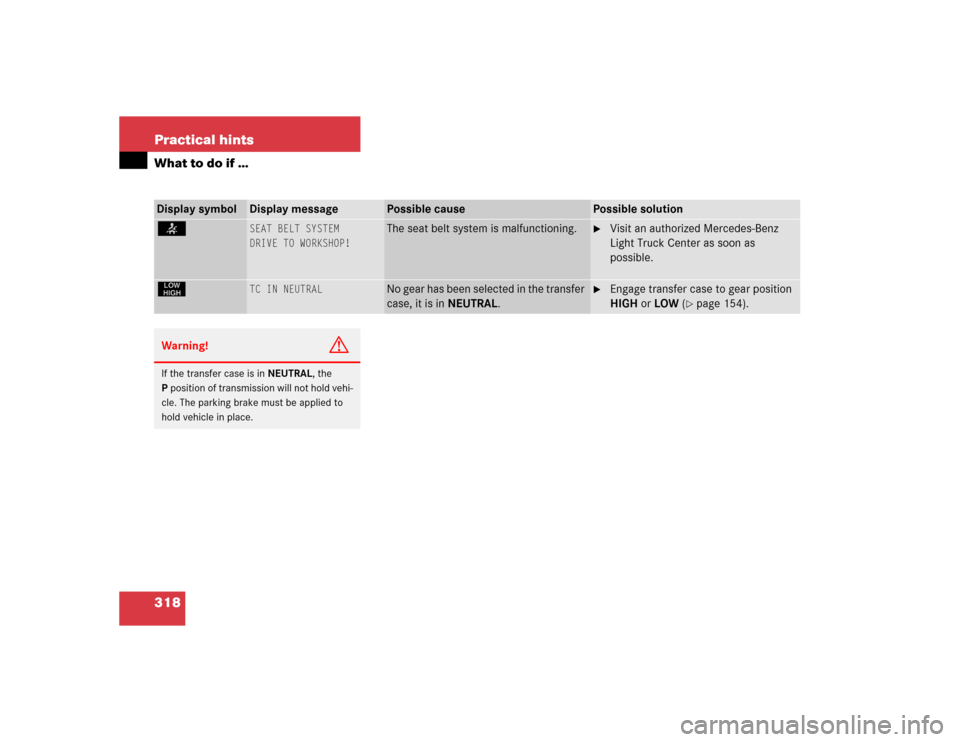
318 Practical hintsWhat to do if …Display symbol
Display message
Possible cause
Possible solution
<
SEAT BELT SYSTEM
DRIVE TO WORKSHOP!
The seat belt system is malfunctioning.
�
Visit an authorized Mercedes-Benz
Light Truck Center as soon as
possible.
§
TC IN NEUTRAL
No gear has been selected in the transfer
case, it is in NEUTRAL.
�
Engage transfer case to gear position
HIGH or LOW (
�page 154).
Warning!
G
If the transfer case is in NEUTRAL, the
Pposition of transmission will not hold vehi-
cle. The parking brake must be applied to
hold vehicle in place.
Page 322 of 416
.
�
O")
322 Practical hintsWhere will I find...?Vehicle jack
The vehicle jack is under the rear bench
seat on the passenger side.
1Cover
2Tab
3Vehicle jack�
Fold the rear bench seat forward
(�page 184).
�
Open cover1.
�
Open tab2 and remove vehicle
jack3.
Please also observe the safety guidelines
in the “Flat tire” section (
�page 346)
when using the jack.
CD changer
The CD changer is located on the left side
of the cargo compartment.CD changer
Warning!
G
The jack is designed exclusively for jacking
up the vehicle under the axle housing. To
help avoid personal injury, use the jack only
to lift the vehicle during a wheel change.
Never get beneath the vehicle while it is sup-
ported by the jack. Keep hands and feet
away from the area under the lifted vehicle.
Always firmly set parking brake and block
wheels before raising vehicle with jack.
Do not disengage parking brake while the
vehicle is raised. Be certain that the jack is
always vertical (plumb line) when in use, es-
pecially on hills. Always try to use the jack
on level surface. Make sure the jack is posi-
tioned correctly under the axle housing. Al-
ways lower the vehicle onto sufficient
capacity jackstands before working under
the vehicle.
iFor CD changer instructions, see sepa-
rate COMAND operator’s manual.
Page 334 of 416
334 Practical hintsReplacing bulbsBulbs Front lamps Rear lamps
Lamp
Type
1
Additional turn
signal lamp
LED
2
Turn signal lamp
1156 NA
3
Side marker lamp
T 4 W
4
High and low beam
H4 60 (55 W)
Parking and
standing lamp
T 4 W
5
Fog lamp
H3 (55 W)
Lamp
Type
6
High mounted brake
lamp
LED
7
Turn signal lamp
PY 21 W
Brake lamp
P 21 W
Tail, parking and
standing lamp
R 5 W
8
Backup lamp
P 21 W
9
License plate lamps
C 5 W
a
Rear fog lamp
P 21 W
b
Side marker lamp
T 4 W
Page 335 of 416

335 Practical hints
Replacing bulbs
Notes on bulb replacement�
Use only 12 volt bulbs of the same type
and with the specified watt rating.
�
Switch lights off before changing a bulb
to prevent short circuits.
�
Always use a clean lint-free cloth when
handling bulbs.
�
Your hands should be dry and free of oil
and grease.
�
If the newly installed bulb does not
come on, visit an authorized
Mercedes-Benz Light Truck Center.
Have the LEDs for the following lamps re-
placed by an authorized Mercedes-Benz
Light Truck Center.
�
Additional turn signals in the exterior
rear view mirrors
�
High mounted brake lamp
�
Lamps in the exterior rear view mirrors
Warning!
G
Bulbs and bulb sockets can be very hot. Al-
low the lamp to cool down before changing
a bulb.
Keep bulbs out of reach of children.
Halogen lamps contain pressurized gas.
A bulb can explode if you:�
touch or move it when hot
�
drop the bulb
�
scratch the bulb
Wear eye and hand protection.
iHave the headlamp adjustment
checked regularly by a Mercedes-Benz
Light Truck Center.
Do not turn the headlamp adjusting
screws. If the adjusting screws are
turned, the headlamp adjustment must
be checked by a Mercedes-Benz Light
Truck Center.
Page 342 of 416
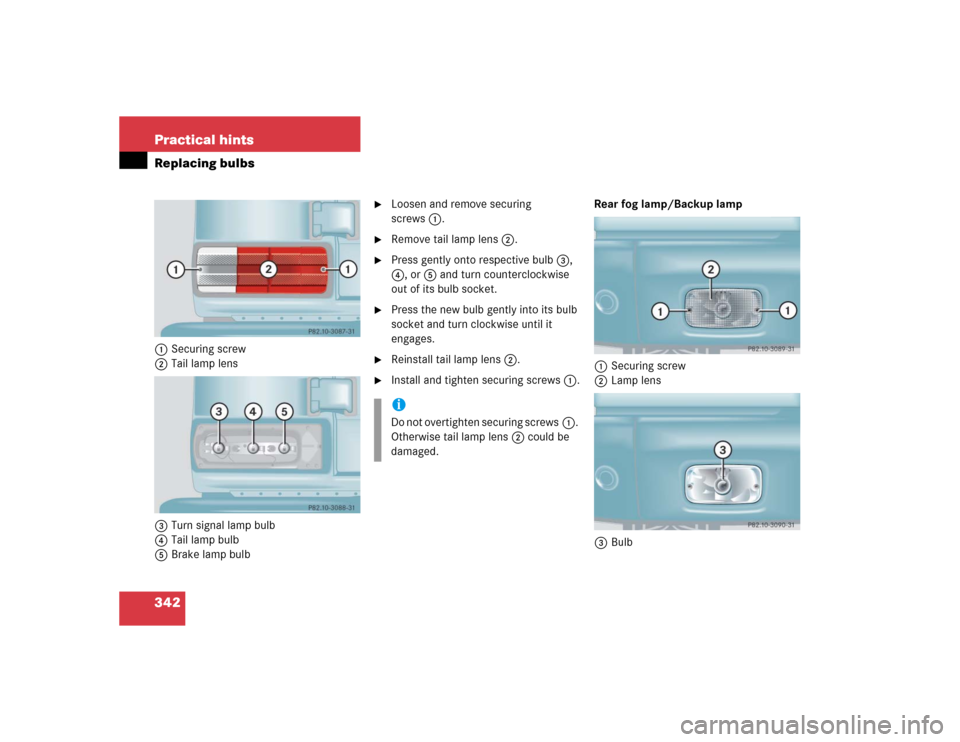
342 Practical hintsReplacing bulbs1Securing screw
2Tail lamp lens
3Turn signal lamp bulb
4Tail lamp bulb
5Brake lamp bulb
�
Loosen and remove securing
screws1.
�
Remove tail lamp lens2.
�
Press gently onto respective bulb3,
4, or5 and turn counterclockwise
out of its bulb socket.
�
Press the new bulb gently into its bulb
socket and turn clockwise until it
engages.
�
Reinstall tail lamp lens2.
�
Install and tighten securing screws1.Rear fog lamp/Backup lamp
1Securing screw
2Lamp lens
3BulbiDo not overtighten securing screws1.
Otherwise tail lamp lens2 could be
damaged.


Parkin")