Page 342 of 416
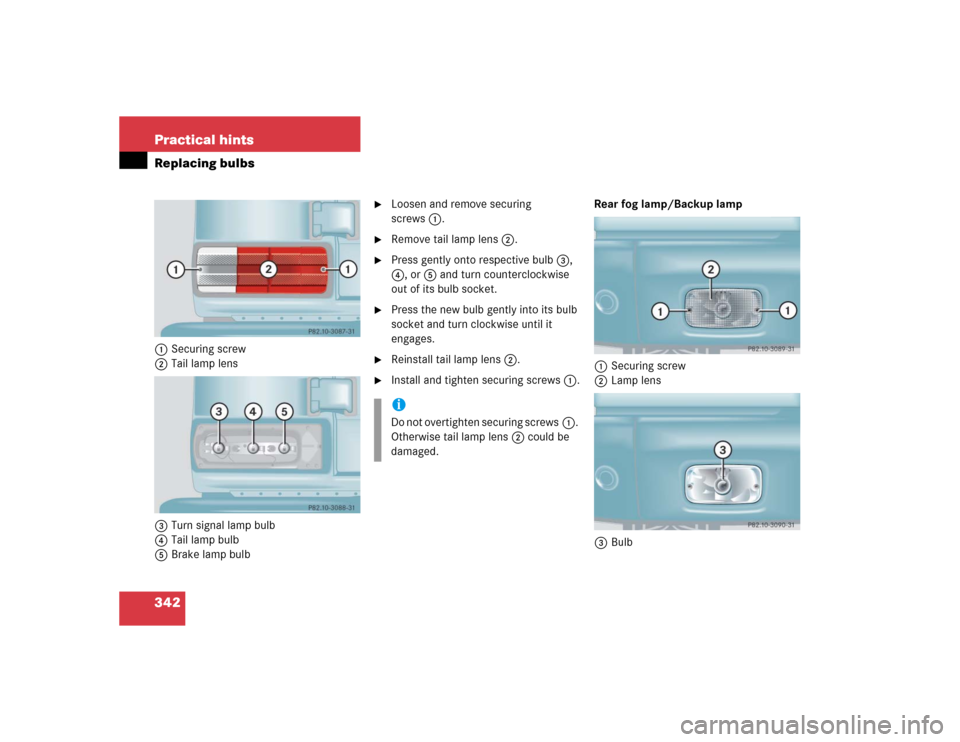
342 Practical hintsReplacing bulbs1Securing screw
2Tail lamp lens
3Turn signal lamp bulb
4Tail lamp bulb
5Brake lamp bulb
�
Loosen and remove securing
screws1.
�
Remove tail lamp lens2.
�
Press gently onto respective bulb3,
4, or5 and turn counterclockwise
out of its bulb socket.
�
Press the new bulb gently into its bulb
socket and turn clockwise until it
engages.
�
Reinstall tail lamp lens2.
�
Install and tighten securing screws1.Rear fog lamp/Backup lamp
1Securing screw
2Lamp lens
3BulbiDo not overtighten securing screws1.
Otherwise tail lamp lens2 could be
damaged.
Page 343 of 416
343 Practical hints
Replacing bulbs
�
Loosen and remove securing
screws1.
�
Remove lamp lens2.
�
Press gently onto bulb3 and turn
counterclockwise out of its bulb
socket.
�
Press new bulb3 gently into the bulb
socket and turn clockwise until it
engages.
�
Reinstall lamp lens2.
�
Install and tighten securing screws1.License plate lamp
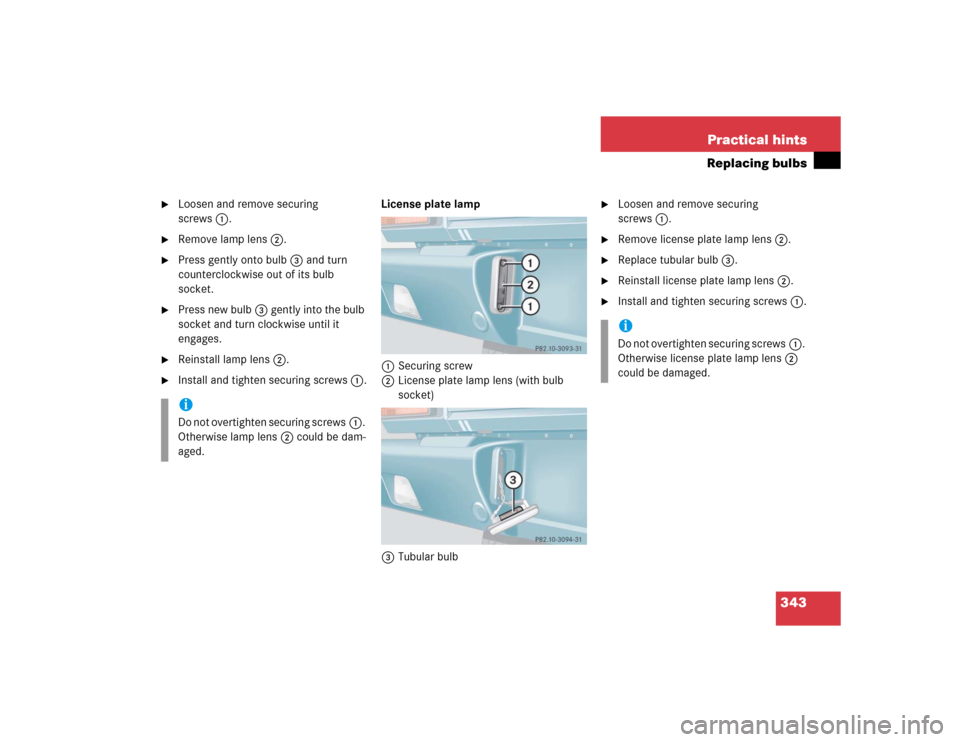
1Securing screw
2License plate lamp lens (with bulb
socket)
3Tubular bulb
�
Loosen and remove securing
screws1.
�
Remove license plate lamp lens2.
�
Replace tubular bulb3.
�
Reinstall license plate lamp lens2.
�
Install and tighten securing screws1.
iDo not overtighten securing screws1.
Otherwise lamp lens2 could be dam-
aged.
iDo not overtighten securing screws1.
Otherwise license plate lamp lens2
could be damaged.
Page 345 of 416
345 Practical hints
Replacing wiper blades
�
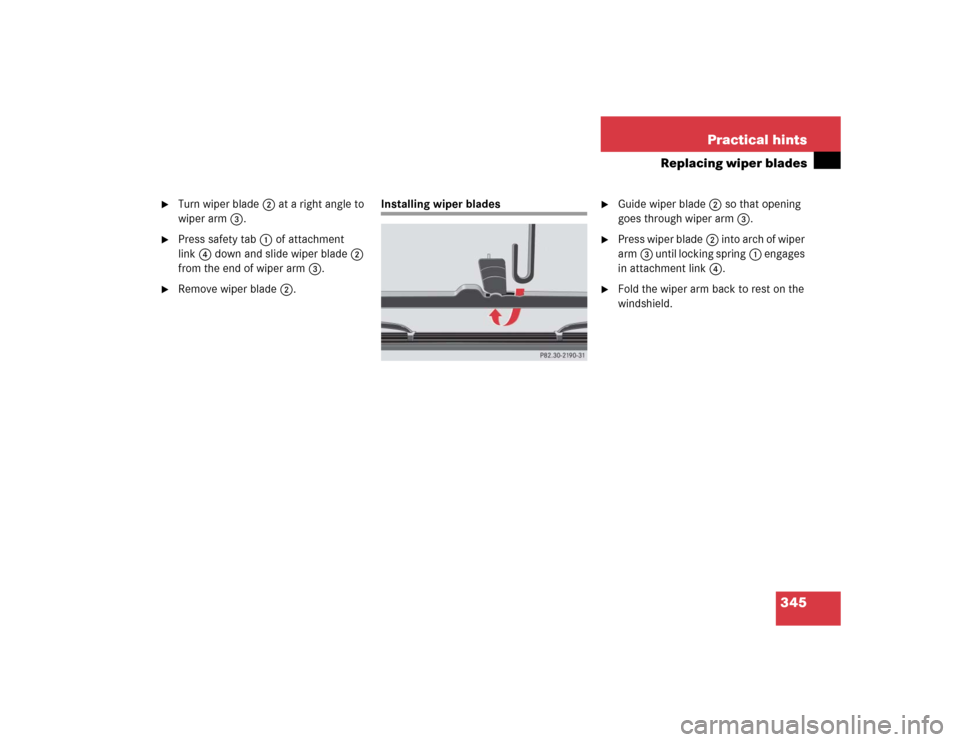
Turn wiper blade2 at a right angle to
wiper arm3.
�
Press safety tab1 of attachment
link4 down and slide wiper blade2
from the end of wiper arm3.
�
Remove wiper blade2.
Installing wiper blades
�
Guide wiper blade2 so that opening
goes through wiper arm3.
�
Press wiper blade2 i n t o a r c h o f w i p e r
arm3 until locking spring1 engages
in attachment link4.
�
Fold the wiper arm back to rest on the
windshield.
Page 346 of 416

346 Practical hintsFlat tirePreparing the vehicle�
Park the vehicle as far as possible from
moving traffic on a hard surface.
�
Turn on the hazard warning flashers.
�
Engage the steering wheel lock in the
straight ahead position and set the
parking brake.
�
Move the gear selector lever toP.
�
Have any passenger exit the vehicle at
a safe distance from the roadway.
�
Remove the vehicle tool kit
(�page 321) and the jack
(�page 322).
�
Remove the spare wheel from the
spare wheel mounting bracket
(�page 323).Information on spare wheel
When you replace the vehicle’s tires, you
can use the spare wheel as a regular wheel
if:
�
it is not more than six years old
�
rim and tire are the same model as the
regular wheels
Warning!
G
For your safety, remove spare wheel from
the spare wheel mounting bracket before
undertaking any further steps.
Warning!
G
If the spare tire is more than six years old or
is not the same model as the regular tires,
have the spare tire replaced with a new tire
at the nearest Mercedes-Benz Light Truck
Center.
Never operate the vehicle with more than
one spare tire.
Warning!
G
G55AMG:
Vehicles with different tire dimensions on
the front and rear axle: rim and tire size of
spare wheel and normal wheel differ.
Handling will be adversely affected when the
spare wheel is used.
Do not exceed the maximum speed of
50 mph (80 km/h).
Page 347 of 416
.
Lifting the vehicle
�
Prevent the vehicle from rolling away
by blocking wheels with wheel chocks
(not includ")
347 Practical hints
Flat tire
Mounting the spare wheel�
Prepare the vehicle (
�page 346).
Lifting the vehicle
�
Prevent the vehicle from rolling away
by blocking wheels with wheel chocks
(not included) or other sizable objects.
When changing wheel on a level surface:
�
Place one chock in front of and one be-
hind the wheel that is diagonally oppo-
site to the wheel being changed.
When changing wheel on a hill:
�
Place chocks on the downhill side
blocking both wheels of the other axle.
Wheel wrench�
On wheel to be changed, loosen but do
not yet remove the wheel bolts (ap-
proximately one full turn with wrench).
Warning!
G
The jack is designed exclusively for jacking
up the vehicle under the axle housing. To
help avoid personal injury, use the jack only
to lift the vehicle during a wheel change.
Never get beneath the vehicle while it is sup-
ported by the jack. Keep hands and feet
away from the area under the lifted vehicle.
Always firmly set parking brake and block
wheels before raising vehicle with jack.
Do not disengage parking brake while the
vehicle is raised. Be certain that the jack is
always vertical (plumb line) when in use, es-
pecially on hills. Always try to use the jack
on level surface. Make sure the jack is posi-
tioned correctly under the axle housing. Al-
ways lower the vehicle onto sufficient
capacity jackstands before working under
the vehicle.
If the vehicle is not raised as described, it
could slip off the jack as a result of vibra-
tions (e.g. opening or closing a door or the
tailgate).
Page 352 of 416

352 Practical hintsBatteryHave the battery removed at a
Mercedes-Benz Light Truck Center.
If you charge the battery yourself, make
sure to comply with the operating instruc-
tions for your battery charger.
Disconnecting the battery�
Read and observe safety instructions
and precautions (
�page 351).
�
Turn off all electrical consumers.
�
Disconnect the battery negative lead.
�
Remove the cover from the positive ter-
minal.
�
Disconnect the battery positive lead.
�
Remove the breather hose from the
battery.
!Have the battery checked regularly by
an authorized Mercedes-Benz Light
Truck Center.
Refer to Maintenance Booklet for main-
tenance intervals or contact an autho-
rized Mercedes-Benz Light Truck
Center for further information.
!Never loosen or detach battery termi-
nal clamps while the engine is running
or the SmartKey is in the starter switch.
Otherwise the alternator and other
electronic components could be se-
verely damaged.
Warning!
G
With a disconnected battery�
you will no longer be able to turn the
SmartKey in the starter switch
�
the gear selector lever will remain
locked in position
P
Page 353 of 416
353 Practical hints
Battery
Reconnecting the battery�
Turn off all electrical consumers.
�
Connect the positive lead and fasten its
cover.
�
Connect the negative lead.
�
Install the breather hose.!Never invert the terminal connections.!The battery, its filler caps and the vent
tube must always be securely installed
when the vehicle is in operation.
iThe following procedures must be car-
ried out following any interruption of
battery power (e.g. due to reconnec-
tion):�
Set the clock (see COMAND
operator’s manual).
�
Resynchronize the front seat head
restraints and seat adjustment fore,
aft (
�page 102).
�
Synchronize the ESP (
�page 300).
Page 356 of 416

356 Practical hintsTowing the vehicleMercedes-Benz recommends that the vehi-
cle be transported with all wheels off the
ground using flatbed or appropriate wheel
lift/dolly equipment. This method is pref-
erable to other types of towing.
When circumstances do not permit the
recommended towing methods, the vehi-
cle may be towed with all wheels on the ground only so far as necessary to have the
vehicle moved to a safe location where the
recommended towing methods can be em-
ployed.
!Use flatbed or wheel lift/dolly equip-
ment, with SmartKey in starter switch
turned to position0.
Do not tow with sling-type equipment.
Towing with sling-type equipment over
bumpy roads will damage radiator and
supports.
To prevent damage during transport,
do not tie down vehicle by its chassis or
suspension parts. Use the towing eyes.
Switch off the ESP (
�page 86),
tow-away alarm (
�page 89) and the
automatic central locking
(
�page 141).
!When towing the vehicle with all wheels
on the ground, the gear selector lever
must be in position N and the
SmartKey must be in starter switch
position2.
When towing the vehicle with all wheels
on the ground, the vehicle may be
towed only for distances up to 30 miles
(50 km) and at a speed not to exceed
30 mph (50 km/h).
If the vehicle is towed with one axle
raised (observe instructions regarding
flexible drive shaft and propeller
shafts), the engine must be shut off
(SmartKey in starter switch position1).
Otherwise, the 4-ETS may become en-
gaged which may cause loss of towing
control.
!Do not tow-start the vehicle.Warning!
G
Prior to towing the vehicle with all wheels on
the ground, make sure the SmartKey is in
starter switch position2.
If the SmartKey is left in the starter switch
position0 for an extended period of time, it
can no longer be turned in the switch. In this
case, the steering is locked. To unlock, re-
move SmartKey from starter switch and re-
insert.
Always tow with a tow bar if:�
the engine will not run
�
there is a malfunction in the power sup-
ply or in the vehicle’s electrical system
as that will be necessary to adequately con-
trol the towed vehicle.