259 Operation
Tires and wheels
Checking tire inflation pressure
Regularly check your tire inflation pressure
at least once a month.
Check and adjust the tire inflation
pressure when the tires are cold. The tires
can be considered cold if the vehicle has
been parked for at least three hours or
driven less than one mile (1.6 km).
If you check the tire inflation pressure
when the tires are warm (the vehicle has
been driven for several miles or sitting less
than three hours), the reading will be
approximately 4 psi (0.3 bar) higher than
the cold reading. This is normal. Do not let
air out to match the specified cold tire in-
flation pressure. Otherwise, the tire will be
underinflated.
Follow the steps below to achieve correct
tire inflation pressure:�
Remove the cap from the valve on one
tire.
�
Firmly press a tire gauge onto the
valve.
�
Read tire inflation pressure on tire
gauge and check against the recom-
mended tire inflation pressure on the
placard on the driver’s door B-pillar
(�page 257). If necessary, add air to
achieve the recommended tire inflation
pressure.
�
Install the valve cap.
�
Repeat this procedure for each tire.iIf you have overfilled the tire, release
tire inflation pressure by pushing the
metal stem of the valve with e.g. a tip of
a pen. Then recheck the tire inflation
pressure with the tire gauge.iThe recommended tire inflation pres-
sures for your vehicle can be found on
the tire placard located on the driver’s
door B-pillar. The tire inflation pres-
sures are not listed in the Operator’s
Manual.
Warning!
G
Follow recommended tire inflation
pressures.
Do not underinflate tires. Underinflated tires
wear excessively and / or unevenly,
adversely affect handling and fuel economy,
and are more likely to fail from being over-
heated.
Do not overinflate tires. Overinflated tires
can adversely affect handling and ride
comfort, wear unevenly, increase stopping
distance, and result in sudden deflation
(blowout) because they are more likely to
become punctured or damaged by road
debris, potholes etc.
Do not overload the tires by exceeding the
specified load limit as indicated on the plac-
ard on the driver’s door B-pillar. Overloading
the tires can overheat them, possibly caus-
ing a blowout.
326 Practical hintsUnlocking/locking in an emergency�
Press lock cylinder2 and pull on tail-
gate handle3.
�
Open the tailgate to the side.
Locking the vehicle
If you are unable to lock the vehicle with
the SmartKey, lock it with the mechanical
key as follows:�
Close the passenger doors and the tail-
gate.
�
Press the central locking switch in the
cockpit (
�page 99).
�
Check to see whether the locking
knobs on the passenger doors are still
visible. If necessary, push them down
manually.
�
Slide the mechanical key2 out of the
SmartKey.
�
Lock the driver’s door with the me-
chanical key.
�
Check if the tailgate is locked. If neces-
sary lock the tailgate with the mechan-
ical key.
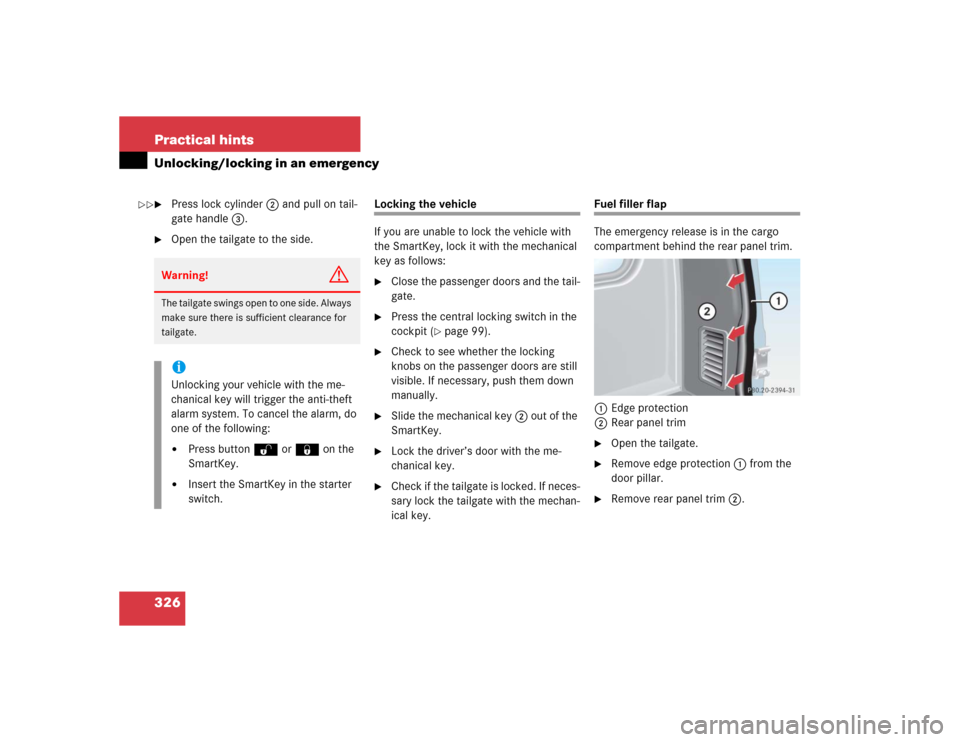
Fuel filler flap
The emergency release is in the cargo
compartment behind the rear panel trim.
1Edge protection
2Rear panel trim�
Open the tailgate.
�
Remove edge protection1 from the
door pillar.
�
Remove rear panel trim2.
Warning!
G
The tailgate swings open to one side. Always
make sure there is sufficient clearance for
tailgate.iUnlocking your vehicle with the me-
chanical key will trigger the anti-theft
alarm system. To cancel the alarm, do
one of the following:�
Press button Œ or ‹ on the
SmartKey.
�
Insert the SmartKey in the starter
switch.
��