Page 219 of 498

217 Controls in detail
Audio system
Manual tuning�
Select desired waveband.
�
Press S or Tbutton for approx.
three seconds.
�
Press button repeatedly until desired
frequency has been reached.
Step-by-step station tuning takes place
in ascending or descending order. Each
time the button is pressed, the radio
tunes further by 0.2 MHz. During man-
ual tuning, the radio is muted.Automatic seek tuning
�
Select desired waveband.
�
Press S or T button briefly.
The radio will tune to the next highest
or next lowest receivable frequency.Scan search
�
Starting scan search�
Select desired waveband.
�
Press
SC soft key.
SC will appear in the display. The
radio briefly tunes in all receivable
stations on the waveband selected.
iYou can only enter frequencies within
the respective waveband.
If a button is not pressed within
four seconds, the radio will return to
the last station tuned.
iIf no station is received after two
consecutive scans of the complete
frequency range, then the scan stops
at the frequency from which it began.
Page 224 of 498

222 Controls in detailAudio systemThe first channel 001 is called up and the
PTY system changes to All categories.
If no station can be received,
ACQUIRING
appears in the display.
If the Satellite radio service is not
activated,
ACQUIRING
will also appear in the
radio display and
NO SAT
will appear in the
multifunction display.Selecting a station
The following options are available:
�
Selecting a station using the selected
category (
�page 223),
�
Tuning via station presets
(�page 222),
�
Tuning via scan search (
�page 224).
�
Tuning via manual channel input
(�page 222).
�
Tuning via the program category list
(�page 223).
Tuning via station presets
Ten satellite radio station presets are avail-
able.
You can access the presets via number
keys.Accessing via number keys
�
Enter number of preset you wish to se-
lect, e.g. 1.
The radio plays the station stored un-
der this number and the PTY function
changes to the category corresponding
to the station.
Tuning via manual channel input
Example: tuning in channel 16
iThe system will tune to a default sta-
tion if no station had been selected pre-
viously.
Page 231 of 498
229 Controls in detail
Audio system
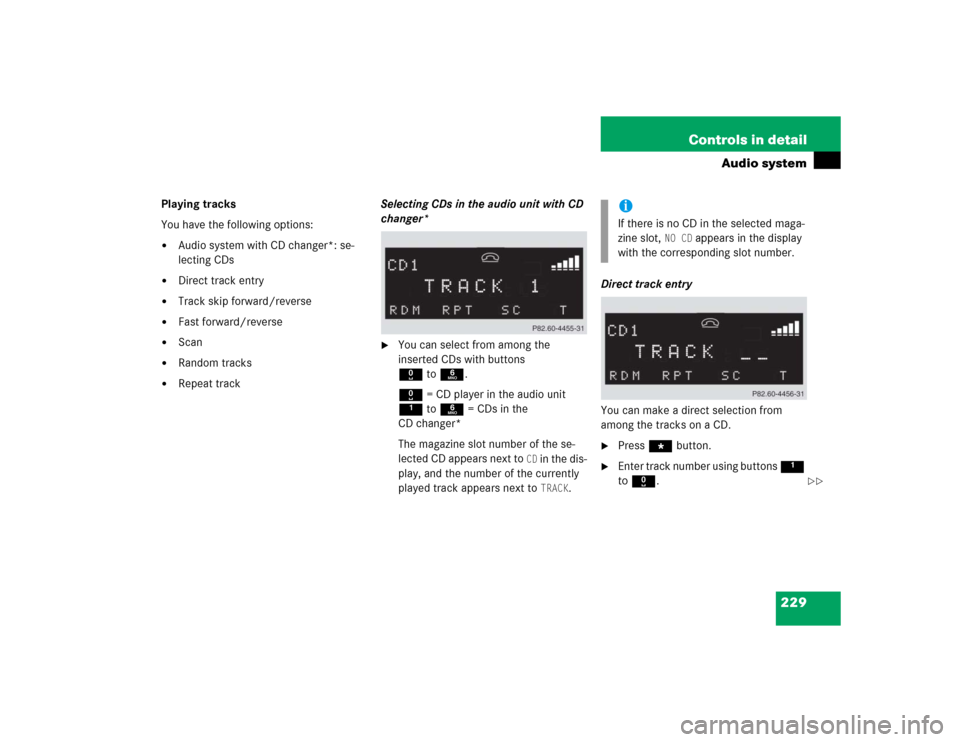
Playing tracks
You have the following options:�
Audio system with CD changer*: se-
lecting CDs
�
Direct track entry
�
Track skip forward/reverse
�
Fast forward/reverse
�
Scan
�
Random tracks
�
Repeat trackSelecting CDs in the audio unit with CD
changer*
�
You can select from among the
inserted CDs with buttons
Rto6.
R = CD player in the audio unit
1to6 = CDs in the
CD changer*
The magazine slot number of the se-
lected CD appears next to
CD in the dis-
play, and the number of the currently
played track appears next to TRACK
.Direct track entry
You can make a direct selection from
among the tracks on a CD.
�
Press * button.
�
Enter track number using buttons 1
to R.iIf there is no CD in the selected maga-
zine slot,
NO CD
appears in the display
with the corresponding slot number.
��
Page 237 of 498

235 Controls in detail
Audio system
�
Press button ‚ or ƒ repeat-
edly until desired entry has been
reached.
The stored entries are selected in
alphabetical order with the sub-en-
tries.
�
When you have selected a number,
press s button.
The call will be made.
�
Viewing the telephone number of a
telephone book entry�
Search for desired entry.
�
Press
NUM
soft key.
The telephone number of the phone
book entry appears in the display.
�
Returning calls received
�
Press
MEM
soft key or press ‚ or
ƒ.
�
Press
RCV
soft key (received calls).
The number of received calls and
then the call last received appear
briefly in the display.
�
Select desired telephone number
with button ‚ or ƒ.
The letter
R and the number of the
memory position appear in the up-
per left-hand corner of the display.
The numbers are stored in the order
of the calls received.
�
When you have selected a number,
press s button.
The call will be made.
iSeveral sub-entries can be stored for
each main entry (name). These entries
are marked by a corresponding abbre-
viation that appears in the upper
left-hand corner of the display. The fol-
lowing abbreviations for sub-entries
are possible:
CEL = Mobile phone
HOM = Home
WOR = Work
FAX = Fax
PAG = Pager
TEL = Main
Page 243 of 498

241 Controls in detail
Audio system
�
Press button ‚ or ƒ repeat-
edly until desired entry has been
reached.
The stored entries are selected in
alphabetical order with the sub-en-
tries.
�
When you have selected a number,
press s button.
The call will be made.
�
Viewing the telephone number of a
phone book entry�
Search for desired entry.
�
Press
NUM
soft key.
The telephone number of the phone
book entry appears in the display.
�
Returning calls received
�
Press
MEM
soft key or press ‚ or
ƒ.
�
Press
RCV
soft key (received calls).
The number of received calls and
then the call last received appear
briefly in the display.
�
Select desired telephone number
with button ‚ or ƒ.
The letter
R and the number of the
memory position appear in the up-
per left-hand corner of the display.
The numbers are stored in the order
of the calls received.
�
When you have selected a number,
press s button.
The call will be made.
iSeveral sub-entries can be stored for
each main entry (name). These entries
are marked by a corresponding abbre-
viation that appears in the upper
left-hand corner of the display. The fol-
lowing abbreviations for sub-entries
are possible:
CEL = Mobile phone
HOM = Home
WOR = Work
FAX = Fax
PAG = Pager
TEL = Main
Page 247 of 498

245 Controls in detail
Audio system
Emergency calls “911”
The following describes how to dial a “911”
emergency call using the audio system
head unit when a Mercedes-Benz specified
mobile phone* is inserted in the phone
cradle*. Unless otherwise specified, the
descriptions refer to the audio system
head unit.
Consult the separate telephone operating
instructions that came with your mobile
phone* for information on how to place a
“911” emergency call on the mobile
phone*. The following conditions must be met for a
“911” emergency call:
�
Telephone must be switched on.
�
The corresponding mobile communica-
tions network must be available.
If you cannot make an emergency call, you
will have to initiate rescue measures your-
self. GSM network phones
Placing a “911” emergency call using
audio head unit with the phone locked
�
Press hbutton to switch to tele-
phone operation. PIN?
appears in the audio display.
�
Enter 911 using the number keypad on
the audio head unit.
�
Press
OK soft key or sbutton for
dialing to begin.
DIALING
appears in the audio display
while the telephone establishes the
connection.
�
Wait until the emergency call center
answers, then describe the emergency.
Warning!
G
The “911” emergency call system is a public
service. Using it without due cause is a crim-
inal offense.
iEmergency calls may not be possible
with all telephone networks or if certain
network services and/or telephone
functions are active. Check with your
local service providers.
Page 249 of 498

247 Controls in detail
Power windows
�Power windows
Opening and closing the windows
The side windows are opened and closed
electrically. The switches for all the side
windows are on the driver’s door. The
switches for the respective windows are
on the front passenger door and the rear
side trim panels.
1Left front window
2Right front window
3Right rear window
4Left rear window
5Rear window override switch
(
�page 82)
Warning!
G
When closing the windows, make sure there
is no danger of anyone being harmed by the
closing procedure.
The closing of the door windows can be im-
mediately halted by releasing the switch or,
if switch was pulled past the resistance
point and released, by either pressing or
pulling the respective switch.
The closing of the rear side windows can be
immediately halted by releasing the switch.
The door windows are equipped with the ex-
press-close and automatic reversal func-
tion. If a door window encounters an
obstruction that blocks its path in a circum-
stance where you pulled the switch past the
resistance point and released it to close the
window, the automatic reversal function will
stop the window and open it slightly.
If a door window encounters an obstruction
that blocks its path in a circumstance where
you are closing the window by pulling and
holding the switch, by pressing and holding
button
‹
on the SmartKey, or by press-
ing and holding the lock button
(vehicles with KEYLESS-GO*) on the door
handle, the automatic reversal function will
not operate.
When leaving the vehicle, always remove the
SmartKey or SmartKey with KEYLESS-GO*
from the starter switch, take it with you, and
lock the vehicle. Do not leave children unat-
tended in the vehicle, or with access to an
unlocked vehicle. Unsupervised use of vehi-
cle equipment can cause an accident
and/or serious personal injury.
Page 250 of 498
.Opening the windows
�
Press switch1 to4 to the resistance
point.
The corresponding window will move
downwards until you release th")
248 Controls in detailPower windows�
Switch on ignition (
�page 36).Opening the windows
�
Press switch1 to4 to the resistance
point.
The corresponding window will move
downwards until you release the
switch.
Closing the windows
�
Pull on switch1 to4 to the
resistance point.
The corresponding window will move
upwards until you release the switch.Fully opening the door windows
(Express-open)
�
Press switch1 or2 past the
resistance point and release.
The corresponding window opens
completely.
Fully closing the door windows
(Express-close)
�
Pull switch1 or2 past the
resistance point and release.
The corresponding window closes
completely.
iYou can also open or close the win-
dows using the:�
SmartKey (summer opening/con-
venience feature) (
�page 249)
�
button, in the control panel of
the climate control (
�page 185) or
automatic climate control
(
�page 195).
�
buttone in the control panel of
the automatic climate control
(�page 195).
Warning!
G
If you pull and hold the switch up when
closing the window, and upward movement
of the window is blocked by some obstruc-
tion including but not limited to arms, hands,
fingers, etc., the automatic reversal will not
operate.