Page 129 of 498

127 Controls in detail
Lighting
USA only
By default, the daytime running lamp mode
is deactivated. Activate the daytime run-
ning lamp mode using the control system,
see “Setting daytime running lamp mode
(USA only)” (
�page 155).
When the engine is running, and you turn
the exterior lamp switch to positionC
orB, the manual headlamp mode has
priority over the daytime running lamp
mode.
The corresponding exterior lamps switch
on (
�page 124).Locator lighting and night security
illumination
The locator lighting and the night security
illumination are described in the “Control
system” section, see “Setting locator light-
ing” (
�page 156) and “Setting night secu-
rity illumination” (
�page 156).Fog lamps
Warning!
G
In low ambient lighting or foggy conditions,
only switch from position U to B with
the vehicle at a standstill. Switching
fromU to B will briefly switch off the
headlamps. Doing so while driving in low
ambient lighting conditions may result in an
accident.iFog lamps will operate with the parking
lamps and/or the low beam headlamps
on. Fog lamps should only be used in
conjunction with low beam headlamps.
Consult your State or Province Motor
Vehicle Regulations regarding permis-
sible lamp operation.
Page 130 of 498
128 Controls in detailLighting
Front fog lamps�
Switch on the low beam headlamps
(�page 50).
�
Pull out the exterior lamp switch to first
stop.
The front fog lamps switch on.
The green indicator lamp‡ in the
exterior lamp switch comes on
(�page 124).
�
Push in the exterior lamp switch.
The front fog lamps switch off.
The green indicator lamp‡ in the
exterior lamp switch goes out.Rear fog lamp (driver’s side only)
�
Switch on the front fog lamps
(�page 128).
�
Pull out the exterior lamp switch to
second stop.
The rear fog lamp switches on.
The yellow indicator lamp† in the
exterior lamp switch comes on
(�page 124).
�
Push in the exterior lamp switch to first
stop.
The rear fog lamp switches off.
The yellow indicator lamp† in the
exterior lamp switch goes out.
The front fog lamps remain lit.
iFog lamps cannot be switched on with
the exterior lamp switch in
positionU. For switching on the fog
lamps, turn the exterior lamp switch to
positionB first.
Page 157 of 498
�
Move the selection marker with
buttonæ orç to the
Lighting
submenu.
�
Press buttonj ork repeatedly
until the")
155 Controls in detail
Control system
Setting daytime running lamp mode
(USA only)�
Move the selection marker with
buttonæ orç to the
Lighting
submenu.
�
Press buttonj ork repeatedly
until the message
Lamp circuit
headlamp
appears in the multifunction
display.
The selection marker is on the current
setting.
�
Pressæ orç to select manual
operation (
manual
) or daytime running
lamp mode (
constant
) activated.
With daytime running lamp mode activated
and the exterior lamp switch in
positionM or U the low beam
headlamps are switched on when the
engine is running.
In low ambient light conditions the
following lamps will switch on additionally:
�
Parking lamps
�
Tail lamps
�
License plate lamps
�
Side marker lamps
For more information on the daytime run-
ning lamp mode, see “Lighting”
(
�page 124).
iThis function is not available in
countries where the daytime running
lamp mode is mandatory and therefore
in a constant mode.
iIf you turn the exterior lamp switch to
another position, the corresponding
lamp(s) will switch on.
For safety reasons, resetting the Lighting
submenu to factory settings
(
�page 147) while driving will not
deactivate the daytime running lamp
mode.
The following message appears in the
multifunction display:
Lighting – Cannot be completely
reset to factory settings while
driving
.
Page 365 of 498
363 Practical hints
What to do if …?
On the pages that follow, you will find a
compilation of the most important warning
and malfunction messages that may
appear in the display.
For your convenience the messages are
divided into two sections:�
Text messages (
�page 364)
�
Symbol messages (
�page 373)
iSwitching on the ignition causes all
instrument cluster lamps (except low
beam headlamp indicator lamp, high
beam headlamp indicator lamp, and
turn signal indicator lamps unless acti-
vated) as well as the multifunction dis-
play to come on. Make sure the lamps
and the multifunction display are in
working order before starting your jour-
ney.
Page 385 of 498

383 Practical hints
What to do if …?
Display symbol
Display message
Possible cause
Possible solution
.
High beam, left
The left high beam lamp is malfunction-
ing.
�
Replace the bulb as soon as possible.
High beam, right
The right high beam lamp is malfunction-
ing.
�
Replace the bulb as soon as possible.
Lamp sensor
Drive to workshop
The lamp sensor is malfunctioning. The
headlamps switch on automatically.
�
In the control system, set lamp opera-
tion to manual (
�page 155).
�
Switch on headlamps using the exteri-
or lamp switch.
�
Visit an authorized Mercedes-Benz
Center as soon as possible.
License plate lamp,
left
The left license plate lamp is malfunction-
ing.
�
Replace the bulb as soon as possible.
License plate lamp,
right
The right license plate lamp is malfunc-
tioning.
�
Replace the bulb as soon as possible.
Low beam, left
The left low beam lamp is malfunctioning.
Halogen headlamp:�
Replace the bulb as soon as possible.
Bi-Xenon* headlamp:
�
Visit an authorized Mercedes-Benz
Center as soon as possible.
Page 386 of 498

384 Practical hintsWhat to do if …?Display symbol
Display message
Possible cause
Possible solution
.
Low beam, right
The right low beam lamp is malfunction-
ing.
Halogen headlamp:�
Replace the bulb as soon as possible.
Bi-Xenon* headlamp:
�
Visit an authorized Mercedes-Benz
Center as soon as possible.
Parking lamp
front left
The left front parking lamp is
malfunctioning.
�
Visit an authorized Mercedes-Benz
Center as soon as possible.
Parking lamp
front right
The right front parking lamp is
malfunctioning.
�
Visit an authorized Mercedes-Benz
Center as soon as possible.
Rear foglamp
back-up lamp on
The foglamp is malfunctioning. A back-up
bulb is being used.
�
Visit an authorized Mercedes-Benz
Center as soon as possible.
Reverse lamp, left
The left backup lamp is malfunctioning.
�
Replace the bulb as soon as possible.
Reverse lamp, right
The right backup lamp is malfunctioning.
�
Replace the bulb as soon as possible.
Side marker lamp
front left
The front left side marker lamp is malfunc-
tioning.
�
Replace the bulb as soon as possible.
Side marker lamp
front right
The front right side marker lamp is mal-
functioning.
�
Replace the bulb as soon as possible.
Tail lamp left
back-up lamp on
The left tail lamp is malfunctioning. A
back-up bulb is being used.
�
Visit an authorized Mercedes-Benz
Center as soon as possible.
Page 406 of 498

404 Practical hintsReplacing bulbsSafe vehicle operation depends on proper
exterior lighting and signaling. It is there-
fore essential that all bulbs and lamp
assemblies are in good working order at all
times.
Correct headlamp adjustment is extremely
important. Have headlamps checked and
readjusted at regular intervals and when a
bulb has been replaced. See an authorized
Mercedes-Benz Center for headlamp ad-
justment.
Bulbs Front lamps
iIf the headlamps or front fog lamps are
fogged up on the inside as a result of
high humidity, driving the vehicle a
distance with the lights on should clear
up the fogging.iBack-up bulbs will be brought into use
when lamps malfunction. Observe the
messages in the multifunction display
(�page 382).
Lamp
Type
1
Additional turn signal
lamps
LED
2
Turn signal lamp
1156 NA
3
Halogen headlamp:
Low beam
Bi-Xenon* headlamp:
Low and high beam
1
1Vehicles with Bi-Xenon headlamps* do not replace
the Bi-Xenon bulbs yourself.
H7 (55 W)
D2S-35 W
4
Halogen headlamp:
High beam/high beam
flasher
Bi-Xenon* headlamp:
High beam flasher
H7 (55 W)
H7 (55 W)
Parking and standing
lamps
W 5 W
5
Fog lamp
HB4 (51 W)
Cornering fog lamp*
H7 (55 W)
6
Side marker lamp
W 5 W
Page 408 of 498
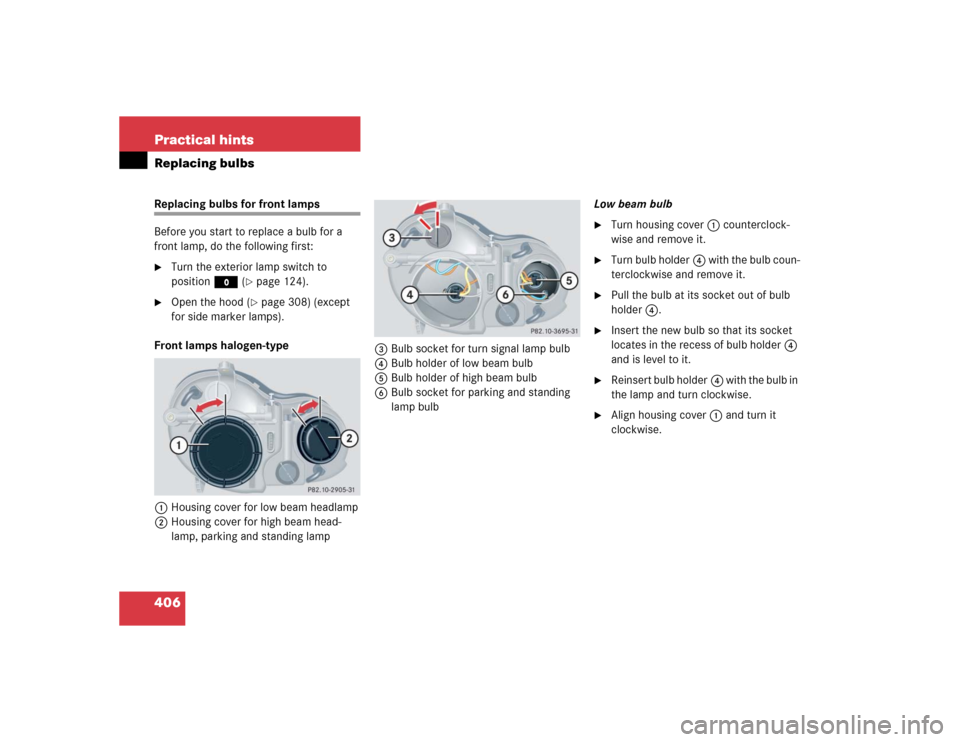
406 Practical hintsReplacing bulbsReplacing bulbs for front lamps
Before you start to replace a bulb for a
front lamp, do the following first:�
Turn the exterior lamp switch to
positionM (
�page 124).
�
Open the hood (
�page 308) (except
for side marker lamps).
Front lamps halogen-type
1Housing cover for low beam headlamp
2Housing cover for high beam head-
lamp, parking and standing lamp3Bulb socket for turn signal lamp bulb
4Bulb holder of low beam bulb
5Bulb holder of high beam bulb
6Bulb socket for parking and standing
lamp bulbLow beam bulb
�
Turn housing cover1 counterclock-
wise and remove it.
�
Turn bulb holder4 with the bulb coun-
terclockwise and remove it.
�
Pull the bulb at its socket out of bulb
holder4.
�
Insert the new bulb so that its socket
locates in the recess of bulb holder4
and is level to it.
�
Reinsert bulb holder4 with the bulb in
the lamp and turn clockwise.
�
Align housing cover1 and turn it
clockwise.