Page 211 of 498
209 Controls in detail
Audio system
Item
Page
1
CD changer mode selector
AUX mode selector
225
215
2
Single CD mode selector
227
3
Radio mode selector
4
Mute function (radio)
219
Pause (CD)
231
5
Volume distribution
213
6
Sound settings
211
7
Display
8
Alphanumeric keypad
Item
Page
9
Speed dialing memory
(telephone) in descending
order
a
Accepting a call
(telephone)
237
b
Telephone mode selector
232
c
Speed dialing memory
(telephone) in ascending
order
233
d
Terminating a call
(telephone)
237
e
CD slot
f
CD ejection
227
Item
Page
g
Soft keys
210
h
Volume
211
j
Switching on/off
210
k
Manual tuning / seek
tuning (radio)
217
Track search, reverse (CD)
230
l
Manual tuning / seek
tuning (radio)
217
Track search,
fast forward (CD)
230
Page 214 of 498

212 Controls in detailAudio systemAdjusting treble�
Press O button repeatedly until TREBLE
appears in the display.
�
Press
+ or
– soft key to increase or de-
crease tone level accordingly.
or
�
Press
RES
soft key briefly to reset treble
tones to their center level.
The radio switches back to the stan-
dard radio menu eight seconds after
the last soft key is pressed.Sound system*
You can either program the sound settings
manually (
�page 211) or choose settings
via preset sound characteristics.
You can select from among the following
settings:
�
STANDARD
: conventional stereo sound.
�
SURROUND
: the sound is set for better
three-dimensional acoustic character-
istics.
�
SPEECH
: the sound is optimized for the
spoken word.
�
Press O button repeatedly until STANDARD
, SURROUND
or
SPEECH
appears
in the display.
�
Press X or Y soft key repeatedly
until the desired sound setting has
been reached.
The sound is set accordingly.
or
�
Press
RES
soft key briefly.The sound setting is reset depending
on the sound source activated.
�
Radio mode:
STANDARD
�
CD/AUX mode:
SURROUND
�
Telephone:
SPEECH
The radio switches back to the stan-
dard radio menu eight seconds after
the last soft key is pressed.
Page 215 of 498

213 Controls in detail
Audio system
Returning sound functions to factory
settings�
Press O button to call up settings
menu in the display.
�
Press
RES
soft key briefly; the respec-
tive sound function is reset to its center
level.
or
�
Press and hold
RES
soft key until
RESET
appears in the display.
The sound settings for bass and treble
are returned to their center level and
the volume is set to a predefined level.Vehicles with sound system*:
The sound setting is reset depending
on the sound source activated.
�
Radio mode:
STANDARD
�
CD/AUX mode:
SURROUND
�
Telephone:
SPEECH
The radio switches back to the stan-
dard radio menu four seconds after the
last soft key is pressed.
Adjusting volume distribution
Call up fader and balance functions by
pressing the P button.
Fader
�
Press P button repeatedly until FADER
appears in the display.
�
Press V or W soft key.
The volume is distributed accordingly
between the front and rear of the vehi-
cle.
or
�
Press
RES
soft key briefly.
The fader is reset to its center level.
The radio switches back to the stan-
dard radio menu eight seconds after
the last soft key is pressed.
Page 217 of 498
 to the radio*
An optional dealer-installed cinch-connec-
tor* for connecting an external audio
source may become availab")
215 Controls in detail
Audio system
Connecting an external audio source
(AUX) to the radio*
An optional dealer-installed cinch-connec-
tor* for connecting an external audio
source may become available for your ve-
hicle model. Feature description is based
on preliminary information at time of print-
ing. Contact an authorized Mercedes-Benz
Center for availability.
You can adjust the volume (
�page 211),
the sound settings (
�page 211) and the
volume distribution (�page 213) for the
AUX input.
Calling up AUX mode
�
Press and hold Q button until AUX
appears in the display.
Canceling AUX mode
�
Press any audio source button.
Radio operation
Selecting radio mode�
Press b button.
Calling up wavebands
You can choose from among the FM, AM
and WB wavebands.
Weather band (
�page 219).Calling up wavebands for radios without
SAT*
�
Press
FM or
AM soft key to switch be-
tween FM and AM.
The FM and AM wavebands are called
up one after another.
or
�
Press
WB soft key.
The weather band menu is called up.
The waveband currently selected
appears in the upper left-hand corner
of the display.
iFM waveband: 87.7......107.9 MHz
AM waveband: 530......1 710 KHz
Page 280 of 498
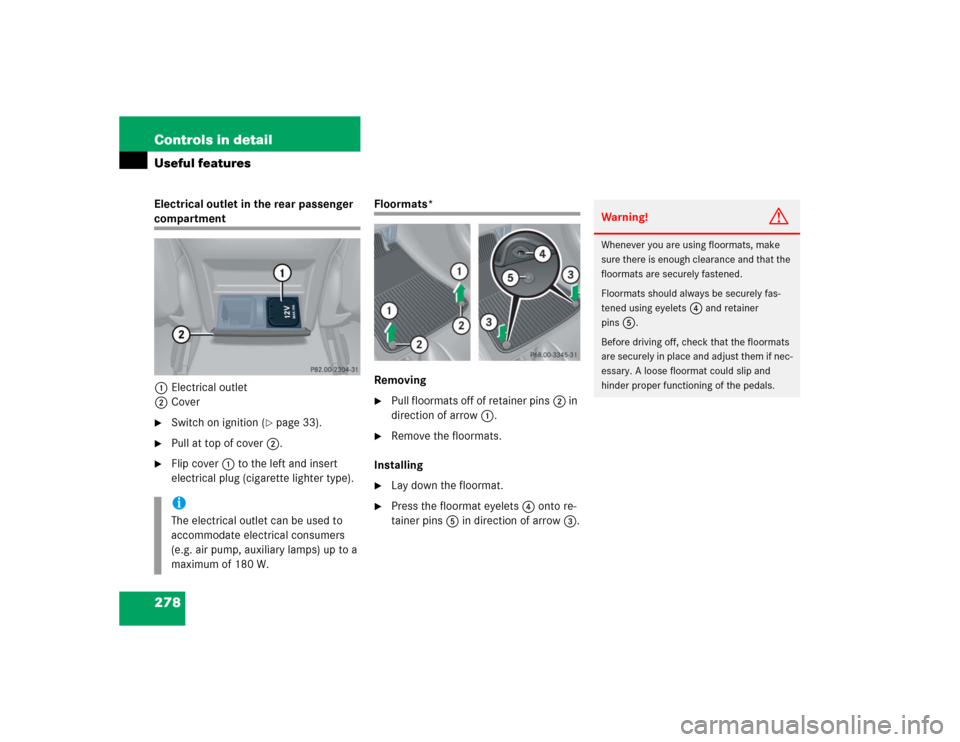
278 Controls in detailUseful featuresElectrical outlet in the rear passenger compartment
1Electrical outlet
2Cover�
Switch on ignition (
�page 33).
�
Pull at top of cover2.
�
Flip cover1 to the left and insert
electrical plug (cigarette lighter type).
Floormats*
Removing�
Pull floormats off of retainer pins2 in
direction of arrow1.
�
Remove the floormats.
Installing
�
Lay down the floormat.
�
Press the floormat eyelets4 onto re-
tainer pins5 in direction of arrow3.
iThe electrical outlet can be used to
accommodate electrical consumers
(e.g. air pump, auxiliary lamps) up to a
maximum of 180 W.
Warning!
G
Whenever you are using floormats, make
sure there is enough clearance and that the
floormats are securely fastened.
Floormats should always be securely fas-
tened using eyelets
4
and retainer
pins
5
.
Before driving off, check that the floormats
are securely in place and adjust them if nec-
essary. A loose floormat could slip and
hinder proper functioning of the pedals.
Page 304 of 498

302 OperationDriving instructionsStanding water
Passenger compartmentDriving abroad
Abroad, there is an extensive
Mercedes-Benz service network at your
disposal. If you plan to drive into areas
which are not listed in the index of your
Mercedes-Benz Center directory, you
should request pertinent information from
an authorized Mercedes-Benz Center.Control and operation of radio trans-
mitters
COMAND*, radio and telephone*
!Do not drive through flooded areas or
water of unknown depth. Before driving
through water, determine its depth.
Never accelerate before driving into
water. The bow wave could force water
into the engine and auxiliary equip-
ment, thus damaging them.
If you must drive through standing wa-
ter, drive slowly to prevent water from
entering the passenger compartment
or the engine compartment. Water in
these areas could cause damage to
electrical components or wiring of the
engine or transmission, or could result
in water being ingested by the engine
through the air intake, causing severe
internal engine damage. Any such dam-
age is not covered by the
Mercedes-Benz Limited Warranty.
Warning!
G
Always fasten items being carried as
securely as possible.
In an accident, during hard braking or sud-
den maneuvers, loose items will be thrown
around inside the vehicle, and cause injury
to vehicle occupants unless the items are
securely fastened in the vehicle.
The trunk is the preferred place to carry
objects.
Warning!
G
Please do not forget that your primary re-
sponsibility is to drive the vehicle safely.
Only operate the COMAND (Cockpit Man-
agement and Data System), radio or tele-
phone
1 if road, weather and traffic
conditions permit.
Bear in mind that at a speed of just 30 mph
(approximately 50 km/h), your vehicle is
covering a distance of 44 feet
(approximately 14 m) every second.
1Observe all legal requirements.
Page 432 of 498
430 Practical hintsFusesAids for changing fuses
Fuse chart
The fuse chart is found in the main fuse
box in the passenger compartment
(�page 430). The amperages of the fuses
are also given there.
Spare fuses
Spare fuses are found in the vehicle tool kit
in the spare wheel well (
�page 390).
Fuse extractor
The fuse extractor is located in the cover of
the auxiliary fuse box in the trunk
(
�page 432).Main fuse box in passenger
compartment
The main fuse box is located in the passen-
ger compartment on the driver’s side of
the cockpit.
1Main fuse box coverOpening
�
Open the driver’s door.
�
Pull fuse box cover1 open with a
screw driver or similar tool (see arrow).
�
Remove fuse box cover1 rearward.
Closing
�
Attach fuse box cover1 in the front.
�
Fold fuse box cover1 in until it engag-
es.
Page 465 of 498
 158
Automatic climate control 194
Activating 195
Adjusting air distribution 198
Air rec")
463 Index
Auto-dimming rear view mirrors 178
Automatic central locking
Activating/deactivating
(control system) 158
Automatic climate control 194
Activating 195
Adjusting air distribution 198
Air recirculation mode 201
Deactivating 195
Defrosting 200
Rear window defroster 183
Setting the temperature 197
Automatic headlamp mode 125
Automatic lighting control
Activating 132
Deactivating 132
Automatic locking when driving 110
Automatic shift program 170
Automatic time change
(Daylight Saving Time
(DST) summer/winter) 153Automatic transmission 165
Accelerator position 171
Comfort program mode 170
Emergency operation
(Limp Home Mode) 177
Fluid level 312
Gear ranges 168
Gear selector lever 165
Gear selector lever position 165, 169
Gear shifting malfunctions 177
Kickdown 171
Manual shifting 167
One-touch gearshifting 167
Program mode selector switch 170
Starting the engine 47
Transmission fluid 312
Auxiliary fuse box 432B
Backrest
Folding forward 268
Folding rearward 269
Backup lamp 405, 410
Bulbs 405
Back-up lamps
Bulbs 404
Bar 338
BAS 85, 455
Messages in display 366
Batteries, SmartKey
Check lamp 97, 102
Checking 97, 103
Replacing 402
Batteries, SmartKey with KEYLESS-GO*
Check lamp 97, 102
Checking 97, 103
Replacing 403
Battery discharged
Jump starting 423

219
Pause (CD)
231
5
Vol")