Page 394 of 498
392 Practical hintsWhere will I find...?Operational position�
Turn crank handle clockwise until it
engages (operational position).
Before storing the vehicle jack in its
compartment:
�
It should be fully collapsed.
�
The handle must be folded in (storage
position).Setting up the collapsible wheel chock
The collapsible wheel chock serves to
additionally secure the vehicle, e.g. while
changing the wheel.
1Tilt the plate upward
2Fold the lower plate outward
3Insert the plate
�
Tilt both plates upward1.
�
Fold the lower plate outward2.
�
Guide the tabs of the lower plate all the
way into the openings of the base
plate3.
Page 395 of 498

393 Practical hints
Where will I find...?
Minispare wheel (except CLK 55 AMG)
The Minispare wheel is located in the
storage compartment underneath the
trunk floor.
Removing the Minispare wheel�
Lift up trunk floor cover and engage
trunk floor handle in upper edge of
trunk.
�
Loosen the retaining screw in the mid-
dle of storage well casing by turning it
counterclockwise (
�page 389).
�
Remove the storage well casing
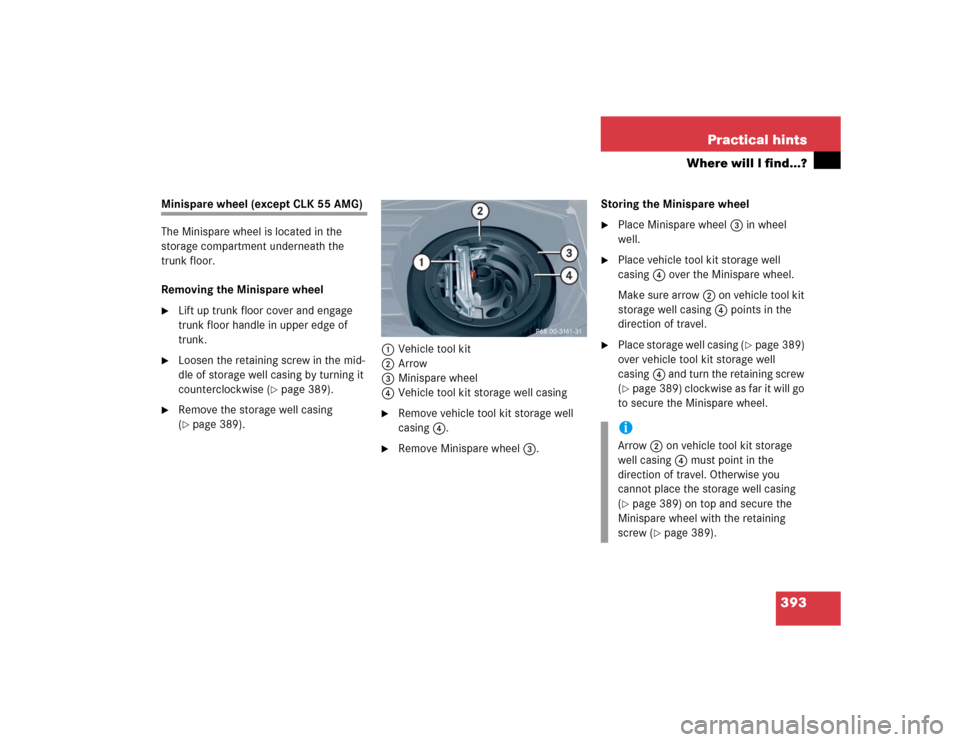
(�page 389).1Vehicle tool kit
2Arrow
3Minispare wheel
4Vehicle tool kit storage well casing
�
Remove vehicle tool kit storage well
casing4.
�
Remove Minispare wheel3.Storing the Minispare wheel
�
Place Minispare wheel3 in wheel
well.
�
Place vehicle tool kit storage well
casing4 over the Minispare wheel.
Make sure arrow2 on vehicle tool kit
storage well casing4 points in the
direction of travel.
�
Place storage well casing (
�page 389)
over vehicle tool kit storage well
casing4 and turn the retaining screw
(
�page 389) clockwise as far it will go
to secure the Minispare wheel.
iArrow2 on vehicle tool kit storage
well casing4 must point in the
direction of travel. Otherwise you
cannot place the storage well casing
(�page 389) on top and secure the
Minispare wheel with the retaining
screw (
�page 389).
Page 397 of 498

395 Practical hints
Where will I find...?
�
Loosen retaining screw3 by turning it
counterclockwise.
�
Remove collapsible tire1.
Storing the collapsible tire
If you wish to store the collapsible tire after
use, carry out the following steps.
Otherwise the collapsible tire will not fit
the storage compartment.
�
Unscrew the valve cap from the valve
of the collapsible tire.
�
Take the valve extractor from the
vehicle tool kit (
�page 391).
�
Unscrew the valve insert from the valve
and allow the air to escape.
�
Screw the valve insert back into the
valve.
�
Screw the valve cap back on the valve.
�
Pull the protective wrap provided with
the vehicle tool kit over the collapsible
tire.
�
Store the collapsible tire and the valve
extractor in the storage compartment
underneath the trunk floor.
�
Pierce the protective wrap with
retaining screw3.
�
Secure the collapsible tire by turning
retaining screw3clockwise.
!Make sure the collapsible tire is dry
when storing it.
iIt may take a few minutes for the col-
lapsible tire to deflate completely.
!To prevent damage, always disengage
trunk floor handle from upper edge of
trunk and lower trunk floor before
closing the trunk lid.Warning!
G
The dimensions of the collapsible tire are
different from those of the road wheels. As
a result, the vehicle handling characteristics
change when driving with a collapsible tire
mounted.
The collapsible tire should only be used tem-
porarily, and should be replaced with a reg-
ular road wheel as quickly as possible.
Page 399 of 498
397 Practical hints
Unlocking/locking in an emergency
�Unlocking/locking in an emergency
Unlocking the vehicle
If you are unable to unlock the vehicle with
the SmartKey or KEYLESS-GO*, open the
driver’s door and the trunk using the
mechanical key.
1Mechanical key locking tab
2Mechanical key
�
Move locking tab1 in direction of
arrow.
�
Slide mechanical key2 out of the
housing.Unlocking the driver’s door
1Unlocking
�
Insert the mechanical key into the
driver’s door lock until it stops.
�
Turn the mechanical key counterclock-
wise to position1.
The driver’s door is unlocked.
iUnlocking your vehicle with the me-
chanical key will trigger the anti-theft
alarm system. To cancel the alarm, do
one of the following:�
Press button Œ or ‹ on the
SmartKey.
�
Insert the SmartKey in the starter
switch.
Vehicles with KEYLESS-GO*
�
Pull the outside door handle.
�
Press the KEYLESS-GO* start/stop
button (
�page 35).
Page 400 of 498

398 Practical hintsUnlocking/locking in an emergencyUnlocking the trunk
A minimum height clearance of 5.71 ft
(1.74 m) is required to open the trunk lid.
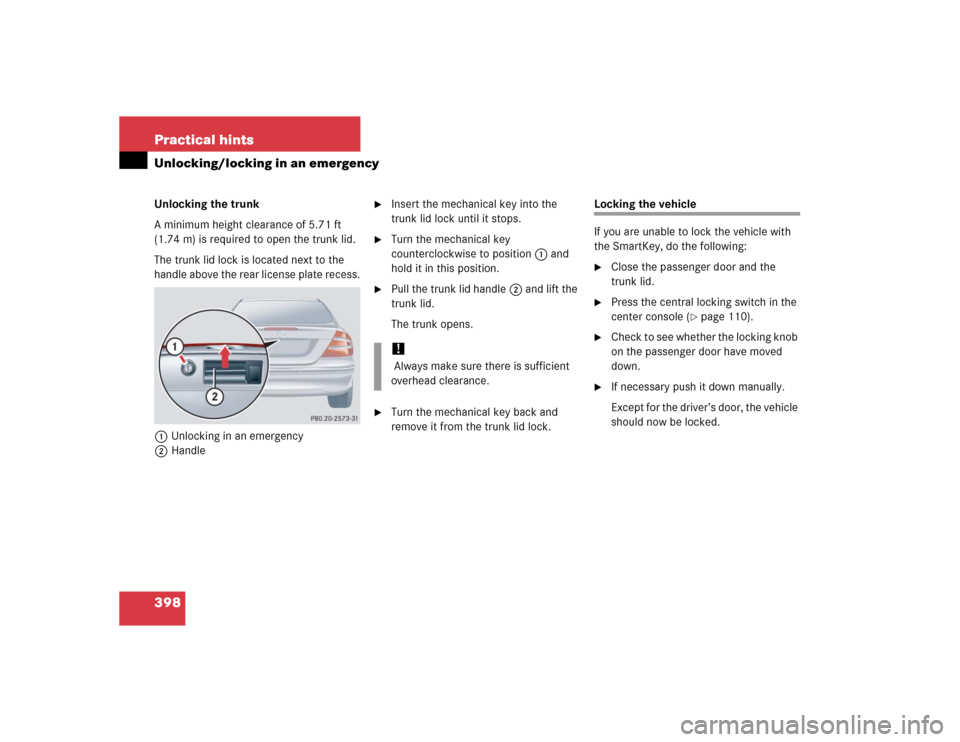
The trunk lid lock is located next to the
handle above the rear license plate recess.
1Unlocking in an emergency
2Handle
�
Insert the mechanical key into the
trunk lid lock until it stops.
�
Turn the mechanical key
counterclockwise to position1 and
hold it in this position.
�
Pull the trunk lid handle2 and lift the
trunk lid.
The trunk opens.
�
Turn the mechanical key back and
remove it from the trunk lid lock.
Locking the vehicle
If you are unable to lock the vehicle with
the SmartKey, do the following:�
Close the passenger door and the
trunk lid.
�
Press the central locking switch in the
center console (
�page 110).
�
Check to see whether the locking knob
on the passenger door have moved
down.
�
If necessary push it down manually.
Except for the driver’s door, the vehicle
should now be locked.
! Always make sure there is sufficient
overhead clearance.
Page 401 of 498
399 Practical hints
Unlocking/locking in an emergency
2Locking�
Insert the mechanical key into the
driver’s door lock until it stops.
�
Turn the mechanical key clockwise to
position2.
The driver’s door is locked.
Fuel filler flap
In case the central locking system does
not release the fuel filler flap, you can open
it manually.
The release button is on the right-hand
side of the luggage compartment behind
the side trim.
�
Open trunk lid.
�
Remove the side trim from the
right-hand side of the luggage compart-
ment.
�
Reach inside through opening2 in di-
rection of arrow.
�
Turn release knob 1 clockwise (arrow)
as far as will go.
The fuel filler flap can be opened.
�
Open the fuel filler flap from outside.
Warning!
G
If you operate the emergency release but-
ton, be careful of the sharp edges so that
you do not injure yourself.
Page 403 of 498
401 Practical hints
Opening/closing in an emergency
�Opening/closing in an emergency
Power tilt/sliding sunroof*
You can open or close the tilt/sliding
sunroof manually should an electrical
malfunction occur.
The tilt/sliding sunroof drive is located
behind the lens 1 of the interior overhead
light.�
Remove SmartKey from the starter
switch.
�
Pry off lens1 using a flat blade
screwdriver.
�
Slide both locking tabs2 in direction
of arrows.
�
Lower the rear of the cover and
remove.
�
Remove the cover.
�
Take the crank 3 out of the Operator’s
Manual pouch.
�
Insert crank3 through hole on the left
side.
�
Turn crank3 clockwise to:�
slide sunroof closed
�
raise sunroof at the rear
�
Turn crank3 counterclockwise to:�
slide sunroof open
�
lower sunroof at the rear
iDo not disconnect electrical
connectors.
iTurn crank3 slowly and smoothly.
The tilt/sliding sunroof must be
synchronized after being operated
manually (
�page 254)
Page 408 of 498
406 Practical hintsReplacing bulbsReplacing bulbs for front lamps
Before you start to replace a bulb for a
front lamp, do the following first:�
Turn the exterior lamp switch to
positionM (
�page 124).
�
Open the hood (
�page 308) (except
for side marker lamps).
Front lamps halogen-type
1Housing cover for low beam headlamp
2Housing cover for high beam head-
lamp, parking and standing lamp3Bulb socket for turn signal lamp bulb
4Bulb holder of low beam bulb
5Bulb holder of high beam bulb
6Bulb socket for parking and standing
lamp bulbLow beam bulb
�
Turn housing cover1 counterclock-
wise and remove it.
�
Turn bulb holder4 with the bulb coun-
terclockwise and remove it.
�
Pull the bulb at its socket out of bulb
holder4.
�
Insert the new bulb so that its socket
locates in the recess of bulb holder4
and is level to it.
�
Reinsert bulb holder4 with the bulb in
the lamp and turn clockwise.
�
Align housing cover1 and turn it
clockwise.