Page 195 of 227
193 Service
Entering data
� Entering data
Sometimes you need to enter data such as
names or phone numbers.
E.g.:�
New phone book entry
�
New address book entry
The following input types are possible:
�
Via selection menu
�
Via 12-button keypad (
�page 195)The selection menu is displayed
automatically when you press the
corresponding button in a menu in which
this kind of data input is possible. The
following display may appear if you create
a new entry in the phone book.You can enter upper-case and lower-case
letters including special characters and
numbers.
The following shift fields can be used to
change the type of the characters:
= Upper case
= Lower case
= Special characters
Shifting Keys
�
Press h, H, g, G or F to
select the shift field .
�
Press E.
Input via selection menu
ABCabc. . .
abc
Page 196 of 227
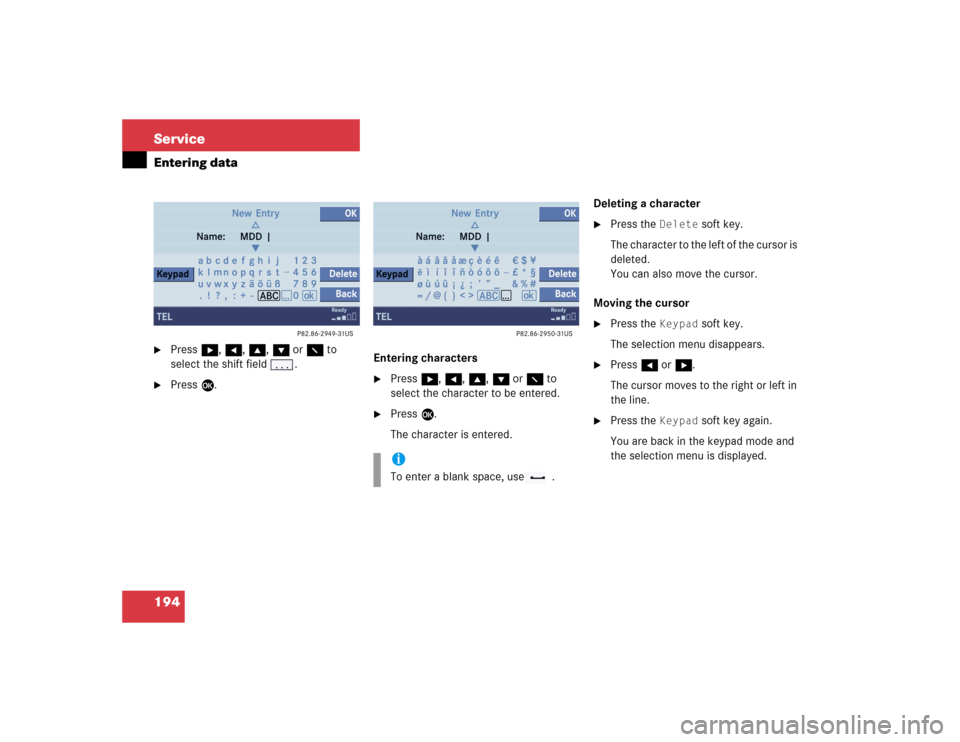
194 ServiceEntering data�
Press h, H, g, G or F to
select the shift field .
�
Press E.Entering characters
�
Press h, H, g, G or F to
select the character to be entered.
�
Press E.
The character is entered.Deleting a character
�
Press the
Delete
soft key.
The character to the left of the cursor is
deleted.
You can also move the cursor.
Moving the cursor
�
Press the
Keypad
soft key.
The selection menu disappears.
�
Press H or h.
The cursor moves to the right or left in
the line.
�
Press the
Keypad
soft key again.
You are back in the keypad mode and
the selection menu is displayed.
. . .
iTo enter a blank space, use .
Page 197 of 227
.
Closing the selection menu
�
P")
195 Service
Entering data
Inserting a character�
Move the cursor to the desired
position.
�
Enter the character as described at
“Entering characters” (
�page 194).
Closing the selection menu
�
Press the
Back
soft key.
or
�
Press the
Keypad
soft key.
or
�
Use h, H, g, G or F to select
the ( field.
�
Press E.
In all cases, the system enters the data.You can enter upper-case and lower-case
letters including special characters and
numbers.
Entering characters
�
Press * or1 - 0 to enter
characters.
Press a key once or several times in
quick succession.After you pressed the key the first time,
the character is displayed at the
bottom of the screen.
You can see which characters you can
enter with that key.
Each continuing depression of the key
displays the next character.
�
If required, press key #.
This key shifts from lower to upper
case.
�
Wait until the displayed character
disappears.
The character is entered.
Input via 12-button keypadiE.g.: Key 5
Press 1 x = J
Press 2 x = K
Press 3 x = L
Press 4 x = 5
Page 198 of 227
196 ServiceEntering dataDeleting a character�
Press the
Delete
soft key.
The character to the left of the cursor is
deleted.
You can also move the cursor.
Moving the cursor
�
Press H or h.
The cursor moves to the right or left.Inserting a character
�
Move the cursor to the desired
position.
�
Enter the character as described at
“Entering characters” (
�page 194).
iTo enter a blank space, use the
on the 0 key.
Page 200 of 227
198 System settingsSystem settings
� System settings�
Press C.
�
In the Service main menu, press the System
soft key.
System settings menu
In the System settings menu you can:�
set date and time
�
switch verification and notification
tones on and off (
�page 201)
�
adjust display settings (
�page 201)
�
activate and deactivate the Voice
control system* help window
(�page 203)
�
start Voice control system*
individualization (
�page 203)
�
reset system settings (
�page 204)Setting date
Activating the System settings
menu
Setting the date/time iExact settings of date, time and current
time zone allow you:�
correct navigation for
routes with time-dependent traffic
guidance
�
correct calculation of the expected
time of arrival
iIf time/date information is transmitted
by the GPS, you cannot set the date.
A satellite symbol is displayed on the
status bar if the system uses GPS data.
Page 201 of 227

199 System settings
System settings
�
In the System menu, press the
Time
soft key.
The Date/Time menu for setting date
and time will appear.
Country
soft key:
Can only be selected if you use the GPS.
You can select the country (
�page 200).
�
Press H or h to select day, month
or year.
�
Press g or G.
Depending on the selection, you set
the day, the month or the year.
�
Press the
Back
soft key.
or
�
Press E.
The setting is saved.
Setting the time
�
In the System settings menu, press the Time
soft key.
�
Press H or h to select hours or
minutes.
�
Press g or G.
Depending on the selection, you set
the hour or the minute.Setting the hour:
Each time the button is pressed, the
time is adjusted in increments of
1hour.
Setting the minute:
�
With GPS reception:
Each time the button is pressed, the
time is adjusted in increments of
30 minutes.
�
Without GPS reception:
Each time the button is pressed, the
time is adjusted in increments of
1minute.
�
Press the
Back
soft key.
or
�
Press E.
The setting is saved.iTime settings are not automatically
changed to daylight saving time.
Change the clock manually.
Page 202 of 227
200 System settingsSystem settingsSetting date and time format�
Press the
Format
soft key.
The Format menu for selecting the time
and date display formats will appear.
�
Press g or G to select a format for
date and time.
�
Press E.
The format setting is applied.
�
Press the
Back
soft key.
or
�
Wait a few seconds.
The Date/Time menu will automatically
appear.
Selecting the country
You can only use this function if you use
the GPS.
�
Press the
Country
soft key.
The country list will appear.
�
Press g or G to select a country.
If a country has multiple time zones,
e.g. Canada and USA, you can select
the applicable time zone and, if
applicable, daylight saving time
settings.
�
Press E.
The settings are applied.
Option
Symbol
Format selected
_
Format not selected
-
Page 203 of 227
201 System settings
System settings
�
In the System settings menu, press the Tones
soft key.
The Tones menu will appear.
�
Press G or g to select an entry.
�
Press E.
The respective tones are activated or
deactivated. You hear the tone when
you activate it.
�
Press the
Back
soft key.
or
�
Wait a few seconds.
The System settings menu will
reappear.
�
In the System settings menu, press the Display
soft key.
You can use the following functions:
�
adjust the display brightness
�
set the display dimming
characteristics
Switching verification and
notification tones on and off
Option
Symbol
Tone activated
Q
Tone deactivated
q
Making display settings