Page 184 of 227
.
�
Press the
Details
soft key.
The detail view will appear.You can use the soft keys to use other
functions for")
182 ServiceAddress book�
Select an address book entry with the
symbol (
�page 176).
�
Press the
Details
soft key.
The detail view will appear.You can use the soft keys to use other
functions for the mobile phone internal
memory entry:
�
Keypad
soft key:
Changes a mobile phone internal
memory entry (
�page 182).
�
Import
soft key:
Imports a mobile phone internal
memory entry into the address book
(
�page 183).
Changing a mobile phone internal
memory entry
�
Activate the detail view of the desired
mobile phone internal memory entry.
A list with two data fields is displayed
(name and phone number).
�
Press g or G to select a data field
(e.g. the name field).
You can enter data in a field using the
12-button keypad (1 - #) or the
selection menu.
Input via selection menu
�
Press the
Keypad
soft key.
The selection menu will appear.
�
Enter the data using the selection
menu (
�page 193).
After you have entered the data, the
entry edit menu is displayed again. You
can select the next data field and enter
data.
Input via 12-button keypad
�
Press buttons 1 - # to enter the
data (
�page 195).
Details on a mobile phone internal
memory entry
iIf you change a mobile phone internal
memory entry in the address book, the
entry is automatically also changed on
the mobile phone internal memory.
Page 187 of 227
, press the
New
soft key.
The entry creation menu will appear.
A list with data fields is displayed
(Surname, Name, Cell, URL).You ca")
185 Service
Address book
�
In the Address book menu
(�page 176), press the
New
soft key.
The entry creation menu will appear.
A list with data fields is displayed
(Surname, Name, Cell, URL).You can use the softkey to use additional
functions for the address book entry.
�
GenInfo
, Co.
(Company)
, PrivInfo
and
Keypad
soft key:
You can create a new address book
entry.
�
Note
soft key:
You can add a note (
�page 180).
�
New
or
Del.
soft keys:
You can add or delete a spoken name
to or from the address book
(
�page 180).
�
Play
soft key:
Plays back the spoken name
(
�page 181).
�
Export
soft key:
Exports parts of the address book entry
to the mobile phone internal memory
(
�page 181).
�
Press g or G to select a data field
(e.g.
Name
).
You can enter data in a field using the
12-keys keyboard (1 - #) or the
selection menu.
Input via selection menu
�
Press the
Keypad
soft key.
The selection menu appears.
�
Enter the data using the selection
menu (
�page 193).
After you have entered the data, the
entry creation menu is displayed again.
You can select the next data field and
enter data.
New address book entry
Page 191 of 227

189 Service
Tele Aid*
� Tele Aid*
Tele Aid* incorporates the following
functions:�
Emergency call
�
Roadside Assistance
�
Information call
�
Remote Door Unlock
�
Stolen Vehicle RecoveryThe speaker volume of a Tele Aid call can
be adjusted using the volume control on
the COMAND (
�page 98) or the æ and
ç buttons on the multifunction steering
wheel.
During a Tele Aid call, all audio sources are
muted. The telephone is turned off and no
SMS messages can be received or
transmitted.
During a Tele Aid call, the used Network
Type (“A” for analog network or “D” for
digital network) and the signal strength are
displayed on the lower right corner of the
COMAND display.An emergency call is initiated
automatically in the event emergency
tensioning devices (ETDs) or air bags are
deployed. An emergency call can also be
initiated manually by pressing the I
button. Refer to your vehicle Operator’s
Manual for additional information.
Once the emergency call is in progress, the
indicator lamp in the I button will
begin to flash. The message
Connecting
Call
appears on the display and all audio
resources are muted.
When the connection is established, the
message
Call
Connected
appears on
the display. A voice connection between
the Response Center and the vehicle
occupants is established soon after the
emergency call has been initiated.
iTo use Tele Aid*, the Tele Aid service
must be subscribed to and properly
activated. If you have any questions
regarding activation, please call
the Response Center at 1-800-756-
9018 (in the USA) or 1-888-923-8367
(in Canada).
The Tele Aid system is operational
provided the Tele Aid service was sub-
scribed to and properly activated.
Additionally, the vehicle’s battery must
be charged, properly connected, not
damaged and cellular service and GPS
coverage must be available.
General
Emergency call
Page 192 of 227
 the message
Call failed
appea")
190 ServiceTele Aid*If the Tele Aid system could not establish a
voice connection to the Response Center
(e.g. the relevant cellular phone network is
not available) the message
Call failed
appears.
Should this occur, assistance must be
summoned by other means.
Terminating the connection
The connection can only be terminated by
the Response Center who has answered
the call.Roadside Asssistance will assist if
technical problems with your vehicle are
experienced.
Roadside Assistance can only be
requested manually by pressing the •
button. Refer to your vehicle Operator’s
Manual for additional information.
After initiating Roadside Assistance, the
message
Connecting Call
will appear
on the display and the connection to a
Mercedes-Benz Roadside Assistance
Center is established. All audio sources are
muted.
If the connection is established, the
message
Call Connected
will appear
and a voice connection between the
Roadside Assistance Center and the
vehicle occupants is established soon
after.
iDuring an active emergency call,
switching to another application is not
possible.
Warning
G
If you feel at any way in jeopardy when in the
vehicle (e.g. smoke or fire in the vehicle, ve-
hicle in a dangerous road location), please
do not wait for voice contact after you have
pressed the button. Carefully leave the ve-
hicle and move to a safe location. The
Response Center will automatically contact
local emergency officials with the vehicle's
approximate location if they receive an auto-
matic SOS signal and cannot make voice
contact with the vehicle occupants.
Roadside Assistance
Page 193 of 227
. The
message
Cal")
191 Service
Tele Aid*
If the Tele Aid system could not establish a
voice connection to a Mercedes-Benz
Roadside Center (e.g. the relevant cellular
phone network is not available). The
message
Call failed
appears.Terminating the connection
Roadside Assistance calls can be
terminated using the ì button on the
multifunctional steering wheel or the K
key on COMAND. The call can also be
terminated by the Roadside Assistance
Center.
The COMAND reverts to the system last
active before a Tele Aid call was initiated.Pressing the ¡ button, a call to the
Mercedes-Benz Customer Assistance
Center will be initiated. Information
regarding the operation of your vehicle, the
nearest authorized Mercedes-Benz Center
or Mercedes-Benz USA products and
services is available to you.
Refer to your vehicle Operator’s Manual for
additional information.
After initiating an Information call, the
message
Connecting Call
will appear
on display. The system is then establishing
a connection to the Mercedes-Benz
Customer Assistance Center. All audio
sources are muted.
If the connection is established, the
message
Call Connected
will appear
and a voice connection between the
Roadside Assistance Center and the
vehicle occupants is established soon
after.
iDuring an active Roadside Assistance
call, switching to another application
(e.g. Navigation*) is possible.
Information call
Page 195 of 227
193 Service
Entering data
� Entering data
Sometimes you need to enter data such as
names or phone numbers.
E.g.:�
New phone book entry
�
New address book entry
The following input types are possible:
�
Via selection menu
�
Via 12-button keypad (
�page 195)The selection menu is displayed
automatically when you press the
corresponding button in a menu in which
this kind of data input is possible. The
following display may appear if you create
a new entry in the phone book.You can enter upper-case and lower-case
letters including special characters and
numbers.
The following shift fields can be used to
change the type of the characters:
= Upper case
= Lower case
= Special characters
Shifting Keys
�
Press h, H, g, G or F to
select the shift field .
�
Press E.
Input via selection menu
ABCabc. . .
abc
Page 196 of 227
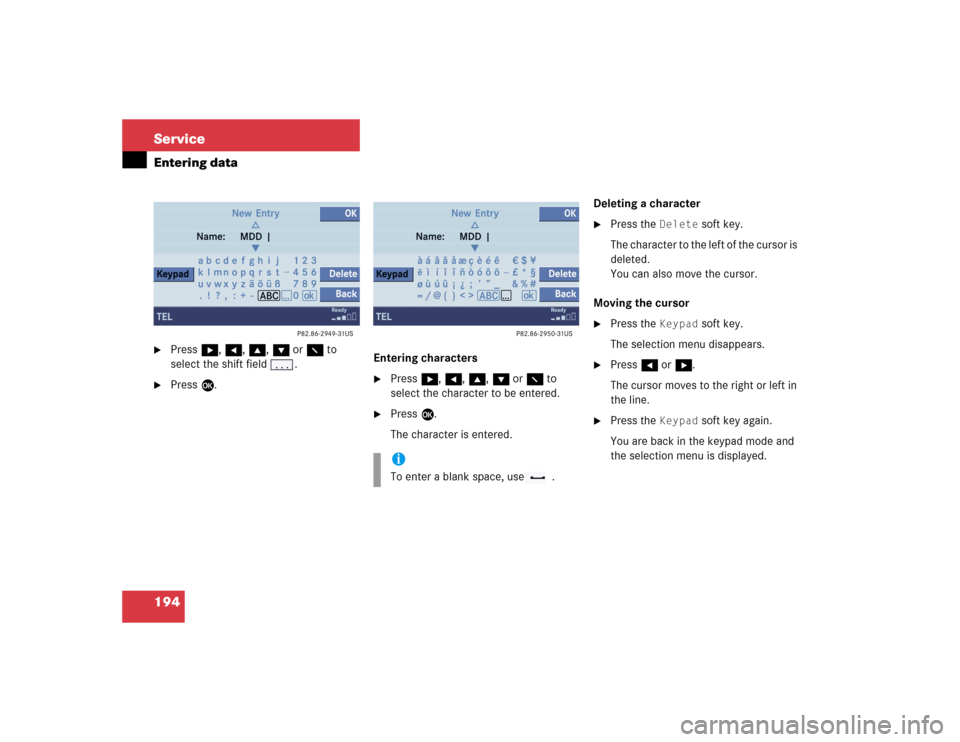
194 ServiceEntering data�
Press h, H, g, G or F to
select the shift field .
�
Press E.Entering characters
�
Press h, H, g, G or F to
select the character to be entered.
�
Press E.
The character is entered.Deleting a character
�
Press the
Delete
soft key.
The character to the left of the cursor is
deleted.
You can also move the cursor.
Moving the cursor
�
Press the
Keypad
soft key.
The selection menu disappears.
�
Press H or h.
The cursor moves to the right or left in
the line.
�
Press the
Keypad
soft key again.
You are back in the keypad mode and
the selection menu is displayed.
. . .
iTo enter a blank space, use .
Page 197 of 227
.
Closing the selection menu
�
P")
195 Service
Entering data
Inserting a character�
Move the cursor to the desired
position.
�
Enter the character as described at
“Entering characters” (
�page 194).
Closing the selection menu
�
Press the
Back
soft key.
or
�
Press the
Keypad
soft key.
or
�
Use h, H, g, G or F to select
the ( field.
�
Press E.
In all cases, the system enters the data.You can enter upper-case and lower-case
letters including special characters and
numbers.
Entering characters
�
Press * or1 - 0 to enter
characters.
Press a key once or several times in
quick succession.After you pressed the key the first time,
the character is displayed at the
bottom of the screen.
You can see which characters you can
enter with that key.
Each continuing depression of the key
displays the next character.
�
If required, press key #.
This key shifts from lower to upper
case.
�
Wait until the displayed character
disappears.
The character is entered.
Input via 12-button keypadiE.g.: Key 5
Press 1 x = J
Press 2 x = K
Press 3 x = L
Press 4 x = 5