Page 373 of 474

372 Practical hintsWhat to do if …Display symbol
Display message
Possible cause
Possible solution
K
Close slid./pop-up
sunroof
You have opened the driver’s door with
the SmartKey removed from the starter
switch and the panorama roof with power
tilt/sliding panel open.
�
Close the panorama roof with power
tilt/sliding panel (
�page 242).
J
Close slid./pop-up
sunroof
You have opened the driver’s door with
the SmartKey removed from the starter
switch and the panorama roof with power
tilt/sliding panel open.
�
Close the panorama roof with power
tilt/sliding panel (
�page 242).
L
Tele Aid malfunction.
Drive to workshop
One or more main functions of the Tele
Aid system* are malfunctioning.
�
Have the Tele Aid system* checked by
an authorized Mercedes-Benz Center.
t
Function unavailable.
This display appears if buttont
or s on the multifunction steering
wheel is pressed and the vehicle is not
equipped with a telephone*.
Ê
Trunk open
This message will appear whenever the
trunk lid is open.
�
Close the trunk lid.
W
Washer fluid
please refill
The fluid level has dropped to
about
1/3of total reservoir capacity.
�
Add washer fluid (
�page 299).
Page 382 of 474
381
Practical hints
Opening/closing in an emergency
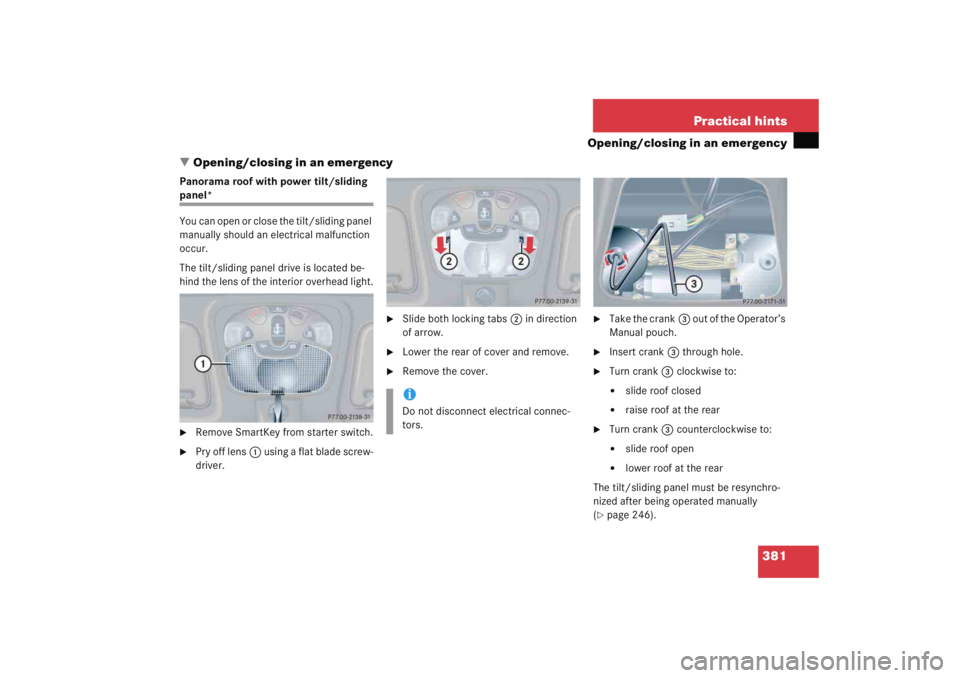
� Opening/closing in an emergency
Panorama roof with power tilt/sliding panel*
You can open or close the tilt/sliding panel
manually should an electrical malfunction
occur.
The tilt/sliding panel drive is located be-
hind the lens of the interior overhead light.�
Remove SmartKey from starter switch.
�
Pry off lens 1 using a flat blade screw-
driver.
�
Slide both locking tabs 2 in direction
of arrow.
�
Lower the rear of cover and remove.
�
Remove the cover.
�
Take the crank 3 out of the Operator’s
Manual pouch.
�
Insert crank 3 through hole.
�
Turn crank 3 clockwise to:�
slide roof closed
�
raise roof at the rear
�
Turn crank 3 counterclockwise to:�
slide roof open
�
lower roof at the rear
The tilt/sliding panel must be resynchro-
nized after being operated manually
(
�page 246).
iDo not disconnect electrical connec-
tors.
Page 402 of 474

401
Practical hints
Battery
� Battery
The battery is located in the engine com-
partment on the right hand side.
1 Clamps
Removing filter box�
Release clamps 1.
�
Remove filter box.
Installing filter box
�
Insert filter box properly.
�
Secure it with clamps 1.
Warning!
G
Failure to follow these instructions can re-
sult in severe injury or death.
Observe all safety instructions and precau-
tions when handling automotive batteries
(�page 297).
Never lean over batteries while connecting,
you might get injured.
Battery fluid contains sulfuric acid. Do not
allow this fluid to come in contact with eyes,
skin or clothing. In case it does, immediately
flush affected area with water and seek
medical help if necessary.
A battery will also produce hydrogen gas,
which is flammable and explosive. Keep
flames or sparks away from battery, avoid
improper connection of jumper cables,
smoking, etc.
!Never loosen or detach battery termi-
nal clamps while the engine is running
or the SmartKey is in the starter switch.
Otherwise the alternator and other
electronic components could be se-
verely damaged.
Have the battery checked regularly by
an authorized Mercedes-Benz Center.
Refer to Maintenance Booklet for main-
tenance intervals or contact an autho-
rized Mercedes-Benz Center for further
information.Warning!
G
Do not place metal objects on the battery as
this could result in a short circuit.
Use leak-proof battery only to avoid the risk
of acid burns in the event of an accident.
��
Page 404 of 474
.
�")
403
Practical hints
Battery
Reconnecting the battery�
Turn off all electrical consumers.
�
Remove SmartKey from the starter
switch.
�
Connect the positive lead and fasten its
cover
2 (
�page 402).
�
Connect the negative lead.
�
Reinstall the filter box (
�page 401).
Batteries contain materials that can harm
the environment if disposed of improperly.
Large 12-volt storage batteries contain
lead. Recycling of batteries is the preferred
method of disposal. Many states require
sellers of batteries to accept old batteries
for recycling.
Warning!
G
Never charge a battery while still installed in
the vehicle unless the accessory battery
charge unit approved by Mercedes-Benz is
being used. Gases may escape during charg-
ing and cause explosions that may result in
paint damage, corrosion or personal injury.
An accessory battery charge unit specially
adapted for Mercedes-Benz vehicles and
tested and approved by Mercedes-Benz is
available, permitting the charging of the bat-
tery in its installed position. Contact an au-
thorized Mercedes-Benz Center for
information and availability. Charge battery
in accordance with the instructions for the
accessory battery charger.
!NEVER invert the terminal connections!!The battery, its filler caps and the vent
tube must always be securely installed
when the vehicle is in operation.
iThe following procedures must be car-
ried out following any interruption of
battery power (e.g. due to reconnec-
tion):�
Set the clock (
�page 139) (vehi-
cles with COMAND*: see COMAND
operator’s manual).
�
Resynchronize side windows
(�page 240).
�
Resynchronize panorama roof with
power tilt/sliding panel*
(�page 246).
Page 426 of 474
425
Technical data
Weights
� Weights
Roof load max.
220 lb (100 kg)
Trunk load max.
220 lb (100 kg)
Page 448 of 474

447
Index
Checking
Brake fluid 290
Coolant level 290, 296, 359
Headlamp cleaning fluid 290
Oil level 290, 292
Tire inflate pressure 290
Vehicle lighting 290
Windshield washer fluid 290
Child safety 70 Air bags 62
Front passenger front air bag off indica-tor lamp 27, 76, 345
Infant and child restraint systems 66, 70
LATCH child seat anchors 78
OCS 73
Child seat anchors see LATCH child seat anchors
Cigarette lighter 259
Cleaning Cup holders 337
Gear selector lever 337
Hard plastic trim items 337
Headlamps 167
Headliner 337
Instrument cluster 337 Leather upholstery 338
Light alloy wheels 336
MB Tex upholstery 338
Plastic and rubber parts 338
Seat belts 337
Steering wheel 337
Upholstery 338
Windows 336
Windshield 54
Wiper blades 336
Wood trims 338
Cleaning tires 302
Climate control 172 Adjusting air distribution and volume 176
Defogging windshield 176
Defrosting 177
Rear window defroster 170
Setting the temperature 175
Clock 25, 139
Closing Ashtray, center console 258
Cup holder 257
Glove box 254
Hood 292
Luggage compartment 95 Panorama roof with power tilt/sliding
panel* in an emergency 381
Panorama roof with power tilt/sliding panel* with SmartKey 244
Storage compartment, armrest 255
Trunk lid 95
Windows 238
Windows with SmartKey 239
Cockpit 22, 437
Cockpit management and data system (COMAND*) 437
Cold tire inflation pressure 323
Collapsible tire 437
Collapsible wheel chock 375
COMAND* see separate operating instructions 437
Combination switch 114 Turn signals 52
Windshield wipers 53
Comfort driving Transmission program mode 164
Control and operation of radio transmitters 284
Page 451 of 474

450 IndexDownhill drivingCruise control 248
Downshifting Automatic transmission* 160
Manual transmission 158
Drinking and driving 277
Driving Aquaplaning 281
General instructions 44, 277
In winter 283
Problems 55
Safety systems 81
Through standing water 284
Driving abroad 284
Driving instructions 277
Driving off 279
Driving safety systems ABS 81
BAS 82
ESP 83
Driving systems 247 Cruise control 247
Driving safety systems 81 E
Easy-entry/exit feature* 100
Activating 148
Electrical fuses 410
Electrical outlet 260
Electrical system Technical data 423
Electronic Stability Program see ESP 438
Emergency call system* 262
Emergency calls "911" 234
Initiating an emergency call 264
With Tele Aid* 263
Emergency operation (Limp Home Mode) 166
Emergency operations Closing panorama roof with power tilt/sliding panel* 381
Locking the vehicle 379
Opening panorama roof with power tilt/sliding panel* 381
Releasing trunk lid from inside 96
Remote door unlock 268
Unlocking the Trunk lid 378
Unlocking the vehicle 377 Emergency tensioning device see
ETD 438
Emission control 286
Emission control label 416
Ending A call (telephone*) 154
Engine Compartment 291
Starting with automatic transmission* 49
Starting with manual transmission 48
Starting with the SmartKey 48, 49
Technical data 418
Turning off with the key 58
Engine cleaning 335
Engine compartment 291 Fuse box in 411
Hood 291
Engine malfunction indicator lamp 25, 342
Engine number 438
Page 456 of 474

455
Index
LATCH child seat anchors 78
Folding back 78, 79
Layout of poly-V-belt drive 417
Leather upholstery Cleaning 338
License plate lamps Messages in display 367
Replacing bulbs 385, 392
Light alloy wheels Cleaning 336
Technical data 420
Light sensor 367
Lighter see Cigarette lighter
Lighting 110 Automatic headlamp mode 111
Combination switch 114
Daytime running lamp mode 112
Exterior lamp switch 110
Front fog lamps 113
High beams 114
Instrument cluster illumination 119
Instruments 119
Interior 117
Interior delayed shut-off (Control system) 147
Locator lighting 112 Low beam 110
Low beam, indicator lamp 25
Manual headlamp mode 111
Night security illumination 112
Parking lamps 110
Rear fog lamp 113
Settings (control system) 144
Limiting the gear range 161
Limp Home Mode 166
Loading 250 Cargo tie-down rings 253
Instructions 252
Roof rack* 250
Split rear bench seat 250
Loading terminology 323
Loading the vehicle 303
Locator lighting 112 Setting 145
Lock buttons 439
Locking 56, 90 Automatic while driving 97
Centrally from inside 98
Fuel filler flap 288
Global, SmartKey 92
Vehicle in an emergency 379
Loss of keys 94 Loss of Service and Warranty Information
Booklet 415
Low beam headlamps Messages in display 368
Replacing bulbs 385, 387
Lowering Vehicle 400
Lubricants Technical data 426
Luggage compartment Closing 95
Closing the lid 95
Opening from inside vehicle 95
Trunk lid emergency release 96
Luggage cover 252