Page 357 of 474

356 Practical hintsWhat to do if …Display message
Possible cause
Possible solution
ESP
malfunction.
Visit workshop.
The ESP is deactivated because of a
malfunction.
The brake system is still functioning
normally but without the ESP available.
�
Continue driving with added caution.
�
Visit an authorized Mercedes-Benz
Center as soon as possible.
Failure to follow these instructions
increases the risk of an accident.
Display malfunction.
Visit workshop.
The ESP or the ESP display is
malfunctioning.
�
Continue driving with added caution.
�
Visit an authorized Mercedes-Benz
Center as soon as possible.
Failure to follow these instructions
increases the risk of an accident.
SRS
Restraint system
malfunction
Drive to workshop
The system is malfunctioning.
�
Drive with added caution to the
nearest authorized Mercedes-Benz
Center.
Warning!
G
In the event a malfunction of the SRS is indi-
cated as outlined above, the SRS may not be
operational. For your safety, we strongly
recommend that you visit an authorized
Mercedes-Benz Center immediately to have
the system checked; otherwise the SRS may
not be activated when needed in an
accident, which could result in serious or
fatal injury, or it might deploy unexpectedly
and unnecessarily which could also result in
injury.
Page 364 of 474
363
Practical hints
What to do if …
Display symbol
Display messages
Possible cause
Possible solution
:
USA only:At next gas station
add 1.0 qt engine oilCanada only:At next gas station
add 1.0 l engine oil
The engine oil level is too low.
�
Add engine oil (
�page 294) and check
the engine oil level (
�page 293).
Engine oil level
Stop, engine off!
There is no oil in the engine. There is a
danger of engine damage.
�
Carefully bring the vehicle to a halt as
soon as possible.
�
Turn off the engine.
�
Add engine oil (
�page 294) and check
the engine oil level (
�page 293).
Engine oil level
Reduce oil level
You have added too much engine oil.
There is a risk of damaging the engine or
the catalytic converter.
�
Have oil siphoned or drained off.
Observe all legal requirements with
respect to its disposal.
Change engine oil
Visit workshop.
It may be that there is water in the engine
oil.
�
Have the engine oil checked.
Page 391 of 474

390 Practical hintsReplacing bulbsParking and standing lamp bulb�
Turn housing cover2 counterclock-
wise and remove it.
�
Pull out bulb socket 5 with the bulb.
�
Pull the bulb out of bulb socket 5.
�
Press the new bulb into bulb socket 5.
�
Press bulb socket 5 back into the
lamp.
�
Align housing cover 2 and turn it
clockwise. Side marker lamp bulb
�
Carefully slide the lamp towards the
rear in direction of arrows.
�
Remove the front end first.
�
Turn the bulb socket with the bulb
counterclockwise and remove it.
�
Pull the bulb out of the bulb socket.
�
Insert the new bulb into the bulb sock-
et.
�
Place the bulb socket back into the
lamp and turn it clockwise.
�
To reinstall the lamp, set the rear end in
the bumper and let the front end en-
gage.
Replacing bulbs for rear lamps
Before you start to replace a bulb for a rear
lamp, do the following first:�
Turn the exterior lamp switch to
position
M (
�page 110).
Tail lamp unit
1 Trim panel
2 Latch
�
Open the trunk lid.
�
Turn latches 1 on respective trim
panel 2 clockwise.
�
Fold trim panel 2 to the side.
Page 392 of 474

391
Practical hints
Replacing bulbs
3
Tab
4 Bulb socket for side marker lamp bulb�
Press tabs 3 together.
�
Remove the bulb carrier.
�
Press gently onto the respective bulb
and turn counterclockwise out of its
bulb socket.
�
Press the new bulb gently into its bulb
socket and turn clockwise until it en-
gages. 5
Brake lamp bulb
6 Backup lamp bulb
7 Turn signal lamp bulb
8 Rear fog lamp bulb (only driver’s side),
tail, parking and standing lamp
�
Reinstall the bulb carrier.
Let tabs 3 engage.
�
Reinstall trim panel 2.
�
Turn latches 1 counterclockwise. Side marker lamp
The bulb socket for the side marker lamp
bulb is located between the bulb carrier
and the vehicle’s body.
�
Open the trunk lid.
�
Turn latches
1 on respective trim
panel 2 clockwise.
�
Fold trim panel 2 to the side.
�
Pull bulb socket 4 with the bulb out of
its holder.
�
Pull the bulb out of bulb socket 4.
�
Press the new bulb into bulb socket 4.
�
Press bulb socket 4 back into its
holder.
�
Reinstall trim panel 2.
�
Turn latches 1 counterclockwise.
Page 393 of 474
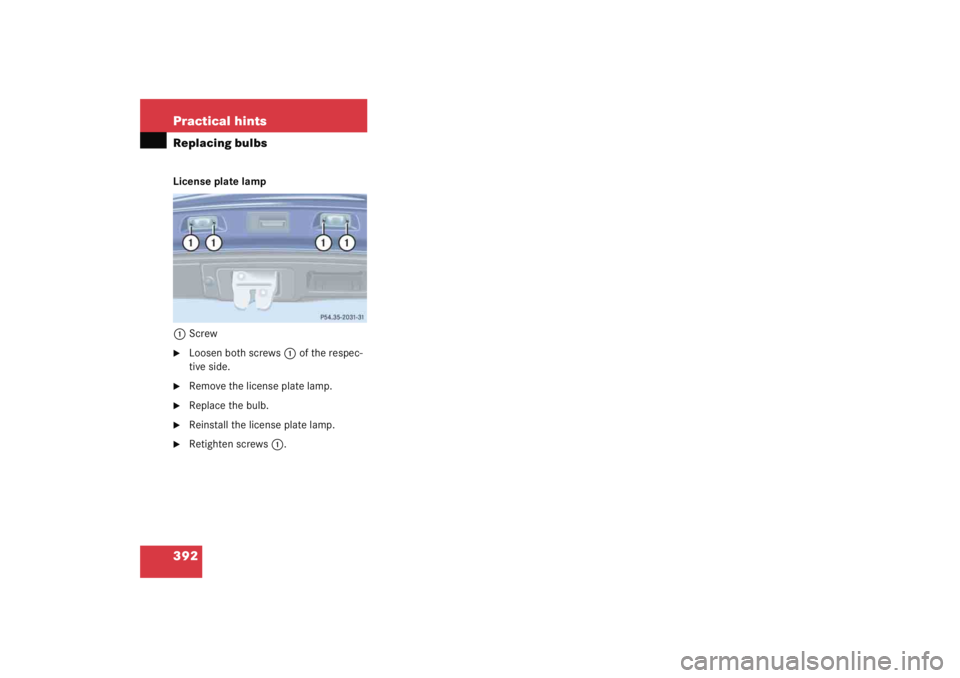
392 Practical hintsReplacing bulbsLicense plate lamp1 Screw�
Loosen both screws 1 of the respec-
tive side.
�
Remove the license plate lamp.
�
Replace the bulb.
�
Reinstall the license plate lamp.
�
Retighten screws 1.
Page 407 of 474

406 Practical hintsTowing the vehicleMercedes-Benz recommends that the vehi-
cle be transported with all wheels off the
ground using flatbed or appropriate wheel
lift/dolly equipment. This method is pref-
erable to other types of towing.When circumstances do not permit the
recommended towing methods, the vehi-
cle may be towed with all wheels on the
ground or front wheels raised only so far as
necessary to have the vehicle moved to a
safe location where the recommended
towing methods can be employed.
!Use flatbed or wheel lift/dolly equip-
ment with SmartKey in starter switch
turned to position
0.
Do not tow with sling-type equipment.
Towing with sling-type equipment over
bumpy roads will damage radiator and
supports.
To prevent damage during transport,
do not tie down vehicle by its chassis or
suspension parts.
Switch off the tow-away alarm
(�page 87) and deactivate the auto-
matic central locking (
�page 148).
!Vehicles with automatic transmission:
Do not tow-start the vehicle.
!If the vehicle is towed with the front
axle raised, the engine must be shut off
(SmartKey in starter switch position 0
or 1). Otherwise, the ESP will immedi-
ately be engaged and will apply the rear
wheel brakes.
When towing the vehicle with all wheels
on the ground, the gear selector lever
must be in position N (manual trans-
mission: gears disengaged) and the
SmartKey must be in starter switch
position 2.
When towing the vehicle with all wheels
on the ground or the front axle raised,
the vehicle may be towed only for dis-
tances up to 30 miles (50 km) and at a
speed not to exceed 30 mph
(50 km/h).
Page 419 of 474
418 Technical dataEngineModel
C 230 Kompressor (203.740)
1
1The quoted data apply only to the standard vehicle. See an authorized Mercedes-Benz Center for the corresponding data of all sp ecial bodies and special equipment.
C 320 (203.764)
1
Engine
271
112
Mode of operation
4-stroke engine, gasoline injection
4-stroke engine, gasoline injection
No. of cylinders
4
6
Bore
3.23 in (82.00 mm)
3.54 in (89.90 mm)
Stroke
3.35 in (85.00 mm)
3.3 in (84.00 mm)
Total piston displacement
109.6 cu in (1796 cm
3)
195.2 cu in (3199 cm
3)
Compression ratio
8.5:1
10:1
Output acc. to SAE J 1349
189 hp / 5800 rpm
2
(141 kW / 5800 rpm)
2Premium fuel required. Performance may vary with fuel octane rating.
215hp/5700rpm
2
(160 kW / 5700 rpm)
Maximum torque acc. to SAE J 1349
192 lb-ft / 3500 rpm
(260 Nm / 3500 rpm)
229 lb-ft / 3000 rpm
(310 Nm / 3000 rpm)
Maximum engine speed
6000 rpm
6000 rpm
Firing order
1-3-4-2
1-4-3-6-2-5
Poly-V-belt
2420 mm
2380 mm
Page 427 of 474
426 Technical dataFuels, coolants, lubricants, etc.CapacitiesVehicle components and their respective
lubricants must match. Therefore use only
brands tested and approved by
Mercedes-Benz. Please refer to the Factory Approved Service Products
pamphlet, or inquire at your authorized
Mercedes-Benz Center.
Model
Capacity
Fuels, coolants, lubricants, etc.
Engine with oil filter
C230Kompressor
C320
5.8 US qt (5.5 l)
7.9 US qt (7.5 l)
approved engine oils
Automatic transmission
8.5 US qt (8.0 l)
MB Automatic Transmission Fluid
Manual transmission
1.3 US qt (1.2 l)
MB Manual Transmission Oil
Rear axle
1.2 US qt (1.1 l)
Hypoid gear oil SAE 85 W 90
Power steering
approx. 1.1 US qt (1.0 l)
MB Power Steering Fluid (Pentosin CHF 11S)
Front wheel hubs
approx. 2.1 oz (60 g) each
High temperature roller bearing grease
Cooling system
C230Kompressor
C320
approx. 5.9 US qt (5.6 l)
approx. 6.8 US qt (6.4 l)
MB 325.0 Anticorrosion/Antifreeze Agent


1
1The quoted data apply only to the standard vehicle. See an authorized Mercedes-Benz Center for the corresponding data of all sp ecial bodie")
