2005 KIA Sportage light
[x] Cancel search: lightPage 317 of 354
Maintenance24 7
1
2
3
4
5
6
7
8
9
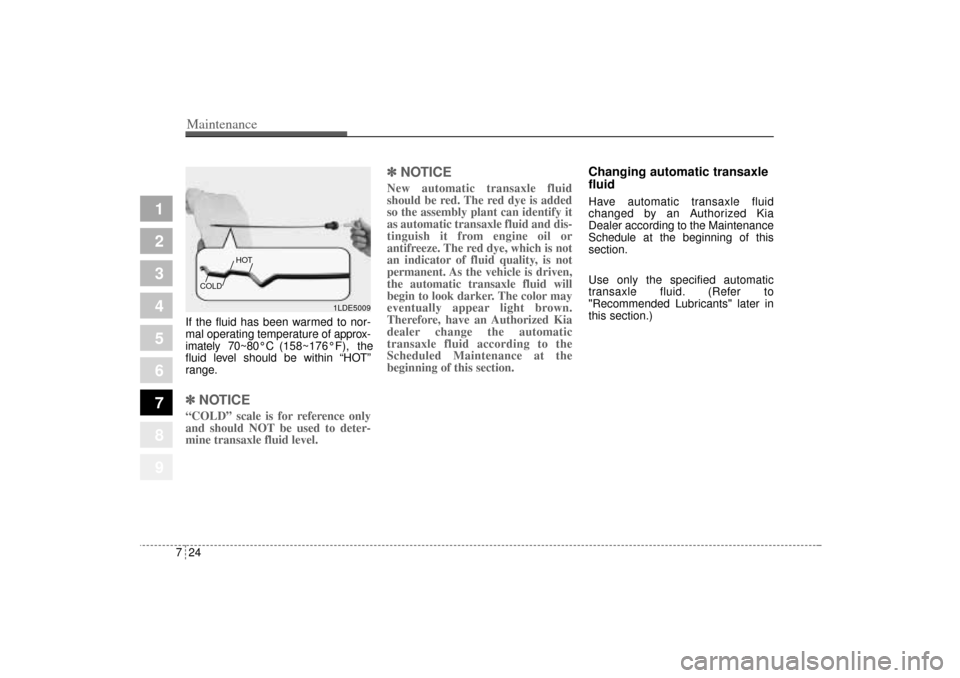
If the fluid has been warmed to nor-
mal operating temperature of approx-
imately 70~80°C(158~176°F), the
fluid level should be within “HOT”
range.✽ ✽
NOTICE“COLD” scale is for reference only
and should NOT be used to deter-
mine transaxle fluid level.
✽ ✽
NOTICENew automatic transaxle fluid
should be red. The red dye is added
so the assembly plant can identify it
as automatic transaxle fluid and dis-
tinguish it from engine oil or
antifreeze. The red dye, which is not
an indicator of fluid quality, is not
permanent. As the vehicle is driven,
the automatic transaxle fluid will
begin to look darker. The color may
eventually appear light brown.
Therefore, have an Authorized Kia
dealer change the automatic
transaxle fluid according to the
Scheduled Maintenance at the
beginning of this section.
Changing automatic transaxle
fluidHave automatic transaxle fluid
changed by an Authorized Kia
Dealer according to the Maintenance
Schedule at the beginning of this
section.
Use only the specified automatic
transaxle fluid. (Refer to
"Recommended Lubricants" later in
this section.)
1LDE5009 COLDHOT
KM CAN (ENG) 7.qxd 9/13/2004 4:47 PM Page 24
Page 324 of 354
731
Maintenance
1
2
3
4
5
6
7
8
9
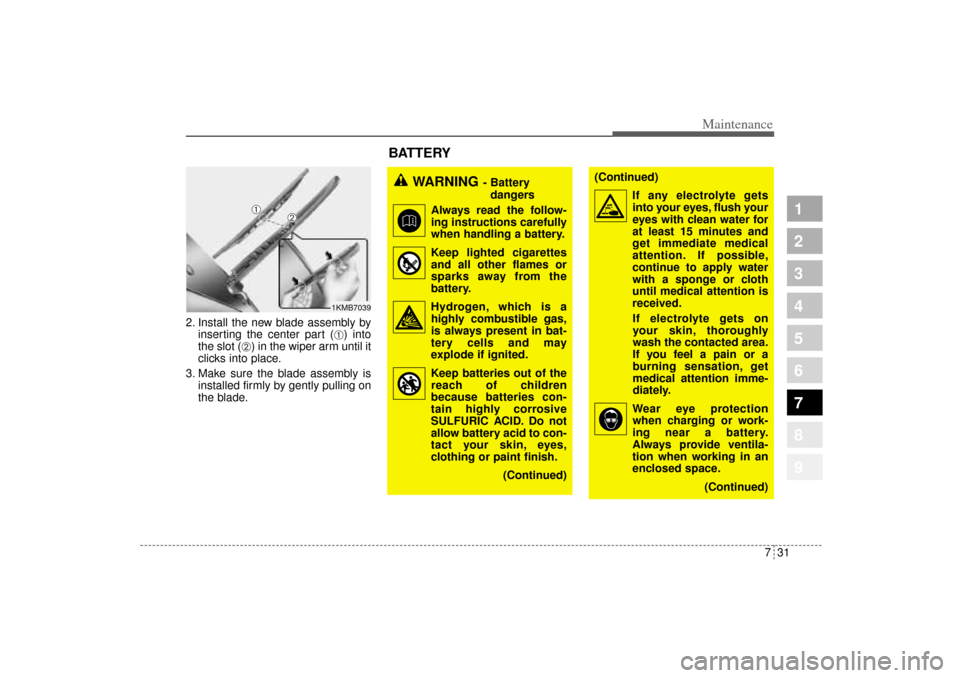
2. Install the new blade assembly by
inserting the center part (
➀) into
the slot (
➁) in the wiper arm until it
clicks into place.
3. Make sure the blade assembly is
installed firmly by gently pulling on
the blade.
WARNING
- Battery
dangers
Always read the follow-
ing instructions carefully
when handling a battery.
Keep lighted cigarettes
and all other flames or
sparks away from the
battery.
Hydrogen, which is a
highly combustible gas,
is always present in bat-
tery cells and may
explode if ignited.
Keep batteries out of the
reach of children
because batteries con-
tain highly corrosive
SULFURIC ACID. Do not
allow battery acid to con-
tact your skin, eyes,
clothing or paint finish.
(Continued)
(Continued)
If any electrolyte gets
into your eyes, flush your
eyes with clean water for
at least 15 minutes and
get immediate medical
attention. If possible,
continue to apply water
with a sponge or cloth
until medical attention is
received.
If electrolyte gets on
your skin, thoroughly
wash the contacted area.
If you feel a pain or a
burning sensation, get
medical attention imme-
diately.
Wear eye protection
when charging or work-
ing near a battery.
Always provide ventila-
tion when working in an
enclosed space.
(Continued)
1KMB7039
BATTERY
➀
➁
KM CAN (ENG) 7.qxd 9/13/2004 4:47 PM Page 31
Page 325 of 354
Maintenance32 7
1
2
3
4
5
6
7
8
9
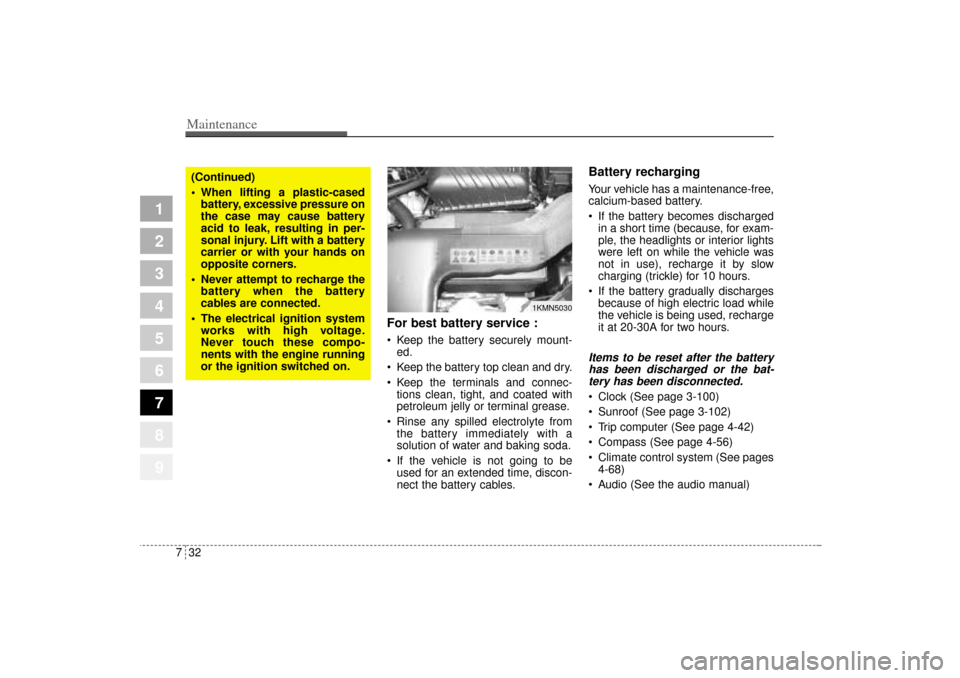
For best battery service : Keep the battery securely mount-
ed.
Keep the battery top clean and dry.
Keep the terminals and connec-
tions clean, tight, and coated with
petroleum jelly or terminal grease.
Rinse any spilled electrolyte from
the battery immediately with a
solution of water and baking soda.
If the vehicle is not going to be
used for an extended time, discon-
nect the battery cables.
Battery recharging Your vehicle has a maintenance-free,
calcium-based battery.
If the battery becomes discharged
in a short time (because, for exam-
ple, the headlights or interior lights
were left on while the vehicle was
not in use), recharge it by slow
charging (trickle) for 10 hours.
If the battery gradually discharges
because of high electric load while
the vehicle is being used, recharge
it at 20-30A for two hours.Items to be reset after the battery
has been discharged or the bat-
tery has been disconnected. Clock (See page 3-100)
Sunroof (See page 3-102)
Trip computer (See page 4-42)
Compass (See page 4-56)
Climate control system (See pages
4-68)
Audio (See the audio manual)
1KMN5030
(Continued)
When lifting a plastic-cased
battery, excessive pressure on
the case may cause battery
acid to leak, resulting in per-
sonal injury. Lift with a battery
carrier or with your hands on
opposite corners.
Never attempt to recharge the
battery when the battery
cables are connected.
The electrical ignition system
works with high voltage.
Never touch these compo-
nents with the engine running
or the ignition switched on.
KM CAN (ENG) 7.qxd 9/13/2004 4:47 PM Page 32
Page 332 of 354
739
Maintenance
1
2
3
4
5
6
7
8
9
Wheel replacement When replacing the metal wheels for
any reason, make sure the new
wheels are equivalent to the original
factory units in diameter, rim width
and offset.
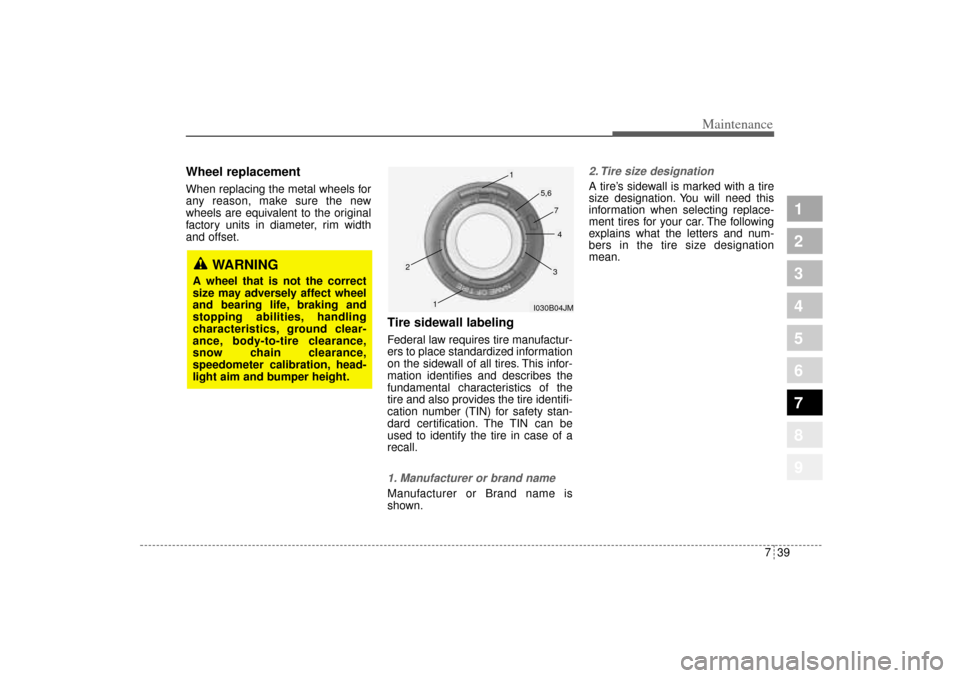
Tire sidewall labelingFederal law requires tire manufactur-
ers to place standardized information
on the sidewall of all tires. This infor-
mation identifies and describes the
fundamental characteristics of the
tire and also provides the tire identifi-
cation number (TIN) for safety stan-
dard certification. The TIN can be
used to identify the tire in case of a
recall.1. Manufacturer or brand nameManufacturer or Brand name is
shown.
2. Tire size designation A tire’s sidewall is marked with a tire
size designation. You will need this
information when selecting replace-
ment tires for your car. The following
explains what the letters and num-
bers in the tire size designation
mean.
WARNING
A wheel that is not the correct
size may adversely affect wheel
and bearing life, braking and
stopping abilities, handling
characteristics, ground clear-
ance, body-to-tire clearance,
snow chain clearance,
speedometer calibration, head-
light aim and bumper height.
I030B04JM
1
1
2
34
5,6
7
KM CAN (ENG) 7.qxd 9/13/2004 4:47 PM Page 39
Page 333 of 354
Maintenance40 7
1
2
3
4
5
6
7
8
9
Example tire size designation:
(These numbers are provided as an
example only; your tire size designa-
tor could vary depending on your
vehicle.)
P215/65R16 96T
P - Applicable vehicle type (tires
marked with the prefix “P’’ are
intended for use on passenger
cars or light trucks; however, not
all tires have this marking).
215 - Tire width in millimeters.
65 - Aspect ratio. The tire’s section
height as a percentage of its
width.
R - Tire construction code (Radial).
16 - Rim diameter in inches.
96 - Load Index, a numerical code
associated with the maximum
load the tire can carry.
T - Speed Rating Symbol. See the
speed rating chart in this section
for additional information.Wheel size designation
Wheels are also marked with impor-
tant information that you need if you
ever have to replace one. The follow-
ing explains what the letters and
numbers in the wheel size designa-
tion mean.
Example wheel size designation:
6.5 J×16
6.5 - Rim width in inches.
J - Rim contour designation.
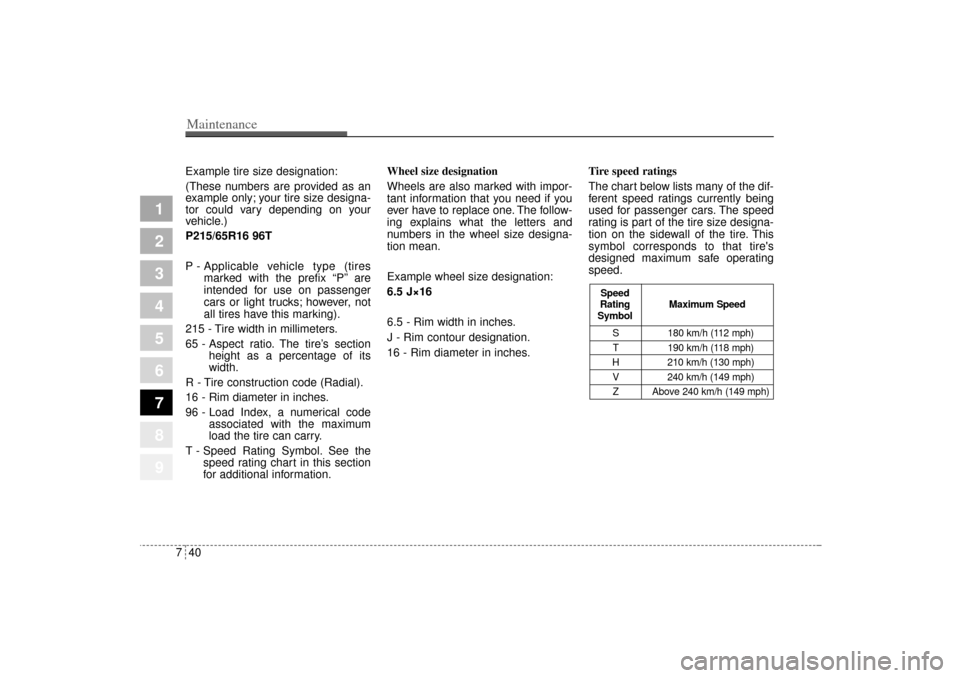
16 - Rim diameter in inches.Tire speed ratings
The chart below lists many of the dif-
ferent speed ratings currently being
used for passenger cars. The speed
rating is part of the tire size designa-
tion on the sidewall of the tire. This
symbol corresponds to that tire's
designed maximum safe operating
speed.
S 180 km/h (112 mph)
T 190 km/h (118 mph)
H 210 km/h (130 mph)
V 240 km/h (149 mph)
Z Above 240 km/h (149 mph)
Maximum Speed Speed
Rating
Symbol
KM CAN (ENG) 7.qxd 9/13/2004 4:47 PM Page 40
Page 338 of 354
745
Maintenance
1
2
3
4
5
6
7
8
9
Intended Outboard Sidewall:The
side of an asymmetrical tire, that
must always face outward when
mounted on a vehicle.
Kilopascal (kPa): The metric unit for
air pressure.
Load Index: An assigned number
ranging from 1 to 279 that corre-
sponds to the load carrying capacity
of a tire.
Maximum Inflation Pressure:The
maximum air pressure to which a
cold tire may be inflated. The maxi-
mum air pressure is molded onto the
sidewall.Maximum Load Rating: The load
rating for a tire at the maximum per-
missible inflation pressure for that
tire.
Maximum Loaded Vehicle Weight:
The sum of curb weight; accessory
weight; vehicle capacity weight; and
production options weight.
Normal Occupant Weight: The
number of occupants a vehicle is
designed to seat multiplied by 68 kg
(150 pounds).
Occupant Distribution: Designated
seating positions.Outward Facing Sidewall: The side
of a asymmetrical tire that has a par-
ticular side that faces outward when
mounted on a vehicle. The side of the
tire that contains a whitewall, bears
white lettering or bears manufactur-
er, brand and or model name mold-
ing that is higher or deeper than the
same moldings on the other sidewall
of the tire.
Passenger (P-Metric) Tire: A tire
used on passenger cars and some
light duty trucks and multipurpose
vehicles.
Recommended Inflation Pressure:
Vehicle manufacturer's recommend-
ed tire inflation pressure and shown
on the tire placard.
KM CAN (ENG) 7.qxd 9/13/2004 4:47 PM Page 45
Page 344 of 354
751
Maintenance
1
2
3
4
5
6
7
8
9
EXTERIOR CARE Exterior general caution It is very important to follow the label
directions when using any chemical
cleaner or polish. Read all warning
and caution statements that appear
on the label.Finish maintenanceWashing To help protect your vehicle’s finish
from rust and deterioration, wash it
thoroughly and frequently at least
once a month with lukewarm or cold
water.
If you use your vehicle for off-road
driving, you should wash it after each
off-road trip. Pay special attention to
the removal of any accumulation of
salt, dirt, mud, and other foreign
materials. Make sure the drain holes
in the lower edges of the doors and
rocker panels are kept clear and
clean.Insects, tar, tree sap, bird droppings,
industrial pollution and similar
deposits can damage your vehicle’s
finish if not removed immediately.
Even prompt washing with plain
water may not completely remove all
these deposits. A mild soap, safe for
use on painted surfaces, may be
used.
After washing, rinse the vehicle thor-
oughly with lukewarm or cold water.
Do not allow soap to dry on the fin-
ish.
✽ ✽
NOTICEDo not use strong soap, chemical
detergents or hot water, and do not
wash the vehicle in direct sunlight or
when the body of the vehicle is
warm.
CAUTION
Water washing in the engine
compartment may cause the
failure of electrical circuits
located in the engine compart-
ment.
Never allow water or other liq-
uids to come in contact with
electrical/electronic compo-
nents inside the vehicle as
this may damage them.
WARNING
After washing the vehicle, test
the brakes while driving slowly
to see if they have been affected
by water. If braking performance
is impaired, dry the brakes by
applying them lightly while
maintaining a slow forward
speed.
KM CAN (ENG) 7.qxd 9/13/2004 4:47 PM Page 51
Page 346 of 354
753
Maintenance
1
2
3
4
5
6
7
8
9
Bright-metal maintenance To remove road tar and insects,
use a tar remover, not a scraper or
other sharp object.
To protect the surfaces of bright-
metal parts from corrosion, apply a
coating of wax or chrome preser-
vative and rub to a high luster.
During winter weather or in coastal
areas, cover the bright metal parts
with a heavier coating of wax or
preservative. If necessary, coat the
parts with non-corrosive petroleum
jelly or other protective compound.
Underbody maintenanceCorrosive materials used for ice and
snow removal and dust control may
collect on the underbody. If these
materials are not removed, acceler-
ated rusting can occur on underbody
parts such as the fuel lines, frame,
floor pan and exhaust system, even
though they have been treated with
rust protection.
Thoroughly flush the vehicle under-
body and wheel openings with luke-
warm or cold water once a month,
after off-road driving and at the end
of each winter. Pay special attention
to these areas because it is difficult
to see all the mud and dirt. It will do
more harm than good to wet down
the road grime without removing it.
The lower edges of doors, rocker
panels, and frame members have
drain holes that should not be
allowed to clog with dirt; trapped
water in these areas can cause rust-
ing.
WARNING
After washing the vehicle, test
the brakes while driving slowly
to see if they have been affected
by water. If braking performance
is impaired, dry the brakes by
applying them lightly while
maintaining a slow forward
speed.
KM CAN (ENG) 7.qxd 9/13/2004 4:47 PM Page 53