Page 270 of 354
In case of an emergency2 6ROAD WARNING Hazard warning flasher The hazard warning flasher serves
as a warning to other drivers to exer-
cise extreme caution when
approaching, overtaking, or passing
your vehicle. It should be used when-
ever emergency repairs are being
made or when the vehicle is stopped
near the edge of a roadway.Depress the flasher switch with the
ignition switch in any position. The
flasher switch is located in the center
console switch panel. All turn signal
lights will flash simultaneously.
• The hazard warning flasher oper-
ates whether your vehicle is run-
ning or not.
The turn signals do not work when
the hazard flasher is on.
Care must be taken when using
the hazard warning flasher while
the vehicle is being towed.
1
2
3
4
5
6
7
8
9
1KMA2109
KM CAN (ENG) 6.qxd 9/13/2004 4:47 PM Page 2
Page 275 of 354
67
In case of an emergency
ELECTRICAL CIRCUIT PROTECTION Fuses A vehicle’s electrical system is pro-
tected from electrical overload dam-
age by fuses.
This vehicle has two fuse panels,
one located in the driver's side panel
bolster, the other in the engine com-
partment near the battery.If any of your vehicle’s lights, acces-
sories, or controls do not work, check
the appropriate circuit fuse. If a fuse
has blown, the element inside the
fuse will be melted.
If the electrical system does not
work, first check the driver’s side
fuse panel.
Always replace a blown fuse with
one of the same rating.If the replacement fuse blows, this
indicates an electrical problem. Avoid
using the system involved and imme-
diately consult an Authorized Kia
Dealer.
Two kinds of fuses are used: stan-
dard for lower amperage rating and
main for higher amperage ratings.
1
2
3
4
5
6
7
8
9
1LDA4002 Standard
Main fuse
NormalNormal
Blown
Blown
KM CAN (ENG) 6.qxd 9/13/2004 4:47 PM Page 7
Page 276 of 354
In case of an emergency8 6Fuse replacement
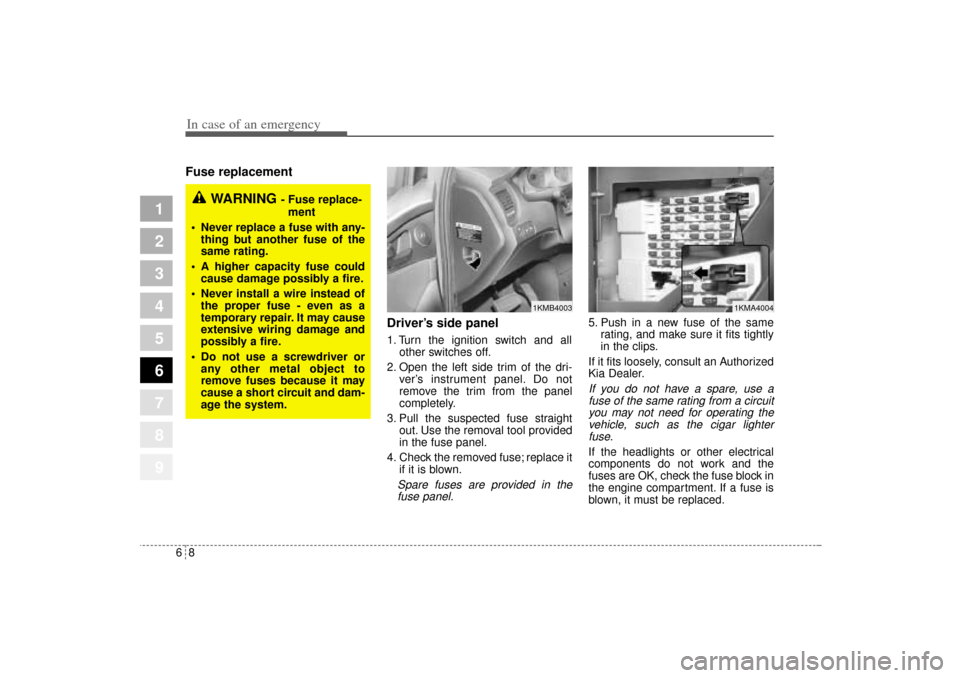
Driver’s side panel
1. Turn the ignition switch and all
other switches off.
2. Open the left side trim of the dri-
ver’s instrument panel. Do not
remove the trim from the panel
completely.
3. Pull the suspected fuse straight
out. Use the removal tool provided
in the fuse panel.
4. Check the removed fuse; replace it
if it is blown.Spare fuses are provided in the
fuse panel.
5. Push in a new fuse of the same
rating, and make sure it fits tightly
in the clips.
If it fits loosely, consult an Authorized
Kia Dealer.If you do not have a spare, use a
fuse of the same rating from a circuit
you may not need for operating the
vehicle, such as the cigar lighter
fuse.If the headlights or other electrical
components do not work and the
fuses are OK, check the fuse block in
the engine compartment. If a fuse is
blown, it must be replaced.
1
2
3
4
5
6
7
8
9
1KMB4003
1KMA4004
WARNING
- Fuse replace-
ment
Never replace a fuse with any-
thing but another fuse of the
same rating.
A higher capacity fuse could
cause damage possibly a fire.
Never install a wire instead of
the proper fuse - even as a
temporary repair. It may cause
extensive wiring damage and
possibly a fire.
Do not use a screwdriver or
any other metal object to
remove fuses because it may
cause a short circuit and dam-
age the system.
KM CAN (ENG) 6.qxd 9/13/2004 4:47 PM Page 8
Page 279 of 354
611
In case of an emergency
1
2
3
4
5
6
7
8
9
Description Fuse rating Protected component
TAIL RH 10A Taillight (right)
RR HTR 30A Rear defroster
HAZARD 15A Hazard warning light
SAFETY P/WDW 15A Safety power window
HTD MIRR 10A Outside rearview mirror defroster
TAIL LH 10A Taillight (left)
ECU (B+) 10A TCU, Immobilizer
P/OUTLET.RR 15A Power outlet (rear)
RR FOG 10A Rear fog lamp
RR WIPER 15A Rear wiper
F/MIRROR 10A
Folding the outside rearview mirror
START 10AIgnition lock/inhibitor switch,
Theft-alarm system
AV 10A Audio
P/OUTLET.FR 15A Power outlet (front)
OBD II 10A OBD II, Diagonosis
S/HTR 20A Seat warmer
SPARE 15A Spare fuse
C/LIGHTER 15A Cigar lighter
AUDIO 10AETACS, Audio, Door lock,
Electric remote control mirror
ROOM LP 10ACluster, ETACS, A/C, Clock,
Room lamp
S/ROOF & D/LOCK 20A Sunroof, Door lock
A/CON 10A Air conditioner
IGN 10A Fuel filter heater, AQS, Headlight
P/WDW-1 30A Power window (left)
Description Fuse rating Protected component
P/WDW-2 30A Power window (right)
SPARE 10A Spare fuse
IG COIL 20A Ignition coil
T/SIG 15A Turn signal light
A/BAG IND 10A Cluster
CLUSTER 10A Cluster
SPARE FUSE 15A Spare fuse
SPARE FUSE 10A Spare fuse
B/UP 10A Back-up light
A/BAG 15A Airbag
ABS 10A Anti-lock brake system
ECU 10A TCS, ESP, Immobilizer
SPARE FUSE 30A Spare fuse
SPARE FUSE 20A Spare fuse
P/CONN 30A Power connector fuse
SHUNT CONN - Shunt connector
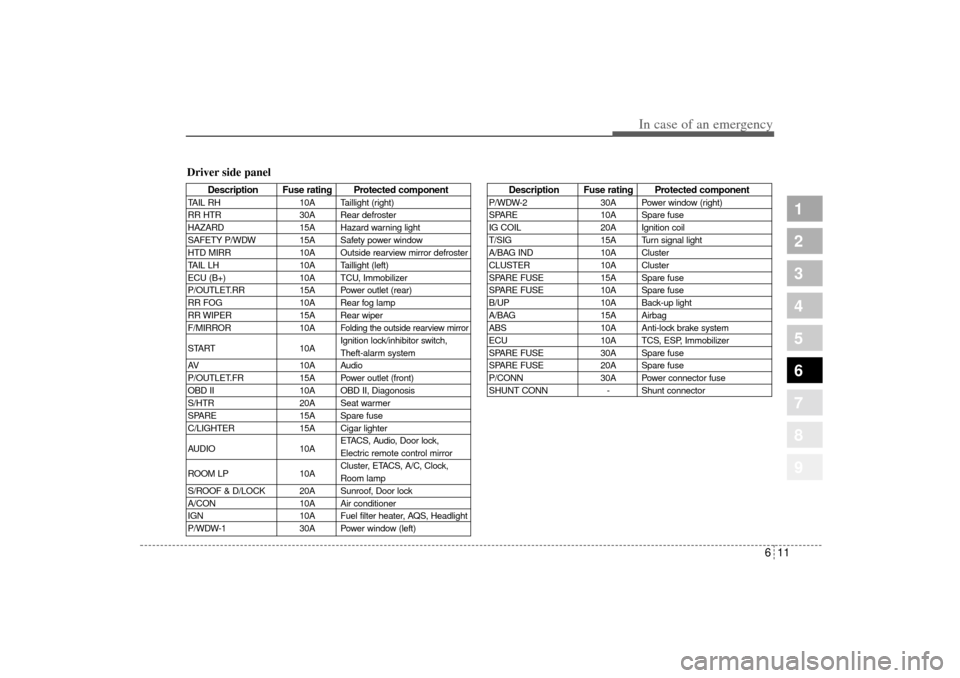
Driver side panel
KM CAN (ENG) 6.qxd 9/13/2004 4:47 PM Page 11
Page 280 of 354
In case of an emergency12 6
1
2
3
4
5
6
7
8
9
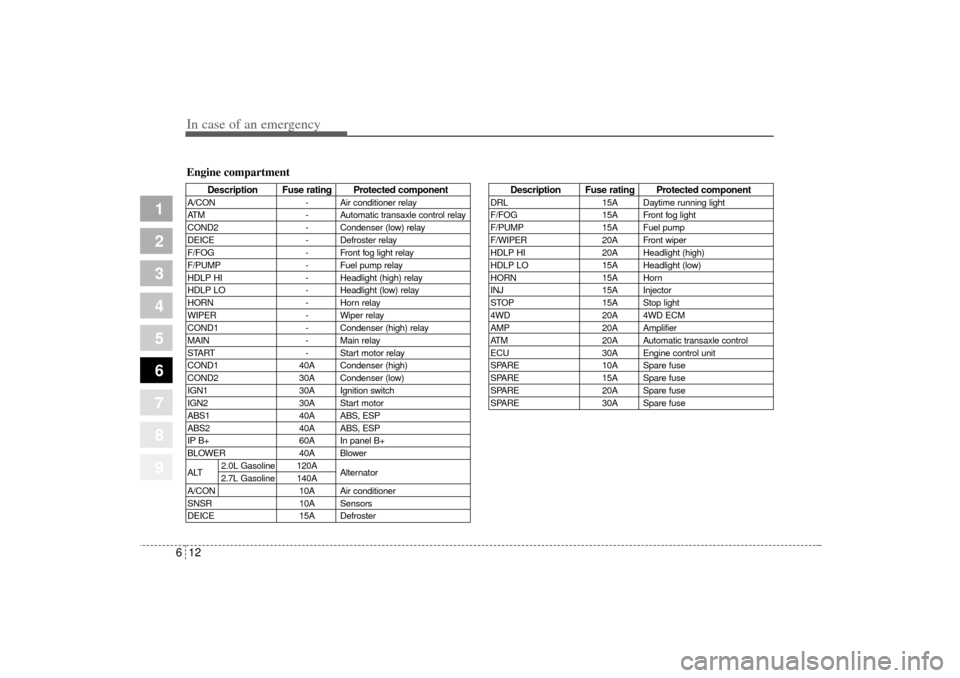
Engine compartment
Description Fuse rating Protected component
A/CON - Air conditioner relay
ATM - Automatic transaxle control relay
COND2 - Condenser (low) relay
DEICE - Defroster relay
F/FOG - Front fog light relay
F/PUMP - Fuel pump relay
HDLP HI - Headlight (high) relay
HDLP LO - Headlight (low) relay
HORN - Horn relay
WIPER - Wiper relay
COND1 - Condenser (high) relay
MAIN - Main relay
START - Start motor relay
COND1 40A Condenser (high)
COND2 30A Condenser (low)
IGN1 30A Ignition switch
IGN2 30A Start motor
ABS1 40A ABS, ESP
ABS2 40A ABS, ESP
IP B+ 60A In panel B+
BLOWER 40A Blower
ALT2.0L Gasoline 120A
Alternator
2.7L Gasoline 140A
A/CON 10A Air conditioner
SNSR 10A Sensors
DEICE 15A Defroster
Description Fuse rating Protected component
DRL 15A Daytime running light
F/FOG 15A Front fog light
F/PUMP 15A Fuel pump
F/WIPER 20A Front wiper
HDLP HI 20A Headlight (high)
HDLP LO 15A Headlight (low)
HORN 15A Horn
INJ 15A Injector
STOP 15A Stop light
4WD 20A 4WD ECM
AMP 20A Amplifier
ATM 20A Automatic transaxle control
ECU 30A Engine control unit
SPARE 10A Spare fuse
SPARE 15A Spare fuse
SPARE 20A Spare fuse
SPARE 30A Spare fuse
KM CAN (ENG) 6.qxd 9/13/2004 4:47 PM Page 12
Page 281 of 354
613
In case of an emergency
1
2
3
4
5
6
7
8
9
Power connector fuseYour vehicle is equipped with a
power connector fuse to prevent bat-
tery discharge if your vehicle is
parked without being operated for
prolonged periods. Use the following
procedures before parking the vehi-
cle for prolonged period.
1. Turn off the engine.
2. Turn off the headlights and tail
lights.
3. Open the driver’s side panel cover
and pull up the “P/CONN 30A”.
✽ ✽
NOTICE• If the power connector fuse is
pulled up from the fuse panel, the
warning chime, audio, clock and
interior lamps, etc., will not oper-
ate. Some items must be reset after
replacement. (Refer to “Items to
be reset···.” on page 7-37)
• Even though the power connector
fuse is pulled up, the battery can
still be discharged by operation of
the headlights or other electrical
devices.
1KMA4005
Power connector fuse
KM CAN (ENG) 6.qxd 9/13/2004 4:47 PM Page 13
Page 301 of 354
Maintenance8 7
1
2
3
4
5
6
7
8
9
OWNER MAINTENANCE Owner maintenance schedule The following lists are vehicle checks
and inspections that should be per-
formed by the owner or an
Authorized Kia Dealer at the fre-
quencies indicated to help ensure
safe, dependable operation of your
vehicle.
Any adverse conditions should be
brought to the attention of your deal-
er as soon as possible.
These Owner Maintenance Checks
are generally not covered by war-
ranties and you may be charged for
labor, parts and lubricants used.
When you stop for fuel: Check the engine oil level.
Check coolant level in coolant
reservoir.
Check the windshield washer fluid
level.
Look for low or under-inflated tires.
While operating your vehicle: Note any changes in the sound of
the exhaust or any smell of
exhaust fumes in the vehicle.
Check for vibrations in the steering
wheel. Notice any increased steer-
ing effort or looseness in the steer-
ing wheel, or change in its straight-
ahead position.
Notice if your vehicle constantly
turns slightly or “pulls” to one side
when traveling on smooth, level
road.
When stopping, listen and check
for strange sounds, pulling to one
side, increased brake pedal travel
or “hard-to-push” brake pedal.
If any slipping or changes in the
operation of your transaxle occurs,
check the transaxle fluid level.
Check automatic transaxle P
(Park) function.
Check parking brake.
Check for fluid leaks under your
vehicle (water dripping from the air
conditioning system during or after
use is normal).
WARNING
Be careful when checking your
engine coolant level when the
engine is hot. Scalding hot
coolant and steam may blow out
under pressure. This could
cause serious injury.
KM CAN (ENG) 7.qxd 9/13/2004 4:47 PM Page 8
Page 302 of 354
79
Maintenance
1
2
3
4
5
6
7
8
9
At least monthly: Check coolant level in the coolant
recovery reservoir.
Check the operation of all exterior
lights, including the stoplights, turn
signals and hazard warning flash-
ers.
Check the inflation pressures of all
tires including the spare.
At least twice a year
(i.e., every Spring and Fall) : Check radiator, heater and air con-
ditioning hoses for leaks or da-
mage.
Check windshield washer spray
and wiper operation. Clean wiper
blades with clean cloth dampened
with washer fluid.
Check headlight alignment.
Check muffler, exhaust pipes,
shields and clamps.
Check the lap/shoulder belts for
wear and function.
Check for worn tires and loose
wheel lug nuts.
At least once a year : Clean body and door drain holes.
Lubricate door hinges and checks,
and hood hinges.
Lubricate door and hood locks and
latches.
Lubricate door rubber weather-
strips.
Check the air conditioning system
before the warm weather season.
Check the power steering fluid
level.
Inspect and lubricate automatic
transaxle linkage and controls.
Clean battery and terminals.
Check the brake fluid level.
KM CAN (ENG) 7.qxd 9/13/2004 4:47 PM Page 9