Page 200 of 424

FF/TUNE/RW
Press FF (Fast Forward) and the CD player will begin to
fast forward until FF is released. The RW ( Reverse)
button works in a similar manner.
Random Play — SET / RND
Press the RND button while the CD is playing to activate
Random Play. This feature plays the tracks on the disc in
random order to provide an interesting change of pace.
Press the SEEK button to move to the next randomly
selected track.
Press the SET / RND button a second time to stop
Random Play.
PTY (Program Type) Button
Pressing this button once will turn on the PTY mode for
5 seconds. If no action is taken during the 5 second time
out the PTY icon will turn off. Pressing the PTY buttonrepeatedly within 5 seconds will allow the program
format type to be selected. Many radio stations do not
currently broadcast PTY information.
Toggle the PTY button to select the following format
types:
Program Type Radio Display
Adult Hits Adlt Hit
Classical Classicl
Classic Rock Cls Rock
College College
Country Country
Emergency ALERT!
Emergency Test Test
Information Inform
Jazz Jazz
Foreign Language Language
News News
200 UNDERSTANDING YOUR INSTRUMENT PANEL
Page 201 of 424
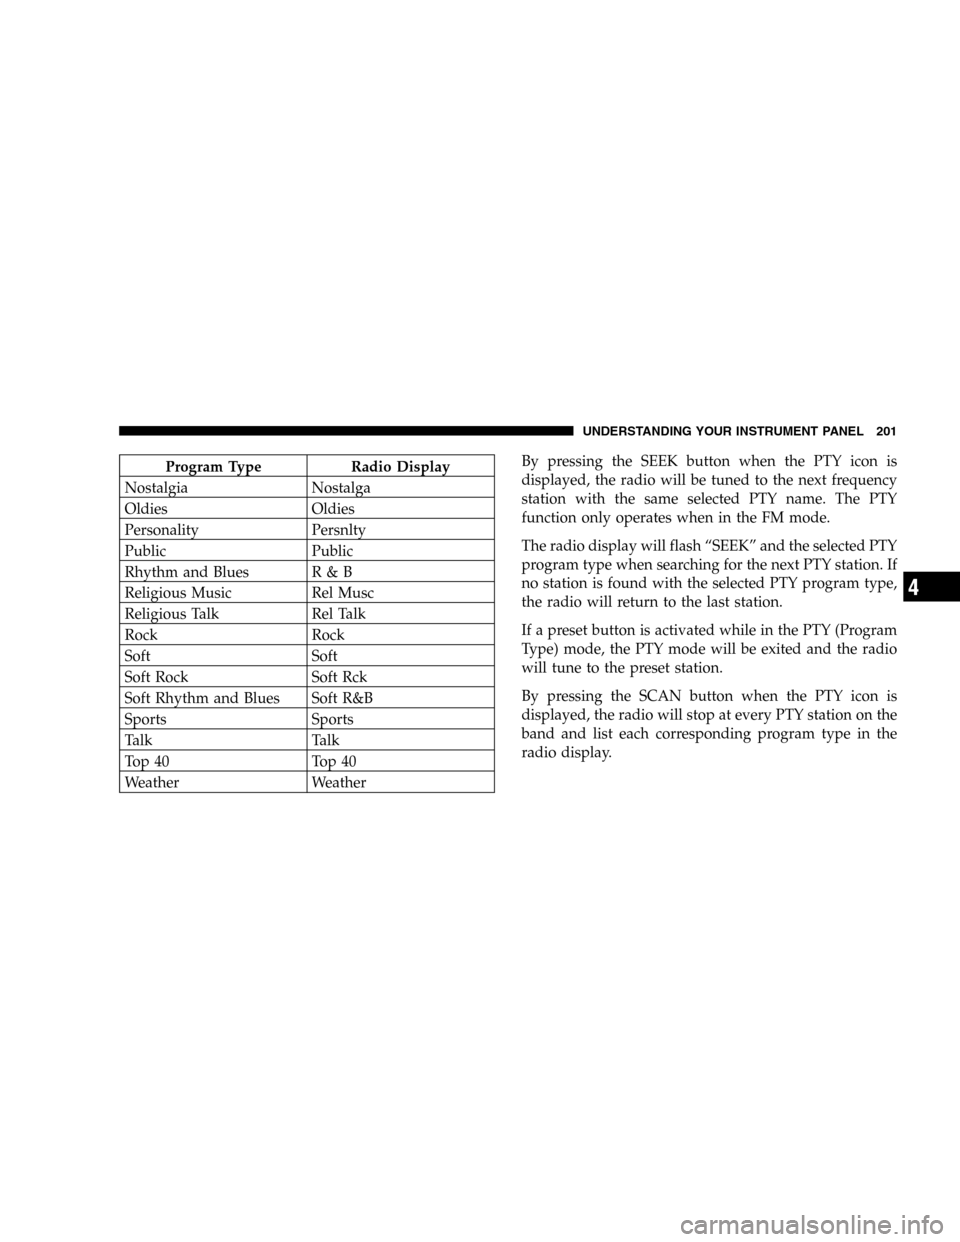
Program Type Radio Display
Nostalgia Nostalga
Oldies Oldies
Personality Persnlty
Public Public
Rhythm and Blues R & B
Religious Music Rel Musc
Religious Talk Rel Talk
Rock Rock
Soft Soft
Soft Rock Soft Rck
Soft Rhythm and Blues Soft R&B
Sports Sports
Talk Talk
Top 40 Top 40
Weather WeatherBy pressing the SEEK button when the PTY icon is
displayed, the radio will be tuned to the next frequency
station with the same selected PTY name. The PTY
function only operates when in the FM mode.
The radio display will flash “SEEK” and the selected PTY
program type when searching for the next PTY station. If
no station is found with the selected PTY program type,
the radio will return to the last station.
If a preset button is activated while in the PTY (Program
Type) mode, the PTY mode will be exited and the radio
will tune to the preset station.
By pressing the SCAN button when the PTY icon is
displayed, the radio will stop at every PTY station on the
band and list each corresponding program type in the
radio display.
UNDERSTANDING YOUR INSTRUMENT PANEL 201
4
Page 202 of 424
Time
Press the TIME button to change the display from
elapsed CD playing time to time of day.
Operating Instructions - Satellite Radio Mode (If
Equipped)
Refer to the Satellite Radio section of the Owner’s
Manual.
CD Diagnostic Indicators
When driving over a very rough road, the CD player may
skip momentarily. Skipping will not damage the disc or
the player, and play will resume automatically.
As a safeguard and to protect your CD player, one of the
following warning symbols may appear on your display.
A CD HOT symbol indicates the player is too hot.CD HOT will pause the operation. Play can be resumed
when the operating temperature is corrected or another
MODE is selected.
CD ERROR will appear on the display if the laser is
unable to read the Disc data for the following reasons:
•Warped disc
•Excessive vibration
•Disc inserted upside down
•Damaged disc
•Water condensation on optics
202 UNDERSTANDING YOUR INSTRUMENT PANEL
Page 204 of 424
System Activation
To activate your Sirius Satellite Radio service, call the
toll-free number 888-539-7474, or visit the Sirius web site
at www.sirius.com. Please have the following informa-
tion available when activating your system:
1. The Electronic Serial Number/Sirius Identification
Number (ESN/SID).
2. Credit card information.
3. Your Vehicle Identification Number.
Electronic Serial Number/Sirius Identification
Number (ENS/SID)
The Electronic Serial Number/Sirius Identification Num-
ber is needed to activate your Sirius Satellite Radio
system. To access the ESN/SID, refer to the following
steps:
ESN/SID Access With RBB, RAH and RBK Radios
With the ignition switch in the ACCESSORY position and
the radio OFF, press the Tape Eject or CD Eject (depend-
ing on the radio type) and Time buttons simultaneously
for 3 seconds. The first four digits of the twelve-digit
ESN/SID number will be displayed. Press the SEEK UP
button to display the next four digits. Continue to press
the SEEK UP button until all twelve ESN/SID digits have
been displayed. The SEEK DOWN will page down until
the first four digits are displayed. The radio will exit the
ESN/SID mode when any other button is pushed, the
ignition is turned OFF, or 5 minutes has passed since any
button was pushed.
204 UNDERSTANDING YOUR INSTRUMENT PANEL
Page 205 of 424
ESN/SID Access With RBP, RBU, RAZ, RB1 and
RBQ Radios
With the ignition switch in the ACCESSORY position and
the radio OFF, press the CD Eject and TIME buttons
simultaneously for 3 seconds. All twelve ESN/SID num-
bers will be displayed. The radio will exit the ESN/SID
mode when any other button is pushed, the ignition is
turned OFF, or 5 minutes has passed since any button
was pushed.
Selecting Satellite Mode in RBB, RAH and RBK
Radios
Press the MODE button repeatedly until�SA�appears in
the display. A CD or tape may remain in the radio while
in the Satellite radio mode.
Selecting Satellite Mode in RBP, RBU, RAZ, RB1
and RBQ Radios
Press the MODE button repeatedly until the word
�SIRIUS�appears in the display. These radios will also
display the following:
•After 3 seconds, the current channel name and channel
number will be displayed for 5 seconds.
•The current program type and channel number will
then be displayed for 5 seconds.
•The current channel number will then be displayed
until an action occurs.
A CD or tape may remain in the radio while in the
Satellite radio mode.
UNDERSTANDING YOUR INSTRUMENT PANEL 205
4
Page 206 of 424
Selecting a Channel
Press and release the SEEK or TUNE buttons to search for
the next channel. Press the top of the button to search up
and the bottom of the button to search down. Holding the
TUNE button causes the radio to bypass channels until
the button is released.
Press and release the SCAN button (if equipped) to
automatically change channels every 7 seconds. The
radio will pause on each channel for 7 seconds before
moving on to the next channel. The word�SCAN�will
appear in the display between each channel change. Press
the SCAN button a second time to stop the search.
NOTE:Channels that may contain objectionable content
can be blocked. Contact Sirius Customer Care at 888-539-
7474 to discuss options for channel blocking or unblock-
ing. Please have your ESN/SID information available.
Storing and Selecting Pre-Set Channels
In addition to the 10 AM and 10 FM pre-set stations, you
may also commit 10 satellite stations to push button
memory. These satellite channel pre-set stations will not
erase any AM or FM pre-set memory stations. Follow the
memory pre-set procedures that apply to your radio.
Using the PTY (Program Type) Button (if
equipped)
Follow the PTY button instructions that apply to your
radio.
PTY Button�SCAN�
When the desired program type is obtained, press the
�SCAN�button within five seconds. The radio will play 7
seconds of the selected channel before moving to the next
channel of the selected program type. Press the�SCAN�
button a second time to stop the search.
206 UNDERSTANDING YOUR INSTRUMENT PANEL
Page 270 of 424
CAUTION!
After inspecting or adjusting the tire pressure al-
ways reinstall the valve stem cap. This will prevent
moisture and dirt from entering the valve stem,
which could damage the wheel rim sensor.
NOTE:
•The TPM system can inform the driver of a low tire
pressure condition.
•The TPM system is not intended to replace normal tire
care and maintenance, nor to provide warning of a tire
failure or condition.
•The TPM system should not be used as a tire pressure
gauge while adjusting your tire pressure.
Tire Pressure Monitoring — Premium System
The Tire Pressure Monitor System (TPM) system uses
wireless technology with wheel rim mounted electronic
sensors to monitor tire pressure levels. Sensors mounted
to each wheel as part of the valve stem transmit tire
pressure readings to the Receiver Module. The wheel
sensors monitor tire pressure, and status for all four
active road tires and the spare tire. The spare tire pressure
is monitored, but not displayed.
NOTE:It is particularly important, for you to check the
tire pressure in all of your tires regularly and to maintain
the proper pressure.
The Tire Pressure Monitoring Indicator Lamp will
illuminate in the instrument cluster, and an au-
dible chime will be activated when one or more
tire pressures is low. The Tire Pressure Monitoring Indi-
cator Lamp will flash on and off for ten seconds when a
270 STARTING AND OPERATING
Page 271 of 424
system fault is detected. The flash cycle will repeat every
ten minutes or until the fault condition is removed and
reset.
The Tire Pressure Monitoring System consists of the
following components:
•Receiver Module
•4/5 Wheel Sensors
•4 Wheel Sensor Trigger Modules
•Tire Pressure Monitoring System Display Messages in
the EVIC
•Amber Colored Tire Pressure Monitoring Indicator
Lamp
The system consists of tire pressure monitoring sensors
attached to each wheel through the valve stem mounting
hole, a central receiver module, Wheel Sensor Trigger
Modules mounted in three of the four wheel wells,various Tire Pressure Monitoring System Display Mes-
sages in the EVIC, and an amber colored Indicator Lamp.
A sensor shall be installed in the spare wheel if the
vehicle is equipped with a matching full size spare wheel
and tire assembly.
NOTE:For vehicles with optional wheel/tire sizes and
significantly different tire placard pressures, the placard
pressure value and the low-pressure threshold value is
re-programmable at your authorized dealer to accommo-
date the customer selected wheel/tire combinations rec-
ommended by DaimlerChrysler.
The following�warnings�will cause a text message to be
displayed, an audible chime to sound and the tire pres-
sure Indicator Lamp to illuminate. The audible chime
will occur once every ignition cycle for each�warning�
detected. The tire pressure Indicator Lamp will illumi-
nate continuously (solid) and shall remain illuminated
until the warning condition is removed/reset.
STARTING AND OPERATING 271
5