Page 171 of 424

11. Temperature Gage
Indicates engine coolant temperature. Any read-
ing within the normal range indicates that the
cooling system is operating satisfactorily.
The gage pointer will likely indicate a higher temperature
(above center scale) when driving in hot weather, up
mountain grades, in heavy stop and go traffic, or when
towing a trailer. It should not be allowed to exceed the
upper limits of the normal operating range.
If the pointer rises to the red zone (five chimes will
occur), pull over and stop the vehicle. Do not turn the
engine off. Idle the vehicle with the air conditioning
turned off, until the pointer drops back into the normal
range. If the engine remains in the high range, turn the
engine off and call for service.12. Reset Button
Press this button to toggle between the odometer and trip
odometer display. When in the trip odometer mode,
holding the button in resets the trip odometer. Also,
pressing the “Reset” button will clear out any warning
messages in the odometer display.
13. Odometer/Trip Odometer
A vacuum fluorescent display indicates the total distance
the vehicle has been driven. Also, the cluster will display,
replacing the odometer/trip odometer, vehicle warning
messages such as: door/gate/glass ajar and low washer
fluid. See appropriate sections for more information.
NOTE:If vehicle is equipped with the optional Elec-
tronic Vehicle Information Center (EVIC) in the overhead
console, all warnings including “door”, “GATE”,
“GLASS”, and “LOWASH” will only be displayed in the
UNDERSTANDING YOUR INSTRUMENT PANEL 171
4
Page 172 of 424

EVIC display (not in the instrument cluster). For addi-
tional information, refer to “Overhead Console — If
Equipped” in Section 3.
U.S. federal regulations require that upon transfer of
vehicle ownership, the seller certify to the purchaser the
correct mileage that the vehicle has been driven. There-
fore, if the odometer reading is changed during repair or
replacement, be sure to keep a record of the reading
before and after the service so that the correct mileage can
be determined.
14. Cruise Indicator Light
This indicator lights when the speed control
system is turned ON.
15. Oil Pressure Warning Light
Shows low engine oil pressure. The light will come
on and remain on when the ignition switch is
turned from the OFF to the ON position, and the lightwill turn off after the engine is started. If the bulb does
not come on, have the system checked by your autho-
rized dealer.
If the warning light comes on and remains on while
driving, stop the vehicle and shut off the engine. DO
NOT OPERATE THE VEHICLE UNTIL THE CAUSE IS
CORRECTED. Also, a single chime will sound.
16. Transmission Temperature Warning Light
This light indicates that there is excessive trans-
mission fluid temperature that might occur with
severe usage such as trailer towing or snow plowing. If
this light comes on, stop the vehicle and run the engine at
idle or faster, with the transmission in N (Neutral) until
the light goes off.
172 UNDERSTANDING YOUR INSTRUMENT PANEL
Page 176 of 424

off. If the light remains lit with the engine running your
vehicle will usually be drivable, however, see your dealer
for service as soon as possible. If the light is flashing
when the engine is running, immediate service is re-
quired and you may experience reduced performance, an
elevated/rough idle or engine stall and your vehicle may
require towing. The light will come on when the ignition
is first turned on and remain on briefly as a bulb check.
If the light does not come on during starting, have the
system checked by an authorized dealer.
30. Glow Plug Indicator Light — If Equipped
This light will illuminate when the ignition
switch is first turned to the ON position. Wait
until the light turns off before starting the
vehicle. Refer to “Starting Procedures” in Sec-
tion 5 of this manual. (See page 220 for more
information.)ELECTRONIC DIGITAL CLOCK
The clock and radio each use the display panel built into
the radio. A digital readout shows the time in hours and
minutes whenever the ignition switch is in the ON or
ACC position and the time button is pressed.
When the ignition switch is in the OFF position, or when
the radio frequency is being displayed, time keeping is
accurately maintained.
Clock Setting Procedure
1. Turn the ignition switch to the ON or ACC position
and press the time button. Using the tip of a ballpoint pen
or similar object, press either the hour (H) or minute (M)
buttons on the radio.
2. Press the H button to set hours or the M button to set
minutes. The time setting will increase each time you
press a button.
176 UNDERSTANDING YOUR INSTRUMENT PANEL
Page 178 of 424

remain active for up to 45 seconds after the ignition
switch has been turned off. Opening a vehicle front door
will cancel this feature.
SALES CODE RAZ—AM/ FM STEREO RADIO
WITH CASSETTE TAPE PLAYER, CD PLAYER
AND CD CHANGER CONTROLS
NOTE:The radio sales code is located on the lower left
side of your radio faceplate.
Operating Instructions — Radio
NOTE:Power to operate the radio is controlled by the
ignition switch. It must be in the ON or ACC position to
operate the radio.
Power Switch, Volume Control
Press the ON/VOL control to turn the radio on. Turn the
volume control clockwise to increase the volume. The
volume will be displayed and continuously updated
while the button is pressed.
Seek Button (Radio Mode)
Press and release the Seek button to search for the next
station in either the AM or FM mode. Press the top of the
button to seek up and the bottom to seek down. Holding
the button will by pass stations until you release the
button.
RAZ Radio
178 UNDERSTANDING YOUR INSTRUMENT PANEL
Page 179 of 424

Tuning
Press the TUNE control up or down to increase or
decrease the frequency. If you press and hold the button,
the radio will continue to tune until you release the
button. The frequency will be displayed and continu-
ously updated while the button is pressed.
Radio Data System (RDS)
The Radio Data System allows radio broadcasting sta-
tions to send data signals on a subcarrier frequency
which is added to the stereo signal. RDS was developed
to give FM receivers user-friendly features, such as
Program Service name (PS) and Program Type (PTY).
Program Service name is typically used by the broad-
caster to display the station’s name or call letters, for
example�WNIC�. Typically these are 8 characters in
length and are displayed by the radio for those stationswhich are broadcasting this information. PTY (Program
Type) is used to characterize the station’s program ma-
terial, for example�Rock Music�.
PTY (Program Type) Button
Pressing this button once will turn on the PTY mode for
5 seconds. If no action is taken during the 5 second time
out the PTY icon will turn off. Pressing the PTY button
within 5 seconds will allow the program format type to
be selected. Many radio stations do not currently broad-
cast PTY information.
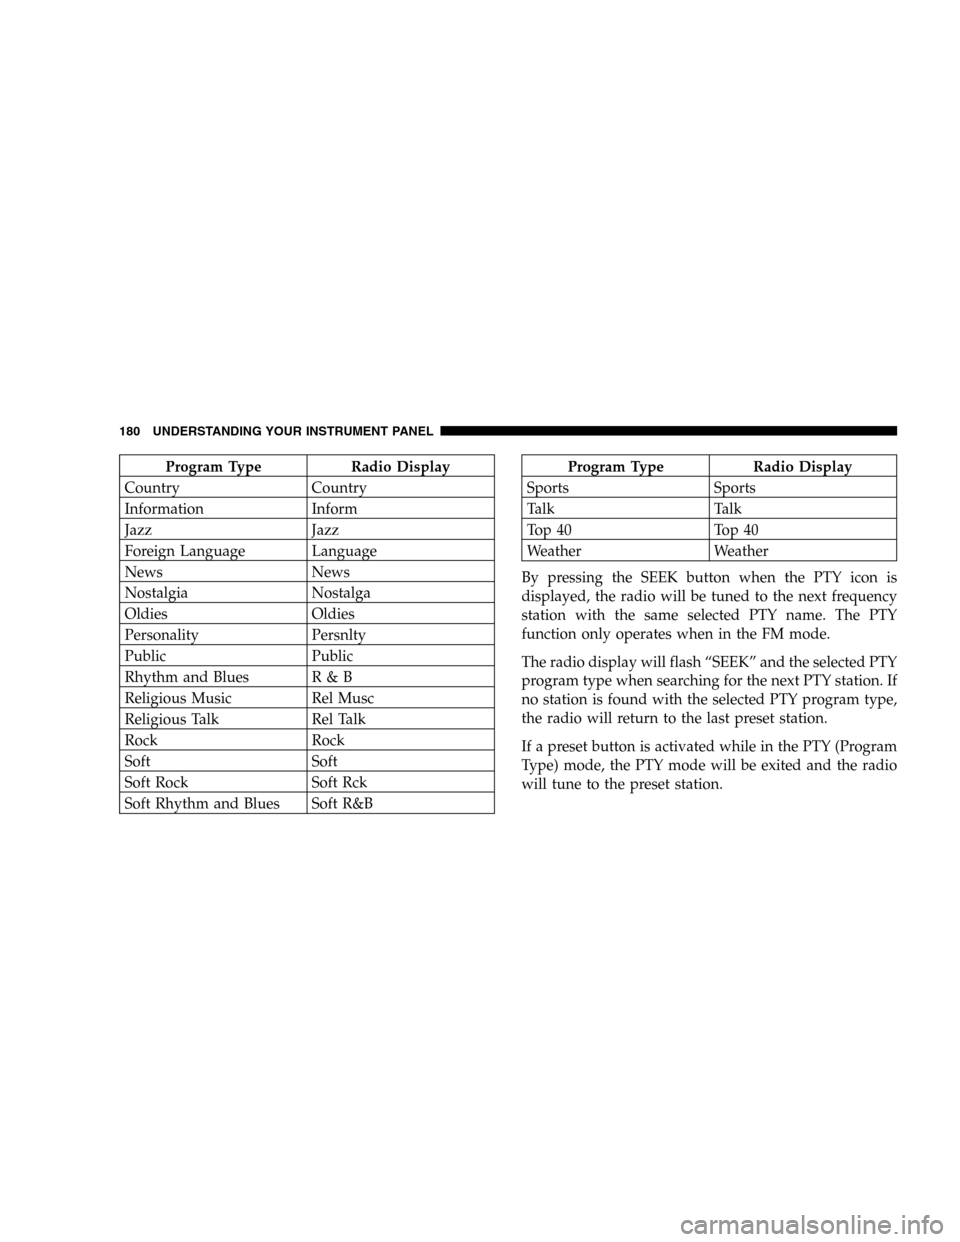
Toggle the PTY button to select the following format
types:
Program Type Radio Display
Adult Hits Adlt Hit
Classical Classicl
Classic Rock Cls Rock
College College
UNDERSTANDING YOUR INSTRUMENT PANEL 179
4
Page 180 of 424

Program Type Radio Display
Country Country
Information Inform
Jazz Jazz
Foreign Language Language
News News
Nostalgia Nostalga
Oldies Oldies
Personality Persnlty
Public Public
Rhythm and Blues R & B
Religious Music Rel Musc
Religious Talk Rel Talk
Rock Rock
Soft Soft
Soft Rock Soft Rck
Soft Rhythm and Blues Soft R&BProgram Type Radio Display
Sports Sports
Talk Talk
Top 40 Top 40
Weather Weather
By pressing the SEEK button when the PTY icon is
displayed, the radio will be tuned to the next frequency
station with the same selected PTY name. The PTY
function only operates when in the FM mode.
The radio display will flash “SEEK” and the selected PTY
program type when searching for the next PTY station. If
no station is found with the selected PTY program type,
the radio will return to the last preset station.
If a preset button is activated while in the PTY (Program
Type) mode, the PTY mode will be exited and the radio
will tune to the preset station.
180 UNDERSTANDING YOUR INSTRUMENT PANEL
Page 181 of 424

Pressing PTY, then SCAN will scan the FM Band and stop
at all RDS stations. Each RDS station will be played for a
5 second scan once around the FM Band and stop at the
last station. The PTY icon will then turn off.
Balance
The Balance control adjusts the left-to-right speaker bal-
ance. Push in the button and it will pop out. Adjust the
balance and push the button back in. The balance will be
displayed and continuously updated while the button is
turned.
Fade
The Fade control provides for balance between the front
and rear speakers. Push in the button and it will pop out.
Adjust the balance and push the button back in. The fade
will be displayed and continuously updated while the
button is turned.
Tone Control
Slide the Bass and/or Treble controls up or down to
adjust the sound for the desired tone. The treble, and bass
will be displayed and continuously updated while the
slide is moved.
AM/FM Selection
Press the AM/FM button to change from AM to FM. The
operating mode will be displayed next to the station
frequency. The display will show ST when a stereo
station is received.
Scan Button
Pressing the SCAN button causes the tuner to search for
the next station, in either AM or FM, pausing for 5 seconds
at each listenable station before continuing to the next.
Pressing the AM/FM button continues the search in the
alternate frequency band.
To stop the search, press SCAN a second time.
UNDERSTANDING YOUR INSTRUMENT PANEL 181
4
Page 182 of 424

To Set The Radio Push-button Memory
When you are receiving a station that you wish to
commit to push-button memory, press the SET button.
SET 1 will show in the display window. Select the
push-button you wish to lock onto this station and press
and release that button. If a station is not selected within
5 seconds after pressing the SET button, the station will
continue to play but will not be locked into push-button
memory.
You may add a second station to each push-button by
repeating the above procedure with this exception: Press
the SET button twice and SET 2 will show in the display
window. Each button can be set for SET 1 and SET 2 in
both AM and FM. This allows a total of 10 AM and 10 FM
stations to be locked into memory. You can recall the
stations stored in SET 2 memory by pressing the push-
button twice.
To Change From Clock To Radio Mode
Press the Time button to change the display between
radio frequency and time.
Operating Instructions — Tape Player
Insert the cassette with the exposed tape side toward the
right and the mechanical action of the player will gently
pull the cassette into the play position.
NOTE:When subjected to extremely cold temperatures,
the tape mechanism may require a few minutes to warm
up for proper operation. Sometimes poor playback may
be experienced due to a defective cassette tape. Clean and
demagnetize the tape heads at least twice a year.
Seek Button
Press the SEEK button up for the next selection on the
tape and down to return to the beginning of the current
selection.
182 UNDERSTANDING YOUR INSTRUMENT PANEL