Page 229 of 424
•When “rocking” a stuck vehicle by shifting between a
forward gear and reverse, do not spin wheels faster than
15 mph (24 km/h), or drivetrain damage may result.
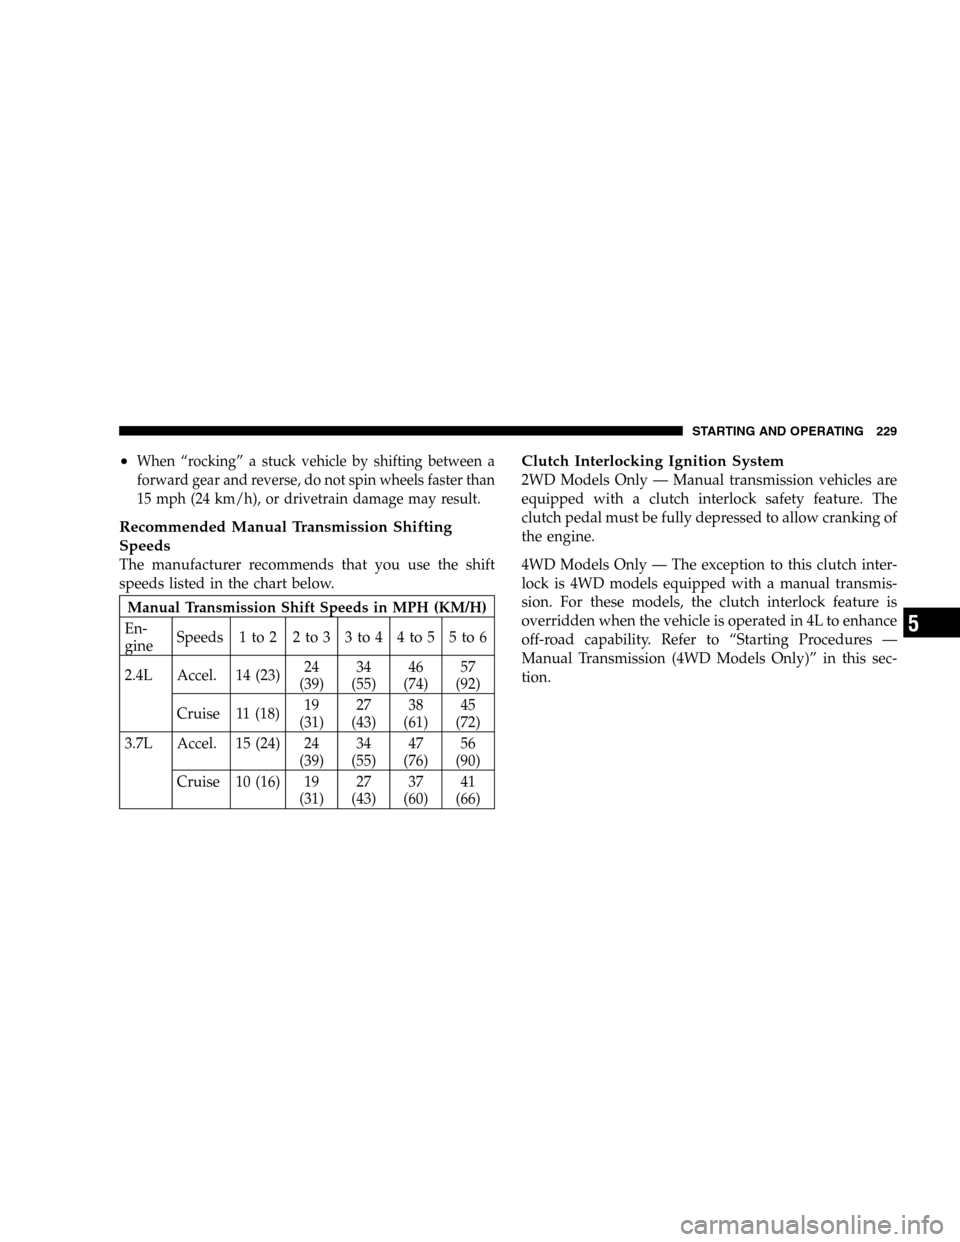
Recommended Manual Transmission Shifting
Speeds
The manufacturer recommends that you use the shift
speeds listed in the chart below.
Manual Transmission Shift Speeds in MPH (KM/H)
En-
gineSpeeds 1 to 2 2 to 3 3 to 4 4 to 5 5 to 6
2.4L Accel. 14 (23)24
(39)34
(55)46
(74)57
(92)
Cruise 11 (18)19
(31)27
(43)38
(61)45
(72)
3.7L Accel. 15 (24) 24
(39)34
(55)47
(76)56
(90)
Cruise 10 (16) 19
(31)27
(43)37
(60)41
(66)
Clutch Interlocking Ignition System
2WD Models Only — Manual transmission vehicles are
equipped with a clutch interlock safety feature. The
clutch pedal must be fully depressed to allow cranking of
the engine.
4WD Models Only — The exception to this clutch inter-
lock is 4WD models equipped with a manual transmis-
sion. For these models, the clutch interlock feature is
overridden when the vehicle is operated in 4L to enhance
off-road capability. Refer to “Starting Procedures —
Manual Transmission (4WD Models Only)” in this sec-
tion.
STARTING AND OPERATING 229
5
Page 239 of 424
4L
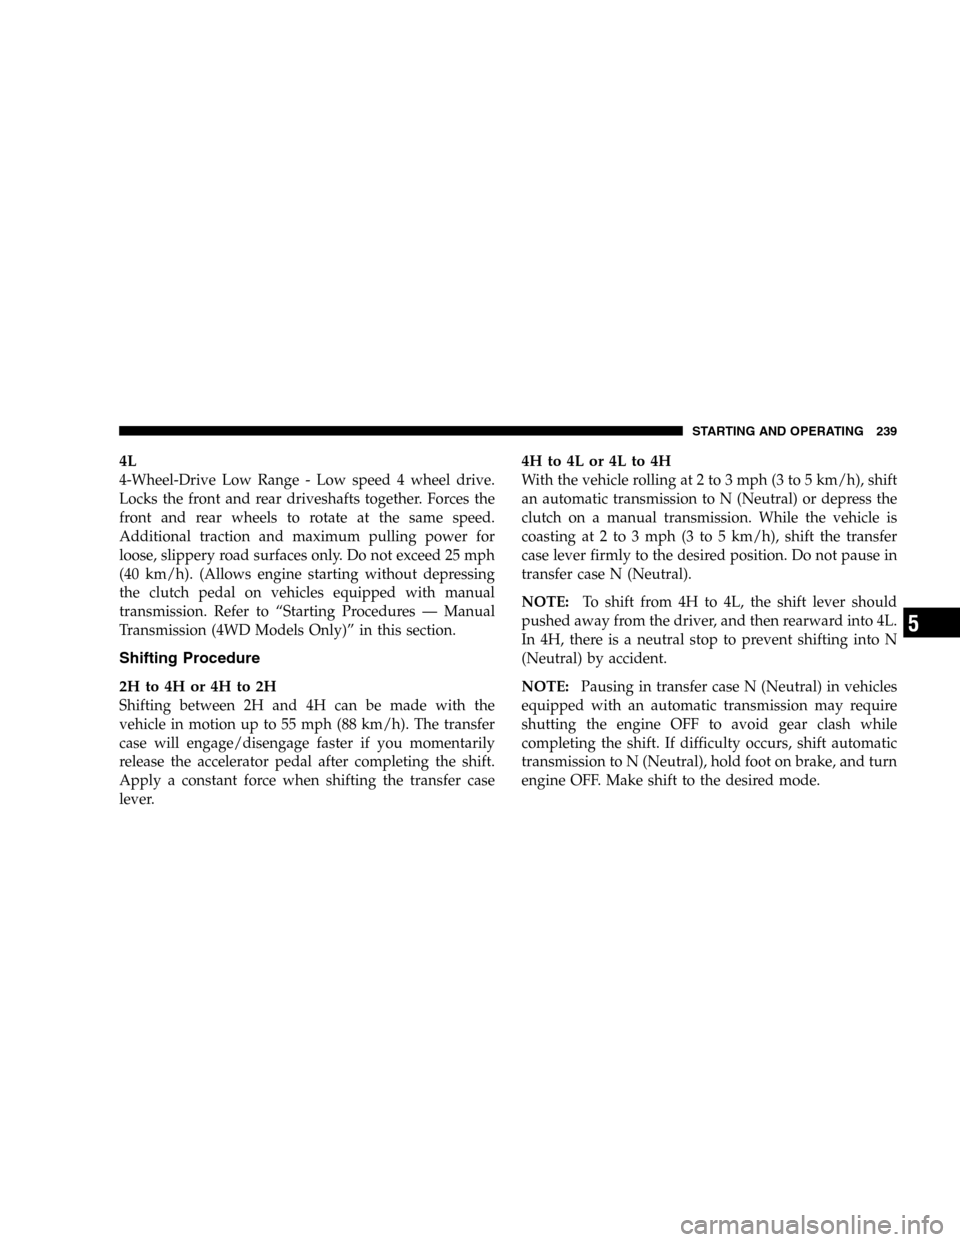
4-Wheel-Drive Low Range - Low speed 4 wheel drive.
Locks the front and rear driveshafts together. Forces the
front and rear wheels to rotate at the same speed.
Additional traction and maximum pulling power for
loose, slippery road surfaces only. Do not exceed 25 mph
(40 km/h). (Allows engine starting without depressing
the clutch pedal on vehicles equipped with manual
transmission. Refer to “Starting Procedures — Manual
Transmission (4WD Models Only)” in this section.
Shifting Procedure
2H to 4H or 4H to 2H
Shifting between 2H and 4H can be made with the
vehicle in motion up to 55 mph (88 km/h). The transfer
case will engage/disengage faster if you momentarily
release the accelerator pedal after completing the shift.
Apply a constant force when shifting the transfer case
lever.
4H to 4L or 4L to 4H
With the vehicle rolling at 2 to 3 mph (3 to 5 km/h), shift
an automatic transmission to N (Neutral) or depress the
clutch on a manual transmission. While the vehicle is
coasting at 2 to 3 mph (3 to 5 km/h), shift the transfer
case lever firmly to the desired position. Do not pause in
transfer case N (Neutral).
NOTE:To shift from 4H to 4L, the shift lever should
pushed away from the driver, and then rearward into 4L.
In 4H, there is a neutral stop to prevent shifting into N
(Neutral) by accident.
NOTE:Pausing in transfer case N (Neutral) in vehicles
equipped with an automatic transmission may require
shutting the engine OFF to avoid gear clash while
completing the shift. If difficulty occurs, shift automatic
transmission to N (Neutral), hold foot on brake, and turn
engine OFF. Make shift to the desired mode.
STARTING AND OPERATING 239
5
Page 287 of 424
RECREATIONAL TOWING (BEHIND
MOTORHOME, ETC.)
Towing – 2WD Models
Recreational towing is not allowed.Towing with the
rear wheels on the ground can result in severe transmis-
sion damage.
Towing — 4WD Models
CAUTION!
Internal damage to the transfer case will occur if a
front or rear wheel lift is used when recreational
towing.
NOTE:The transfer case must be shifted into N (Neu-
tral), and the transmission must be shifted into P (Park)(for automatic transmission) or into any forward gear (for
manual transmission) for recreational towing.
Shifting Into Neutral (N)
Use the following procedure to prepare your vehicle for
recreational towing.
CAUTION!
It is necessary to follow these steps to be certain that
the transfer case is fully in N (Neutral) before
recreational towing to prevent damage to internal
parts.
1. Depress brake pedal.
2. Shift transmission into N (Neutral).
3. Shift transfer case lever into N (Neutral).
4. Start engine.
STARTING AND OPERATING 287
5
Page 288 of 424
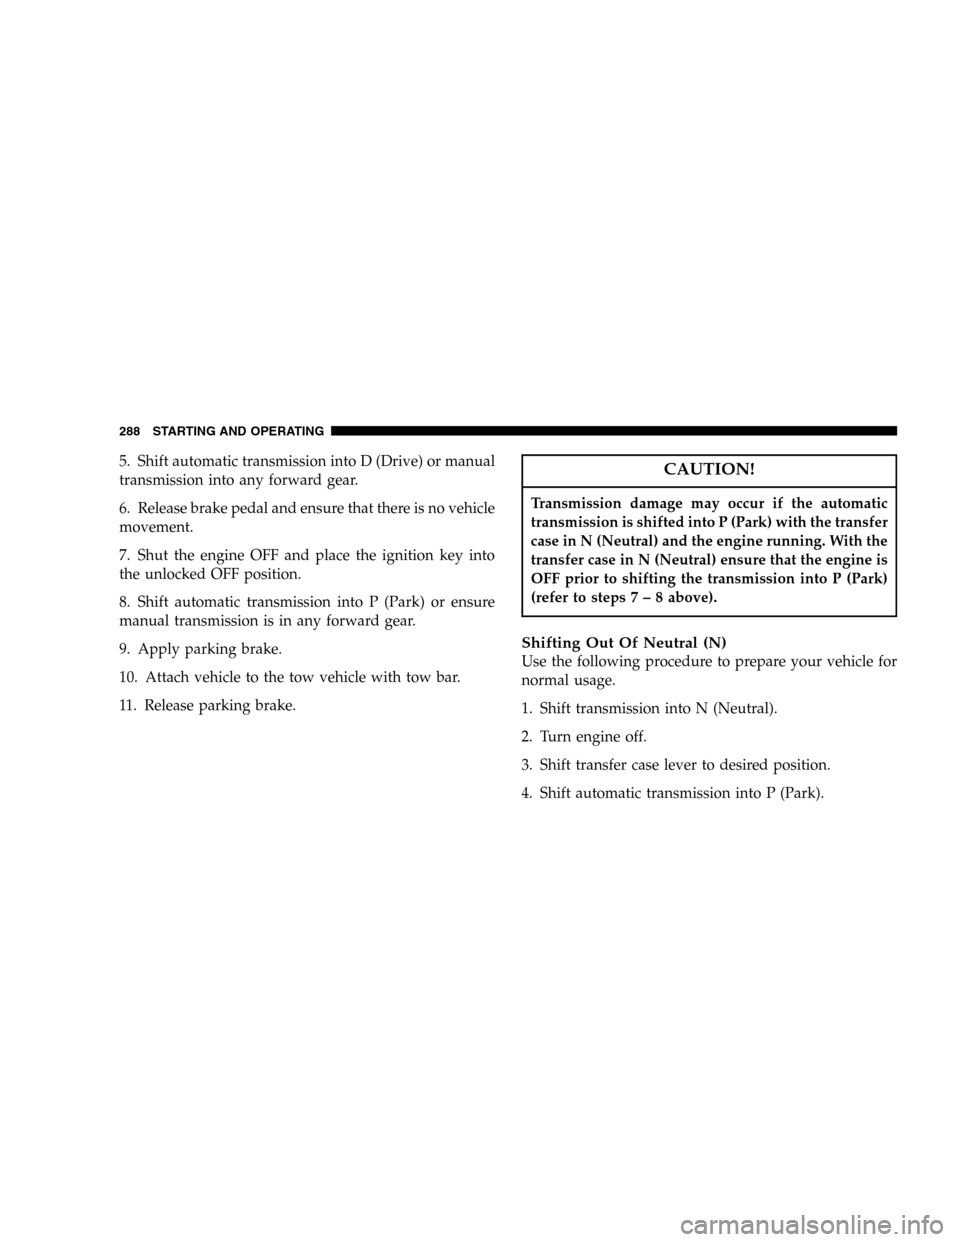
5. Shift automatic transmission into D (Drive) or manual
transmission into any forward gear.
6. Release brake pedal and ensure that there is no vehicle
movement.
7. Shut the engine OFF and place the ignition key into
the unlocked OFF position.
8. Shift automatic transmission into P (Park) or ensure
manual transmission is in any forward gear.
9. Apply parking brake.
10. Attach vehicle to the tow vehicle with tow bar.
11. Release parking brake.CAUTION!
Transmission damage may occur if the automatic
transmission is shifted into P (Park) with the transfer
case in N (Neutral) and the engine running. With the
transfer case in N (Neutral) ensure that the engine is
OFF prior to shifting the transmission into P (Park)
(refer to steps7 – 8 above).
Shifting Out Of Neutral (N)
Use the following procedure to prepare your vehicle for
normal usage.
1. Shift transmission into N (Neutral).
2. Turn engine off.
3. Shift transfer case lever to desired position.
4. Shift automatic transmission into P (Park).
288 STARTING AND OPERATING
Page 289 of 424
5. Start engine.
6. Shift automatic transmission into D (Drive) or manual
transmission into any forward gear.
WARNING!
You or others could be injured if you leave the
vehicle unattended with the transfer case in the N
(Neutral) position without first fully engaging the
parking brake. The transfer case N (Neutral) position
disengages both the front and rear driveshafts from
the powertrain and will allow the vehicle to move
regardless of the transmission position. The parking
brake should always be applied when the driver is
not in the vehicle.
CAUTION!
Do not use a bumper mounted clamp-on tow bar on
your vehicle. The bumper face bar will be damaged.
SNOW PLOW
Snow plows, winches, and other aftermarket equipment
shouldnotbe added to the front end of your vehicle. The
airbag crash sensors may be affected by the change in the
front end structure. The airbags could deploy unexpect-
edly or could fail to deploy during a collision.
STARTING AND OPERATING 289
5
Page 296 of 424
NOTE:If you have added aftermarket accessories to the
spare tire mounted carrier, it cannot exceed a gross
weight of 50 lbs (23 kg) including the weight of the spare
tire.
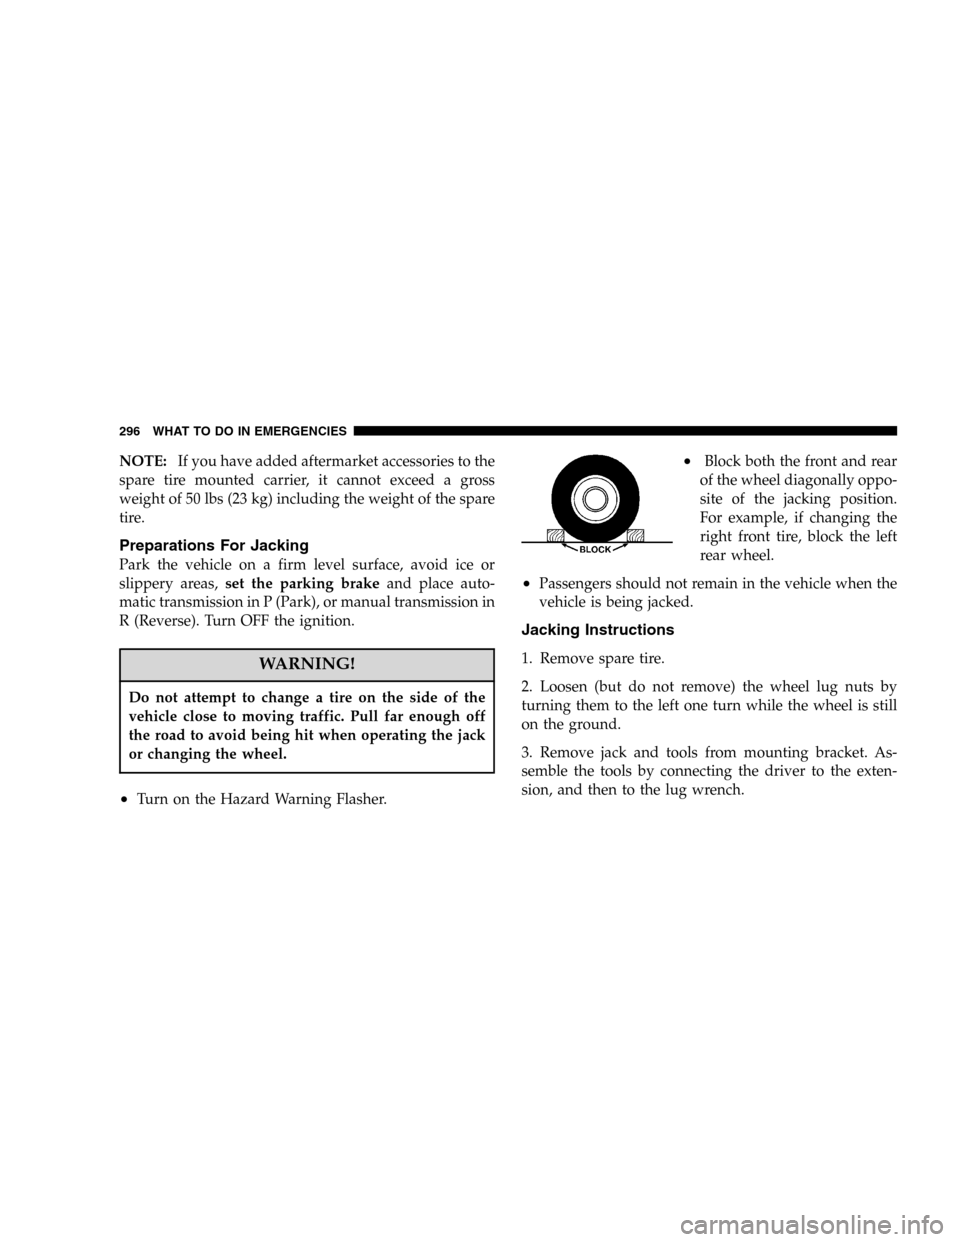
Preparations For Jacking
Park the vehicle on a firm level surface, avoid ice or
slippery areas,set the parking brakeand place auto-
matic transmission in P (Park), or manual transmission in
R (Reverse). Turn OFF the ignition.
WARNING!
Do not attempt to change a tire on the side of the
vehicle close to moving traffic. Pull far enough off
the road to avoid being hit when operating the jack
or changing the wheel.
•Turn on the Hazard Warning Flasher.
•Block both the front and rear
of the wheel diagonally oppo-
site of the jacking position.
For example, if changing the
right front tire, block the left
rear wheel.
•Passengers should not remain in the vehicle when the
vehicle is being jacked.
Jacking Instructions
1. Remove spare tire.
2. Loosen (but do not remove) the wheel lug nuts by
turning them to the left one turn while the wheel is still
on the ground.
3. Remove jack and tools from mounting bracket. As-
semble the tools by connecting the driver to the exten-
sion, and then to the lug wrench.
296 WHAT TO DO IN EMERGENCIES
Page 299 of 424

JUMP STARTING PROCEDURE
NOTE:Check the charge indicator on the battery. If the
indicator is light or yellow, replace the battery.
1. Wear eye protection and remove any metal jewelry
such as watch bands or bracelets that might make an
unintended electrical contact.
2. When boost is provided by a battery in another
vehicle, park that vehicle within booster cable reach but
without letting the vehicles touch. Set the parking brake,
place the automatic transmission in P (Park), or manual
transmission in N (Neutral), and turn the ignition to OFF
for both vehicles.
3. Turn off the heater, radio and all unnecessary electrical
loads.4. Connect one end of a jumper cable to the positive
terminal of the discharged battery. Connect the other end
of the same cable to the positive terminal of the booster
battery.
5. Connect the other cable, first to the negative terminal
of the booster battery and then connect the other end to
a non-paint metal surface on the engine of the vehicle
with the discharged battery. Make sure you have a good
contact on the engine.
6. Start the engine in the vehicle which has the booster
battery, let the engine idle a few minutes, then start the
engine in the vehicle with the discharged battery.
7. When removing the jumper cables, reverse the above
sequence exactly. Be careful of the moving belts and fan.
WHAT TO DO IN EMERGENCIES 299
6
Page 304 of 424
▫Maintenance-Free Battery................320
▫Air Conditioner Maintenance.............321
▫Power Steering Fluid Check..............322
▫Driveline And Steering Component
Lubrication..........................322
▫Body Lubrication.....................323
▫Windshield Wiper Blades................323
▫Windshield Washers...................324
▫Exhaust System......................324
▫Cooling System.......................325
▫Hoses And Vacuum/Vapor Harnesses.......330
▫Brake System........................330
▫Automatic Transmission................333▫Hydraulic Clutch Fluid —
Manual Transmission..................335
▫Manual Transmission..................335
▫Transfer Case........................336
▫Front/Rear Axle Fluid..................337
▫Appearance Care And Protection From
Corrosion...........................337
�Fuse Panel...........................342
▫Interior Fuses........................342
▫Underhood Fuses
(Power Distribution Center)..............345
�Vehicle Storage........................349
�Replacement Bulbs......................350
304 MAINTAINING YOUR VEHICLE