Page 1728 of 3419
DTC P1444 EVAP CANISTER PURGE VOLUME CONTROL SOLENOID VALVE
EC-537
C
D
E
F
G
H
I
J
K
L
MA
EC
Revision: October 20052005 QX56
10. CHECK IF EVAP CANISTER SATURATED WITH WATER
1. Remove EVAP canister with EVAP canister vent control valve and EVAP control system pressure sensor
attached.
2. Check if water will drain from the EVAP canister.
Ye s o r N o
Yes >> GO TO 11.
No >> GO TO 13.
11 . CHECK EVAP CANISTER
Weigh the EVAP canister with the EVAP canister vent control valve and EVAP control system pressure sensor
attached.
The weight should be less than 2.5 kg (5.5 lb).
OK or NG
OK >> GO TO 13.
NG >> GO TO 12.
12. DETECT MALFUNCTIONING PART
Check the following.
�EVAP canister for damage
�EVAP hose between EVAP canister and vehicle frame for clogging or poor connection
>> Repair hose or replace EVAP canister.
13. CHECK INTERMITTENT INCIDENT
Refer to EC-156, "
TROUBLE DIAGNOSIS FOR INTERMITTENT INCIDENT" .
>>INSPECTION END
BBIA0351E
Page 1730 of 3419
DTC P1446 EVAP CANISTER VENT CONTROL VALVE
EC-539
C
D
E
F
G
H
I
J
K
L
MA
EC
Revision: October 20052005 QX56
DTC P1446 EVAP CANISTER VENT CONTROL VALVEPFP:14935
Component DescriptionUBS00HB1
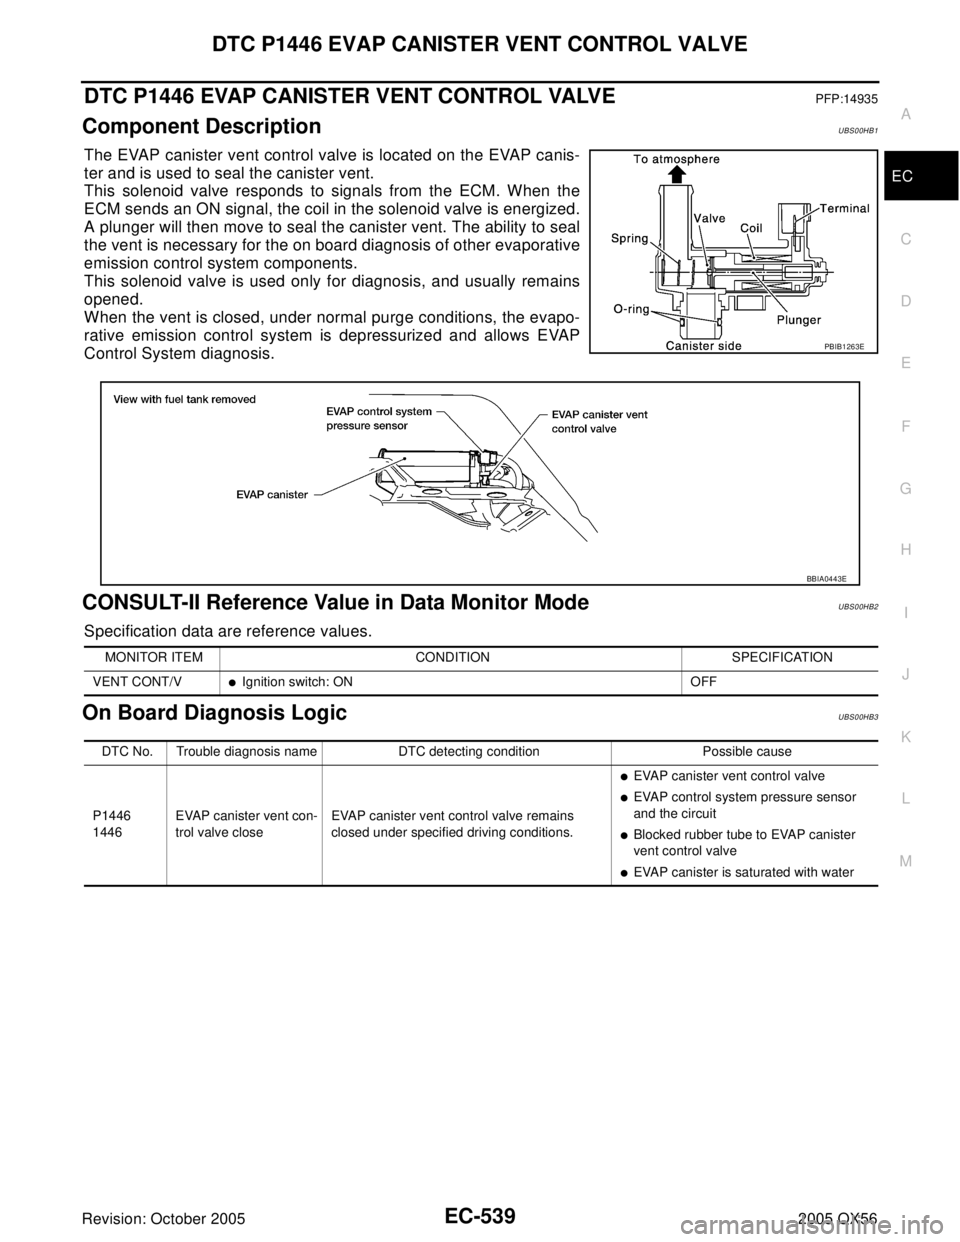
The EVAP canister vent control valve is located on the EVAP canis-
ter and is used to seal the canister vent.
This solenoid valve responds to signals from the ECM. When the
ECM sends an ON signal, the coil in the solenoid valve is energized.
A plunger will then move to seal the canister vent. The ability to seal
the vent is necessary for the on board diagnosis of other evaporative
emission control system components.
This solenoid valve is used only for diagnosis, and usually remains
opened.
When the vent is closed, under normal purge conditions, the evapo-
rative emission control system is depressurized and allows EVAP
Control System diagnosis.
CONSULT-II Reference Value in Data Monitor ModeUBS00HB2
Specification data are reference values.
On Board Diagnosis LogicUBS00HB3
PBIB1263E
BBIA0443E
MONITOR ITEM CONDITION SPECIFICATION
VENT CONT/V
�Ignition switch: ON OFF
DTC No. Trouble diagnosis name DTC detecting condition Possible cause
P1446
1446EVAP canister vent con-
trol valve closeEVAP canister vent control valve remains
closed under specified driving conditions.
�EVAP canister vent control valve
�EVAP control system pressure sensor
and the circuit
�Blocked rubber tube to EVAP canister
vent control valve
�EVAP canister is saturated with water
Page 1733 of 3419
EC-542Revision: October 2005
DTC P1446 EVAP CANISTER VENT CONTROL VALVE
2005 QX56
Specification data are reference values and are measured between each terminal and ground.
CAUTION:
Do not use ECM ground terminals when measuring input/output voltage. Doing so may result in dam-
age to the ECM's transistor. Use a ground other than ECM terminals, such as the ground.
Diagnostic ProcedureUBS00HB6
1. CHECK RUBBER TUBE
1. Turn ignition switch OFF.
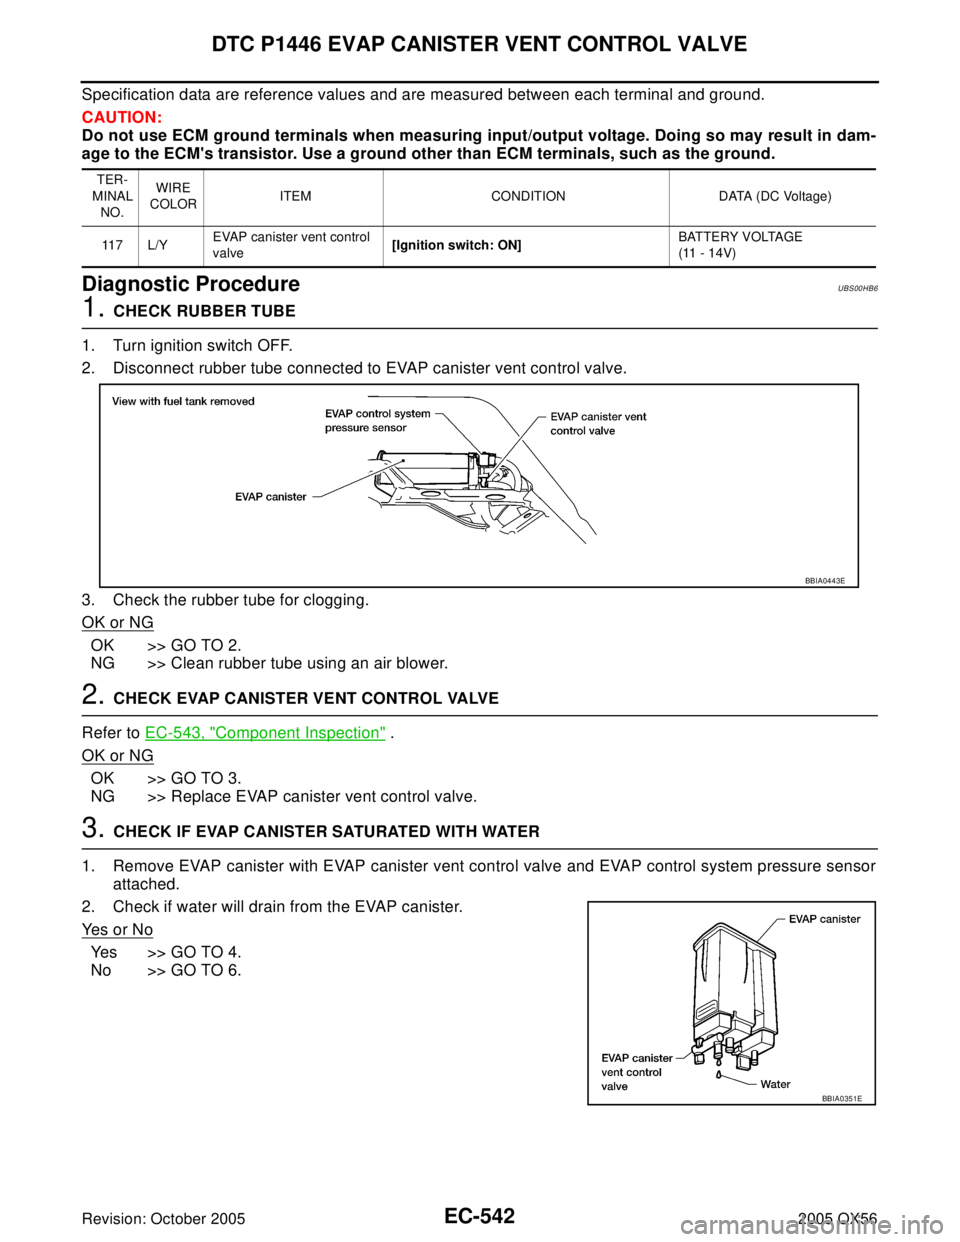
2. Disconnect rubber tube connected to EVAP canister vent control valve.
3. Check the rubber tube for clogging.
OK or NG
OK >> GO TO 2.
NG >> Clean rubber tube using an air blower.
2. CHECK EVAP CANISTER VENT CONTROL VALVE
Refer to EC-543, "
Component Inspection" .
OK or NG
OK >> GO TO 3.
NG >> Replace EVAP canister vent control valve.
3. CHECK IF EVAP CANISTER SATURATED WITH WATER
1. Remove EVAP canister with EVAP canister vent control valve and EVAP control system pressure sensor
attached.
2. Check if water will drain from the EVAP canister.
Ye s o r N o
Yes >> GO TO 4.
No >> GO TO 6.
TER-
MINAL
NO.WIRE
COLORITEM CONDITION DATA (DC Voltage)
11 7 L / YEVAP canister vent control
valve[Ignition switch: ON]BATTERY VOLTAGE
(11 - 14V)
BBIA0443E
BBIA0351E
Page 1734 of 3419
DTC P1446 EVAP CANISTER VENT CONTROL VALVE
EC-543
C
D
E
F
G
H
I
J
K
L
MA
EC
Revision: October 20052005 QX56
4. CHECK EVAP CANISTER
Weigh the EVAP canister with the EVAP canister vent control valve and EVAP control system pressure sensor
attached.
The weight should be less than 2.5 kg (5.5 lb).
OK or NG
OK >> GO TO 6.
NG >> GO TO 5.
5. DETECT MALFUNCTIONING PART
Check the following.
�EVAP canister for damage
�EVAP hose between EVAP canister and vehicle frame for clogging or poor connection
>> Repair hose or replace EVAP canister.
6. CHECK EVAP CONTROL SYSTEM PRESSURE SENSOR CONNECTOR
1. Disconnect EVAP control system pressure sensor harness connector.
2. Check connectors for water.
OK or NG
OK >> GO TO 7.
NG >> Replace EVAP control system pressure sensor.
7. CHECK EVAP CONTROL SYSTEM PRESSURE SENSOR
Refer to EC-334, "
Component Inspection" .
OK or NG
OK >> GO TO 8.
NG >> Replace EVAP control system pressure sensor.
8. CHECK INTERMITTENT INCIDENT
Refer to EC-156, "
TROUBLE DIAGNOSIS FOR INTERMITTENT INCIDENT" .
>>INSPECTION END
Component InspectionUBS00HB7
EVAP CANISTER VENT CONTROL VALVE
With CONSULT-II
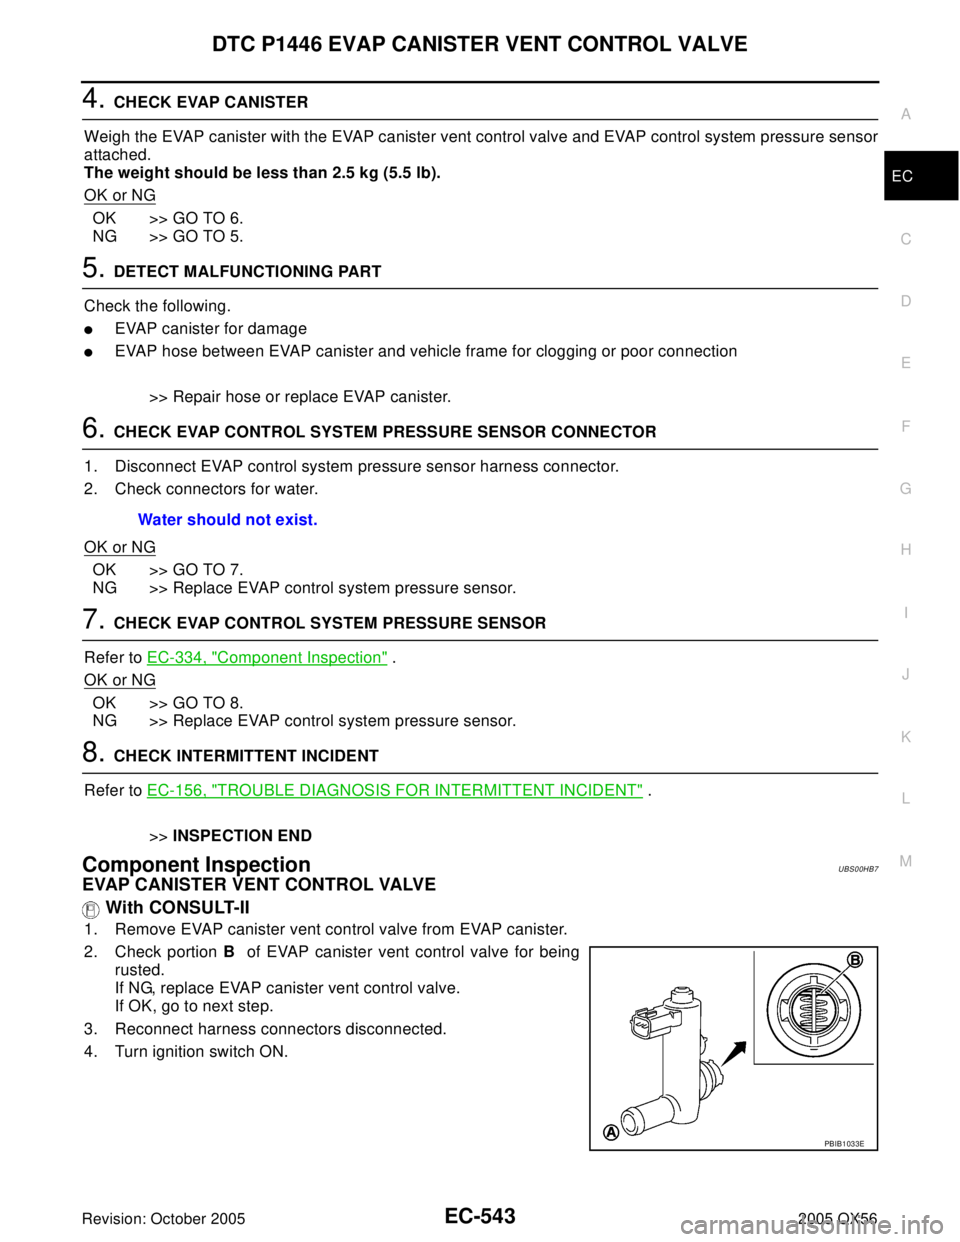
1. Remove EVAP canister vent control valve from EVAP canister.
2. Check portion B of EVAP canister vent control valve for being
rusted.
If NG, replace EVAP canister vent control valve.
If OK, go to next step.
3. Reconnect harness connectors disconnected.
4. Turn ignition switch ON.Water should not exist.
PBIB1033E
Page 1739 of 3419
EC-548Revision: October 2005
DTC P1564 ICC STEERING SWITCH
2005 QX56
Specification data are reference values and are measured between each terminal and ground.
CAUTION:
Do not use ECM ground terminals when measuring input/output voltage. Doing so may result in dam-
age to the ECM's transistor. Use a ground other than ECM terminals, such as the ground.
Diagnostic ProcedureUBS00L1R
1. CHECK GROUND CONNECTIONS
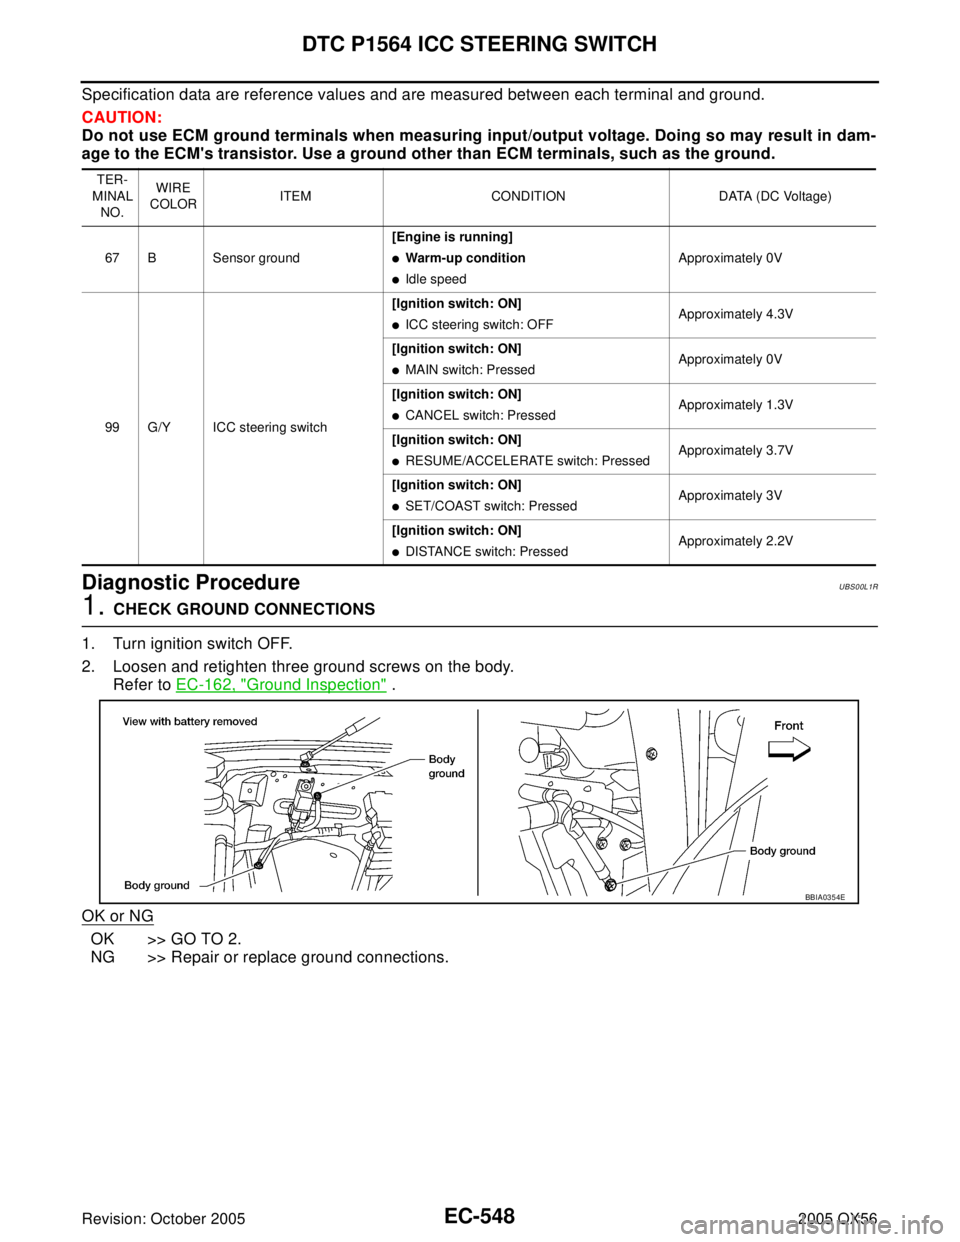
1. Turn ignition switch OFF.
2. Loosen and retighten three ground screws on the body.
Refer to EC-162, "
Ground Inspection" .
OK or NG
OK >> GO TO 2.
NG >> Repair or replace ground connections.
TER-
MINAL
NO.WIRE
COLORITEM CONDITION DATA (DC Voltage)
67 B Sensor ground[Engine is running]
�Warm-up condition
�Idle speedApproximately 0V
99 G/Y ICC steering switch[Ignition switch: ON]
�ICC steering switch: OFFApproximately 4.3V
[Ignition switch: ON]
�MAIN switch: PressedApproximately 0V
[Ignition switch: ON]
�CANCEL switch: PressedApproximately 1.3V
[Ignition switch: ON]
�RESUME/ACCELERATE switch: PressedApproximately 3.7V
[Ignition switch: ON]
�SET/COAST switch: PressedApproximately 3V
[Ignition switch: ON]
�DISTANCE switch: PressedApproximately 2.2V
BBIA0354E
Page 1746 of 3419
DTC P1564 ASCD STEERING SWITCH
EC-555
C
D
E
F
G
H
I
J
K
L
MA
EC
Revision: October 20052005 QX56
Specification data are reference values and are measured between each terminal and ground.
CAUTION:
Do not use ECM ground terminals when measuring input/output voltage. Doing so may result in dam-
age to the ECM's transistor. Use a ground other than ECM terminals, such as the ground.
Diagnostic ProcedureUBS00L11
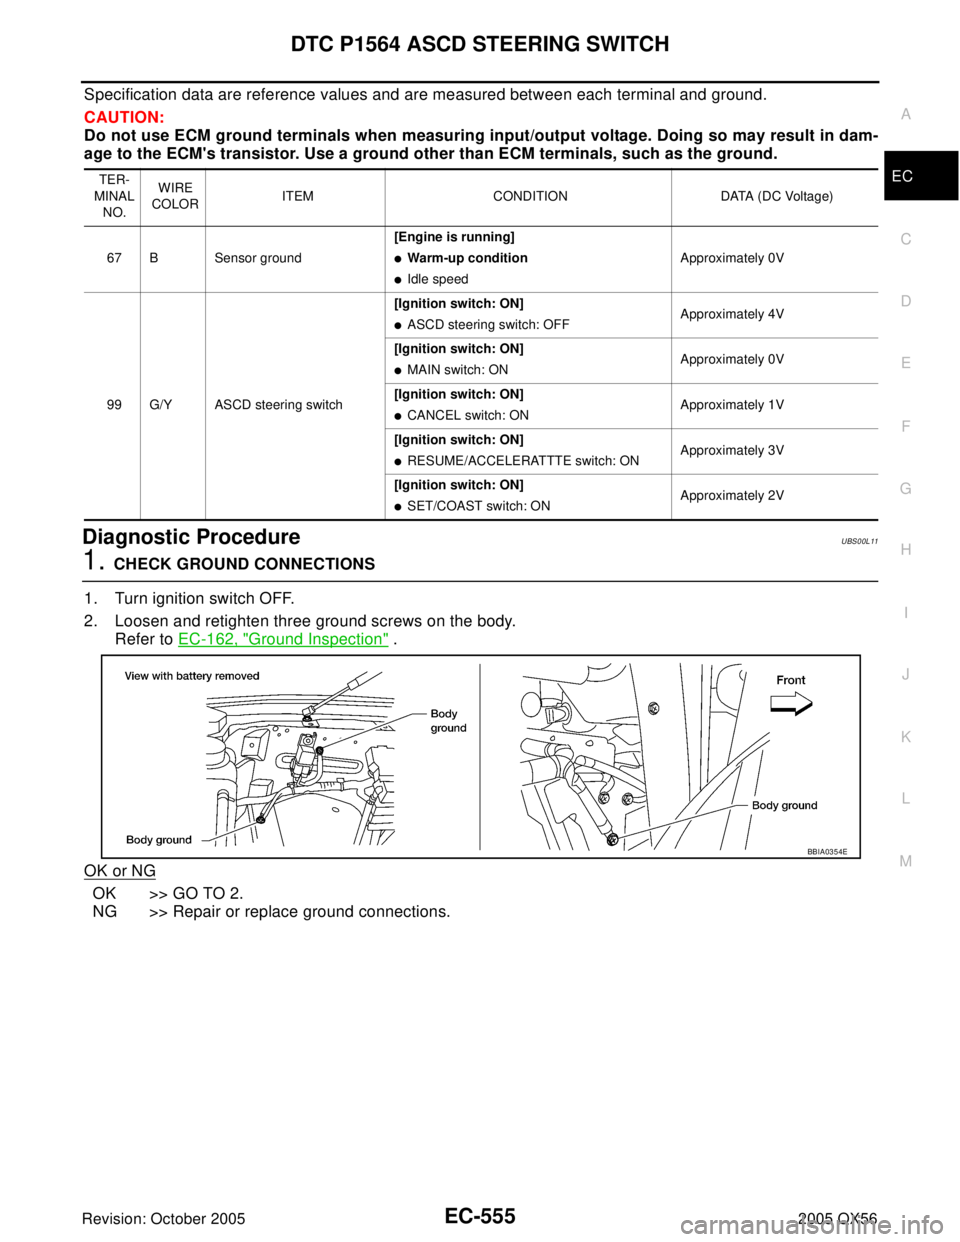
1. CHECK GROUND CONNECTIONS
1. Turn ignition switch OFF.
2. Loosen and retighten three ground screws on the body.
Refer to EC-162, "
Ground Inspection" .
OK or NG
OK >> GO TO 2.
NG >> Repair or replace ground connections.
TER-
MINAL
NO.WIRE
COLORITEM CONDITION DATA (DC Voltage)
67 B Sensor ground[Engine is running]
�Warm-up condition
�Idle speedApproximately 0V
99 G/Y ASCD steering switch[Ignition switch: ON]
�ASCD steering switch: OFFApproximately 4V
[Ignition switch: ON]
�MAIN switch: ONApproximately 0V
[Ignition switch: ON]
�CANCEL switch: ONApproximately 1V
[Ignition switch: ON]
�RESUME/ACCELERATTTE switch: ONApproximately 3V
[Ignition switch: ON]
�SET/COAST switch: ONApproximately 2V
BBIA0354E
Page 1768 of 3419
DTC P1574 ICC VEHICLE SPEED SENSOR
EC-577
C
D
E
F
G
H
I
J
K
L
MA
EC
Revision: October 20052005 QX56
DTC P1574 ICC VEHICLE SPEED SENSORPFP:31036
Component DescriptionUBS00HZ6
The ECM receives two vehicle speed signals via CAN communication line. One is sent from “unified meter and
A/C amp.”, and the other is from TCM (Transmission control module). The ECM uses these signals for ICC
control. Refer to ACS-6, "
DESCRIPTION" for ICC functions.
On Board Diagnosis LogicUBS00HZ7
�This self-diagnosis has the one trip detection logic.
�The MIL will not light up for this self-diagnosis.
NOTE:
�If DTC P1574 is displayed with DTC U1000, U1001, first perform the trouble diagnosis for DTC
U1000, U1001. Refer to EC-163, "
DTC U1000, U1001 CAN COMMUNICATION LINE" .
�If DTC P1574 is displayed with DTC P0500, first perform the trouble diagnosis for DTC P0500.
Refer to EC-372, "
DTC P0500 VSS" .
�If DTC P1574 is displayed with DTC P0605, first perform the trouble diagnosis for DTC P0605.
Refer to EC-383, "
DTC P0605 ECM" .
DTC Confirmation ProcedureUBS00HZ8
CAUTION:
Always drive vehicle at a safe speed.
NOTE:
If DTC Confirmation Procedure has been previously conducted, always turn ignition switch OFF and wait at
least 10 seconds before conducting the next test.
TESTING CONDITION:
Step 3 may be conducted with the drive wheels lifted in the shop or by driving the vehicle. If a road test
is expected to be easier, it is unnecessary to lift the vehicle.
WITH CONSULT-II
1. Start engine.
2. Select “DATA MONITOR” mode with CONSULT-II.
3. Drive the vehicle at more than 40 km/h (25MPH).
4. If DTC is detected, go to EC-578, "
Diagnostic Procedure" .
WITH GST
Follow the procedure “WITH CONSULT-II” above.
DTC No. Trouble Diagnosis Name DTC Detecting Condition Possible Cause
P1574
1574ICC vehicle speed sensorECM detects a difference between two vehicle
speed signals is out of the specified range.
�Harness or connectors
(The CAN communication line is open or
shorted.)
�Combination meter
�ABS actuator and electric unit (control unit)
�Wheel sensor
�TCM
�ECM
SEF 0 58 Y
Page 1769 of 3419
EC-578Revision: October 2005
DTC P1574 ICC VEHICLE SPEED SENSOR
2005 QX56
Diagnostic ProcedureUBS00HZ9
1. CHECK DTC WITH TCM
Check DTC with TCM. Refer to AT-37, "
OBD-II Diagnostic Trouble Code (DTC)" .
OK or NG
OK >> GO TO 2.
NG >> Perform trouble shooting relevant to DTC indicated.
2. CHECK DTC WITH “ABS ACTUATOR AND ELECTRIC UNIT (CONTROL UNIT)”
Refer to BRC-11, "
TROUBLE DIAGNOSIS" .
OK or NG
OK >> GO TO 3.
NG >> Repair or replace.
3. CHECK COMBINATION METER FUNCTION
Refer to DI-5, "
COMBINATION METERS" .
>>INSPECTION END