Page 1828 of 3419

FUEL PUMP CIRCUIT
EC-637
C
D
E
F
G
H
I
J
K
L
MA
EC
Revision: October 20052005 QX56
FUEL PUMP CIRCUITPFP:17042
DescriptionUBS00HDB
SYSTEM DESCRIPTION
*: ECM determines the start signal status by the signals of engine speed and battery voltage.
The ECM activates the fuel pump for several seconds after the ignition switch is turned ON to improve engine
startability. If the ECM receives a engine speed signal from the camshaft position sensor (PHASE), it knows
that the engine is rotating, and causes the pump to operate. If the engine speed signal is not received when
the ignition switch is ON, the engine stalls. The ECM stops pump operation and prevents battery discharging,
thereby improving safety. The ECM does not directly drive the fuel pump. It controls the ON/OFF fuel pump
relay, which in turn controls the fuel pump.
COMPONENT DESCRIPTION
A turbine type design fuel pump is used in the fuel tank.
CONSULT-II Reference Value in Data Monitor ModeUBS00HDC
Specification data are reference values.
Sensor Input signal to ECM ECM Function Actuator
Crankshaft position sensor (POS)
Camshaft position sensor (PHASE)Engine speed*
Fuel pump control Fuel pump relay
Battery Battery voltage*
Condition Fuel pump operation
Ignition switch is turned to ON. Operates for 1 second.
Engine running and crankingOperates.
When engine is stoppedStops in 1.5 seconds.
Except as shown aboveSto ps.
BBIA0402E
MONITOR ITEM CONDITION SPECIFICATION
FUEL PUMP RLY
�For 1 second after turning ignition switch ON
�Engine running or crankingON
�Except above conditions OFF
Page 1839 of 3419
EC-648Revision: October 2005
ELECTRICAL LOAD SIGNAL
2005 QX56
ELECTRICAL LOAD SIGNALPFP:25350
DescriptionUBS00HDL
The electrical load signal (Headlamp switch signal, rear window defogger switch signal, etc.) is transferred
through the CAN communication line from BCM to ECM via IPDM E/R.
CONSULT-II Reference Value in Data Monitor ModeUBS00HDM
Specification data are reference values.
Diagnostic ProcedureUBS00HDN
1. CHECK LOAD SIGNAL CIRCUIT OVERALL FUNCTION-I
1. Turn ignition switch ON.
2. Connect CONSULT-II and select “DATA MONITOR” mode.
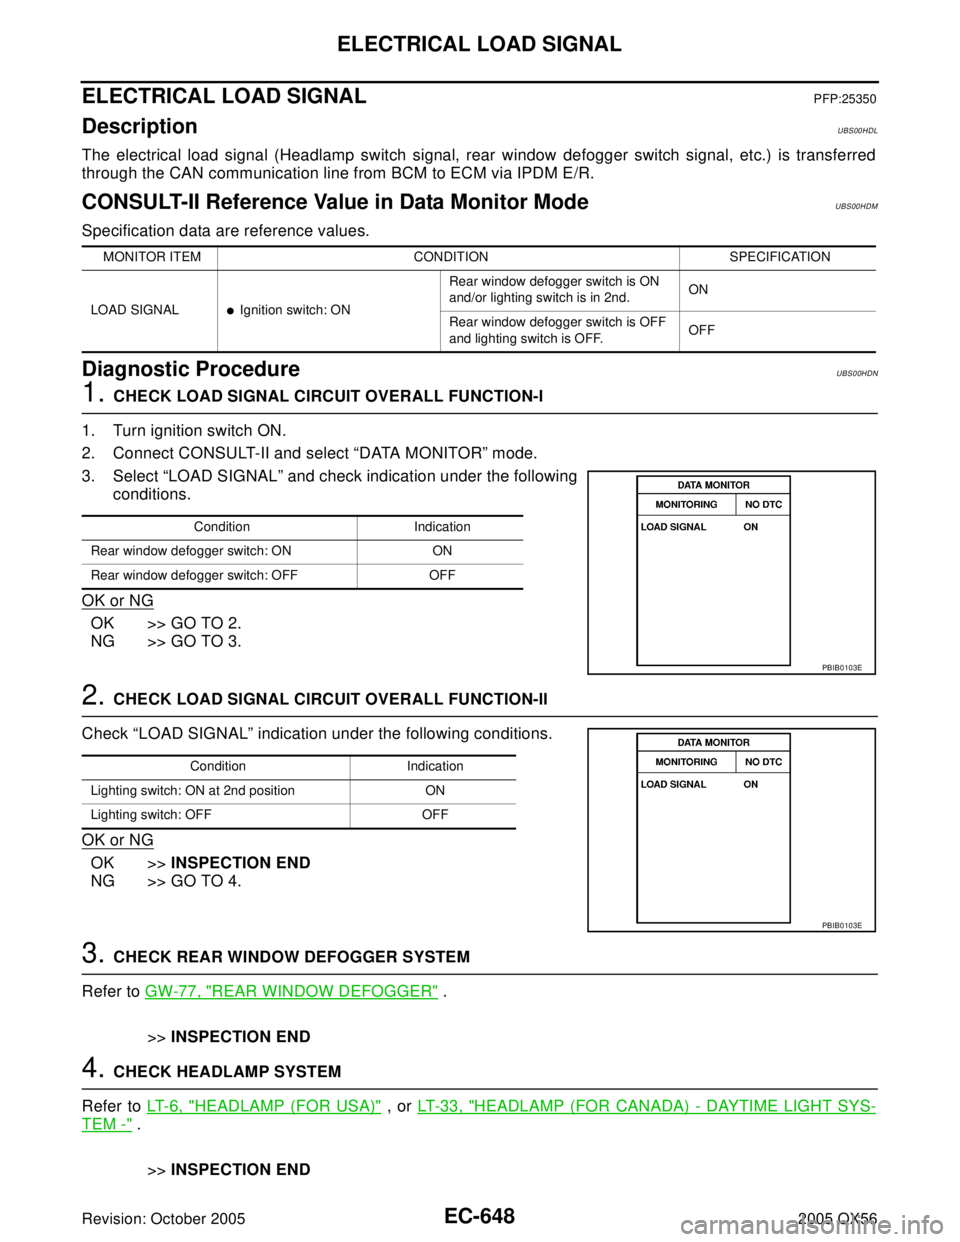
3. Select “LOAD SIGNAL” and check indication under the following
conditions.
OK or NG
OK >> GO TO 2.
NG >> GO TO 3.
2. CHECK LOAD SIGNAL CIRCUIT OVERALL FUNCTION-II
Check “LOAD SIGNAL” indication under the following conditions.
OK or NG
OK >>INSPECTION END
NG >> GO TO 4.
3. CHECK REAR WINDOW DEFOGGER SYSTEM
Refer to GW-77, "
REAR WINDOW DEFOGGER" .
>>INSPECTION END
4. CHECK HEADLAMP SYSTEM
Refer to LT- 6 , "
HEADLAMP (FOR USA)" , or LT- 3 3 , "HEADLAMP (FOR CANADA) - DAYTIME LIGHT SYS-
TEM -" .
>>INSPECTION END
MONITOR ITEM CONDITION SPECIFICATION
LOAD SIGNAL
�Ignition switch: ONRear window defogger switch is ON
and/or lighting switch is in 2nd.ON
Rear window defogger switch is OFF
and lighting switch is OFF.OFF
Condition Indication
Rear window defogger switch: ON ON
Rear window defogger switch: OFF OFF
PBIB0103E
Condition Indication
Lighting switch: ON at 2nd position ON
Lighting switch: OFF OFF
PBIB0103E
Page 1840 of 3419
ICC BRAKE SWITCH
EC-649
C
D
E
F
G
H
I
J
K
L
MA
EC
Revision: October 20052005 QX56
ICC BRAKE SWITCHPFP:25320
Component DescriptionUBS00L23
When depress on the brake pedal, ICC brake switch is turned OFF
and stop lamp switch is turned ON. ECM detects the state of the
brake pedal by this input of two kinds (ON/OFF signal)
Refer to ACS-6, "
DESCRIPTION" for the ICC function.
CONSULT-II Reference Value in Data Monitor ModeUBS00L24
Specification data are reference values.
BBIA0470E
MONITOR ITEM CONDITION SPECIFICATION
BRAKE SW 1
(ICC brake switch)
�Ignition switch: ONBrake pedal: Fully released ON
Brake pedal: Slightly depressed OFF
BRAKE SW 2
(Stop lamp switch)
�Ignition switch: ONBrake pedal: Fully released OFF
Brake pedal: Slightly depressed ON
Page 1845 of 3419
EC-654Revision: October 2005
ICC BRAKE SWITCH
2005 QX56
7. CHECK ICC BRAKE SWITCH INPUT SIGNAL CIRCUIT FOR OPEN AND SHORT
1. Disconnect ECM harness connector.
2. Check harness continuity between ICC brake switch terminal 2 and ECM terminal 108.
Refer Wiring Diagram.
3. Also check harness for short to ground and short to power.
OK or NG
OK >> GO TO 8.
NG >> Repair open circuit or short to ground or short to power in harness or connectors.
8. CHECK ICC BRAKE HOLD RELAY
Refer to EC-656, "
Component Inspection" .
OK >> GO TO 9.
NG >> Replace ICC brake hold relay.
9. CHECK ICC BRAKE SWITCH
Refer to EC-656, "
Component Inspection" .
OK or NG
OK >> GO TO 14.
NG >> Replace ICC brake switch.
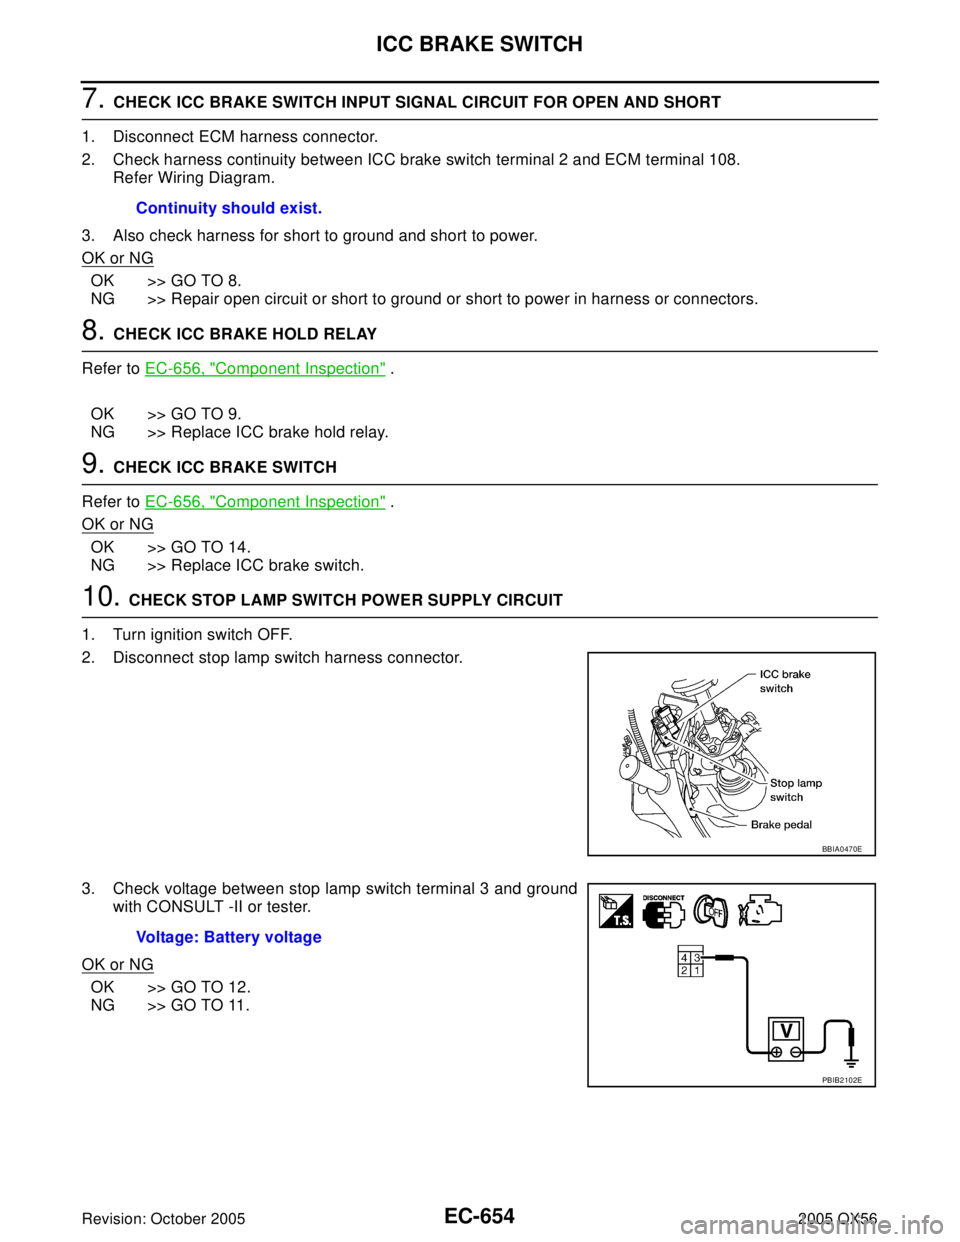
10. CHECK STOP LAMP SWITCH POWER SUPPLY CIRCUIT
1. Turn ignition switch OFF.
2. Disconnect stop lamp switch harness connector.
3. Check voltage between stop lamp switch terminal 3 and ground
with CONSULT -II or tester.
OK or NG
OK >> GO TO 12.
NG >> GO TO 11.Continuity should exist.
BBIA0470E
Voltage: Battery voltage
PBIB2102E
Page 1848 of 3419
ASCD BRAKE SWITCH
EC-657
C
D
E
F
G
H
I
J
K
L
MA
EC
Revision: October 20052005 QX56
ASCD BRAKE SWITCHPFP:25320
Component DescriptionUBS00HDO
When the brake pedal is depressed, ASCD brake switch is turned
OFF and stop lamp switch is turned ON. ECM detects the state of
the brake pedal by this input of two kinds (ON/OFF signal).
Refer to EC-29, "
AUTOMATIC SPEED CONTROL DEVICE (ASCD)"
for the ASCD function.
CONSULT-II Reference Value in Data Monitor ModeUBS00HDP
Specification data are reference values.
BBIA0373E
MONITOR ITEM CONDITION SPECIFICATION
BRAKE SW 1
(ASCD brake switch)
�Ignition switch: ON�Brake pedal: Fully released ON
�Brake pedal: Slightly depressed OFF
BRAKE SW 2
(Stop lamp switch)
�Ignition switch: ON�Brake pedal: Fully released OFF
�Brake pedal: Slightly depressed ON
Page 1852 of 3419
ASCD BRAKE SWITCH
EC-661
C
D
E
F
G
H
I
J
K
L
MA
EC
Revision: October 20052005 QX56
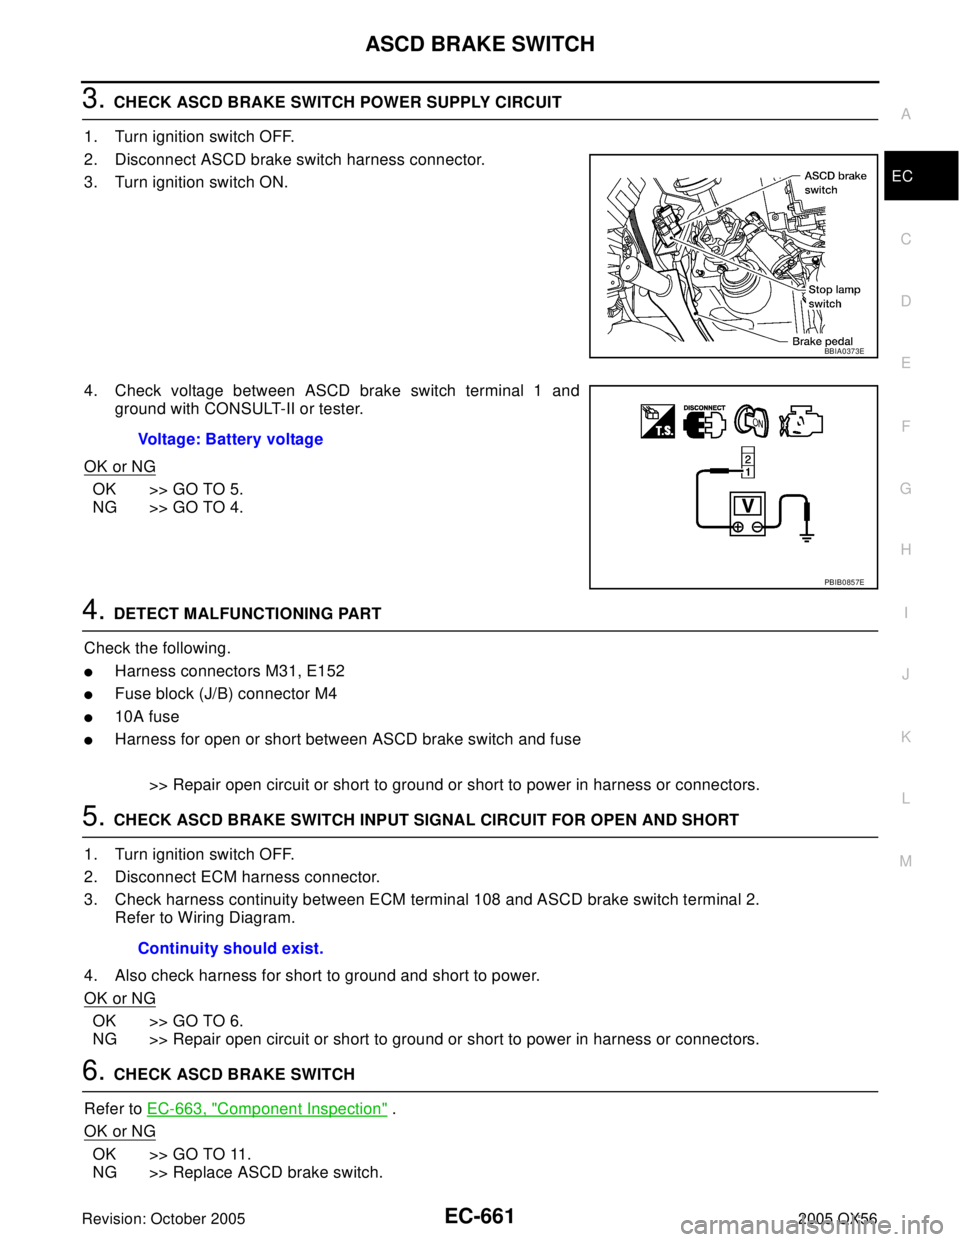
3. CHECK ASCD BRAKE SWITCH POWER SUPPLY CIRCUIT
1. Turn ignition switch OFF.
2. Disconnect ASCD brake switch harness connector.
3. Turn ignition switch ON.
4. Check voltage between ASCD brake switch terminal 1 and
ground with CONSULT-II or tester.
OK or NG
OK >> GO TO 5.
NG >> GO TO 4.
4. DETECT MALFUNCTIONING PART
Check the following.
�Harness connectors M31, E152
�Fuse block (J/B) connector M4
�10A fuse
�Harness for open or short between ASCD brake switch and fuse
>> Repair open circuit or short to ground or short to power in harness or connectors.
5. CHECK ASCD BRAKE SWITCH INPUT SIGNAL CIRCUIT FOR OPEN AND SHORT
1. Turn ignition switch OFF.
2. Disconnect ECM harness connector.
3. Check harness continuity between ECM terminal 108 and ASCD brake switch terminal 2.
Refer to Wiring Diagram.
4. Also check harness for short to ground and short to power.
OK or NG
OK >> GO TO 6.
NG >> Repair open circuit or short to ground or short to power in harness or connectors.
6. CHECK ASCD BRAKE SWITCH
Refer to EC-663, "
Component Inspection" .
OK or NG
OK >> GO TO 11.
NG >> Replace ASCD brake switch.
BBIA0373E
Voltage: Battery voltage
PBIB0857E
Continuity should exist.
Page 1853 of 3419
EC-662Revision: October 2005
ASCD BRAKE SWITCH
2005 QX56
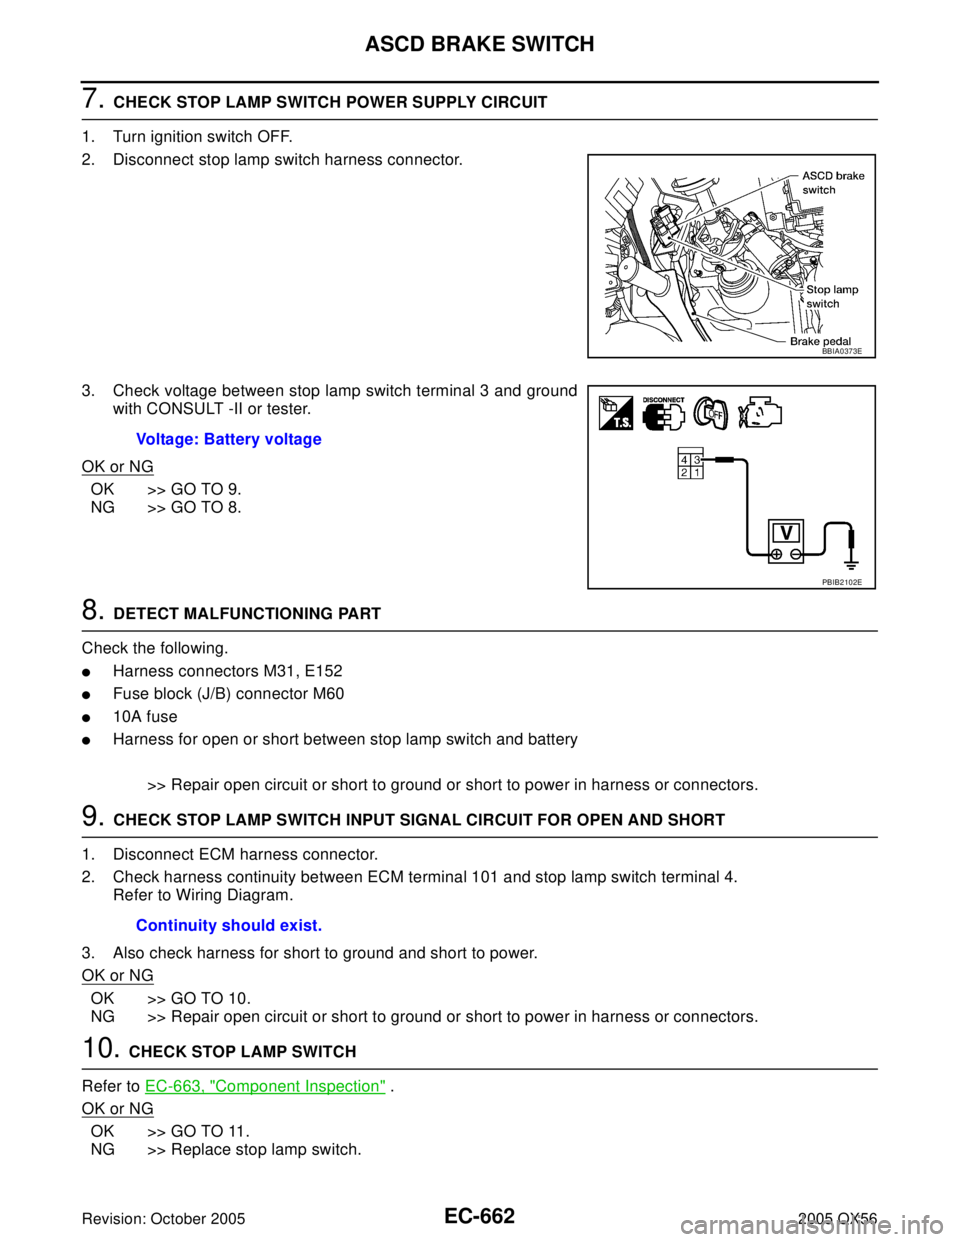
7. CHECK STOP LAMP SWITCH POWER SUPPLY CIRCUIT
1. Turn ignition switch OFF.
2. Disconnect stop lamp switch harness connector.
3. Check voltage between stop lamp switch terminal 3 and ground
with CONSULT -II or tester.
OK or NG
OK >> GO TO 9.
NG >> GO TO 8.
8. DETECT MALFUNCTIONING PART
Check the following.
�Harness connectors M31, E152
�Fuse block (J/B) connector M60
�10A fuse
�Harness for open or short between stop lamp switch and battery
>> Repair open circuit or short to ground or short to power in harness or connectors.
9. CHECK STOP LAMP SWITCH INPUT SIGNAL CIRCUIT FOR OPEN AND SHORT
1. Disconnect ECM harness connector.
2. Check harness continuity between ECM terminal 101 and stop lamp switch terminal 4.
Refer to Wiring Diagram.
3. Also check harness for short to ground and short to power.
OK or NG
OK >> GO TO 10.
NG >> Repair open circuit or short to ground or short to power in harness or connectors.
10. CHECK STOP LAMP SWITCH
Refer to EC-663, "
Component Inspection" .
OK or NG
OK >> GO TO 11.
NG >> Replace stop lamp switch.
BBIA0373E
Voltage: Battery voltage
PBIB2102E
Continuity should exist.
Page 1974 of 3419
ENGINE ASSEMBLY
EM-71
C
D
E
F
G
H
I
J
K
L
MA
EM
Revision: October 20052005 QX56
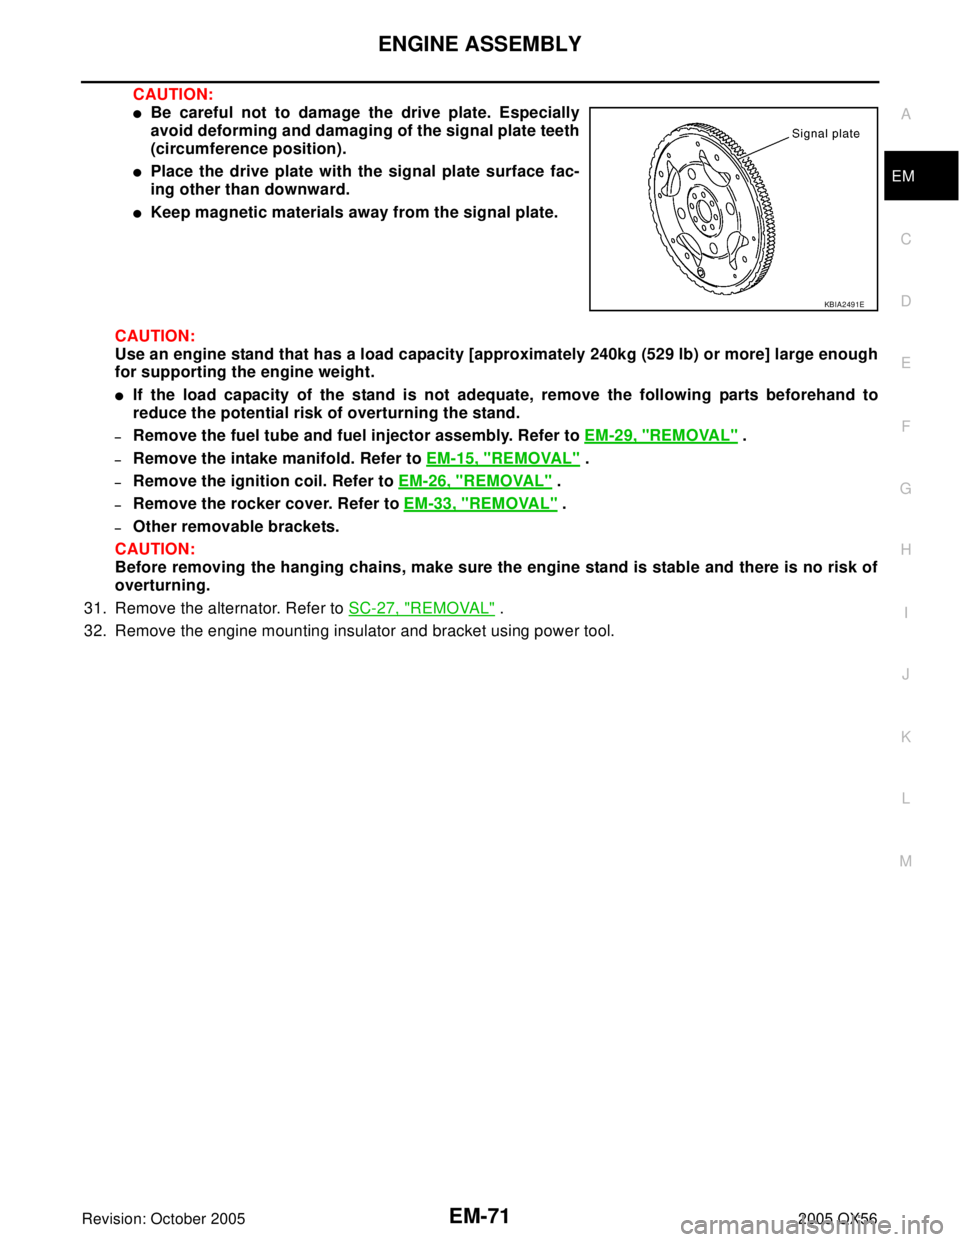
CAUTION:
�Be careful not to damage the drive plate. Especially
avoid deforming and damaging of the signal plate teeth
(circumference position).
�Place the drive plate with the signal plate surface fac-
ing other than downward.
�Keep magnetic materials away from the signal plate.
CAUTION:
Use an engine stand that has a load capacity [approximately 240kg (529 lb) or more] large enough
for supporting the engine weight.
�If the load capacity of the stand is not adequate, remove the following parts beforehand to
reduce the potential risk of overturning the stand.
–Remove the fuel tube and fuel injector assembly. Refer to EM-29, "REMOVAL" .
–Remove the intake manifold. Refer to EM-15, "REMOVAL" .
–Remove the ignition coil. Refer to EM-26, "REMOVAL" .
–Remove the rocker cover. Refer to EM-33, "REMOVAL" .
–Other removable brackets.
CAUTION:
Before removing the hanging chains, make sure the engine stand is stable and there is no risk of
overturning.
31. Remove the alternator. Refer to SC-27, "
REMOVAL" .
32. Remove the engine mounting insulator and bracket using power tool.
KBIA2491E