Page 652 of 3419

NAVIGATION SYSTEM
AV-63
C
D
E
F
G
H
I
J
L
MA
B
AV
Revision: October 20052005 QX56
COMPONENT DESCRIPTION
NAVI Control Unit
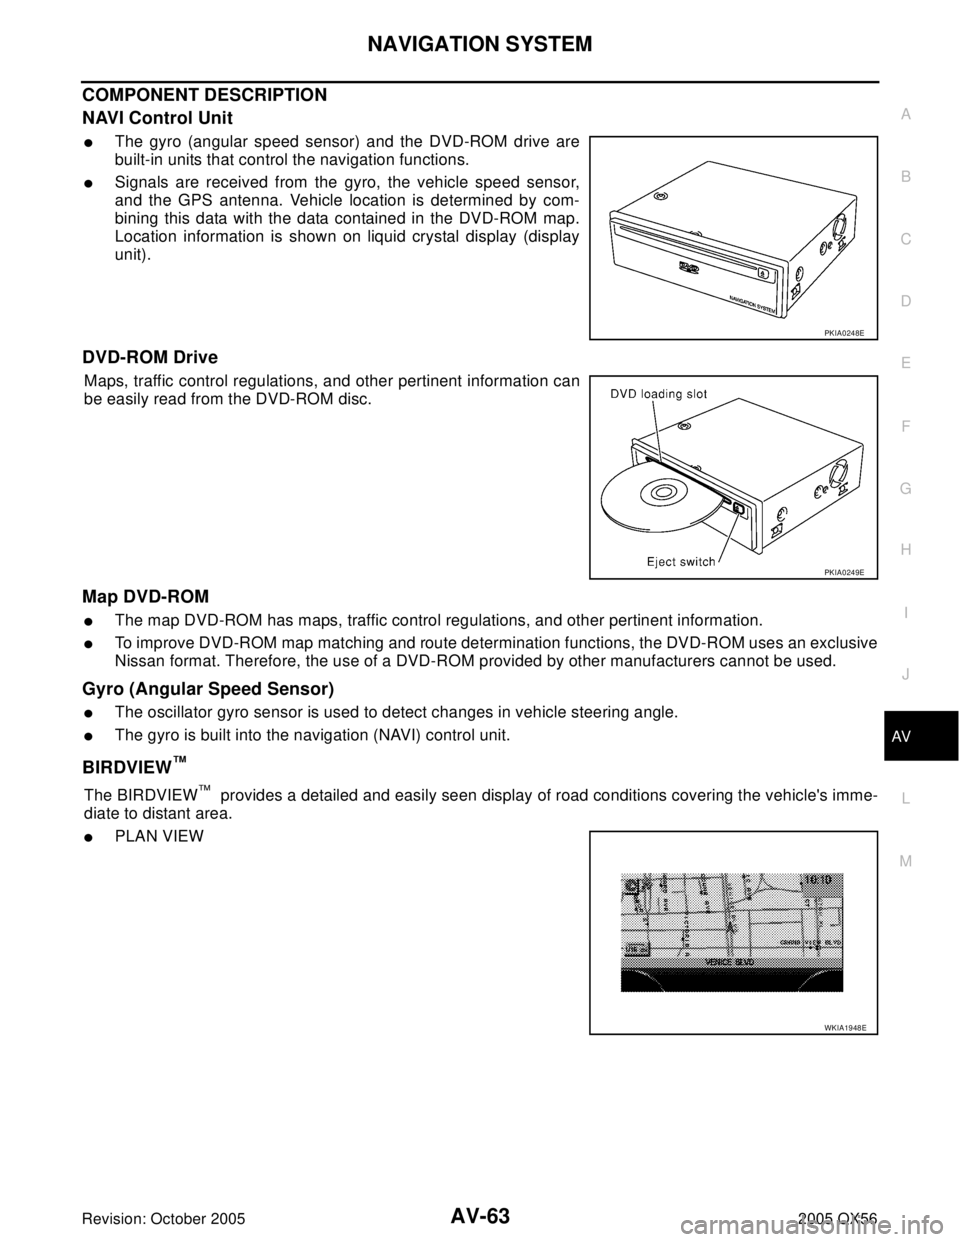
�The gyro (angular speed sensor) and the DVD-ROM drive are
built-in units that control the navigation functions.
�Signals are received from the gyro, the vehicle speed sensor,
and the GPS antenna. Vehicle location is determined by com-
bining this data with the data contained in the DVD-ROM map.
Location information is shown on liquid crystal display (display
unit).
DVD-ROM Drive
Maps, traffic control regulations, and other pertinent information can
be easily read from the DVD-ROM disc.
Map DVD-ROM
�The map DVD-ROM has maps, traffic control regulations, and other pertinent information.
�To improve DVD-ROM map matching and route determination functions, the DVD-ROM uses an exclusive
Nissan format. Therefore, the use of a DVD-ROM provided by other manufacturers cannot be used.
Gyro (Angular Speed Sensor)
�The oscillator gyro sensor is used to detect changes in vehicle steering angle.
�The gyro is built into the navigation (NAVI) control unit.
BIRDVIEW™
The BIRDVIEW™ provides a detailed and easily seen display of road conditions covering the vehicle's imme-
diate to distant area.
�PLAN VIEW
PKIA0248E
PKIA0249E
WKIA1948E
Page 657 of 3419

AV-68
NAVIGATION SYSTEM
Revision: October 20052005 QX56
Setting of the under section display
How To Perform Under Section Display Setting
1. Select “Setting of the Under Section Display”.
�The setting status that is selected from A/C or AV is shown at the lower part of the screen.
Vehicle Electronic Systems
Application Items
How To Perform Navigation Setting
1. Start the engine.
2. Push “SETTING” button.
3. Select “Vehicle Electronic Systems”.
System Settings
How To Perform System Setting
1. Start the engine.
2. Push “SETTING” button.
3. Select “System Settings”.
Icon Description
Adjust Driver Seat When Exiting Vehicle The driver's seat automatically moves back and returns to the original position.
Lift Steering Column When Exiting Vehicle The steering column automatically tilts up and returns to the original position.
Remote Unlock Driver's Door FirstThis option allows selection of which doors will unlock first during an unlocking oper-
ation.
Keyless Remote Response — HornThis option allows the horn chirp mode when pressing the LOCK or UNLOCK button
on the keyfob to be changed.
Keyless Remote Response — LightsThis option allows the hazard flash mode when pressing the LOCK or UNLOCK but-
ton on the keyfob to be changed.
Auto Re-Lock Time This option allows the length of time before doors auto re-lock to be set.
Sensitivity of Automatic Headlights This option allows the sensitivity of the autolights to be set.
Automatic Headlights Off Delay This option allows the length of time before the autolights turn off to be set.
Speed Dependent Wiper This option allows the driving speed dependent wiper function to be turned on or off.
Return All Settings to Default All settings will return to the initial conditions.
WKIA1802E
SKIA4536E
Page 687 of 3419

AV-98
NAVIGATION SYSTEM
Revision: October 20052005 QX56
Terminals and Reference Value for AV SwitchEKS00BJN
Te r m i n a l N o .
(Wire color)
ItemSignal
input/
outputCondition
Voltage
(Approx.)Example of
symptom
+–Ignition
switchOperation
1 (Y) GroundBattery
powerInput OFF - Battery voltageSystem does not
work properly.
2 (V) Ground ACC signal Input ACC - Battery voltageSystem does not
work properly.
3 (R/L) GroundIllumination
signalInput OFFLighting switch is
ON (position 1).Battery voltageAV switch illumi-
nation does not
come on when
lighting switch is
ON (position 1). Turn lighting switch
OFF.3.0V or less
4 (BR) GroundIllumination
control signalInput ONIllumination control
switch is operated
by lighting switch in
1st position.Changes between 0 and 12V.AV switch illumi-
nation cannot be
controlled.
5 (B) Ground Ground - ON - 0V -
6 (V) GroundCommunica-
tion signal (+)Input/
outputON -System does not
work properly.
7-Shield
ground-- - - -
8 (LG) GroundCommunica-
tion signal (-)Input/
outputON -System does not
work properly.
12 (R) GroundRemote con-
trol AInput ONPress MODE
switch 0V
Steering wheel
audio controls
do not function. Press SEEK UP
switch0.75V
Press VOL UP
switch2V
Except for above 5V
13 (G) GroundRemote con-
trol BInput ONPress POWER
switch 0V
Steering wheel
audio controls
do not function. Press SEEK
DOWN switch0.75V
Press VOL DOWN
switch2V
Except for above 5V
14 (L) -Remote con-
trol ground-- - -Steering wheel
audio controls
do not function.
SKIA0175E
SKIA0176E
Page 744 of 3419

NAVIGATION SYSTEM
AV-155
C
D
E
F
G
H
I
J
L
MA
B
AV
Revision: October 20052005 QX56
CURRENT LOCATION MARK IS IN A RIVER OR SEA
The navigation system moves the current-location mark with no distinction between land and rivers or sea. If
the location mark is somehow out of place, it may appear that the vehicle is driving in a river or the sea.
WHEN DRIVING ON SAME ROAD, SOMETIMES CURRENT-LOCATION MARK IS IN RIGHT
PLACE AND SOMETIMES IT IS WRONG PLACE
The conditions of the GPS antenna (GPS data) and gyroscope (angular speed sensor) change gradually.
Depending on the road traveled and the operation of the steering wheel, the location detection results will be
different. Therefore, even on a road on which the location has never been wrong, conditions may cause the
vehicle mark to deviate.
LOCATION CORRECTION BY MAP-MATCHING IS SLOW
�The map-matching function needs to refer to the data of the surrounding area. It is necessary to drive
some distance for the function to work.
�Because map-matching operates on this principle, when there are many roads running in similar direc-
tions in the surrounding area, no matching determination may be made. The location may not be cor-
rected until some special feature is found.
ALTHOUGH GPS RECEIVING DISPLAY IS GREEN, VEHICLE MARK DOES NOT RETURN TO
CORRECT LOCATION
�The GPS accuracy has an error of approximately 10 m (30 ft). In some cases the current-location mark
may not be on the correct street, even when GPS location-correction is done.
�The navigation system compares the results of GPS location detection with the results from map-match-
ing location detection. The one which is determined to have higher accuracy is used.
�GPS location correction may not be performed when the vehicle is stopped.
NAME OF CURRENT PLACE IS NOT DISPLAYED
The current place name may not be displayed if there are no place names displayed on the map screen.
CONTENTS OF DISPLAY DIFFER FOR BIRDVIEW™ AND THE (FLAT) MAP SCREEN
Difference of the BIRDVIEW™ screen from the flat map screen are as follows.
�The current place name displays names which are primarily in the direction of vehicle travel.
�The amount of time before the vehicle travel or turn angle is updated on the screen is longer than for the
(flat) map display.
�The conditions for display of place names, roads, and other data are different for nearby areas and for
more distant areas.
�Some thinning of the character data is done to prevent the display becoming too complex. In some cases
and in some locations, the display contents may differ.
�The same place name, street name, etc. may be displayed multiple times.
Page 746 of 3419
NAVIGATION SYSTEM
AV-157
C
D
E
F
G
H
I
J
L
MA
B
AV
Revision: October 20052005 QX56
Removal and Installation of NAVI Control UnitEKS00BL5
CAUTION:
To avoid damage, eject map DVD-ROM before removing the NAVI control unit.
1. Slide front seat RH fully forward.
2. Remove NAVI control unit kick shield.
3. Disconnect connectors.
4. Remove screws and remove NAVI control unit.
5. Remove screws and brackets from NAVI control unit.
6. Installation is in the reverse order of removal.
Removal and Installation of GPS AntennaEKS00BL6
1. Remove defroster grille.
2. Remove screws.
3. Remove center console. Refer to IP-15, "
Center Console" .
4. Disconnect GPS antenna connector and remove GPS antenna
and feeder assembly out the top.
5. Installation is in the reverse order of removal.
Removal and Installation of Steering Wheel SwitchEKS00BL7
Refer to AV-47, "Removal and Installation of Steering Wheel Audio Control Switches" .
WKIA1594E
WKIA1510E
WKIA1508E
WKIA1509E
Page 842 of 3419
VEHICLE SECURITY (THEFT WARNING) SYSTEM
BL-75
C
D
E
F
G
H
J
K
L
MA
B
BL
Revision: October 20052005 QX56
VEHICLE SECURITY (THEFT WARNING) SYSTEMPFP:28491
Component Parts and Harness Connector LocationEIS0 08 QL
LIIA2374E
1. Fuse block (J/B) 2. Fuse and fusible link box 3. IPDM E/R fuse layout
4. IPDM E/R E122, E123, E124 5. Steering column
(view with instrument panel LH
removed)6. Data link connector M22
(view with instrument panel LH
removed)
Page 984 of 3419

NOISE, VIBRATION, AND HARSHNESS (NVH) TROUBLESHOOTING
BR-5
C
D
E
G
H
I
J
K
L
MA
B
BR
Revision: October 20052005 QX56
NOISE, VIBRATION, AND HARSHNESS (NVH) TROUBLESHOOTINGPFP:00003
NVH Troubleshooting ChartEFS004VZ
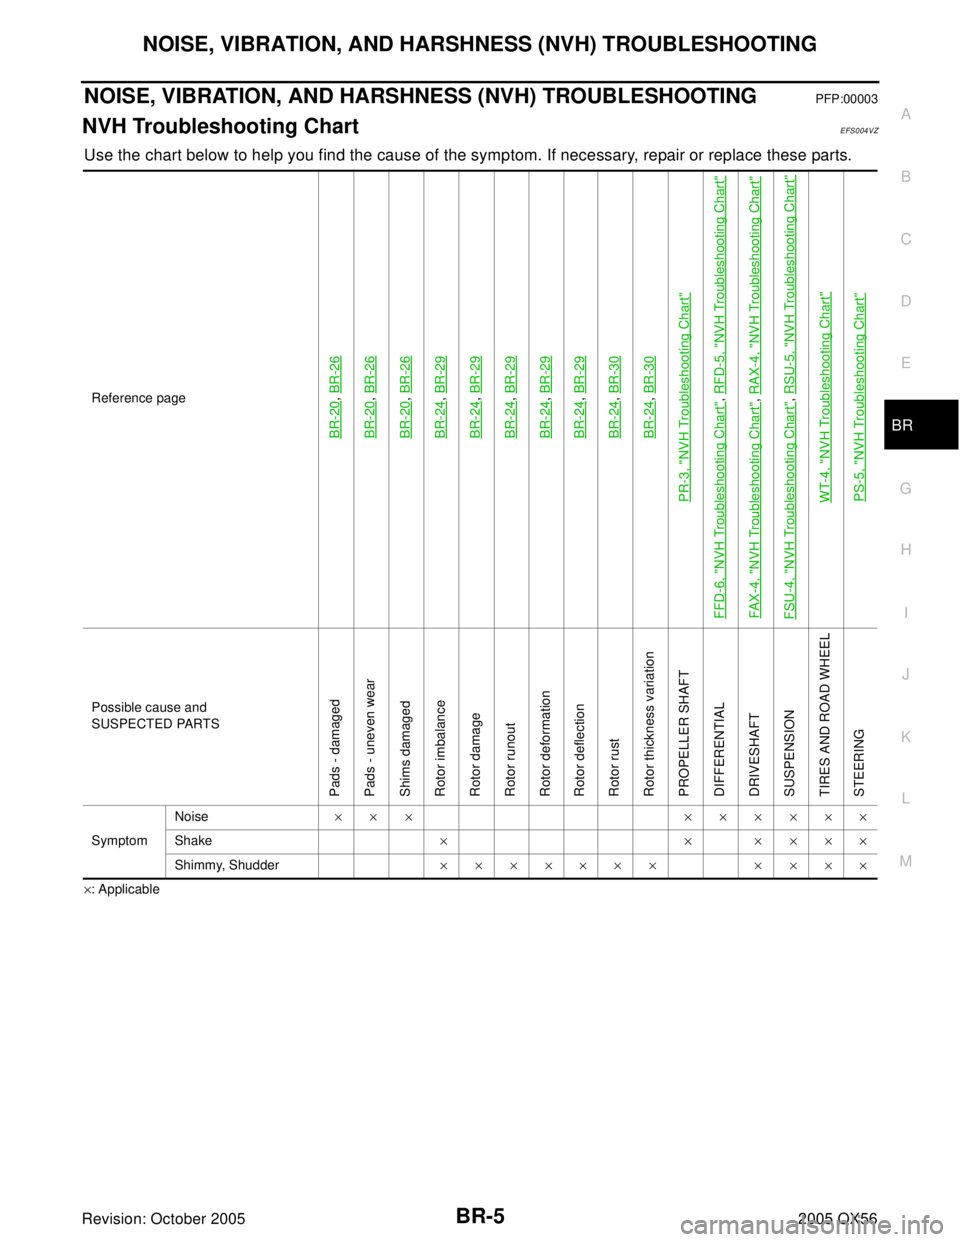
Use the chart below to help you find the cause of the symptom. If necessary, repair or replace these parts.
×: ApplicableReference page
BR-20
, BR-26
BR-20
, BR-26
BR-20
, BR-26
BR-24
, BR-29
BR-24
, BR-29
BR-24
, BR-29
BR-24
, BR-29
BR-24
, BR-29
BR-24
, BR-30
BR-24
, BR-30
PR-3, "
NVH Troubleshooting Chart
"
FFD-6, "
NVH Troubleshooting Chart
", RFD-5, "
NVH Troubleshooting Chart
"
FAX -4, "
NVH Troubleshooting Chart
", RAX-4, "
NVH Troubleshooting Chart
"
FSU-4, "
NVH Troubleshooting Chart
", RSU-5, "
NVH Troubleshooting Chart
"
WT-4, "
NVH Troubleshooting Chart
"
PS-5, "
NVH Troubleshooting Chart
"
Possible cause and
SUSPECTED PARTS
Pads - damaged
Pads - uneven wear
Shims damaged
Rotor imbalance
Rotor damage
Rotor runout
Rotor deformation
Rotor deflection
Rotor rust
Rotor thickness variation
PROPELLER SHAFT
DIFFERENTIAL
DRIVESHAFT
SUSPENSION
TIRES AND ROAD WHEEL
STEERING
SymptomNoise××× ××××××
Shake××××××
Shimmy, Shudder××××××× ××××
Page 990 of 3419

BRAKE PIPING AND HOSE
BR-11
C
D
E
G
H
I
J
K
L
MA
B
BR
Revision: October 20052005 QX56
BRAKE PIPING AND HOSEPFP:46210
Hydraulic CircuitEFS004W5
CAUTION:
�All hoses and tubes must be free from excessive bending, twisting and pulling.
�Make sure there is no interference with other parts when turning steering both clockwise and
counterclockwise.
�The brake piping is an important safety part. If a brake fluid leak is detected, always disassemble
the parts. Replace applicable part with a new one, if necessary.
�Be careful not to splash brake fluid on painted areas; it way cause paint damage. If brake fluid is
splashed on painted areas, wash it away with water immediately.
�Do not bend or twist brake hose sharply, or strongly pull it.
�When removing components, cover connections so that no dirt, dust, or other foreign matter gets
in.
�Refill with new brake fluid. Refer to MA-11, "RECOMMENDED FLUIDS AND LUBRICANTS" .
�Do not reuse drained brake fluid.
Removal and Installation of Front Brake Hose EFS004W6
REMOVAL
1. Drain brake fluid. Refer to BR-9, "Drain and Refill" .
2. Using a flare nut wrench, remove brake tube from brake hose.
3. Remove lock plate and brake hose from bracket.
4. Remove union bolt and then remove brake hose from cylinder body.
1. Actuator 2. Master cylinder 3. Brake booster
4. Connector
WFIA0278E