Page 1156 of 3419

WARNING CHIME
DI-53
C
D
E
F
G
H
I
J
L
MA
B
DI
Revision: October 20052005 QX56
3. CHECK FRONT DOOR SWITCH LH
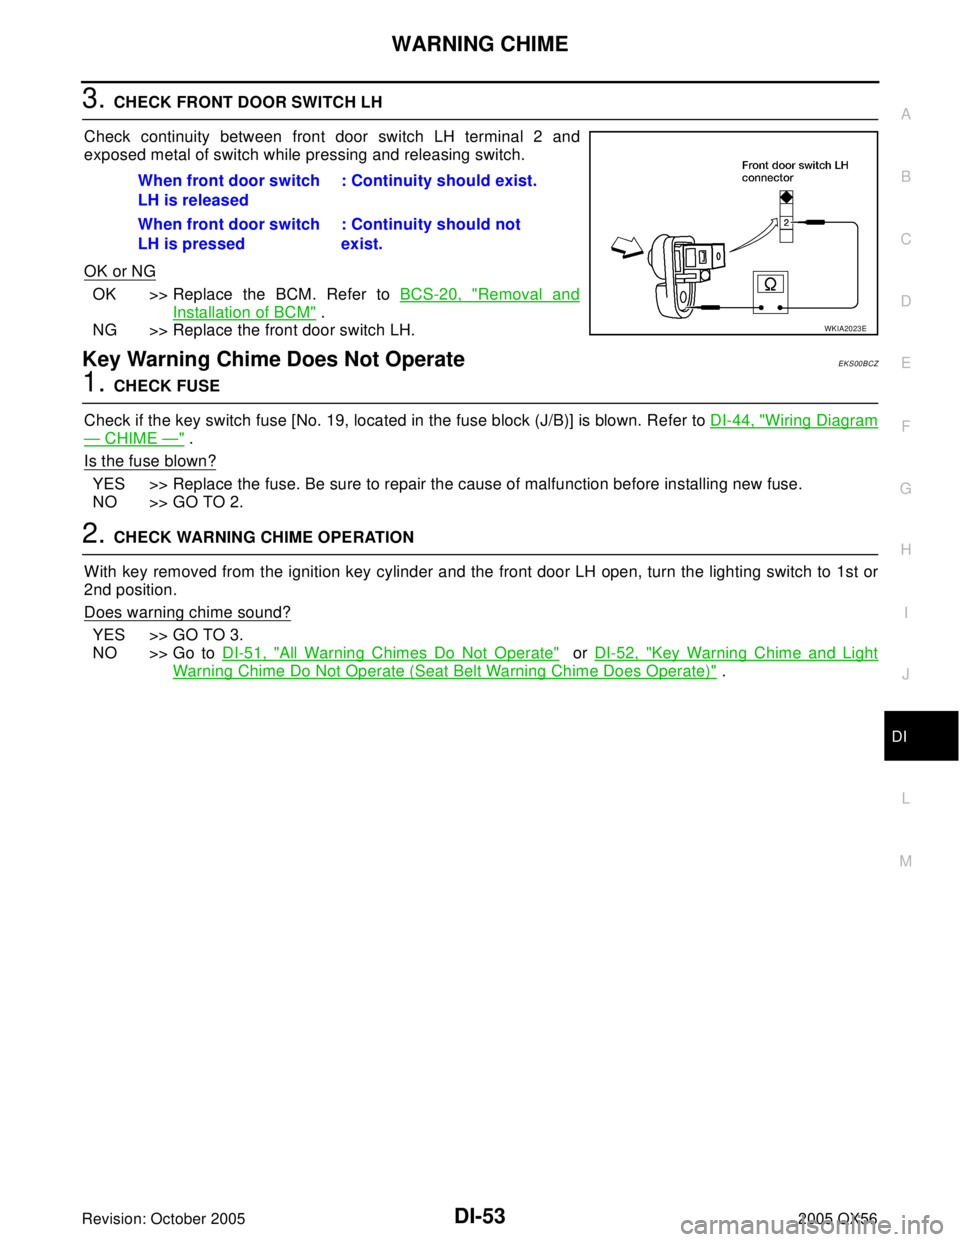
Check continuity between front door switch LH terminal 2 and
exposed metal of switch while pressing and releasing switch.
OK or NG
OK >> Replace the BCM. Refer to BCS-20, "Removal and
Installation of BCM" .
NG >> Replace the front door switch LH.
Key Warning Chime Does Not OperateEKS00BCZ
1. CHECK FUSE
Check if the key switch fuse [No. 19, located in the fuse block (J/B)] is blown. Refer to DI-44, "
Wiring Diagram
— CHIME —" .
Is the fuse blown?
YES >> Replace the fuse. Be sure to repair the cause of malfunction before installing new fuse.
NO >> GO TO 2.
2. CHECK WARNING CHIME OPERATION
With key removed from the ignition key cylinder and the front door LH open, turn the lighting switch to 1st or
2nd position.
Does warning chime sound?
YES >> GO TO 3.
NO >> Go to DI-51, "
All Warning Chimes Do Not Operate" or DI-52, "Key Warning Chime and Light
Warning Chime Do Not Operate (Seat Belt Warning Chime Does Operate)" . When front door switch
LH is released: Continuity should exist.
When front door switch
LH is pressed: Continuity should not
exist.
WKIA2023E
Page 1157 of 3419

DI-54
WARNING CHIME
Revision: October 20052005 QX56
3. CHECK BCM INPUT SIGNAL
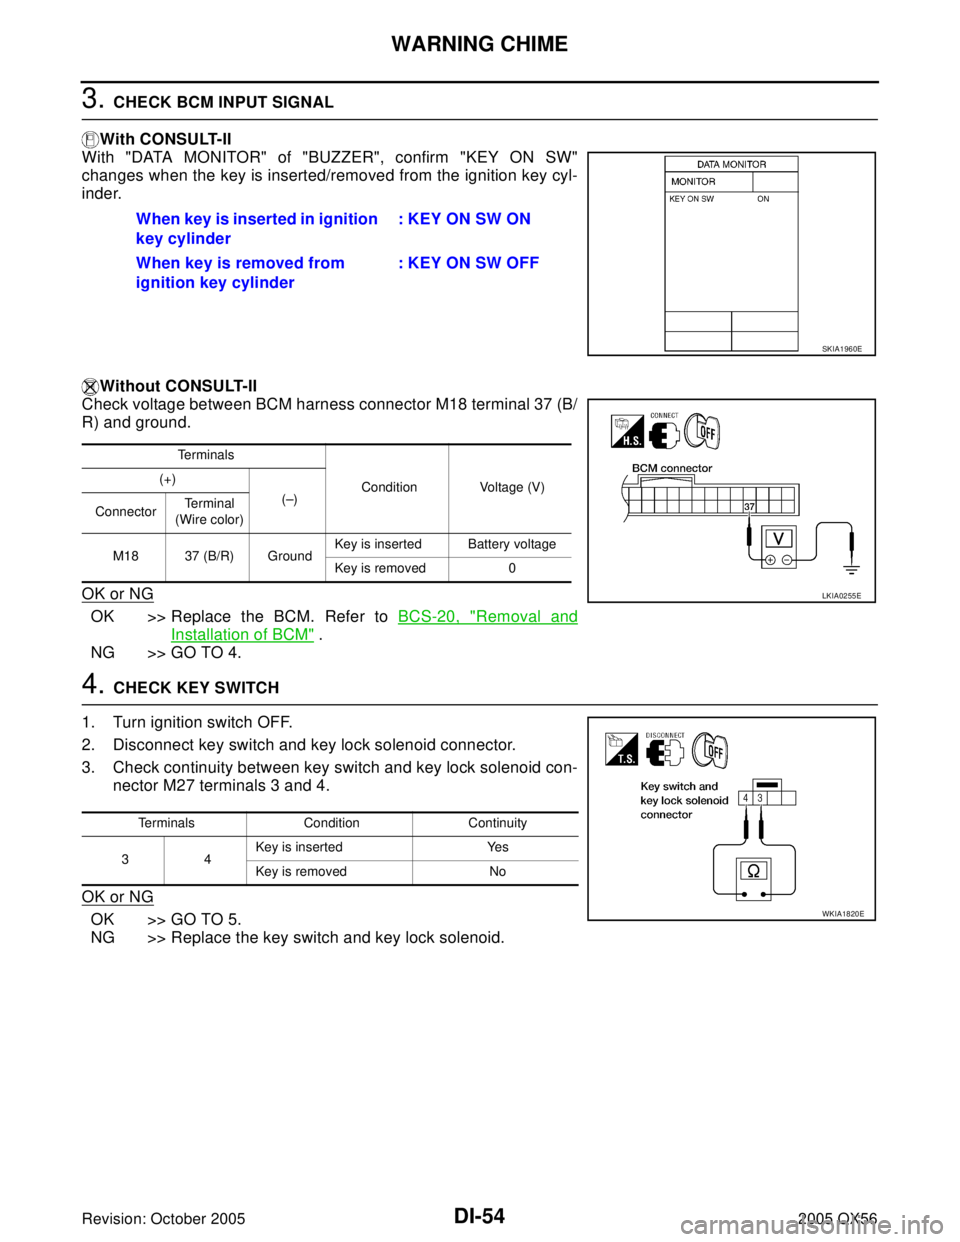
With CONSULT-II
With "DATA MONITOR" of "BUZZER", confirm "KEY ON SW"
changes when the key is inserted/removed from the ignition key cyl-
inder.
Without CONSULT-II
Check voltage between BCM harness connector M18 terminal 37 (B/
R) and ground.
OK or NG
OK >> Replace the BCM. Refer to BCS-20, "Removal and
Installation of BCM" .
NG >> GO TO 4.
4. CHECK KEY SWITCH
1. Turn ignition switch OFF.
2. Disconnect key switch and key lock solenoid connector.
3. Check continuity between key switch and key lock solenoid con-
nector M27 terminals 3 and 4.
OK or NG
OK >> GO TO 5.
NG >> Replace the key switch and key lock solenoid.When key is inserted in ignition
key cylinder: KEY ON SW ON
When key is removed from
ignition key cylinder: KEY ON SW OFF
SKIA1960E
Te r m i n a l s
Condition Voltage (V) (+)
(–)
ConnectorTe r m i n a l
(Wire color)
M18 37 (B/R) GroundKey is inserted Battery voltage
Key is removed 0
LKIA0255E
Terminals Condition Continuity
34Key is inserted Yes
Key is removed No
WKIA1820E
Page 1158 of 3419

WARNING CHIME
DI-55
C
D
E
F
G
H
I
J
L
MA
B
DI
Revision: October 20052005 QX56
5. CHECK KEY SWITCH CIRCUIT
1. Disconnect BCM.
2. Check continuity between BCM harness connector M18 terminal
37 (B/R) and key switch and key lock solenoid harness connec-
tor M27 terminal 4 (B/R).
3. Check continuity between BCM harness connector M18 terminal
37 (B/R) and ground.
OK or NG
OK >> GO TO 6.
NG >> Repair harness or connector.
6. CHECK KEY SWITCH POWER SUPPLY CIRCUIT
Check voltage between key switch and key lock solenoid harness
connector M27 terminal 3 (Y/R) and ground.
OK or NG
OK >> Replace the BCM. Refer to BCS-20, "Removal and
Installation of BCM" .
NG >> Check harness for open or short between fuse and key
switch and key lock solenoid.
Light Warning Chime Does Not OperateEKS00BD0
1. CHECK WARNING CHIME OPERATION
Check key warning chime and seat belt warning chime functions.
Do key warning chime and seat belt warning chime sound?
YES >> GO TO 2.
NO >> Go to DI-51, "
All Warning Chimes Do Not Operate" .
2. CHECK BCM INPUT SIGNAL
With CONSULT-II
1. Select "BCM".
2. With "DATA MONITOR" of "BUZZER", confirm "LIGHT SW 1ST"
status changes when the lighting switch is moved from ON (1st
position) to OFF.
Without CONSULT-II
Check combination switch. Refer to LT-98, "
Combination Switch
Reading Function" .
OK or NG
OK >> Replace the BCM. Refer to BCS-20, "Removal and Installation of BCM" .
NG >> Check lighting switch. Refer to LT- 9 8 , "
Combination Switch Reading Function" . Continuity should exist.
Continuity should not exist.
WKIA2074E
Battery voltage should exist.
WKIA2075E
Lighting switch ON (1st position) : LIGHT SW 1ST ON
Lighting switch OFF : LIGHT SW 1ST OFF
WKIA1877E
Page 1162 of 3419

REAR SONAR SYSTEM
DI-59
C
D
E
F
G
H
I
J
L
MA
B
DI
Revision: October 20052005 QX56
System DescriptionEKS00BD3
FUNCTION
With the ignition switch in the ON or START position, power is supplied
�through 10A fuse [No. 12 , located in the fuse block (J/B)]
�to sonar control unit terminal 8, and
�through 10A fuse (No. 51, located in the IPDM E/R)
�to back-up lamp relay terminals 1 and 3.
Ground is supplied
�to sonar control unit terminal 6
�through body grounds B7 and B19.
With the ignition switch in the ON or START position, and the transmission gear selector lever in the R posi-
tion, power is supplied
�to sonar control unit terminal 5
�from back-up lamp relay terminal 5.
With power and ground supplied, transmission gear selector lever in R position, and the rear sonar system
OFF switch ON, the rear sonar system will detect obstacles within 1.8 m (5.9 ft.) of the rear sonar sensors.
The vehicle operator is notified of obstacles by varied rate of tone from the sonar buzzer depending on dis-
tance of obstacle being sensed.
REAR SONAR SYSTEM OFF SWITCH
With power and ground supplied to the sonar control unit, transmission gear selector lever in R position, the
sonar system can be disabled and the sonar buzzer silenced by momentarily pressing the rear sonar system
OFF switch. The rear sonar system OFF indicator lamp will be illuminated in the rear sonar system OFF
switch.
To disable the rear sonar system, ground is supplied
�to sonar control unit terminal 13
�through rear sonar system OFF switch terminal 1
�through rear sonar system OFF switch terminal 2
�from body grounds M57, M61, and M79.
To light the rear sonar system OFF indicator, power is supplied
�from sonar control unit terminal 4
�to the rear sonar system OFF switch terminal 5.
Ground is supplied
�to the rear sonar system OFF switch terminal 6
�from body grounds M57, M61, and M79.
The rear sonar system and buzzer will be disabled and the rear sonar system OFF indicator will be illuminated
until the ignition switch is turned OFF. When the ignition switch is turned ON, the rear sonar system will be
enabled. Depressing the rear sonar system OFF switch momentarily will enable the rear sonar system also.
Enabling the rear sonar system will cause the rear sonar system OFF indicator to go out.
SONAR BUZZER
With power supplied to the sonar control unit and the transmission gear selector lever in R position, a station-
ary object that is at least 7.0 cm (2.8 in.) wide and 1.0 m (39.0 in.) tall and that is closer than 1.8 meters (5.9 ft.)
will be detected by the rear sonar sensors, causing the sonar buzzer to sound a tone. As the vehicle moves
closer to the object, the rate of the tone will increase. When the object is less than 25.0 cm (10 in.) from the
rear bumper, the tone will sound continuously.
Power is supplied
�to sonar buzzer terminal +
�from sonar control unit terminal 7.
Ground is supplied
�to sonar buzzer terminal -
�from sonar control unit terminal 3.
Page 1172 of 3419
CLOCK
DI-69
C
D
E
F
G
H
I
J
L
MA
B
DI
Revision: October 20052005 QX56
CLOCKPFP:25820
Wiring Diagram — CLOCK —EKS00BDD
WKWA1178E
Page 1173 of 3419
DI-70
CLOCK
Revision: October 20052005 QX56
Removal and Installation of ClockEKS00BDE
REMOVAL
1. Remove cluster lid C. Refer to IP-10, "INSTRUMENT PANEL
ASSEMBLY" .
2. Remove screws (3) and remove clock from cluster lid C.
INSTALLATION
Installation is in the reverse order of removal.
LKIA0477E
Page 1175 of 3419

DI-72
REAR VIEW MONITOR
Revision: October 20052005 QX56
System DescriptionEKS00BDF
�When the A/T selector is in the reverse position, the display shows view to the rear of the vehicle.
�Lines which indicate the vehicle clearance and distances are displayed on the monitor.
POWER SUPPLY AND GROUND
Power is supplied at all times
�through 20A fuse (No. 31, located in the fuse and fusible link box)
�to rear view camera control unit terminal 1.
When ignition switch is in ACC or ON position, power is supplied
�through 10A fuse [No. 4, located in the fuse block (J/B)]
�to rear view camera control unit terminal 2.
Ground is supplied
�to rear view camera control unit terminal 3 and
�to rear view camera terminal 2
�through grounds B7 and B19.
AV COMMUNICATION LINE
Rear view camera control unit is connected to the following units with AV communication line. Each unit trans-
mits/receives data with AV communication line.
�NAVI control unit
�Display unit
�Display control unit
�AV switch
REAR VIEW CAMERA OPERATION
When ignition switch is in ON or START position, power is supplied
�through 10A fuse (No. 51, located in the IPDM E/R)
�to back-up lamp relay terminals 1 and 3.
When A/T selector lever is in reverse position, power is supplied
�through back-up lamp relay terminal 2
�to TCM terminal 7.
Then, when back-up lamp relay is energized,
�from back-up lamp relay terminal 5
�to rear view camera control unit terminal 4.
Then, rear view camera control unit is sent camera ON signal
�through rear view camera control unit terminal 8
�to rear view camera terminal 1.
An image taken by rear view camera is sent
�through rear view camera terminals 3 and 4
�to rear view camera control unit terminals 10 and 9.
Then an image is sent
�through rear view camera control unit terminals 11 and 12
�to display unit terminals 4 and 15.
An image of rear view will be projected on the display.
Side Distance Guideline
When A/T selector lever is in reverse position, rear view camera control unit is sent rear view camera guideline
image
�through rear view camera control unit terminals 11 and 12
�to display unit terminals 4 and 15.
Rear view camera guideline will be projected on the display.
Display shows image from rear view camera image and rear view camera guideline.
Page 1202 of 3419

INDEX FOR DTC
EC-11
C
D
E
F
G
H
I
J
K
L
MA
EC
Revision: October 20052005 QX56
*1: 1st trip DTC No. is the same as DTC No.
*2: This number is prescribed by SAE J2012.
*3: In Diagnostic Test Mode II (Self-diagnostic results), this number is controlled by NISSAN.
*4: The troubleshooting for this DTC needs CONSULT-II.
*5: When the fail-safe operations for both self-diagnoses occur, the MIL illuminates.
*6: 2WD models
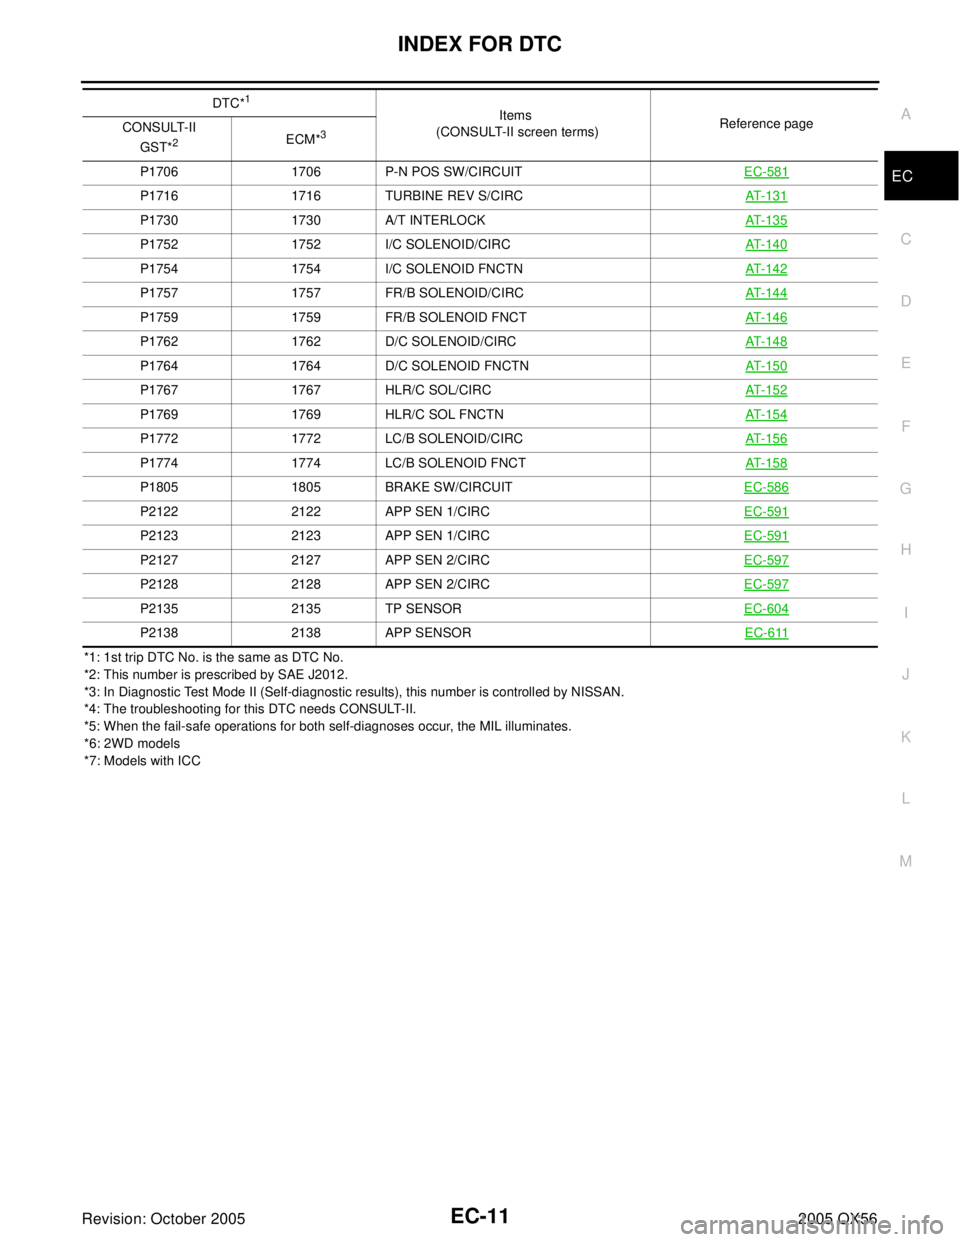
*7: Models with ICCP1706 1706 P-N POS SW/CIRCUITEC-581
P1716 1716 TURBINE REV S/CIRCAT- 1 3 1
P1730 1730 A/T INTERLOCKAT- 1 3 5
P1752 1752 I/C SOLENOID/CIRCAT- 1 4 0
P1754 1754 I/C SOLENOID FNCTNAT- 1 4 2
P1757 1757 FR/B SOLENOID/CIRCAT- 1 4 4
P1759 1759 FR/B SOLENOID FNCTAT- 1 4 6
P1762 1762 D/C SOLENOID/CIRCAT- 1 4 8
P1764 1764 D/C SOLENOID FNCTNAT- 1 5 0
P1767 1767 HLR/C SOL/CIRCAT- 1 5 2
P1769 1769 HLR/C SOL FNCTNAT- 1 5 4
P1772 1772 LC/B SOLENOID/CIRCAT- 1 5 6
P1774 1774 LC/B SOLENOID FNCTAT- 1 5 8
P1805 1805 BRAKE SW/CIRCUITEC-586
P2122 2122 APP SEN 1/CIRCEC-591
P2123 2123 APP SEN 1/CIRCEC-591
P2127 2127 APP SEN 2/CIRCEC-597
P2128 2128 APP SEN 2/CIRCEC-597
P2135 2135 TP SENSOREC-604
P2138 2138 APP SENSOREC-611
DTC*1
Items
(CONSULT-II screen terms)Reference page
CONSULT-II
GST*
2ECM*3