Page 2979 of 3419
SE-14
AUTOMATIC DRIVE POSITIONER
Revision: October 20052005 QX56
FAIL - S AF E M ODE
When any manual and automatic operations are not performed, if any motor operations of seats or pedals are
detected for T2 or more, status is judged “Output error”.
CANCEL OF FAIL-SAFE MODE
The mode is cancelled when the selector lever is shifted to P position from any other position.
OPERATED PORTION T2
Seat sliding Approx. 0.1 sec.
Seat reclining Same as above
Seat lifting (Front) Same as above
Seat lifting (Rear) Same as above
Steering wheel Same as above
Pedal adjust Same as above
Page 2981 of 3419
SE-16
AUTOMATIC DRIVE POSITIONER
Revision: October 20052005 QX56
MEMORY OPERATION
Selecting the memorized position.
NOTE:
The front seat position and pedal adjustment functions (see the following table) operate simultaneously in the
order of priority.
*: In conjunction with sliding the seat, the door mirrors are positioned.
ENTRY OPERATION
When the seat is in the exiting position, the following operation moves the seat to the previous position before
the exiting operation.
EXITING OPERATION
At Entry/Exiting, the seat is automatically moved to the exiting position.
Priority Function Priority Function
1 Seat sliding, (door mirror LH/RH)* 4 Seat reclining
2 Pedal 5 Seat lifter-FR
3 Steering wheel 6 Seat lifter-RR
LIIA1477E
LIIA0855E
LIIA0856E
Page 3000 of 3419

AUTOMATIC DRIVE POSITIONER
SE-35
C
D
E
F
G
H
J
K
L
MA
B
SE
Revision: October 20052005 QX56
Preliminary CheckEIS004XN
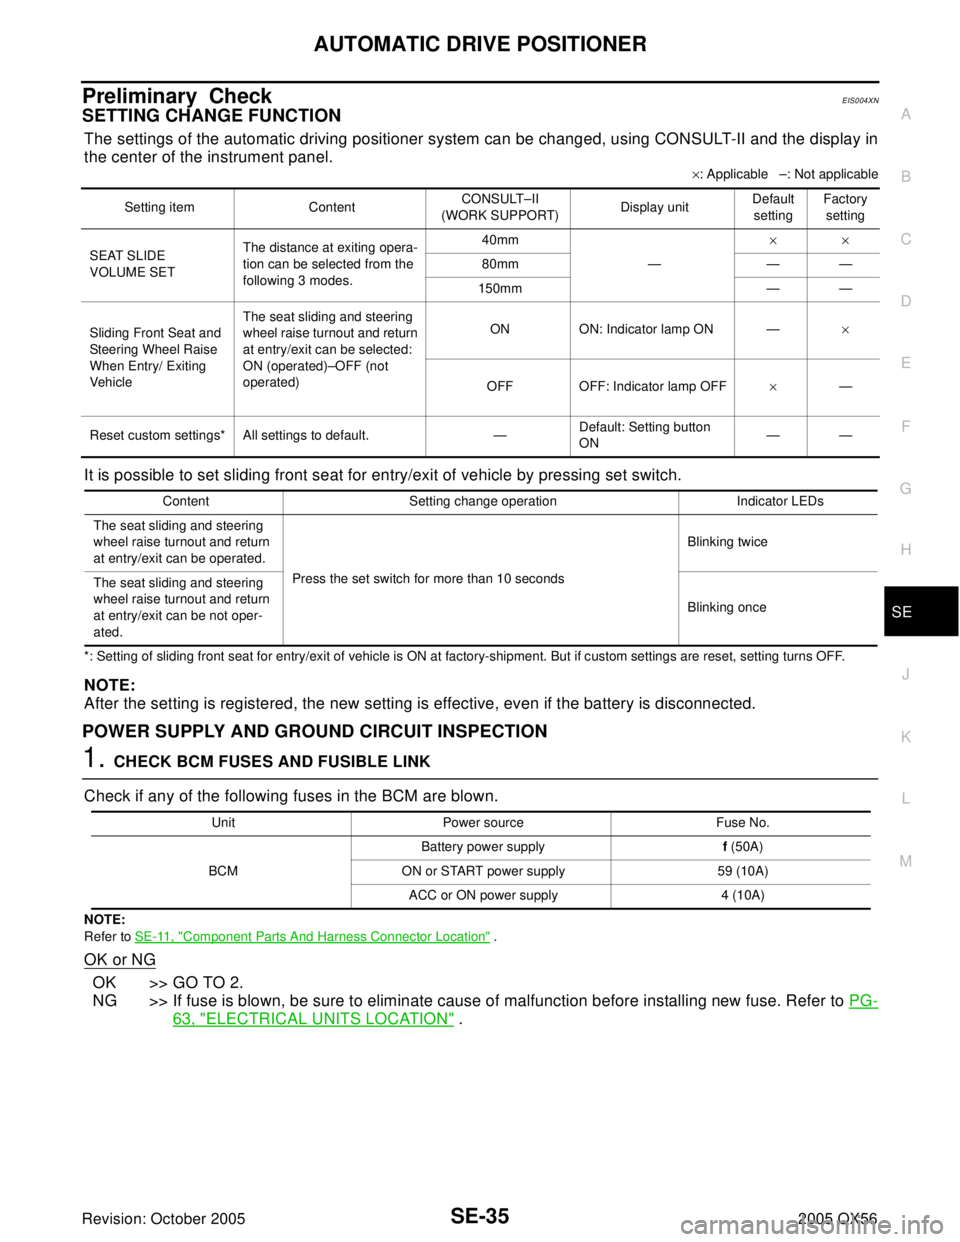
SETTING CHANGE FUNCTION
The settings of the automatic driving positioner system can be changed, using CONSULT-II and the display in
the center of the instrument panel.
×: Applicable –: Not applicable
It is possible to set sliding front seat for entry/exit of vehicle by pressing set switch.
*: Setting of sliding front seat for entry/exit of vehicle is ON at factory-shipment. But if custom settings are reset, setting turns OFF.
NOTE:
After the setting is registered, the new setting is effective, even if the battery is disconnected.
POWER SUPPLY AND GROUND CIRCUIT INSPECTION
1. CHECK BCM FUSES AND FUSIBLE LINK
Check if any of the following fuses in the BCM are blown.
NOTE:
Refer to SE-11, "
Component Parts And Harness Connector Location" .
OK or NG
OK >> GO TO 2.
NG >> If fuse is blown, be sure to eliminate cause of malfunction before installing new fuse. Refer to PG-
63, "ELECTRICAL UNITS LOCATION" .
Setting item ContentCONSULT–II
(WORK SUPPORT)Display unitDefault
settingFactory
setting
SEAT SLIDE
VOLUME SETThe distance at exiting opera-
tion can be selected from the
following 3 modes.40mm
—××
80mm — —
150mm — —
Sliding Front Seat and
Steering Wheel Raise
When Entry/ Exiting
Veh icleThe seat sliding and steering
wheel raise turnout and return
at entry/exit can be selected:
ON (operated)–OFF (not
operated)ON ON: Indicator lamp ON —×
OFF OFF: Indicator lamp OFF×—
Reset custom settings* All settings to default. —Default: Setting button
ON——
Content Setting change operation Indicator LEDs
The seat sliding and steering
wheel raise turnout and return
at entry/exit can be operated.
Press the set switch for more than 10 secondsBlinking twice
The seat sliding and steering
wheel raise turnout and return
at entry/exit can be not oper-
ated.Blinking once
Unit Power source Fuse No.
BCMBattery power supplyf (50A)
ON or START power supply 59 (10A)
ACC or ON power supply 4 (10A)
Page 3008 of 3419

AUTOMATIC DRIVE POSITIONER
SE-43
C
D
E
F
G
H
J
K
L
MA
B
SE
Revision: October 20052005 QX56
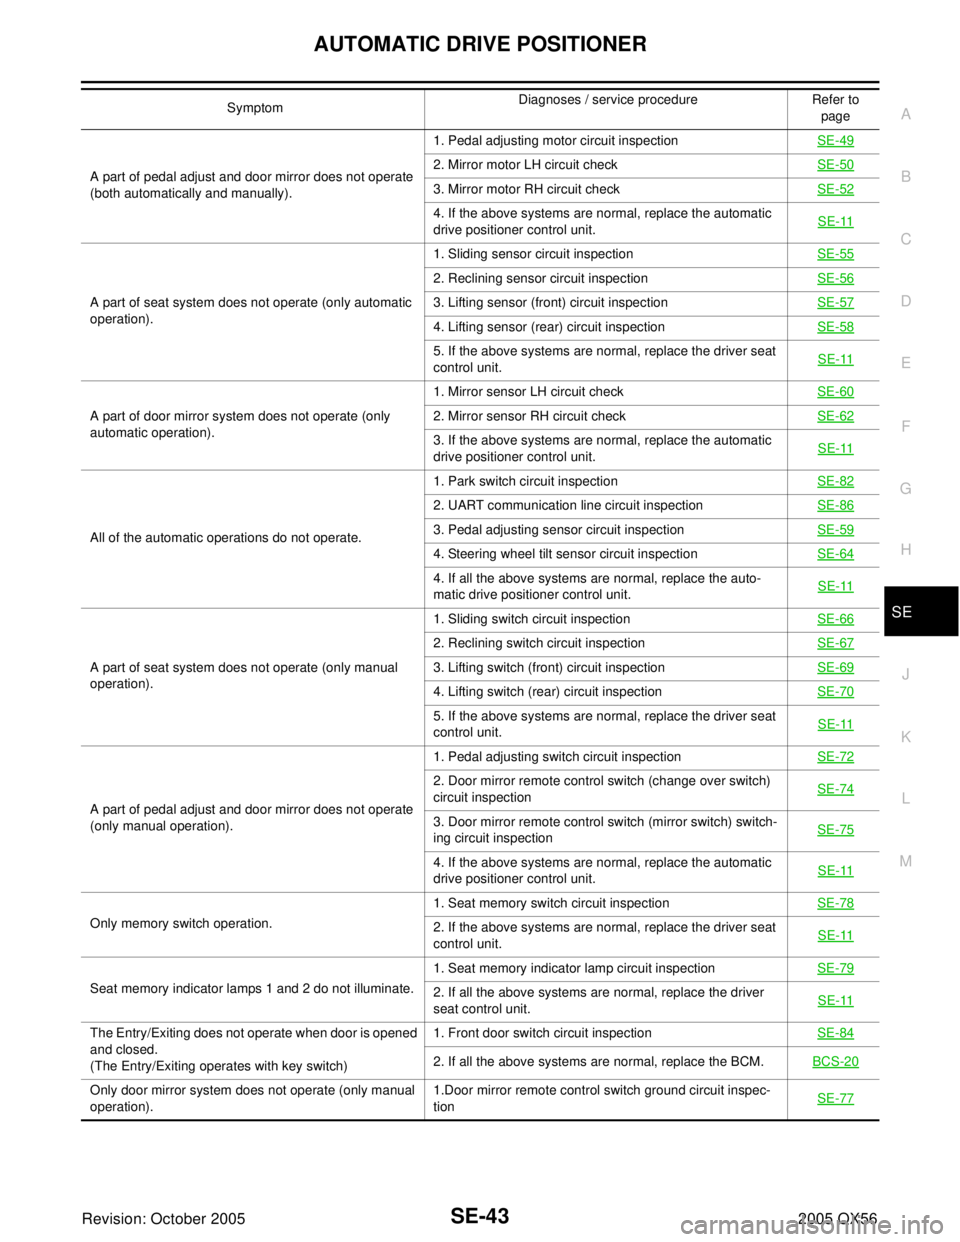
A part of pedal adjust and door mirror does not operate
(both automatically and manually).1. Pedal adjusting motor circuit inspectionSE-492. Mirror motor LH circuit check SE-50
3. Mirror motor RH circuit check SE-52
4. If the above systems are normal, replace the automatic
drive positioner control unit.SE-11
A part of seat system does not operate (only automatic
operation).1. Sliding sensor circuit inspectionSE-55
2. Reclining sensor circuit inspectionSE-56
3. Lifting sensor (front) circuit inspectionSE-57
4. Lifting sensor (rear) circuit inspectionSE-58
5. If the above systems are normal, replace the driver seat
control unit.SE-11
A part of door mirror system does not operate (only
automatic operation).1. Mirror sensor LH circuit checkSE-602. Mirror sensor RH circuit checkSE-62
3. If the above systems are normal, replace the automatic
drive positioner control unit.SE-11
All of the automatic operations do not operate.1. Park switch circuit inspectionSE-82
2. UART communication line circuit inspectionSE-86
3. Pedal adjusting sensor circuit inspectionSE-59
4. Steering wheel tilt sensor circuit inspectionSE-64
4. If all the above systems are normal, replace the auto-
matic drive positioner control unit.SE-11
A part of seat system does not operate (only manual
operation).1. Sliding switch circuit inspectionSE-66
2. Reclining switch circuit inspectionSE-67
3. Lifting switch (front) circuit inspectionSE-69
4. Lifting switch (rear) circuit inspectionSE-70
5. If the above systems are normal, replace the driver seat
control unit.SE-11
A part of pedal adjust and door mirror does not operate
(only manual operation).1. Pedal adjusting switch circuit inspection SE-72
2. Door mirror remote control switch (change over switch)
circuit inspection SE-74
3. Door mirror remote control switch (mirror switch) switch-
ing circuit inspection SE-75
4. If the above systems are normal, replace the automatic
drive positioner control unit.SE-11
Only memory switch operation.1. Seat memory switch circuit inspectionSE-782. If the above systems are normal, replace the driver seat
control unit.SE-11
Seat memory indicator lamps 1 and 2 do not illuminate.1. Seat memory indicator lamp circuit inspectionSE-792. If all the above systems are normal, replace the driver
seat control unit.SE-11
The Entry/Exiting does not operate when door is opened
and closed.
(The Entry/Exiting operates with key switch)1. Front door switch circuit inspectionSE-84
2. If all the above systems are normal, replace the BCM.BCS-20
Only door mirror system does not operate (only manual
operation).1.Door mirror remote control switch ground circuit inspec-
tionSE-77
SymptomDiagnoses / service procedure Refer to
page
Page 3018 of 3419

AUTOMATIC DRIVE POSITIONER
SE-53
C
D
E
F
G
H
J
K
L
MA
B
SE
Revision: October 20052005 QX56
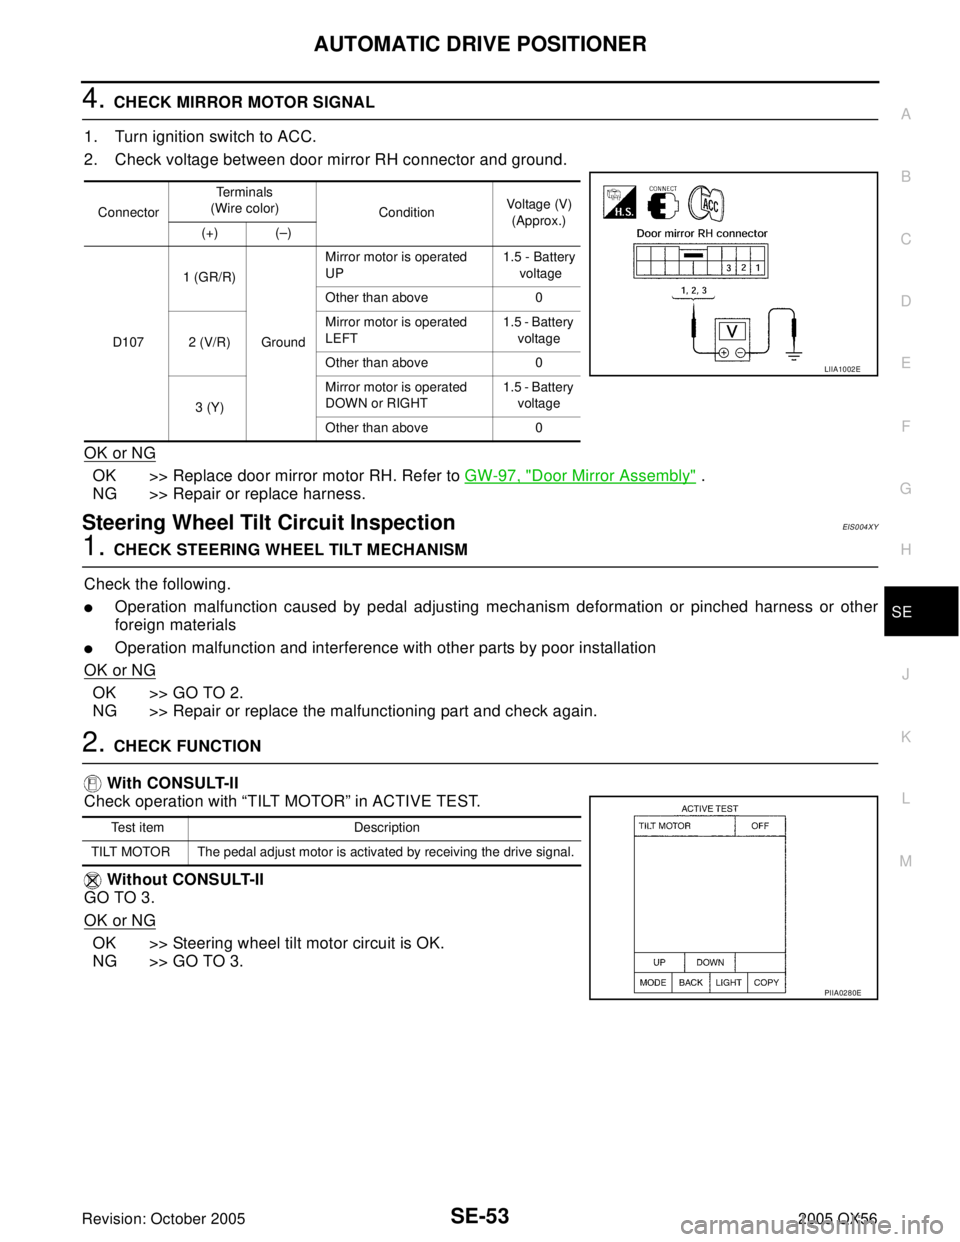
4. CHECK MIRROR MOTOR SIGNAL
1. Turn ignition switch to ACC.
2. Check voltage between door mirror RH connector and ground.
OK or NG
OK >> Replace door mirror motor RH. Refer to GW-97, "Door Mirror Assembly" .
NG >> Repair or replace harness.
Steering Wheel Tilt Circuit InspectionEIS004XY
1. CHECK STEERING WHEEL TILT MECHANISM
Check the following.
�Operation malfunction caused by pedal adjusting mechanism deformation or pinched harness or other
foreign materials
�Operation malfunction and interference with other parts by poor installation
OK or NG
OK >> GO TO 2.
NG >> Repair or replace the malfunctioning part and check again.
2. CHECK FUNCTION
With CONSULT-II
Check operation with “TILT MOTOR” in ACTIVE TEST.
Without CONSULT-II
GO TO 3.
OK or NG
OK >> Steering wheel tilt motor circuit is OK.
NG >> GO TO 3.
ConnectorTerminals
(Wire color)
ConditionVoltage (V)
(Approx.)
(+) (–)
D1071 (GR/R)
GroundMirror motor is operated
UP1.5 - Battery
voltage
Other than above 0
2 (V/R)Mirror motor is operated
LEFT1.5 - Battery
voltage
Other than above 0
3 (Y)Mirror motor is operated
DOWN or RIGHT1.5 - Battery
voltage
Other than above 0
LIIA1002E
Test item Description
TILT MOTOR The pedal adjust motor is activated by receiving the drive signal.
PIIA0280E
Page 3019 of 3419

SE-54
AUTOMATIC DRIVE POSITIONER
Revision: October 20052005 QX56
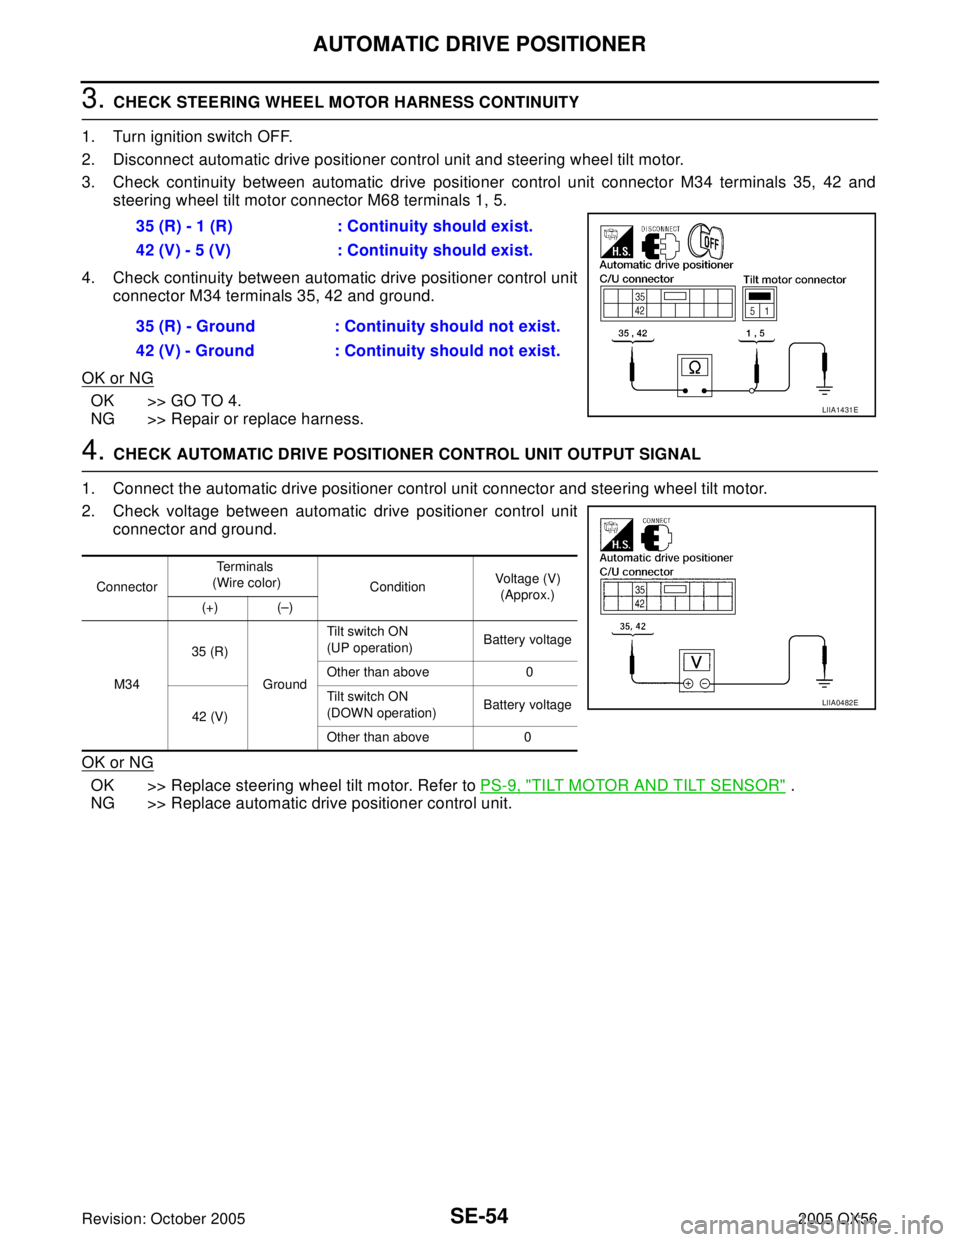
3. CHECK STEERING WHEEL MOTOR HARNESS CONTINUITY
1. Turn ignition switch OFF.
2. Disconnect automatic drive positioner control unit and steering wheel tilt motor.
3. Check continuity between automatic drive positioner control unit connector M34 terminals 35, 42 and
steering wheel tilt motor connector M68 terminals 1, 5.
4. Check continuity between automatic drive positioner control unit
connector M34 terminals 35, 42 and ground.
OK or NG
OK >> GO TO 4.
NG >> Repair or replace harness.
4. CHECK AUTOMATIC DRIVE POSITIONER CONTROL UNIT OUTPUT SIGNAL
1. Connect the automatic drive positioner control unit connector and steering wheel tilt motor.
2. Check voltage between automatic drive positioner control unit
connector and ground.
OK or NG
OK >> Replace steering wheel tilt motor. Refer to PS-9, "TILT MOTOR AND TILT SENSOR" .
NG >> Replace automatic drive positioner control unit.35 (R) - 1 (R) : Continuity should exist.
42 (V) - 5 (V) : Continuity should exist.
35 (R) - Ground : Continuity should not exist.
42 (V) - Ground : Continuity should not exist.
LIIA1431E
ConnectorTerminals
(Wire color)
ConditionVoltage (V)
(Approx.)
(+) (–)
M3435 (R)
GroundTilt switch ON
(UP operation)Battery voltage
Other than above 0
42 (V)Tilt switch ON
(DOWN operation)Battery voltage
Other than above 0
LIIA0482E
Page 3029 of 3419
SE-64
AUTOMATIC DRIVE POSITIONER
Revision: October 20052005 QX56
Steering Wheel Tilt Sensor Circuit InspectionEIS004Y6
1. CHECK FUNCTION
With CONSULT-II
Operate the pedal adjusting switch with “TILT SEN” on the DATA
MONITOR to make sure the voltage changes.
Without CONSULT-II
1. Turn ignition switch OFF.
2. Check voltage between automatic drive positioner connector
and ground.
OK or NG
OK >> Steering wheel tilt sensor circuit is OK.
NG >> GO TO 2.
Monitor item [OPERA-
TION or UNIT]Contents
TILT
SEN“V”The tilt position (voltage) judged from the tilt sensor sig-
nal is displayed.
PIIA0295E
ConnectorTerminals
(Wire color)
ConditionVoltage (V)
(Approx.)
(+) (–)
M33 7 (Y/R) GroundPedal
front end position0.6
Pedal
back end position4.5
LIIA0485E
Page 3030 of 3419
AUTOMATIC DRIVE POSITIONER
SE-65
C
D
E
F
G
H
J
K
L
MA
B
SE
Revision: October 20052005 QX56
2. CHECK HARNESS CONTINUITY
1. Disconnect automatic drive positioner control unit and steering wheel tilt sensor.
2. Check continuity between automatic drive positioner connector M33, M34 terminals 7, 33, 41 and steering
wheel tilt sensor connector M69 terminals 2, 3, 4.
3. Check continuity between automatic drive positioner control unit
connectors M33, M34 terminals 7, 33, 41 and ground.
OK or NG
OK >> Replace steering wheel tilt motor. Refer to PS-9, "TILT
MOTOR AND TILT SENSOR" .
NG >> Repair or replace harness.7 (Y/R) - 3 (Y/BR) : Continuity should exist.
33 (W/L) - 2 (W/L) : Continuity should exist.
41 (W/G) - 4 (W/G) : Continuity should exist.
7 (Y/R) - Ground : Continuity should not exist.
33 (W/L) - Ground : Continuity should not exist.
41 (W/G) - Ground : Continuity should not exist.
LIIA1432E