Page 270 of 4731
CLOSED THROTTLE POSITION AND WIDE OPEN THROTTLE POSITION CIR- CUIT
AT-187
D E
F
G H
I
J
K L
M A
B
AT
Revision: 2005 July 2005 FX
CLOSED THROTTLE POSITION AND WIDE OPEN THROTTLE POSITION CIR-
CUIT
PFP:18002
CONSULT-II Reference ValueACS006CR
Diagnostic ProcedureACS002R2
1. CHECK CAN COMMUNICATION LINE
Perform the self-diagnosis. Refer to AT- 9 3 , "
SELF-DIAGNOSTIC RESULT MODE" , AT- 1 0 3 , "Diagnostic Pro-
cedure without CONSULT-II" .
Is a malfunction in the CAN communication indicated in the results?
YES >> Check CAN communication line. Refer to AT- 1 0 6 , "DTC U1000 CAN COMMUNICATION LINE" .
NO >> GO TO 2.
2. CHECK THROTTLE POSITION SIGNAL CIRCUIT
With CONSULT-II
1. Turn ignition switch ON. (Do not start engine.)
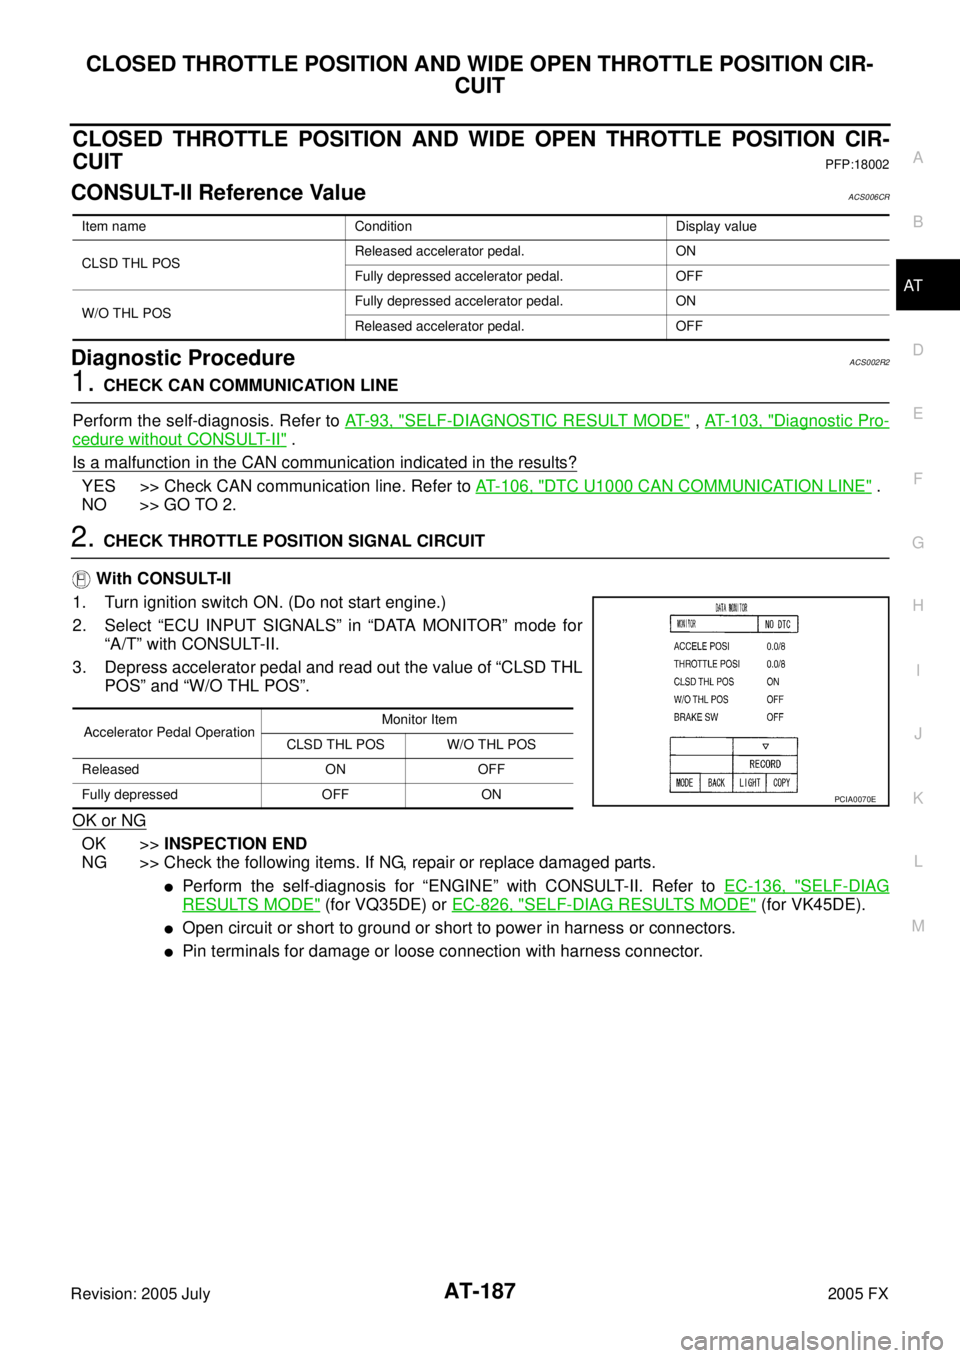
2. Select “ECU INPUT SIGNALS” in “DATA MONITOR” mode for “A/T” with CONSULT-II.
3. Depress accelerator pedal and read out the value of “CLSD THL POS” and “W/O THL POS”.
OK or NG
OK >> INSPECTION END
NG >> Check the following items. If NG, repair or replace damaged parts.
�Perform the self-diagnosis for “ENGINE” with CONSULT-II. Refer to EC-136, "SELF-DIAG
RESULTS MODE" (for VQ35DE) or EC-826, "SELF-DIAG RESULTS MODE" (for VK45DE).
�Open circuit or short to ground or short to power in harness or connectors.
�Pin terminals for damage or loose connection with harness connector.
Item name Condition Display value
CLSD THL POS Released accelerator pedal. ON
Fully depressed accelerator pedal. OFF
W/O THL POS Fully depressed accelerator pedal. ON
Released accelerator pedal. OFF
Accelerator Pedal Operation Monitor Item
CLSD THL POS W/O THL POS
Released ON OFF
Fully depressed OFF ON
PCIA0070E
Page 280 of 4731

TROUBLE DIAGNOSIS FOR SYMPTOMS AT-197
D E
F
G H
I
J
K L
M A
B
AT
Revision: 2005 July 2005 FX
5. CHECK SYMPTOM
Check again. Refer to AT- 5 7 , "
Check at Idle" .
OK or NG
OK >> INSPECTION END
NG >> GO TO 6.
6. CHECK TCM
1. Check TCM input/output signals. Refer to AT- 8 9 , "
TCM Input/Output Signal Reference Values" .
2. If NG, recheck A/T assembly harness connector terminals for damage or loose connection with harness connector.
OK or NG
OK >> INSPECTION END
NG >> Repair or replace damaged parts.
Large Shock (“N” to “D” Position)ACS0080W
SYMPTOM:
A noticeable shock occurs when the selector lever is shifted from “N” to “D” position.
DIAGNOSTIC PROCEDURE
1. CHECK SELF-DIAGNOSTIC RESULTS
Perform self-diagnosis. Refer to AT- 9 3 , "
SELF-DIAGNOSTIC RESULT MODE" , AT- 1 0 3 , "TCM SELF-DIAG-
NOSTIC PROCEDURE (NO TOOLS)" .
Is any malfunction detected by self-diagnostic results?
YES >> Check the malfunctioning system. Refer to AT- 9 3 , "SELF-DIAGNOSTIC RESULT MODE" , AT-
104, "Judgement Self-diagnosis Code" .
NO >> GO TO 2.
2. ENGINE IDLE SPEED
Check the engine idle speed. Refer to EC-83, "
Idle Speed and Ignition Timing Check" (for VQ35DE) or EC-
774, "Idle Speed and Ignition Timing Check" (for VK45DE).
OK or NG
OK >> GO TO 3.
NG >> Adjust engine idle speed. Refer to EC-83, "
Idle Speed and Ignition Timing Check" (for VQ35DE)
or EC-774, "
Idle Speed and Ignition Timing Check" (for VK45DE).
3. CHECK CONTROL LINKAGE
Check the control linkage.
�Refer to AT- 2 3 5 , "Checking of A/T Position" .
OK or NG
OK >> GO TO 4.
NG >> Adjust control linkage. Refer to AT- 2 3 5 , "
Adjustment of
A/T Position" .
SCIA2119E
Page 351 of 4731
AT-268
AIR BREATHER HOSE
Revision: 2005 July 2005 FX
AIR BREATHER HOSEPFP:31098
Removal and InstallationACS002S0
VQ35DE ENGINE MODEL
Refer to the figure below for air breather hose removal and installation procedure.
CAUTION:
�When installing an air breather hose, be careful not to be crushed or blocked by folding or bend-
ing the hose.
�When inserting a hose to the transmission tube, be sure to insert it fully until its end reaches the
tube bend R portion.
SCIA2151E
Page 354 of 4731
TRANSMISSION ASSEMBLY AT-271
D E
F
G H
I
J
K L
M A
B
AT
Revision: 2005 July 2005 FX
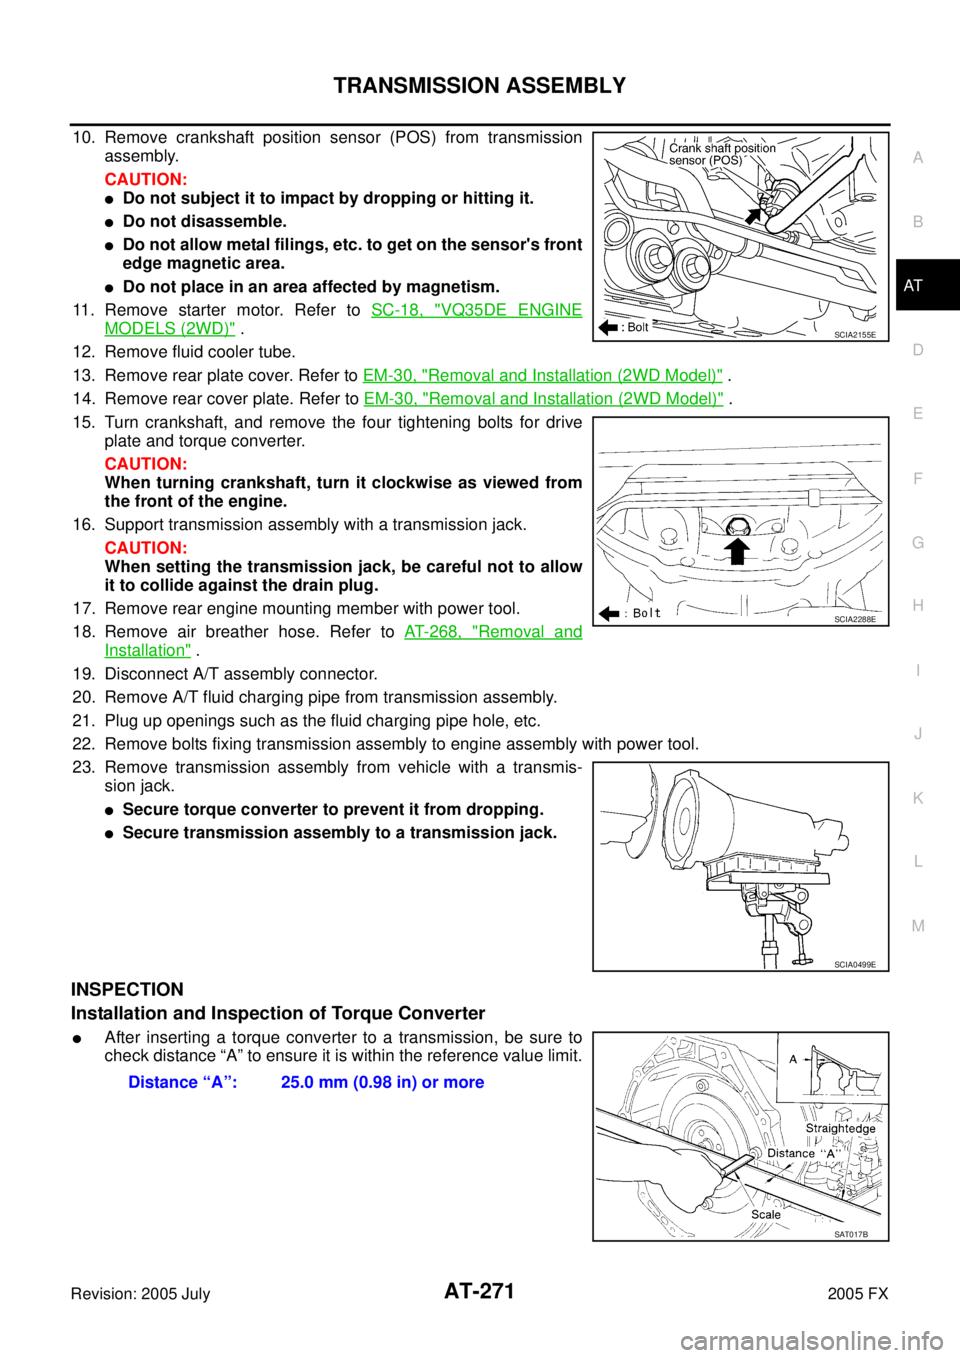
10. Remove crankshaft position sensor (POS) from transmission
assembly.
CAUTION:
�Do not subject it to impact by dropping or hitting it.
�Do not disassemble.
�Do not allow metal filings, etc. to get on the sensor's front
edge magnetic area.
�Do not place in an area affected by magnetism.
11. Remove starter motor. Refer to SC-18, "
VQ35DE ENGINE
MODELS (2WD)" .
12. Remove fluid cooler tube.
13. Remove rear plate cover. Refer to EM-30, "
Removal and Installation (2WD Model)" .
14. Remove rear cover plate. Refer to EM-30, "
Removal and Installation (2WD Model)" .
15. Turn crankshaft, and remove the four tightening bolts for drive plate and torque converter.
CAUTION:
When turning crankshaft, turn it clockwise as viewed from
the front of the engine.
16. Support transmission assembly with a transmission jack. CAUTION:
When setting the transmission jack, be careful not to allow
it to collide against the drain plug.
17. Remove rear engine mounting member with power tool.
18. Remove air breather hose. Refer to AT- 2 6 8 , "
Removal and
Installation" .
19. Disconnect A/T assembly connector.
20. Remove A/T fluid charging pipe from transmission assembly.
21. Plug up openings such as the fluid charging pipe hole, etc.
22. Remove bolts fixing transmission assembly to engine assembly with power tool.
23. Remove transmission assembly from vehicle with a transmis- sion jack.
�Secure torque converter to prevent it from dropping.
�Secure transmission assembly to a transmission jack.
INSPECTION
Installation and Inspection of Torque Converter
�After inserting a torque converter to a transmission, be sure to
check distance “A” to ensure it is within the reference value limit.
SCIA2155E
SCIA2288E
SCIA0499E
Distance “A”: 25.0 mm (0.98 in) or more
SAT017B
Page 356 of 4731
TRANSMISSION ASSEMBLY AT-273
D E
F
G H
I
J
K L
M A
B
AT
Revision: 2005 July 2005 FX
Removal and Installation (AWD Models) ACS0033A
COMPONENTS (FOR VQ35DE)
1. A/T fluid charging pipe 2. O-ring 3. Engine mounting insulator (rear)
4. Rear engine mounting member 5. Copper washer 6. Bracket
7. Fluid cooler tube 8. Bracket 9. Transmission assembly
10. A/T fluid level gauge
SCIA6425E
Page 358 of 4731
TRANSMISSION ASSEMBLY AT-275
D E
F
G H
I
J
K L
M A
B
AT
Revision: 2005 July 2005 FX
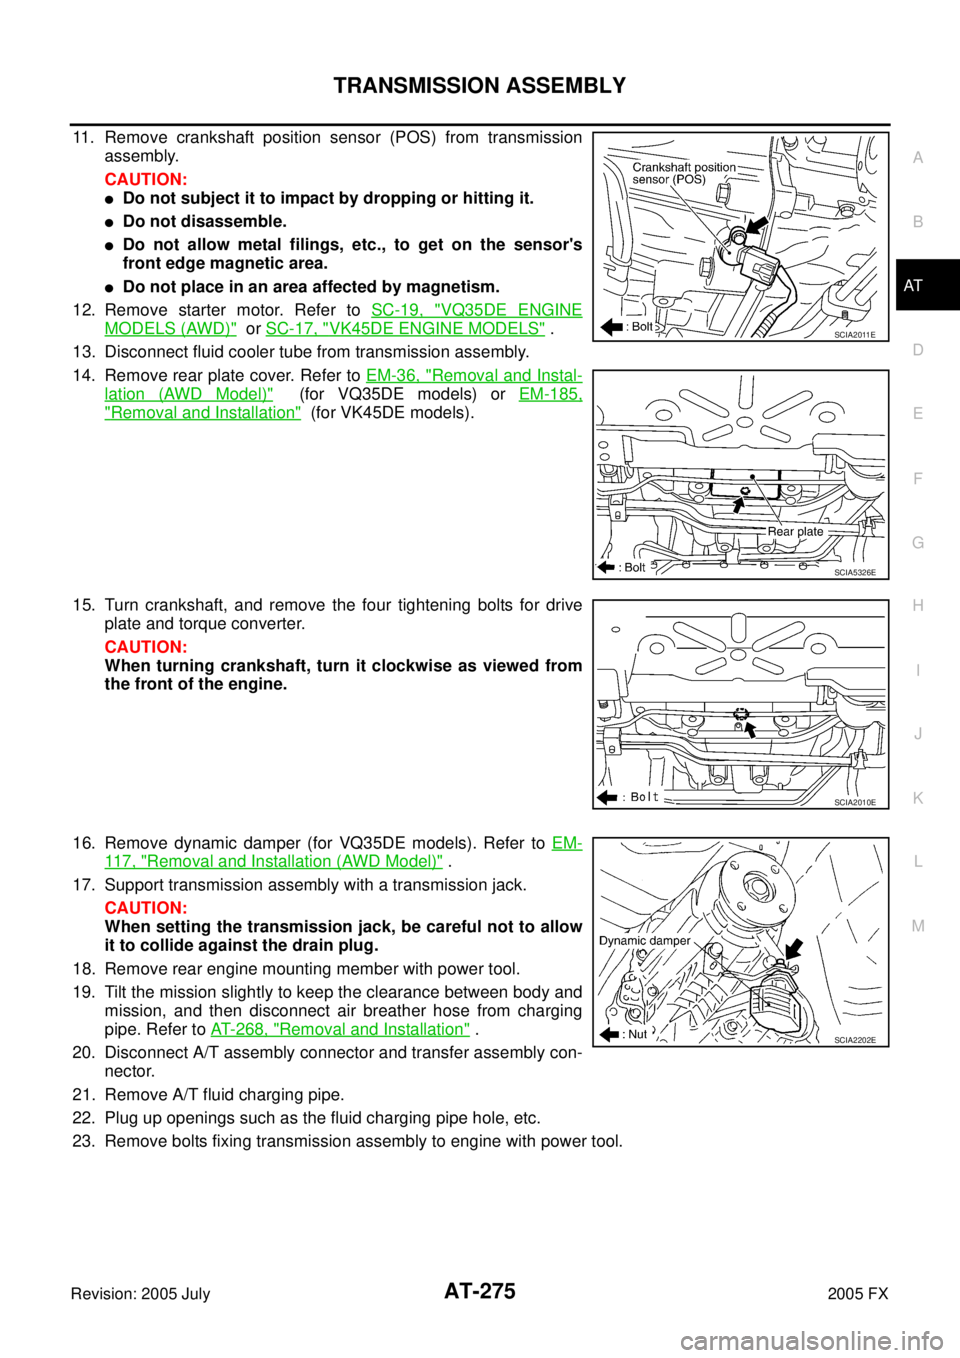
11. Remove crankshaft position sensor (POS) from transmission
assembly.
CAUTION:
�Do not subject it to impact by dropping or hitting it.
�Do not disassemble.
�Do not allow metal filings, etc., to get on the sensor's
front edge magnetic area.
�Do not place in an area affected by magnetism.
12. Remove starter motor. Refer to SC-19, "
VQ35DE ENGINE
MODELS (AWD)" or SC-17, "VK45DE ENGINE MODELS" .
13. Disconnect fluid cooler tube from transmission assembly.
14. Remove rear plate cover. Refer to EM-36, "
Removal and Instal-
lation (AWD Model)" (for VQ35DE models) or EM-185,
"Removal and Installation" (for VK45DE models).
15. Turn crankshaft, and remove the four tightening bolts for drive plate and torque converter.
CAUTION:
When turning crankshaft, turn it clockwise as viewed from
the front of the engine.
16. Remove dynamic damper (for VQ35DE models). Refer to EM-
11 7 , "Removal and Installation (AWD Model)" .
17. Support transmission assembly with a transmission jack. CAUTION:
When setting the transmission jack, be careful not to allow
it to collide against the drain plug.
18. Remove rear engine mounting member with power tool.
19. Tilt the mission slightly to keep the clearance between body and mission, and then disconnect air breather hose from charging
pipe. Refer to AT- 2 6 8 , "
Removal and Installation" .
20. Disconnect A/T assembly connector and transfer assembly con- nector.
21. Remove A/T fluid charging pipe.
22. Plug up openings such as the fluid charging pipe hole, etc.
23. Remove bolts fixing transmission assembly to engine with power tool.
SCIA2011E
SCIA5326E
SCIA2010E
SCIA2202E
Page 359 of 4731
AT-276
TRANSMISSION ASSEMBLY
Revision: 2005 July 2005 FX
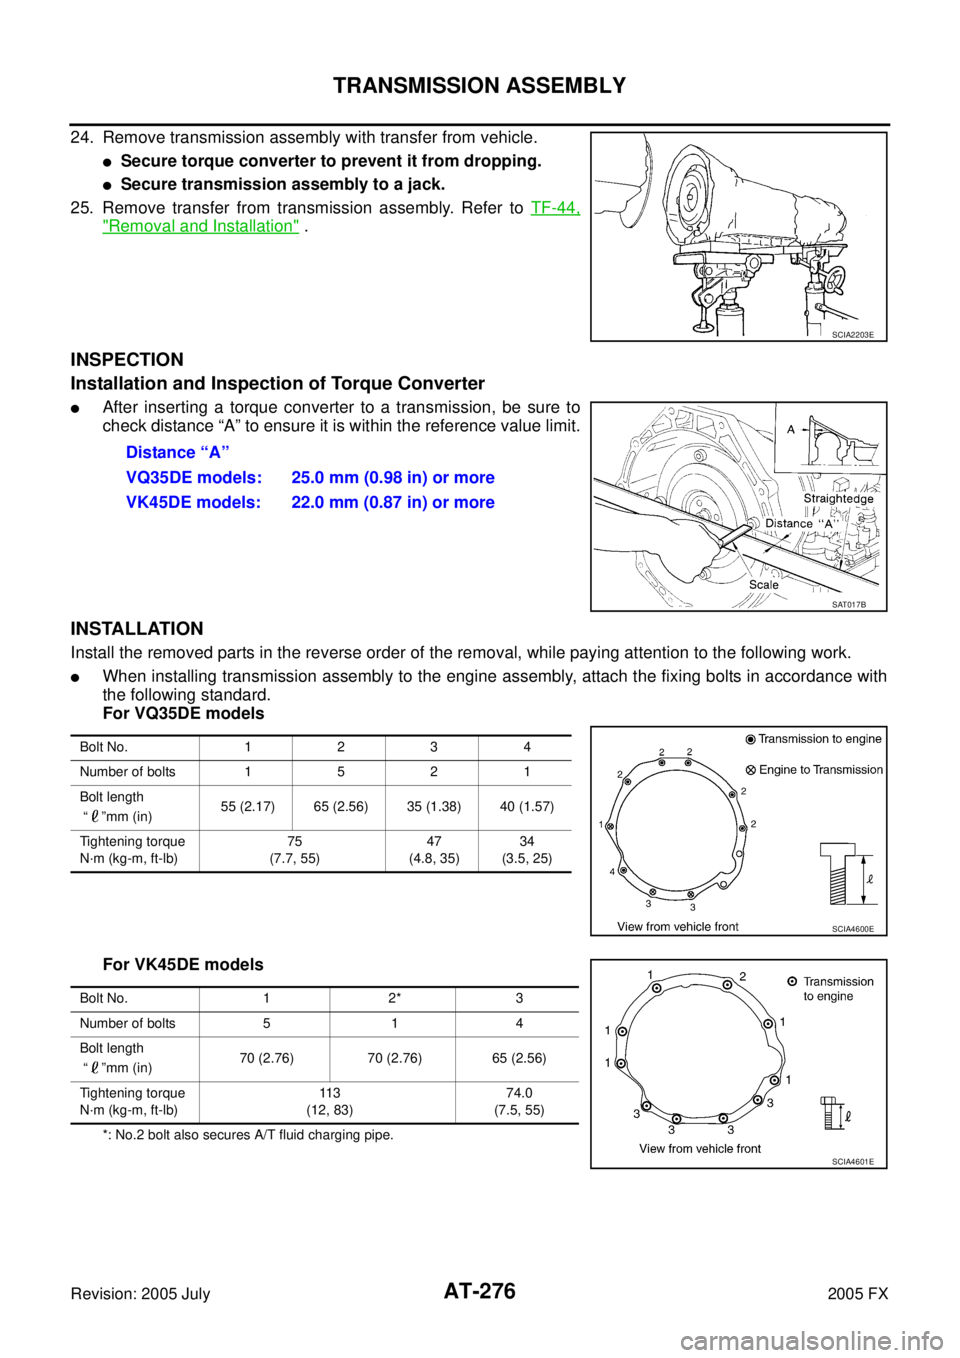
24. Remove transmission assembly with transfer from vehicle.
�Secure torque converter to prevent it from dropping.
�Secure transmission assembly to a jack.
25. Remove transfer from transmission assembly. Refer to TF-44,
"Removal and Installation" .
INSPECTION
Installation and Inspection of Torque Converter
�After inserting a torque converter to a transmission, be sure to
check distance “A” to ensure it is within the reference value limit.
INSTALLATION
Install the removed parts in the reverse order of the removal, while paying attention to the following work.
�When installing transmission assembly to the engine assembly, attach the fixing bolts in accordance with
the following standard.
For VQ35DE models
For VK45DE models
*: No.2 bolt also secures A/T fluid charging pipe.
SCIA2203E
Distance “A”
VQ35DE models: 25.0 mm (0.98 in) or more
VK45DE models: 22.0 mm (0.87 in) or more
SAT017B
Bolt No. 1 2 3 4
Number of bolts 1 5 2 1
Bolt length
“ ”mm (in) 55 (2.17) 65 (2.56) 35 (1.38) 40 (1.57)
Tightening torque
N·m (kg-m, ft-lb) 75
(7.7, 55) 47
(4.8, 35) 34
(3.5, 25)
SCIA4600E
Bolt No. 1 2* 3
Number of bolts 5 1 4
Bolt length
“ ”mm (in) 70 (2.76) 70 (2.76) 65 (2.56)
Tightening torque
N·m (kg-m, ft-lb) 11 3
(12, 83) 74.0
(7.5, 55)
SCIA4601E
Page 360 of 4731
TRANSMISSION ASSEMBLY AT-277
D E
F
G H
I
J
K L
M A
B
AT
Revision: 2005 July 2005 FX
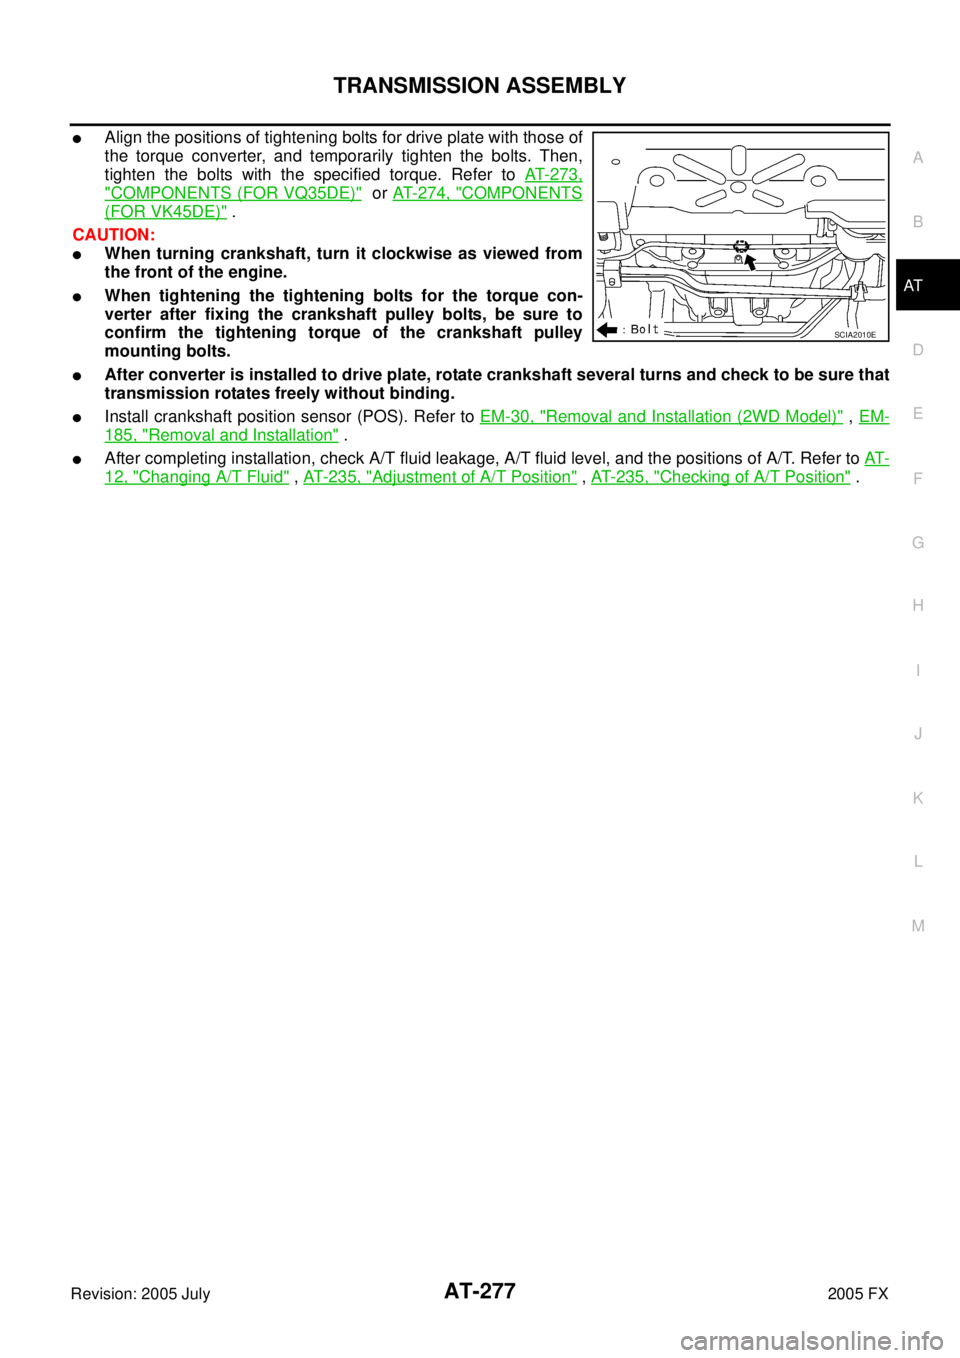
�Align the positions of tightening bolts for drive plate with those of
the torque converter, and temporarily tighten the bolts. Then,
tighten the bolts with the specified torque. Refer to AT- 2 7 3 ,
"COMPONENTS (FOR VQ35DE)" or AT- 2 7 4 , "COMPONENTS
(FOR VK45DE)" .
CAUTION:
�When turning crankshaft, turn it clockwise as viewed from
the front of the engine.
�When tightening the tightening bolts for the torque con-
verter after fixing the crankshaft pulley bolts, be sure to
confirm the tightening torque of the crankshaft pulley
mounting bolts.
�After converter is installed to drive plate, rotate crankshaft several turns and check to be sure that
transmission rotates freely without binding.
�Install crankshaft position sensor (POS). Refer to EM-30, "Removal and Installation (2WD Model)" , EM-
185, "Removal and Installation" .
�After completing installation, check A/T fluid leakage, A/T fluid level, and the positions of A/T. Refer to AT-
12, "Changing A/T Fluid" , AT- 2 3 5 , "Adjustment of A/T Position" , AT- 2 3 5 , "Checking of A/T Position" .
SCIA2010E