Page 4564 of 4731

AUTOMATIC DRIVE POSITIONER SE-91
C
D E
F
G H
J
K L
M A
B
SE
Revision: 2005 July 2005 FX
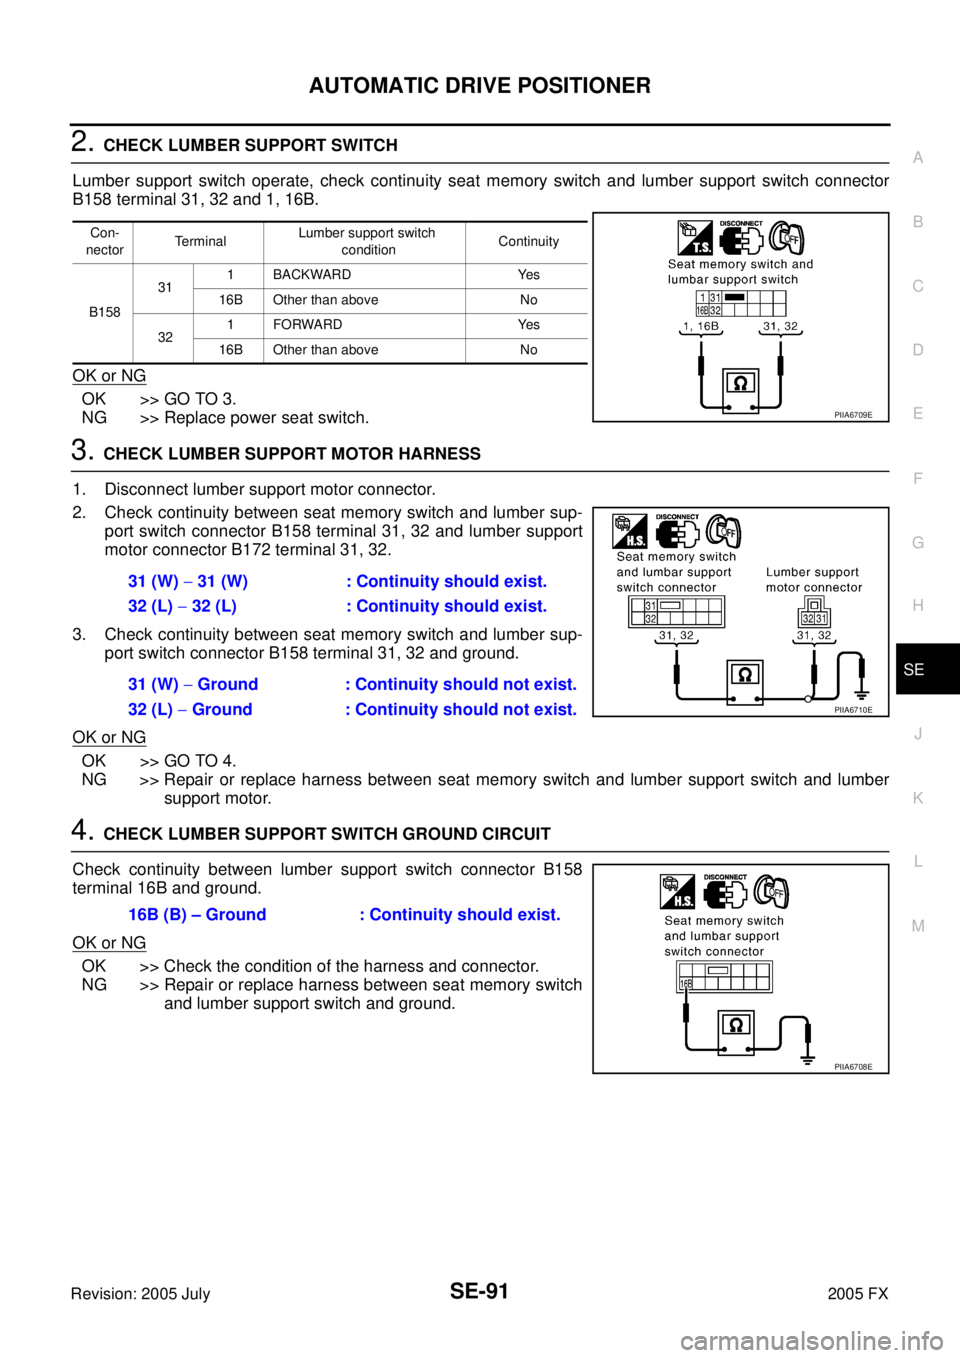
2. CHECK LUMBER SUPPORT SWITCH
Lumber support switch operate, check continuity seat memory switch and lumber support switch connector
B158 terminal 31, 32 and 1, 16B.
OK or NG
OK >> GO TO 3.
NG >> Replace power seat switch.
3. CHECK LUMBER SUPPORT MOTOR HARNESS
1. Disconnect lumber support motor connector.
2. Check continuity between seat memory switch and lumber sup- port switch connector B158 terminal 31, 32 and lumber support
motor connector B172 terminal 31, 32.
3. Check continuity between seat memory switch and lumber sup- port switch connector B158 terminal 31, 32 and ground.
OK or NG
OK >> GO TO 4.
NG >> Repair or replace harness between seat memory switch and lumber support switch and lumber support motor.
4. CHECK LUMBER SUPPORT SWITCH GROUND CIRCUIT
Check continuity between lumber support switch connector B158
terminal 16B and ground.
OK or NG
OK >> Check the condition of the harness and connector.
NG >> Repair or replace harness between seat memory switch and lumber support switch and ground.
Con-
nector Terminal
Lumber support switch
condition Continuity
B158 31
1 BACKWARD Yes
16B Other than above No
32 1FORWARD Yes
16B Other than above No
PIIA6709E
31 (W) − 31 (W) : Continuity should exist.
32 (L) − 32 (L) : Continuity should exist.
31 (W) − Ground : Continuity should not exist.
32 (L) − Ground : Continuity should not exist.
PIIA6710E
16B (B) – Ground : Continuity should exist.
PIIA6708E
Page 4574 of 4731
FRONT SEAT SE-101
C
D E
F
G H
J
K L
M A
B
SE
Revision: 2005 July 2005 FX
1. Headrest 2. Headrest holder (free) 3. Headrest holder (locked)
4. Seatback pad 5. Seatback trim 6. Seat cushion inner finisher
7. Screw 8. Power seat switch assembly 9. Seat cushion trim
10. Seat cushion pad 11. Seatback garnish 12. Nut
13. Side air bag module 14. Clip (C101) 15. Inner cloth stay
16. Lumber support device 17. Bolt 18. Seatback frame
19. Reclining device assembly 20. Seat cushion frame 21. Seat harness assembly
22. Seat adjust assembly 23. Clip (C103) 24. Seat adjust assembly cover
25. Seat cushion outer finisher 26. Seat cushion outer finisher cover 27. Power seat memory switch assembly
28. Seat cushion forward finisher 29. Seat cushion forward finisher lid
Page 4575 of 4731

SE-102
FRONT SEAT
Revision: 2005 July 2005 FX
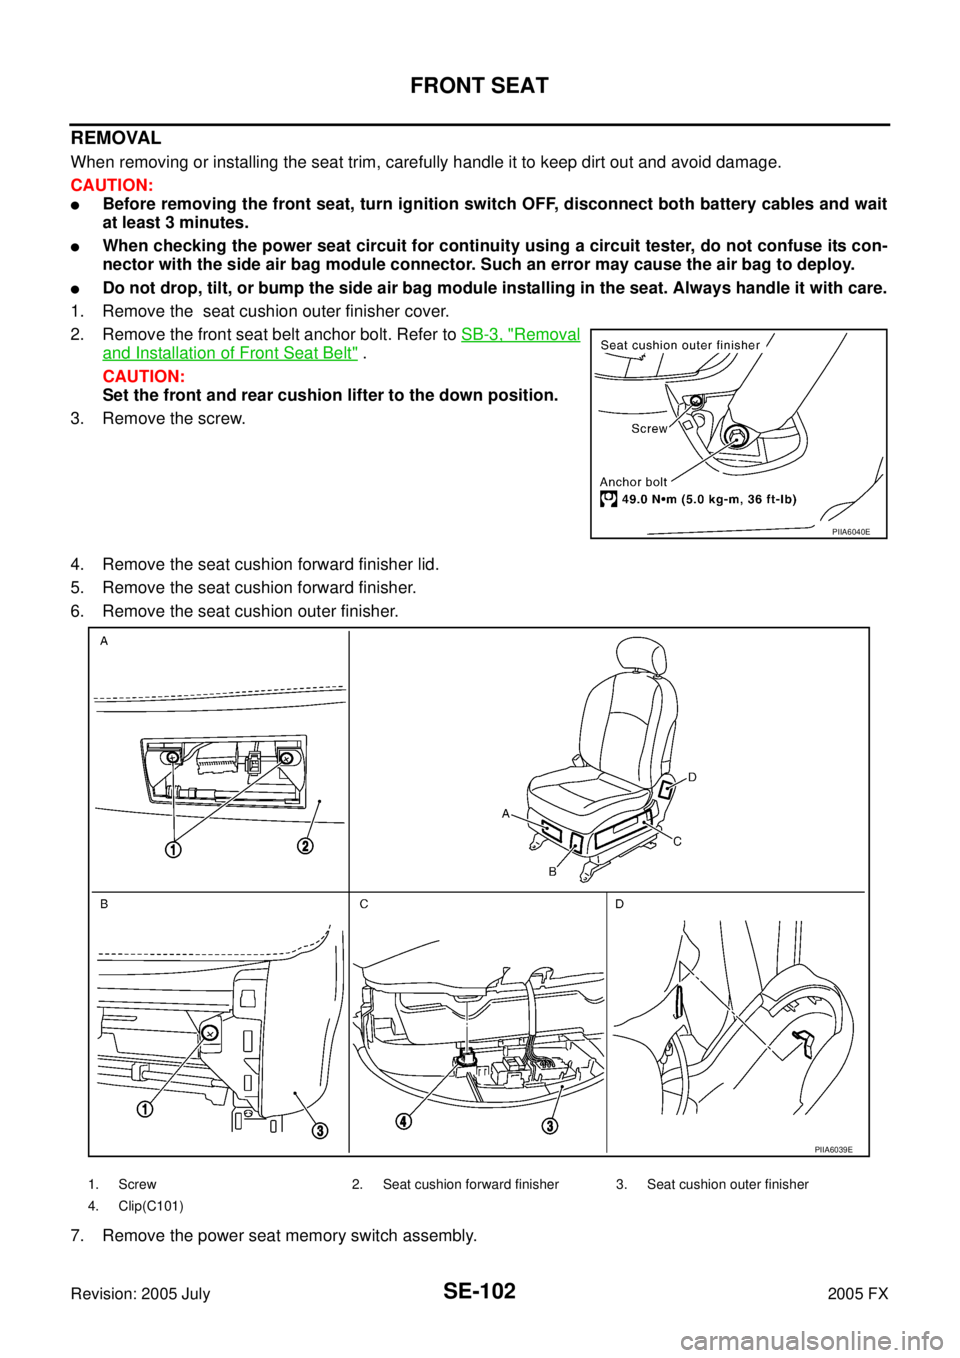
REMOVAL
When removing or installing the seat trim, carefully handle it to keep dirt out and avoid damage.
CAUTION:
�Before removing the front seat, turn ignition switch OFF, disconnect both battery cables and wait
at least 3 minutes.
�When checking the power seat circuit for continuity using a circuit tester, do not confuse its con-
nector with the side air bag module connector. Such an error may cause the air bag to deploy.
�Do not drop, tilt, or bump the side air bag module installing in the seat. Always handle it with care.
1. Remove the seat cushion outer finisher cover.
2. Remove the front seat belt anchor bolt. Refer to SB-3, "
Removal
and Installation of Front Seat Belt" .
CAUTION:
Set the front and rear cushion lifter to the down position.
3. Remove the screw.
4. Remove the seat cushion forward finisher lid.
5. Remove the seat cushion forward finisher.
6. Remove the seat cushion outer finisher.
7. Remove the power seat memory switch assembly.
PIIA6040E
PIIA6039E
1. Screw 2. Seat cushion forward finisher 3. Seat cushion outer finisher
4. Clip(C101)
Page:
< prev 1-8 9-16 17-24