Page 965 of 4731

BL-150
INTELLIGENT KEY SYSTEM
Revision: 2005 July 2005 FX
Check Hazard FunctionAIS004NP
1. CHECK HAZARD WARNING LAMP
Does hazard warning lamp flash with hazard switch?
YES or NO
YES >> Hazard warning lamp circuit is OK.
NO >> Check hazard circuit. Refer to LT- 9 1 , "
TURN SIGNAL AND HAZARD WARNING LAMPS" .
Check Horn FunctionAIS004NQ
First perform the “SELF-DIAG RESULTS” in “BCM” with CONSULT-II, then perform the trouble diagnosis of
malfunction system indicated “SELF-DIAG RESULTS” of “BCM”. Refer to BCS-15, "
CAN Communication
Inspection Using CONSULT-II (Self-Diagnosis)" .
1. CHECK HORN FUNCTION
Does horn sound with horn switch?
YES or NO
YES >> Horn circuit is OK.
NO >> Check horn circuit. Refer to WW-59, "
HORN" .
Check Headlamp FunctionAIS004NR
First perform the “SELF-DIAG RESULTS” in “BCM” with CONSULT-II, then perform the trouble diagnosis of
malfunction system indicated “SELF-DIAG RESULTS” of “BCM”. Refer to BCS-15, "
CAN Communication
Inspection Using CONSULT-II (Self-Diagnosis)" .
1. CHECK HEADLAMP OPERATION
Does headlamp come on when turning lighting switch “ON”?
YES or NO
YES >> Headlamp operation circuit is OK.
NO >> Check headlamp system. Refer to LT- 7 , "
HEADLAMP - XENON TYPE -" .
Check IPDM E/R OperationAIS004NS
1. CHECK IPDM E/R INPUT VOLTAGE
Check voltage between IPDM E/R connector E9 terminal 51 (SB) and ground.
OK or NG
OK >> Replace IPDM E/R.
NG >> GO TO 2. 51 (SB) – Ground : Battery voltage
PIIA6403E
Page 966 of 4731
INTELLIGENT KEY SYSTEM BL-151
C
D E
F
G H
J
K L
M A
B
BL
Revision: 2005 July 2005 FX
2. CHECK IPDM E/R HARNESS
1. Turn ignition switch OFF.
2. Disconnect IPDM E/R and horn relay connector.
3. Check continuity between IPDM E/R connector E9 terminal 51 (SB) and horn relay connector E10 termi- nal 1 (SB).
OK or NG
OK >> Check harness connection.
NG >> Repair or replace harness.
Removal and Installation of Intelligent Key UnitAIS004NT
REMOVAL
1. Remove the instrument lower driver panel. Refer to IP-11, "Removal and Installation" .
2. Disconnect the Intelligent Key unit connector, remove the screw and Intelligent Key unit.
INSTALLATION
Install in the reverse order of removal. 51 (SB) – 1 (SB) : Continuity should exist.
PIIA6404E
PIIA6371E
Page 967 of 4731
BL-152
INTELLIGENT KEY SYSTEM
Revision: 2005 July 2005 FX
Intelligent Key Battery ReplacementAIS006D5
INTELLIGENT KEY BATTERY INSPECTION
Check by connecting a resistance (approximately 300Ω) so that the
current value becomes about 10 mA.
PIIB4646E
Standard : Approx. 2.5V - 3.0V
OCC0607D
Page 972 of 4731

FRONT DOOR LOCK BL-157
C
D E
F
G H
J
K L
M A
B
BL
Revision: 2005 July 2005 FX
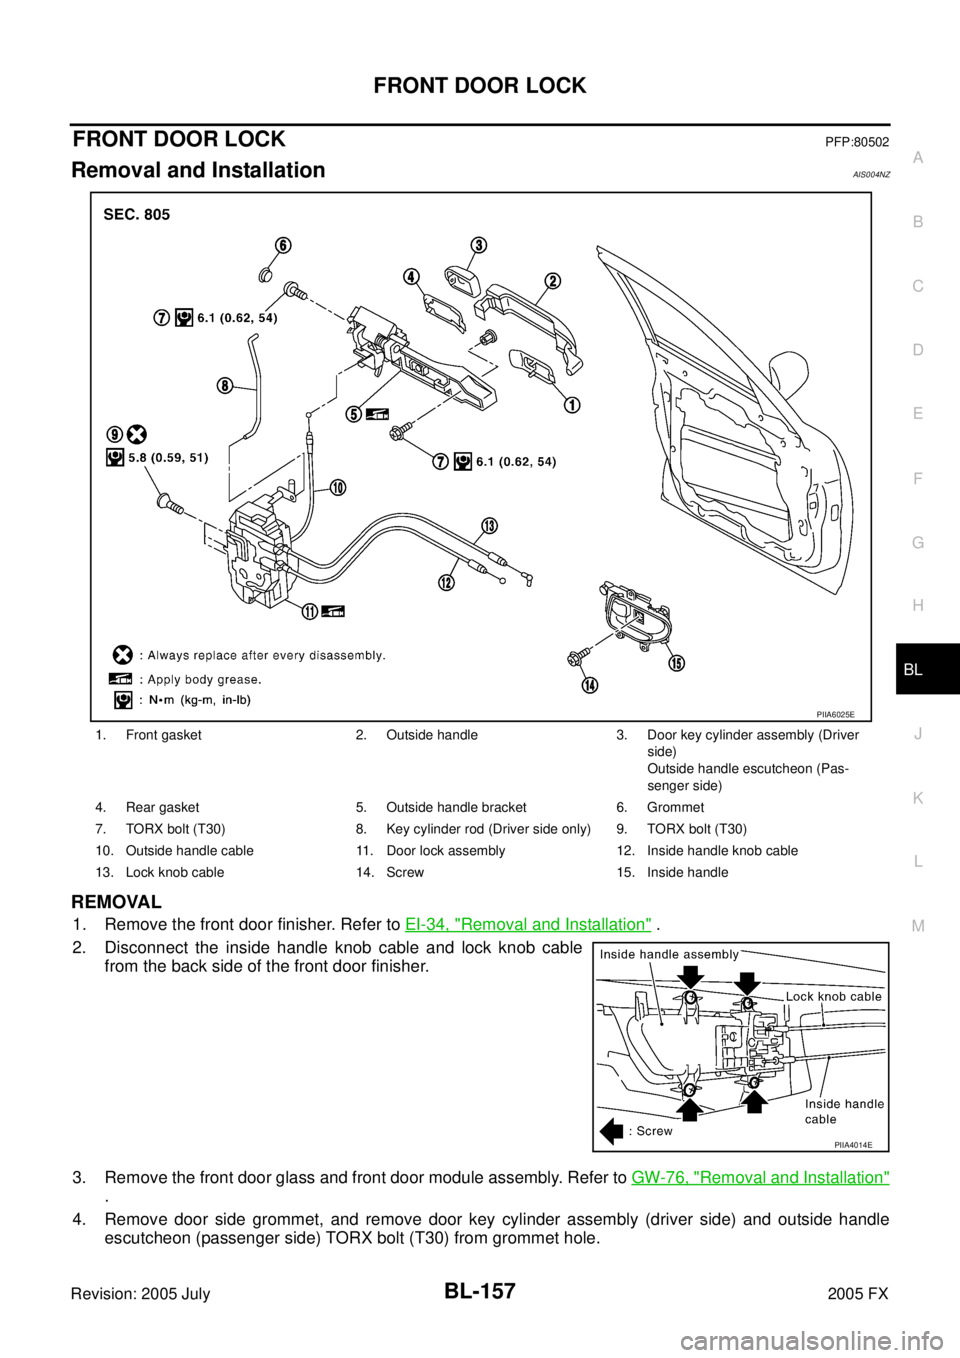
FRONT DOOR LOCKPFP:80502
Removal and InstallationAIS004NZ
REMOVAL
1. Remove the front door finisher. Refer to EI-34, "Removal and Installation" .
2. Disconnect the inside handle knob cable and lock knob cable from the back side of the front door finisher.
3. Remove the front door glass and front door module assembly. Refer to GW-76, "
Removal and Installation"
.
4. Remove door side grommet, and remove door key cylinder assembly (driver side) and outside handle escutcheon (passenger side) TORX bolt (T30) from grommet hole.
1. Front gasket 2. Outside handle 3. Door key cylinder assembly (Driver
side)
Outside handle escutcheon (Pas-
senger side)
4. Rear gasket 5. Outside handle bracket 6. Grommet
7. TORX bolt (T30) 8. Key cylinder rod (Driver side only) 9. TORX bolt (T30)
10. Outside handle cable 11. Door lock assembly 12. Inside handle knob cable
13. Lock knob cable 14. Screw 15. Inside handle
PIIA6025E
PIIA4014E
Page 973 of 4731
BL-158
FRONT DOOR LOCK
Revision: 2005 July 2005 FX
CAUTION:
Do not forcibly remove the TORX bolt (T30).
5. Reach to separate the key cylinder rod connection (on the handle).
6. While pulling the outside handle, remove door key cylinder assembly (driver side) and outside handle escutcheon (passen-
ger side).
7. Disconnect the door request switch connector. (Intelligent Key only)
8. While pulling outside handle, slide toward rear of vehicle to remove outside handle.
9. Remove the front gasket and rear gasket.
PIIA3553E
PIIA3554E
PIIA3555E
PIIA3557E
Page 975 of 4731
BL-160
FRONT DOOR LOCK
Revision: 2005 July 2005 FX
Disassembly and AssemblyAIS004O1
DOOR KEY CYLINDER ASSEMBLY
Remove the key cylinder escutcheon pawl and remove the door key cylinder.
1. Door key cylinder assembly 2. Key cylinder escutcheon 3. Door key cylinder
PIIA6431E
Page 989 of 4731
BL-174
BACK DOOR AUTO CLOSURE SYSTEM
Revision: 2005 July 2005 FX
Terminals and Reference Value for Back Door Closure Control UnitAIS004OG
*, (): Models with Intelligent Key Te r m i -
nal Wire
color Item Condition Voltage (V)
(Approx.)
1 R Power source (Fuse) — Battery voltage
2 PU Closure motor (open) signal Fully close → fully open
3 G Closure motor (close) signal Fully open → fully close
4 B Ground — 0
5 W
(B) Ground* — 0*
Unlock sensor signal
(passenger side) Passenger side door lock is locked 5
Passenger side door lock is unlocked 0
6 Y
(LG) Back door opener switch signal Back door opener switch is ON 0
Other than above 5
7 OR Half-latch switch signal Fully open → fully close
8 L Close switch signal Fully open → fully close
9 P Open switch signal Fully open → fully close
SIIA1480J
SIIA1480J
SIIA1479J
SIIA1478J
SIIA1481J
Page 990 of 4731

BACK DOOR AUTO CLOSURE SYSTEM BL-175
C
D E
F
G H
J
K L
M A
B
BL
Revision: 2005 July 2005 FX
Work FlowAIS004OH
1. Check the symptom and customer's requests.
2. Understand the outline of system. Refer to BL-170, "
System Description" .
3. Perform the preliminary check, Refer to BL-175, "
Preliminary Check"
4. According to the trouble diagnosis chart, repair or replace the cause of the malfunction. Refer to BL-175,
"Trouble Diagnosis Chart by Symptom" .
5. Does back door auto closure system operate normally? If Yes, GO TO 6, If No, GO TO 4.
6. INSPECTION END
Preliminary CheckAIS004OI
Remove the fuse No.18 for the back door closure with the back door closure inactive.
Check that the back door can be open / close normally.
CAUTION:
It is judged it is abnormal, discontinues closure operation, and drive lever returns to a neutral position
if not becoming full-latch within about three seconds after half-latch.
When this operation is done continuously three times, both back door closure and back door opener
switch are not operated because the function of back door closure is stopped.
Thing to reset power supply by pulling out and opening fuse in that case.
Trouble Diagnosis Chart by SymptomAIS004OJ
Symptom Diagnostic procedure and repair order Refer to page
Back door closure does not operate. 1.Back door closure motor power supply and ground
circuit check BL-176
2. Half-latch switch check
BL-176
3. Close switch checkBL-178
4. Open switch check.BL-179
5. Closure motor check.BL-185
6. Replace back door closure control unit.BL-185
Back door does not open (with Intelligent Key system). 1. Intelligent Key system check.
BL-1182. Back door opener switch check.BL-180
Back door does not open 1. Back door opener switch check.
BL-1822. Unlock sensor check.BL-184
3. Replace back door closure control unit.BL-185
Back door does not enter fully closed states through
back door closure operates. 1.Back door fitting adjustment.
BL-164
2. Replace back door lock assembly.BL-168