Page 3317 of 4731
GW-40
POWER WINDOW SYSTEM
Revision: 2005 July 2005 FX
CONSULT-II Function (BCM)AIS004QB
CONSULT-II can display each diagnostic item using the diagnostic test modes shown following.
1. Turn ignition switch “ON”.
2. Connect “CONSULT-II and CONSULT-II CONVERTER” to the data link connector.
3. Turn ignition switch “ON”.
4. Touch “START (NISSAN BASED VHCL)”.
5. Touch “BCM”. If “BCM” is not indicated, go to Refer to GI-39
, “CONSULT-II
Date Link Connector (DLC) Circuit”
6. Touch “RETAINED PWR”.
BCM diagnostic test item Check item diagnostic test mode Content RETAINED PWR Work support Changes setting of each function.
Data monitor Displays the input data of BCM in real time.
Active test Gives a drive signal to a load to check the operation.
PBIB1503E
BCIA0029E
BCIA0030E
LIIA0163E
Page 3318 of 4731
POWER WINDOW SYSTEM GW-41
C
D E
F
G H
J
K L
M A
B
GW
Revision: 2005 July 2005 FX
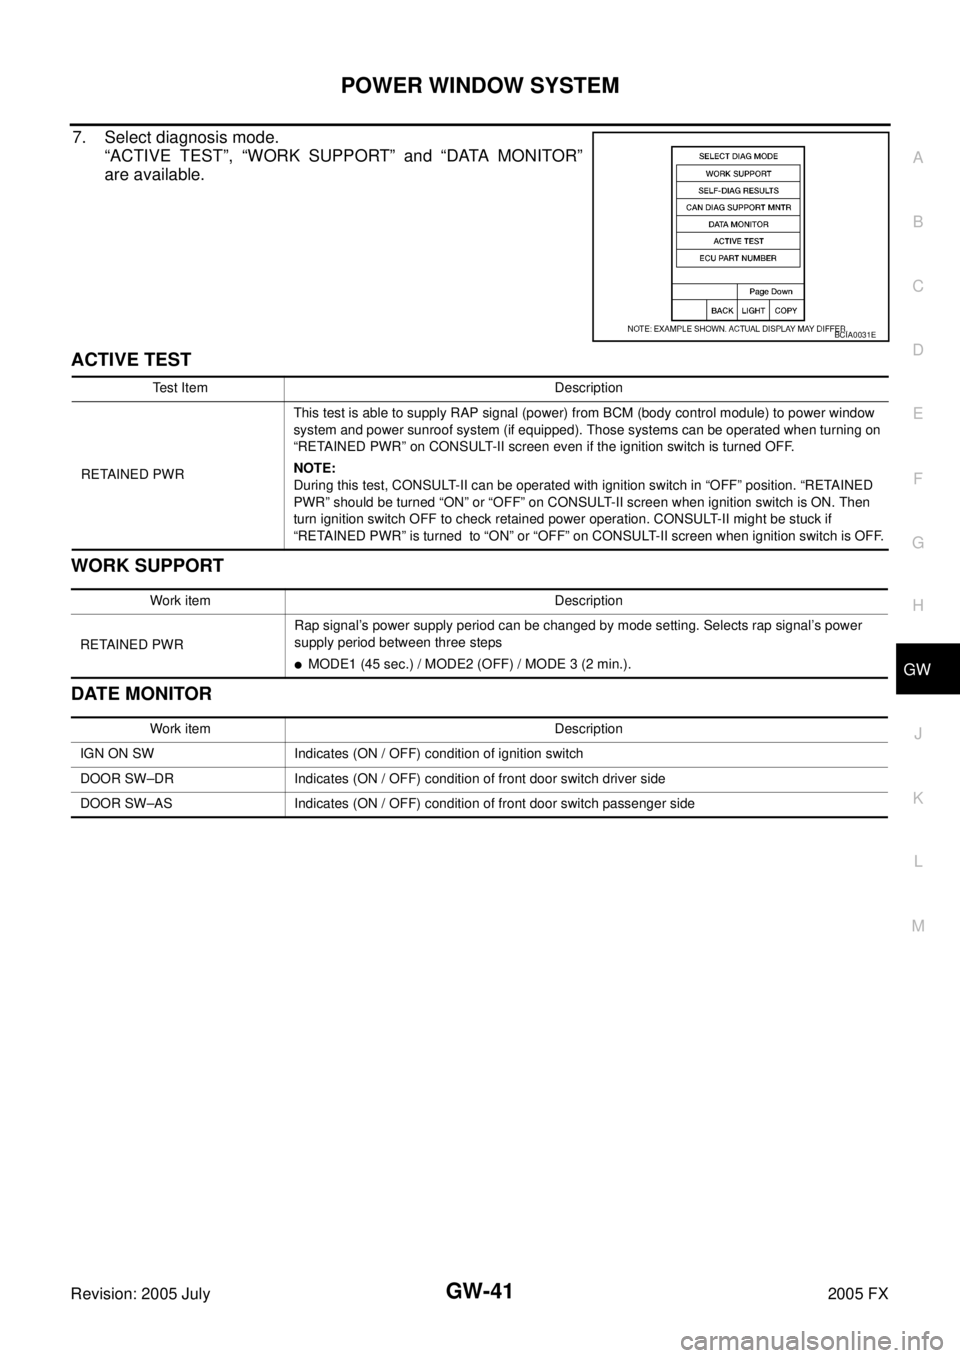
7. Select diagnosis mode.
“ACTIVE TEST”, “WORK SUPPORT” and “DATA MONITOR”
are available.
ACTIVE TEST
WORK SUPPORT
DATE MONITOR
BCIA0031E
Test Item Description
RETAINED PWR This test is able to supply RAP signal (power) from BCM (body control module) to power window
system and power sunroof system (if equipped). Those systems can be operated when turning on
“RETAINED PWR” on CONSULT-II screen even if the ignition switch is turned OFF.
NOTE:
During this test, CONSULT-II can be operated with ignition switch in “OFF” position. “RETAINED
PWR” should be turned “ON” or “OFF” on CONSULT-II screen when ignition switch is ON. Then
turn ignition switch OFF to check retained power operation. CONSULT-II might be stuck if
“RETAINED PWR” is turned to “ON” or “OFF” on CONSULT-II screen when ignition switch is OFF.
Work item Description
RETAINED PWR Rap signal’s power supply period can be changed by mode setting. Selects rap signal’s power
supply period between three steps
�MODE1 (45 sec.) / MODE2 (OFF) / MODE 3 (2 min.).
Work item Description
IGN ON SW Indicates (ON / OFF) condition of ignition switch
DOOR SW–DR Indicates (ON / OFF) condition of front door switch driver side
DOOR SW–AS Indicates (ON / OFF) condition of front door switch passenger side
Page 3322 of 4731
POWER WINDOW SYSTEM GW-45
C
D E
F
G H
J
K L
M A
B
GW
Revision: 2005 July 2005 FX
BCM Power Supply and Ground Circuit CheckAIS004QE
1. CHECK FUSE
�Check 15A fuse [No. 1, located in fuse block (J/B)]
�Check 15A fuse [No. 22, located in fuse block (J/B)]
�Check 50A fusible link (letter M , located in the fuse and fusible link box).
NOTE:
Refer to GW-15, "
Component Parts and Harness Connector Location" .
OK or NG
OK >> GO TO 2.
NG >> If fuse is blown out, be sure to eliminate cause of malfunction before installing new fuse. Refer to
PG-3, "
POWER SUPPLY ROUTING CIRCUIT" .
2. CHECK POWER SUPPLY CIRCUIT
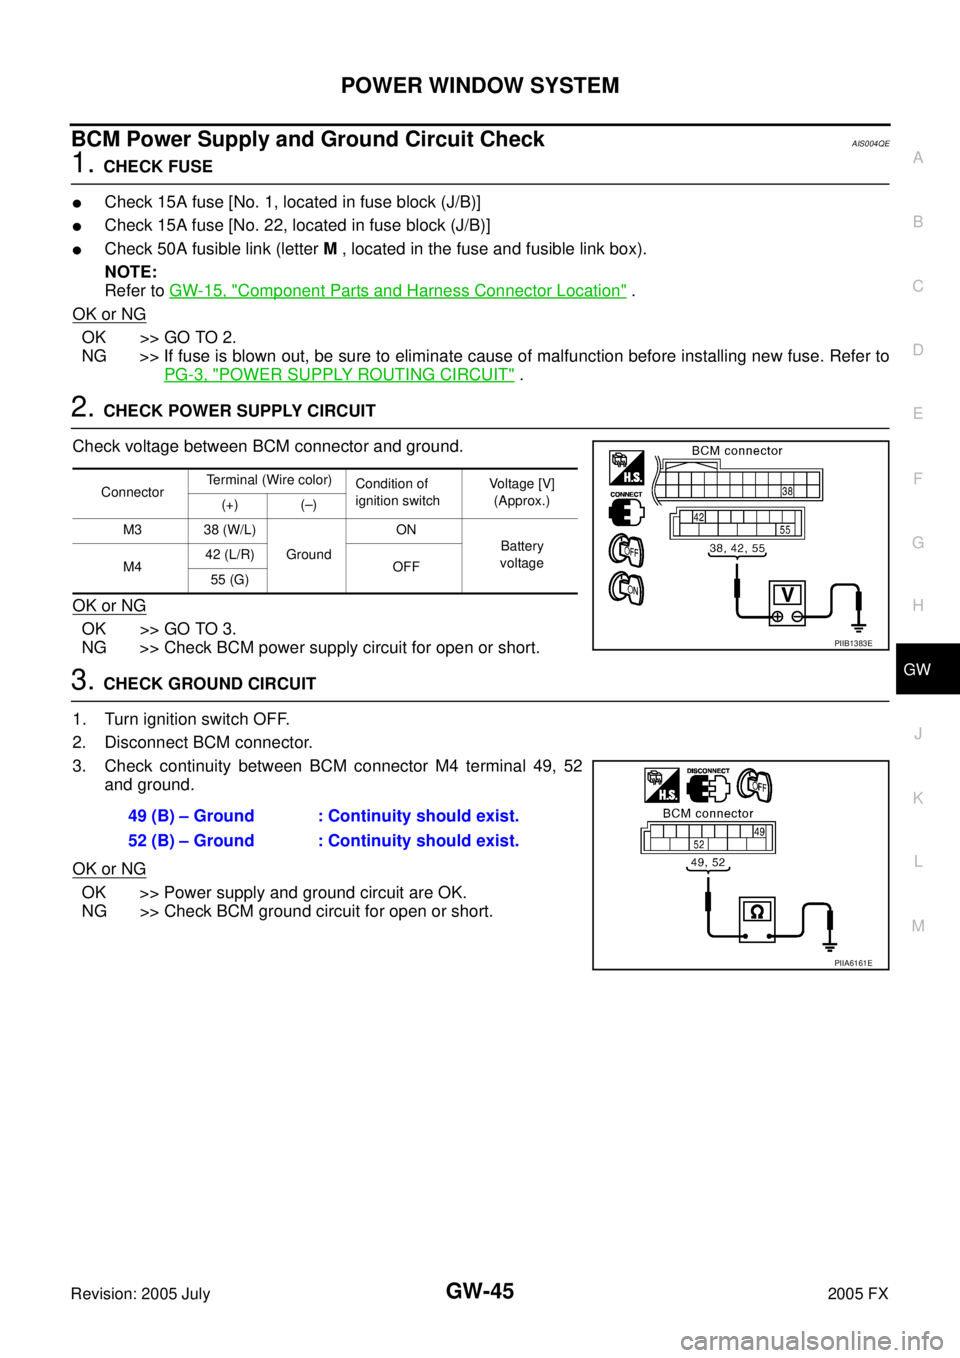
Check voltage between BCM connector and ground.
OK or NG
OK >> GO TO 3.
NG >> Check BCM power supply circuit for open or short.
3. CHECK GROUND CIRCUIT
1. Turn ignition switch OFF.
2. Disconnect BCM connector.
3. Check continuity between BCM connector M4 terminal 49, 52 and ground.
OK or NG
OK >> Power supply and ground circuit are OK.
NG >> Check BCM ground circuit for open or short.
Connector Terminal (Wire color)
Condition of
ignition switch Voltage [V]
(Approx.)
(+) (–)
M3 38 (W/L) Ground ON
Battery
voltage
M4 42 (L/R)
OFF
55 (G)
PIIB1383E
49 (B) – Ground : Continuity should exist.
52 (B) – Ground : Continuity should exist.
PIIA6161E
Page 3323 of 4731
GW-46
POWER WINDOW SYSTEM
Revision: 2005 July 2005 FX
Power Window Main Switch Power Supply Circuit Check AIS004QF
1. CHECK POWER SUPPLY CIRCUIT
1. Turn ignition switch ON.
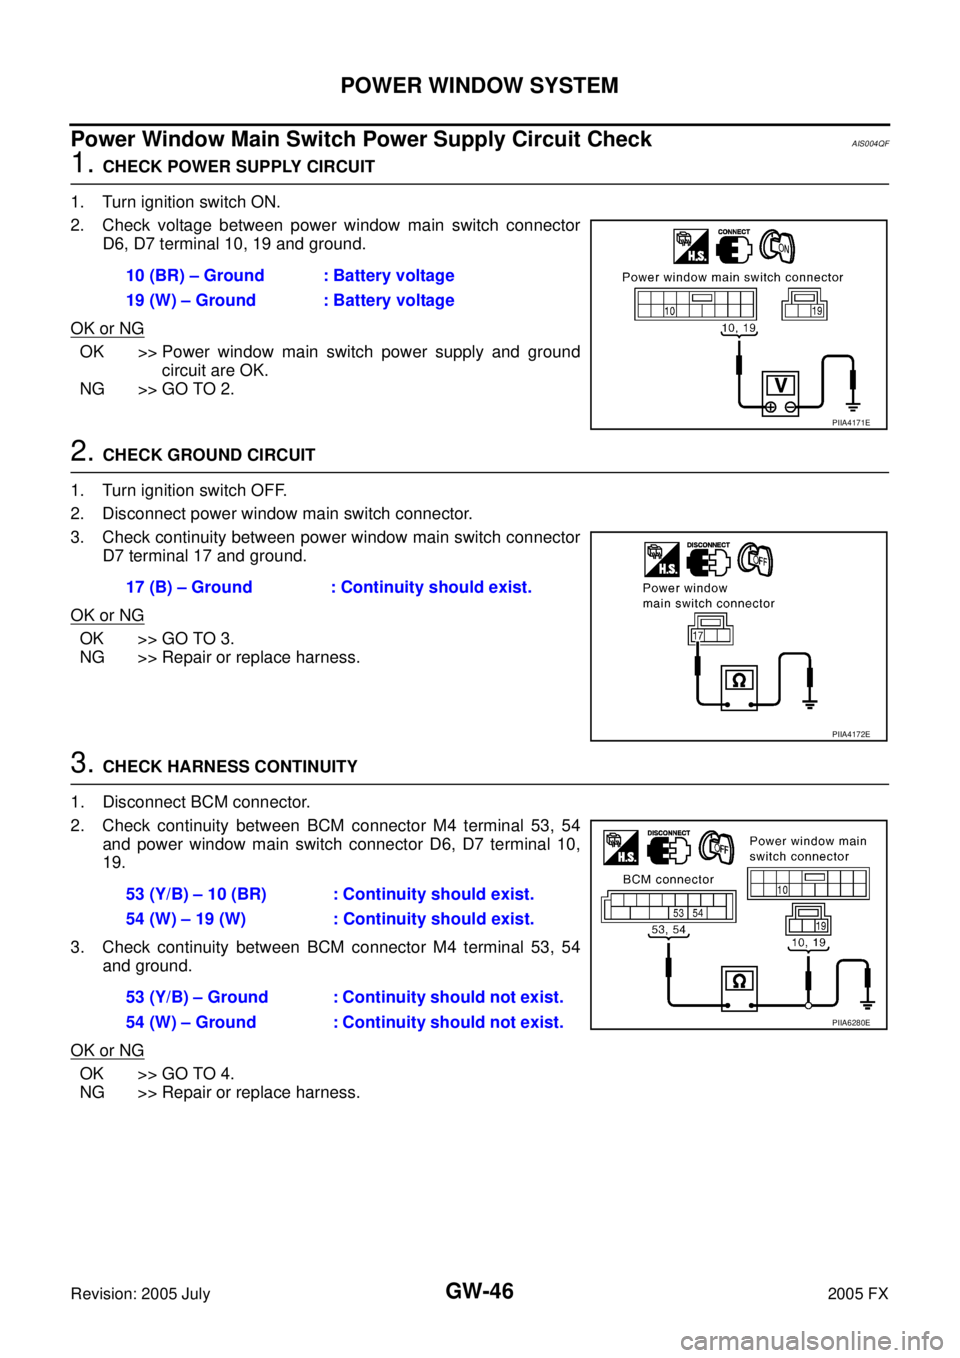
2. Check voltage between power window main switch connector D6, D7 terminal 10, 19 and ground.
OK or NG
OK >> Power window main switch power supply and ground circuit are OK.
NG >> GO TO 2.
2. CHECK GROUND CIRCUIT
1. Turn ignition switch OFF.
2. Disconnect power window main switch connector.
3. Check continuity between power window main switch connector D7 terminal 17 and ground.
OK or NG
OK >> GO TO 3.
NG >> Repair or replace harness.
3. CHECK HARNESS CONTINUITY
1. Disconnect BCM connector.
2. Check continuity between BCM connector M4 terminal 53, 54 and power window main switch connector D6, D7 terminal 10,
19.
3. Check continuity between BCM connector M4 terminal 53, 54 and ground.
OK or NG
OK >> GO TO 4.
NG >> Repair or replace harness. 10 (BR) – Ground : Battery voltage
19 (W) – Ground : Battery voltage
PIIA4171E
17 (B) – Ground : Continuity should exist.
PIIA4172E
53 (Y/B) – 10 (BR) : Continuity should exist.
54 (W) – 19 (W) : Continuity should exist.
53 (Y/B) – Ground : Continuity should not exist.
54 (W) – Ground : Continuity should not exist.
PIIA6280E
Page 3324 of 4731
POWER WINDOW SYSTEM GW-47
C
D E
F
G H
J
K L
M A
B
GW
Revision: 2005 July 2005 FX
4. CHECK BCM OUTPUT SIGNAL
1. Connect BCM connector.
2. Turn ignition switch ON.
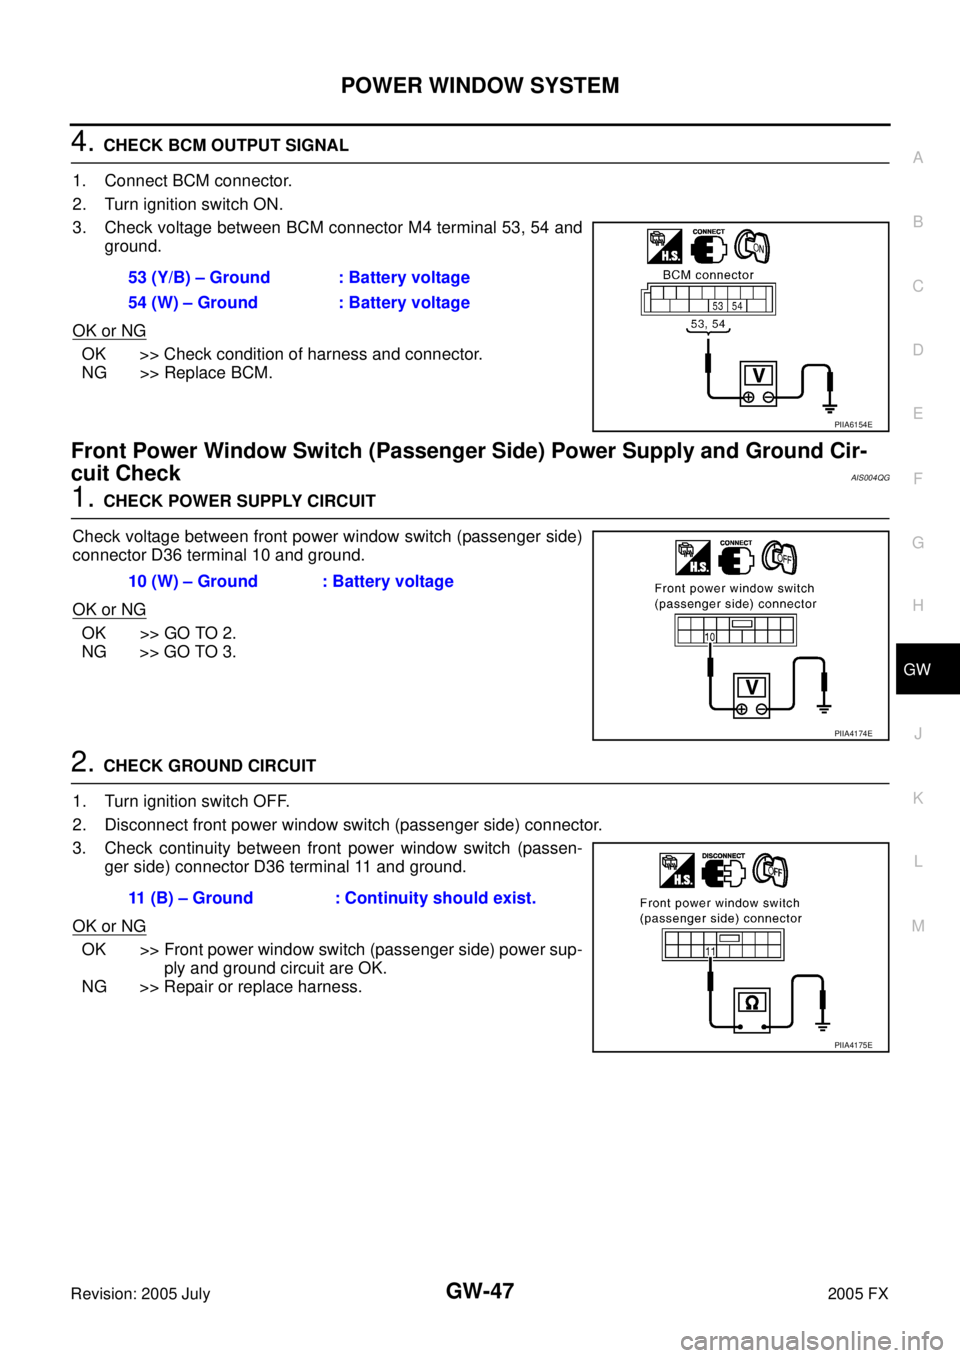
3. Check voltage between BCM connector M4 terminal 53, 54 and ground.
OK or NG
OK >> Check condition of harness and connector.
NG >> Replace BCM.
Front Power Window Switch (Passenger Side) Power Supply and Ground Cir-
cuit Check
AIS004QG
1. CHECK POWER SUPPLY CIRCUIT
Check voltage between front power window switch (passenger side)
connector D36 terminal 10 and ground.
OK or NG
OK >> GO TO 2.
NG >> GO TO 3.
2. CHECK GROUND CIRCUIT
1. Turn ignition switch OFF.
2. Disconnect front power window switch (passenger side) connector.
3. Check continuity between front power window switch (passen- ger side) connector D36 terminal 11 and ground.
OK or NG
OK >> Front power window switch (passenger side) power sup- ply and ground circuit are OK.
NG >> Repair or replace harness. 53 (Y/B) – Ground : Battery voltage
54 (W) – Ground : Battery voltage
PIIA6154E
10 (W) – Ground : Battery voltage
PIIA4174E
11 (B) – Ground : Continuity should exist.
PIIA4175E
Page 3325 of 4731
GW-48
POWER WINDOW SYSTEM
Revision: 2005 July 2005 FX
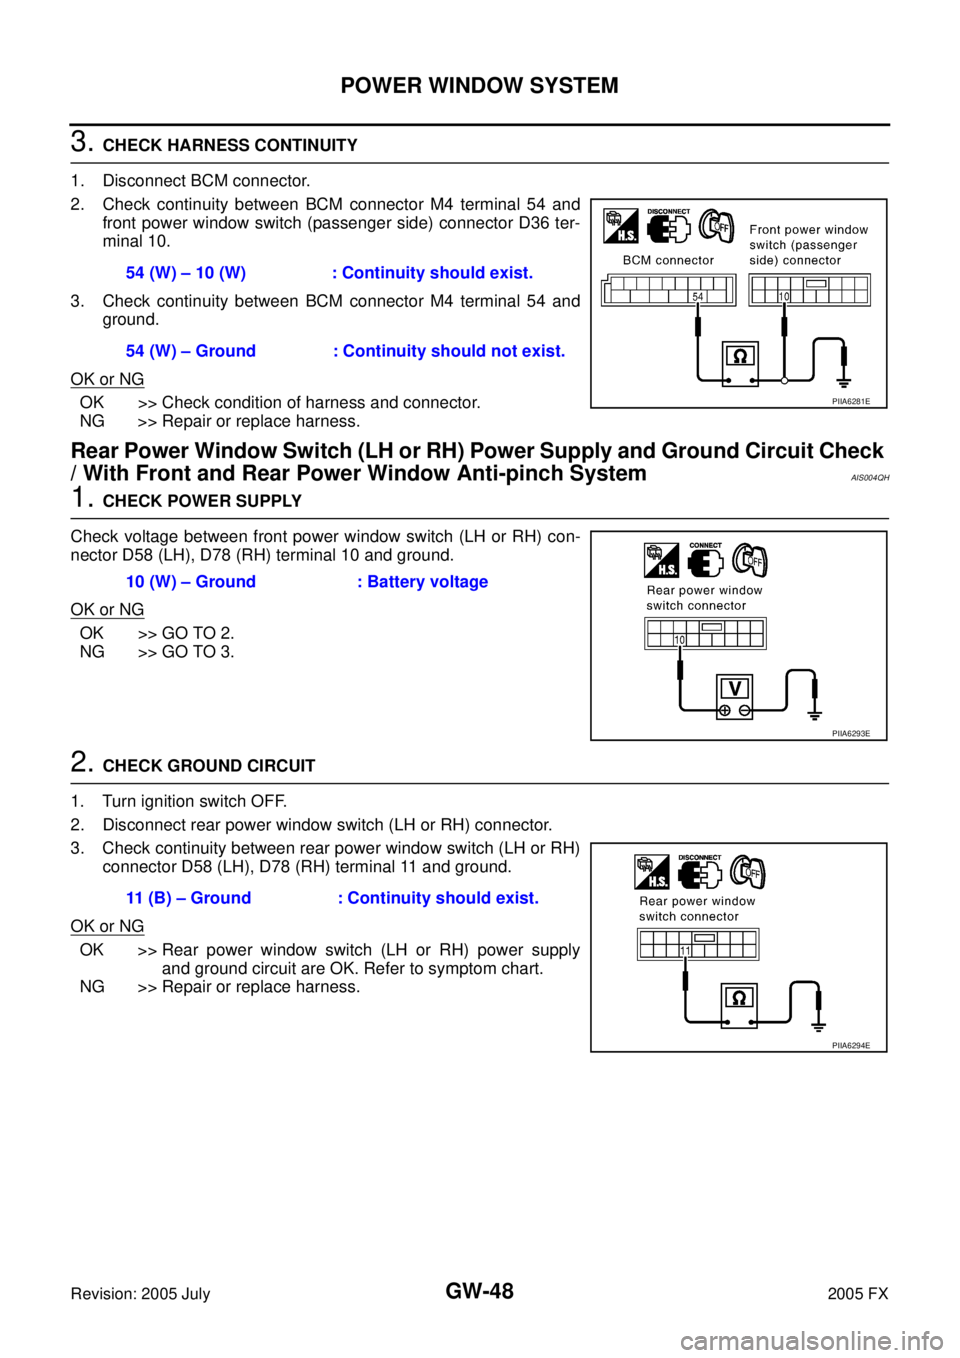
3. CHECK HARNESS CONTINUITY
1. Disconnect BCM connector.
2. Check continuity between BCM connector M4 terminal 54 and front power window switch (passenger side) connector D36 ter-
minal 10.
3. Check continuity between BCM connector M4 terminal 54 and ground.
OK or NG
OK >> Check condition of harness and connector.
NG >> Repair or replace harness.
Rear Power Window Switch (LH or RH) Power Supply and Ground Circuit Check
/ With Front and Rear Power Window Anti-pinch System
AIS004QH
1. CHECK POWER SUPPLY
Check voltage between front power window switch (LH or RH) con-
nector D58 (LH), D78 (RH) terminal 10 and ground.
OK or NG
OK >> GO TO 2.
NG >> GO TO 3.
2. CHECK GROUND CIRCUIT
1. Turn ignition switch OFF.
2. Disconnect rear power window switch (LH or RH) connector.
3. Check continuity between rear power window switch (LH or RH) connector D58 (LH), D78 (RH) terminal 11 and ground.
OK or NG
OK >> Rear power window switch (LH or RH) power supply and ground circuit are OK. Refer to symptom chart.
NG >> Repair or replace harness. 54 (W) – 10 (W) : Continuity should exist.
54 (W) – Ground : Continuity should not exist.
PIIA6281E
10 (W) – Ground : Battery voltage
PIIA6293E
11 (B) – Ground : Continuity should exist.
PIIA6294E
Page 3326 of 4731
POWER WINDOW SYSTEM GW-49
C
D E
F
G H
J
K L
M A
B
GW
Revision: 2005 July 2005 FX
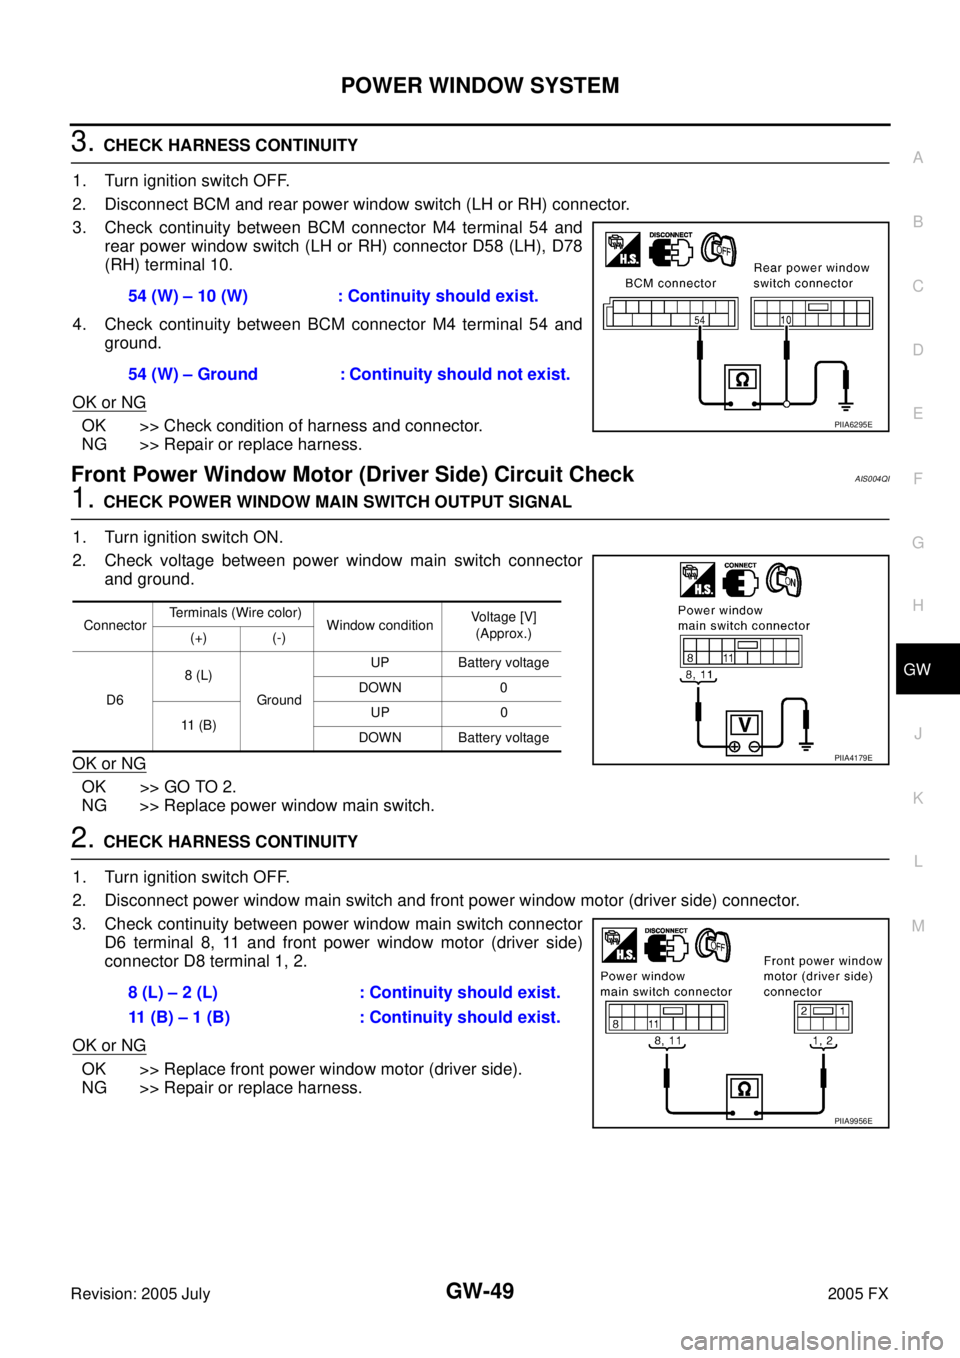
3. CHECK HARNESS CONTINUITY
1. Turn ignition switch OFF.
2. Disconnect BCM and rear power window switch (LH or RH) connector.
3. Check continuity between BCM connector M4 terminal 54 and rear power window switch (LH or RH) connector D58 (LH), D78
(RH) terminal 10.
4. Check continuity between BCM connector M4 terminal 54 and ground.
OK or NG
OK >> Check condition of harness and connector.
NG >> Repair or replace harness.
Front Power Window Motor (Driver Side) Circuit CheckAIS004QI
1. CHECK POWER WINDOW MAIN SWITCH OUTPUT SIGNAL
1. Turn ignition switch ON.
2. Check voltage between power window main switch connector and ground.
OK or NG
OK >> GO TO 2.
NG >> Replace power window main switch.
2. CHECK HARNESS CONTINUITY
1. Turn ignition switch OFF.
2. Disconnect power window main switch and front power window motor (driver side) connector.
3. Check continuity between power window main switch connector D6 terminal 8, 11 and front power window motor (driver side)
connector D8 terminal 1, 2.
OK or NG
OK >> Replace front power window motor (driver side).
NG >> Repair or replace harness. 54 (W) – 10 (W) : Continuity should exist.
54 (W) – Ground : Continuity should not exist.
PIIA6295E
Connector Terminals (Wire color)
Window condition Voltage [V]
(Approx.)
(+) (-)
D6 8 (L)
Ground UP Battery voltage
DOWN 0
11 ( B ) UP 0
DOWN Battery voltage
PIIA4179E
8 (L) – 2 (L) : Continuity should exist.
11 (B) – 1 (B) : Continuity should exist.
PIIA9956E
Page 3327 of 4731
GW-50
POWER WINDOW SYSTEM
Revision: 2005 July 2005 FX
Front Power Window Motor (Passenger Side) Circuit CheckAIS004QJ
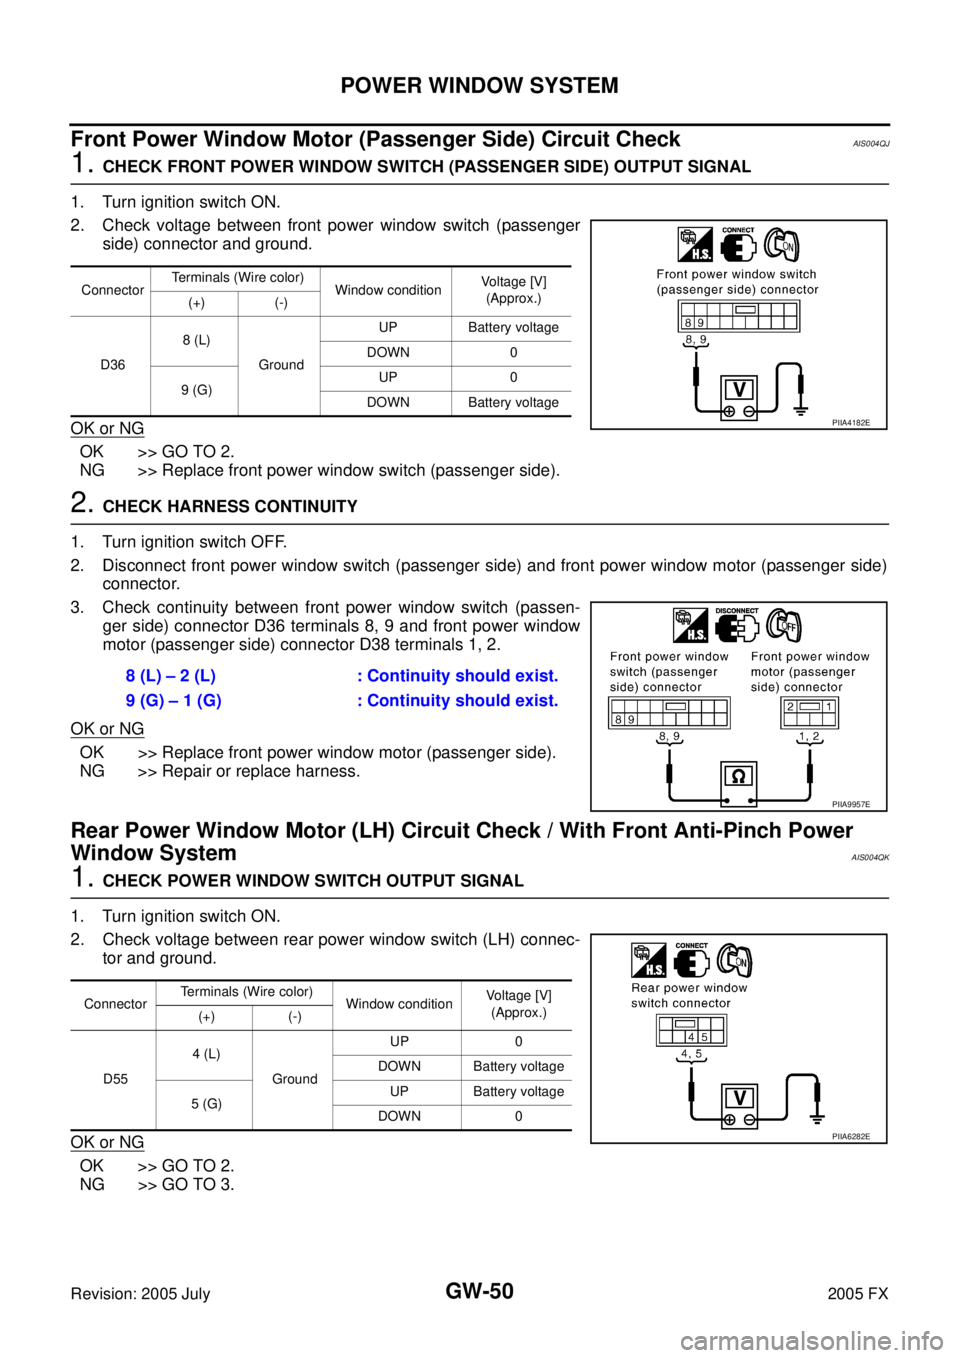
1. CHECK FRONT POWER WINDOW SWITCH (PASSENGER SIDE) OUTPUT SIGNAL
1. Turn ignition switch ON.
2. Check voltage between front power window switch (passenger side) connector and ground.
OK or NG
OK >> GO TO 2.
NG >> Replace front power window switch (passenger side).
2. CHECK HARNESS CONTINUITY
1. Turn ignition switch OFF.
2. Disconnect front power window switch (passenger side) and front power window motor (passenger side) connector.
3. Check continuity between front power window switch (passen- ger side) connector D36 terminals 8, 9 and front power window
motor (passenger side) connector D38 terminals 1, 2.
OK or NG
OK >> Replace front power window motor (passenger side).
NG >> Repair or replace harness.
Rear Power Window Motor (LH) Circuit Check / With Front Anti-Pinch Power
Window System
AIS004QK
1. CHECK POWER WINDOW SWITCH OUTPUT SIGNAL
1. Turn ignition switch ON.
2. Check voltage between rear power window switch (LH) connec- tor and ground.
OK or NG
OK >> GO TO 2.
NG >> GO TO 3.
Connector Terminals (Wire color)
Window condition Voltage [V]
(Approx.)
(+) (-)
D36 8 (L)
Ground UP Battery voltage
DOWN 0
9 (G) UP 0
DOWN Battery voltage
PIIA4182E
8 (L) – 2 (L) : Continuity should exist.
9 (G) – 1 (G) : Continuity should exist.
PIIA9957E
Connector Terminals (Wire color)
Window condition Voltage [V]
(Approx.)
(+) (-)
D55 4 (L)
Ground UP 0
DOWN Battery voltage
5 (G) UP Battery voltage
DOWN 0
PIIA6282E