2005 HYUNDAI XG350 brake
[x] Cancel search: brakePage 173 of 247

5
VEHICLE MAINTENANCE REQUIREMENTS2
MAINTENANCE INTERVALS
F010E01A-AATDo-It-Yourself MaintenanceIf you are mechanically inclined, own a few tools
that are required and want to take the time to do
so, you can inspect and service a number of
items. For more information about doing it your-
self, see Section 6.F010D01A-AATGeneral ChecksThese are the regular checks you should per-
form when you drive your Hyundai or you fill the
fuel tank. A list of these items will be found on
page 6-3.
F010C01A-AATSpecified Scheduled ProceduresThese are the procedures such as inspections,
adjustments and replacements that are listed in
the maintenance charts starting on page 5-4.
These procedures must be performed at the
intervals shown in the maintenance schedule to
assure that your warranty remains in effect.
Although it is strongly recommended that they
be performed by the trained technicians at your
Hyundai dealer, these procedures may be per-
formed at any qualified service facility.
It is suggested that genuine Hyundai service
parts be used for any required repairs or re-
placements. Other parts of equivalent quality
such as engine oil, engine coolant, auto transaxle
oil, brake fluid and so on which are not supplied
by Hyundai Motor Company or its distributorF010B01A-AATMaintenance RequirementsThe maintenance required for your Hyundai
can be divided into three main areas:
o Specified scheduled procedures
o General checks
o Do-it-yourself maintenance
F010A01A-AATService RequirementsTo ensure that you receive the greatest number
of miles of satisfying operation from your Hyundai,
certain maintenance procedures must be per-
formed. Although careful design and engineer-
ing have reduced these to a minimum, those that
are required are of the utmost importance.
It is your responsibility to have these mainte-
nance procedures performed to comply with
the terms of the warranties covering your new
Hyundai. The Owner's Handbook supplied with
your new vehicle provides further information
about these warranties.may be used without affecting your warranty
coverage but you should always be sure these
are equivalent to the quality of the original
Hyundai parts. Your Owner's Handbook pro-
vides further information about your warranty
coverage.
xgflhma-5.p656/16/04, 2:59 PM 2
Page 176 of 247
5
VEHICLE MAINTENANCE REQUIREMENTS
5
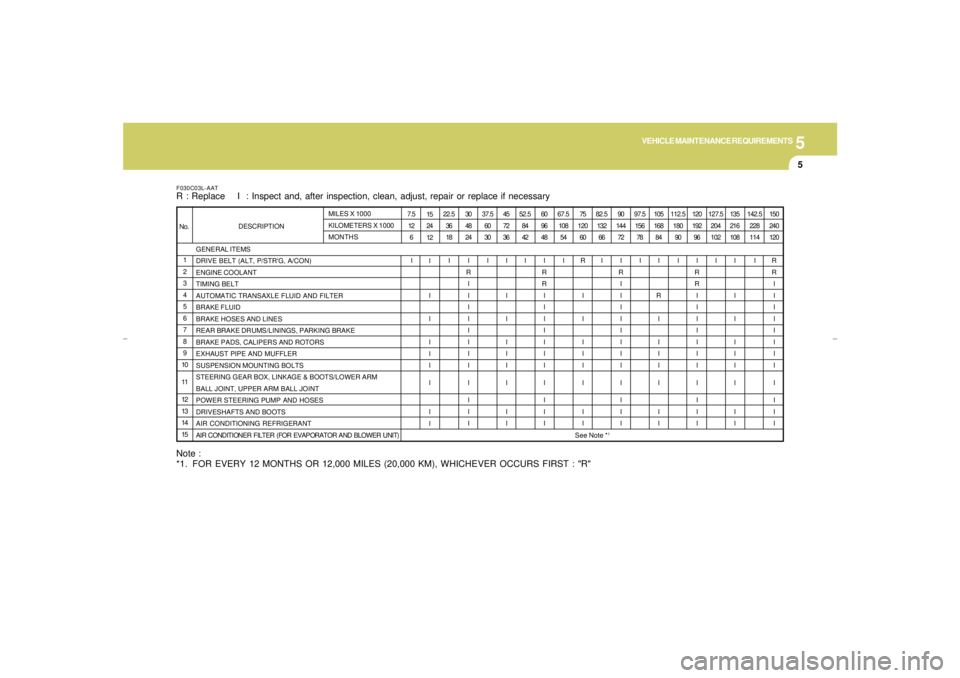
GENERAL ITEMS
DRIVE BELT (ALT, P/STR'G, A/CON)
ENGINE COOLANT
TIMING BELT
AUTOMATIC TRANSAXLE FLUID AND FILTER
BRAKE FLUID
BRAKE HOSES AND LINES
REAR BRAKE DRUMS/LININGS, PARKING BRAKE
BRAKE PADS, CALIPERS AND ROTORS
EXHAUST PIPE AND MUFFLER
SUSPENSION MOUNTING BOLTS
STEERING GEAR BOX, LINKAGE & BOOTS/LOWER ARM
BALL JOINT, UPPER ARM BALL JOINT
POWER STEERING PUMP AND HOSES
DRIVESHAFTS AND BOOTS
AIR CONDITIONING REFRIGERANT
AIR CONDITIONER FILTER (FOR EVAPORATOR AND BLOWER UNIT)
F030C03L-AATR : Replace I : Inspect and, after inspection, clean, adjust, repair or replace if necessary1
2
3
4
5
6
7
8
9
10
11
12
13
14
15 No.DESCRIPTIONMILES X 1000
KILOMETERS X 1000
MONTHS7.5
12
6
I15
24
12
I
I
I
I
I
I
I
I
I22.5
36
18
I30
48
24
I
R
I
I
I
I
I
I
I
I
I
I
I
I37.5
60
30
I45
72
36
I
I
I
I
I
I
I
I
I52.5
84
42
I60
96
48
I
R
R
I
I
I
I
I
I
I
I
I
I
I67.5
108
54
I75
120
60
R
I
I
I
I
I
I
I
I82.5
132
66
I90
144
72
I
R
I
I
I
I
I
I
I
I
I
I
I
I97.5
156
78
I105
168
84
I
R
I
I
I
I
I
I
I112.5
180
90
I120
192
96
I
R
R
I
I
I
I
I
I
I
I
I
I
I127.5
204
102
I135
216
108
I
I
I
I
I
I
I
I
I142.5
228
114
I150
240
120
R
R
I
I
I
I
I
I
I
I
I
I
I
INote :
*1. FOR EVERY 12 MONTHS OR 12,000 MILES (20,000 KM), WHICHEVER OCCURS FIRST : "R"
See Note *
1
xgflhma-5.p656/16/04, 2:59 PM 5
Page 177 of 247

5
VEHICLE MAINTENANCE REQUIREMENTS6
MAINTENANCE UNDER SEVERE USAGE CONDITIONS
SEVERE DRIVING CONDITIONSA - Repeated short distance driving
B - Extensive idling
C - Driving in dusty, rough roads
D - Driving in areas using salt or other corrosive materials
or in very cold weather
E - Driving in sandy areasF040A03L-AATThe following items must be serviced more frequently on cars normally used under severe driving conditions. Refer to the chart below for the appropriate
maintenance intervals.
R : Replace I : Inspect and, after inspection, clean, adjust, repair or replace if necessary
F - More than 50% driving in heavy city traffic during hot weather
above 90°F (32°C)
G - Driving in mountainous areas
H - Towing a trailer
I - Driving as a patrol car, taxi, vehicle towing or other commercial use ENGINE OIL AND FILTER
AIR CLEANER FILTER
SPARK PLUGS
BRAKE PADS, CALIPERS AND ROTORS
REAR BRAKE DRUMS / LININGS, PARKING BRAKE
STEERING GEAR BOX, LINKAGE & BOOTS /
LOWER ARM BALL JOINT, UPPER ARM BALL JOINT
DRIVESHAFTS AND BOOTS
AUTOMATIC TRANSAXLE FLUID AND FILTER
AIR CONDITIONER FILTER
(FOR EVAPORATOR AND BLOWER UNIT)
MAINTENANCE ITEM
R
R
R
I
I
I
I
R
R
VERY 3,000 MILES (4,800 KM) OR 3 MONTHS
MORE FREQUENTLY
MORE FREQUENTLY
MORE FREQUENTLY
MORE FREQUENTLY
MORE FREQUENTLY
EVERY 7,500 MILES (12,000 KM) OR 6 MONTHS
EVERY 30,000 MILES (48,000 KM)
MORE FREQUENTLY
DRIVING
CONDITION MAINTENANCE INTERVALS MAINTENANCE
OPERATION
A, B, C, F, H
C, E
B, H
C, D, G, H
C, D, G, H
C, D, E, F, G
C, E, F
A, C, E, F, G, H, I
C, E
xgflhma-5.p656/16/04, 2:59 PM 6
Page 179 of 247

5
VEHICLE MAINTENANCE REQUIREMENTS8
F070L01A-AATo Suspension Mounting BoltsCheck the suspension connections for loose-
ness or damage. Retighten to the specified
torque.F070K01A-AATo Exhaust Pipe and MufflerVisually inspect the exhaust pipes, muffler and
hangers for cracks, deterioration, or damage.
Start the engine and listen carefully for any
exhaust gas leakage. Tighten connections or
replace parts as necessary.F070J01A-AATo Brake Pads, Calipers and RotorsCheck the pads for excessive wear, discs for
run out and wear, and calipers for fluid leakage.
F070H01A-AATo Rear Brake Drums/Linings, Parking
BrakeCheck the rear brake drums and linings for
scoring, burning, leaking fluid, broken parts,
and excessive wear. Inspect the parking brake
system including the parking brake lever and
cables. For detailed service procedures, refer
to the Shop Manual.F070G02A-AATo Brake FluidCheck brake fluid level in the brake fluid reser-
voir. The level should be between "MIN" and
"MAX" marks on the side of the reservoir. Use
only hydraulic brake fluid conforming to DOT 3
or DOT 4.F070F01A-AATo Brake Hoses and LinesVisually check for proper installation, chafing,
cracks, deterioration and any leakage. Replace
any deteriorated or damaged parts immedi-
ately.
F070E05A-AATo Automatic Transaxle Fluid and FilterThe fluid level should be in the "HOT" range of
the dipstick, after the engine and transaxle are
at normal operating temperature. Check the
automatic transaxle fluid level with the engine
running and the transaxle in neutral, with the
parking brake properly applied. Use HYUNDAI
GENUINE ATF SP III, DIAMOND ATF SP III, SK
ATF SP III or other brands approved by Hyundai
Motor Co., when adding or changing fluid.F070C01A-AATo CoolantThe coolant should be changed at the intervals
specified in the maintenance schedule.F060E01A-AATo Timing beltInspect all parts related to the timing belt for
damage and deformation. Replace any dam-
aged parts immediately.
xgflhma-5.p656/16/04, 2:59 PM 8
Page 181 of 247

Engine Compartment .................................................... 6-2
General Checks ............................................................ 6-3
Checking the Engine Oil ............................................... 6-4
Changing the Oil and Filter ............................................ 6-5
Checking and Changing the Engine Coolant ................ 6-6
Spark Plugs .................................................................. 6-8
Changing the Air Cleaner Filter ..................................... 6-9
Checking the Transaxle Fluid .....................................6-11
Checking the Brakes ..................................................6-12
Air Conditioning Care..................................................6-14
Changing the Conoitioner Air Filter
(For Evaporator and Blower Unit) .............................6-15
Checking Drive Belts ..................................................6-17
Checking and Replacing Fuses..................................6-17
Power Steering Fluid Level .........................................6-20
Headlight Aiming Adjustment......................................6-21
Replacement of Light Bulbs ........................................6-22
Bulb Wattage ...............................................................6-31
Junction Box Description............................................6-32
Do-It-Yourself Maintenance
6
6
xgflhma-6.p656/16/04, 2:58 PM 1
Page 182 of 247
6
DO-IT-YOURSELF MAINTENANCE
2
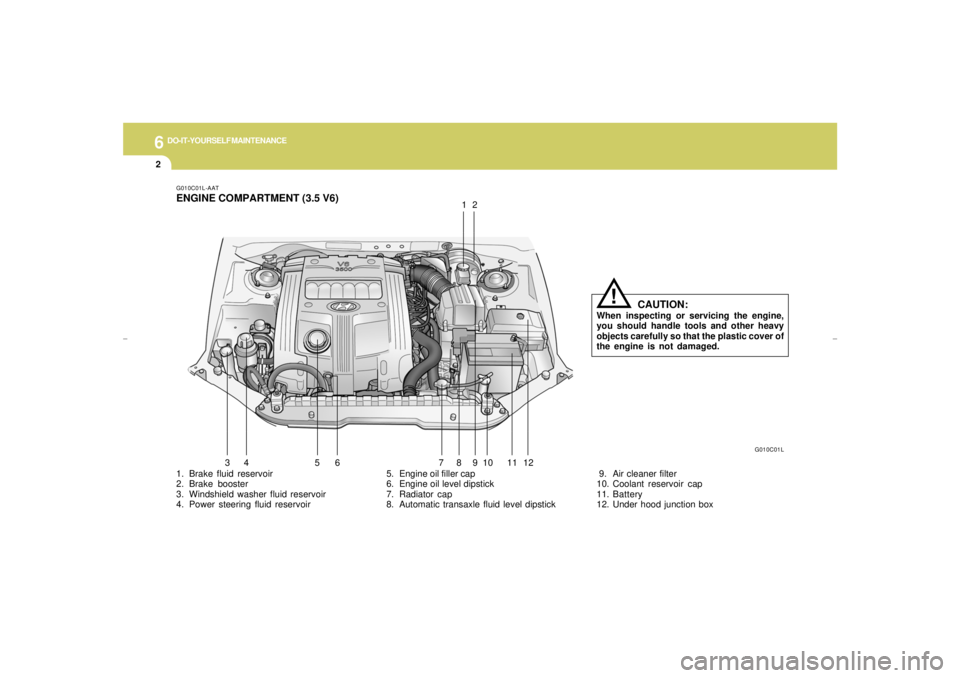
1. Brake fluid reservoir
2. Brake booster
3. Windshield washer fluid reservoir
4. Power steering fluid reservoir5. Engine oil filler cap
6. Engine oil level dipstick
7. Radiator cap
8. Automatic transaxle fluid level dipstickG010C01L-AATENGINE COMPARTMENT (3.5 V6)
9. Air cleaner filter
10. Coolant reservoir cap
11. Battery
12. Under hood junction box
G010C01L
12
34 5 6 7891011
CAUTION:
When inspecting or servicing the engine,
you should handle tools and other heavy
objects carefully so that the plastic cover of
the engine is not damaged.
!
12
xgflhma-6.p656/16/04, 2:58 PM 2
Page 183 of 247

6
DO-IT-YOURSELF MAINTENANCE
3
GENERAL CHECKS
G020C01L-AATVehicle InteriorThe following should be checked each time
when the vehicle is driven:
o Lights operation
o Windshield wiper operation
o Horn operation
o Defroster, heating system operation (and air
conditioning, if installed)
o Steering operation and condition
o Mirror condition and operation
o Turn signal operation
o Accelerator pedal operation
o Brake operation, including parking brake
o Automatic transaxle operation, including
"Park" mechanism operation
o Seat control condition and operation
o Seat belt condition and operation
o Sunvisor operation
If you notice anything that does not operate
correctly or appears to be functioning incor-
rectly, inspect it carefully and seek assistance
from your Hyundai dealer if service is needed.
G020B01A-AATVehicle ExteriorThe following should be checked monthly:
o Overall appearance and condition
o Wheel condition and wheel nut torque
o Exhaust system condition
o Light condition and operation
o Windshield glass condition
o Wiper blade condition
o Paint condition and body corrosion
o Fluid leaks
o Door and hood lock condition
o Tire pressure and condition (including spare
tire)
G020A01L-AATEngine CompartmentThe following should be checked regularly:
o Engine oil level and condition
o Transaxle fluid level and condition
o Brake fluid level
o Coolant level
o Windshield washer fluid level
o Accessory drive belt condition
o Engine coolant hose condition
o Fluid leaks (on or below components)
o Power steering fluid level
o Battery condition
o Air filter condition
xgflhma-6.p656/16/04, 2:58 PM 3
Page 185 of 247

6
DO-IT-YOURSELF MAINTENANCE
5
!
CHANGING THE OIL AND FILTER
!
WARNING:
Be very careful when draining the engine oil
as it may be hot enough to burn you!
G040A01L-AATThe engine oil and filter should be changed at
those intervals specified in the maintenance
schedule in Section 5. If the car is being driven
in severe conditions, more frequent oil and filter
changes are required.
The procedure for changing the oil and filter is
as follows:
1. Park the car on level ground and set the
parking brake. Start the engine and let it
warm up until the needle on the coolant
temperature gauge moves above the lowest
mark. Turn the engine off and place the gear
selector lever in "P".
2. Open the hood and remove the engine oil
filler cap.
G040A02L
3. Slide underneath the car and loosen the
drain plug by turning it counterclockwise with
a wrench of the proper size. Be sure that a
drain pan is in position to catch the oil as it
drains out, then remove the drain plug.
4. When the oil has stopped draining, replace the
drain plug using a new washer and retighten by
turning it clockwise.
Oil pan drain plug tightening torque:
3.5 ~ 4.0 kgf.m
5. Remove the oil filter by turning it counterclock-
wise with a oil filter wrench of the proper size. A
certain amount of oil will come out when you
remove the filter. So be sure to have your drain
pan in place underneath it.
6. Install a new oil filter in accordance with the
instructions on the carton or on the filter itself. Do
not over-tighten.
Oil filter tightening torque:1.2 ~1.6 kgf.m
Be sure that the mounting surface on the engine
is clean and that the old gasket is removed
completely. Lubricate the new gasket on the
filter with clean engine oil before installation.
7. Remove the engine oil level dipstick.8. Refill the crankcase with the recommended
engine oil. Refer to the specification in chap-
ter 9 for engine oil capacity.
Oil filler cap
Oil fillerDrain plug9. Start the engine and check to be sure no oil
is leaking from the drain plug or oil filter.
10.Shut off the engine and recheck the oil level.
NOTE:Always dispose of used engine oil in an
environmentally acceptable manner. It is
suggested that it be placed in a sealed
container and taken to a service station for
reclamation. Do not pour the oil on the
ground or put it in with the household trash.
CAUTION
Slowly pour the recommended oil using by
a tunnel. Do not overfill not to damage
engine.
!
PROPOSITION 65 WARNING:
Used engine oil may cause irritation or can-
cer of the skin if left in contact with the skin
for prolonged periods of time. Used engine
oil contains chemicals that have caused
cancer in laboratory animals. Always protect
your skin by washing your hands thoroughly
with soap and warm water as soon as pos-
sible after handling used oil.
xgflhma-6.p656/16/04, 2:58 PM 5