Page 220 of 539
5VEHICLE MAINTENANCE REQUIREMENTS
10
F060H01A-AAT
o Air Cleaner Filter
A Genuine Hyundai air cleaner filter is
recommended when the filter is re- placed. F060J01A-AAT
o Spark Plugs
(For Gasoline Engine)
Make sure to install new spark plugs of the correct heat range.
F060E01A-AAT
o Timing belt Inspect all parts related to the timing belt for damage and deformation. Re- place any damaged parts immediately. F060G01A-AAT
o Vapor Hose and Fuel Filler Cap The vapor hose and fuel filler cap should be inspected at those intervals specified in the maintenance sched-ule. Make sure that a new vapor hose or fuel filler cap is correctly replaced. F060F0HP-AAT
o Crankcase Ventilation Hoses
Inspect the surface of hoses for evi-
dence of heat and/or mechanical dam-age. Hard and brittle rubber, cracking, tears, cuts, abrasions, and excessiveswelling indicate deterioration. Particu- lar attention should be paid to examine those hose surfaces nearest to highheat sources, such as the exhaust manifold.
Inspect the hose routing to assure that
the hoses do not come in contact with any heat source, sharp edges or mov-ing component which might cause heat damage or mechanical wear. Inspect all hose connections, such as clampsand couplings, to make sure they are secure, and that no leaks are present. Hoses should be replaced immedi-ately if there is any evidence of dete- rioration or damage.
F070C01A-AAT
o Coolant
The coolant should be changed atthe intervals specified in the mainte- nance schedule. F070B01A-GAT
o Cooling System
Check the cooling system part, such
as radiator, coolant reservoir, hosesand connections for leakage and dam-age. Replace any damaged parts.
Page 223 of 539
Engine Compartment ................................................... 6-2
General Checks ........................................................... 6-5
Checking the Engine Oil .............................................. 6-6
Changing the Engine Oil and Filter ..........................6-10
Checking and Changing the Engine Coolant ........... 6-11
Spark Plugs ................................................................ 6-14
Changing the Air Cleaner Filter ................................ 6-15
Checking the Transmission Oil (Manual) .................. 6-18
Checking the Transmission Fluid (Automatic) .......... 6-20
Checking the Brakes ................................................. 6-22
Checking the Clutch Fluid ......................................... 6-24
Air Conditioning Care ................................................ 6-24
Changing the Air Conditioner Filter .......................... 6-26
Checking Drive Belts ................................................. 6-29
Checking and Replacing Fuses ................................ 6-30
Checking The Battery ................................................ 6-32
Checking The Eclectric Cooling Fans ....................... 6-34
Power Steering Fluid Level ....................................... 6-34
Fuel Filter ................................................................... 6-35
Replacement of Headlight Bulbs ............................... 6-39
Headlight Aiming Adjustment .................................... 6-40
Bulb Wattages ............................................................ 6-43
Fuse Panel Description ............................................. 6-44
DO-IT-YOURSELF MAINTENANCE
6
6
Page 224 of 539
6 DO-IT-YOURSELF MAINTENANCE
2
1. Fuse and Relay Box
2. Battery
3. Engine Cover
4. Brake Fluid Reservoir
5. Power Steering Fluid Reservoir 6. Windshield Washer Fluid Reser-
voir
7. Air Cleaner Filter
8. Radiator Cap
9. Engine Oil Filler Cap 10.Automatic Transmission Fluid
Level Dipstick (Vehicle With Auto- matic Transmission)
11.Engine Oil Level Dipstick
12.Engine Coolant Reservoir Cap G010A01HP
G010A01HP-GAT Gasoline Engine (3.5 V6)
CAUTION:
When inspecting or servic-
ing the engine, you should handle tools and other heavy objects carefully so that the plastic cover of theengine is not damaged.
!
ENGINE COMPARTMENT
Page 225 of 539
6
DO-IT-YOURSELF MAINTENANCE
3
G010B01HP-GAT
Diesel Engine (2.5 TCI)
G010B01HP
1. Fuse and Relay Box
2. Battery
3. Automatic Transmission Fluid Level Dipstick (Vehicle With Auto- matic Transmission)
4. Engine Oil Filler Cap 5. Engine Oil Level Dipstick
6. Engine Cover
7. Brake Fluid Reservoir
8. Clutch Fluid Reservoir (If Installed)
9. Power Steering Fluid Reservoir
10.Windshield Washer Fluid Reser-
voir
11.Air Cleaner Filter
12.Radiator Cap
13.Fuel Filter
14.Engine Coolant Reservoir Cap CAUTION:
When inspecting or servic- ing the engine, you shouldhandle tools and other heavy objects carefully so that the plastic cover of theengine is not damaged.
!
Page 226 of 539
6 DO-IT-YOURSELF MAINTENANCE
4
1. Fuse and Relay Box
2. Battery
3. Engine Oil Level Dipstick
4. Engine Cover
5. Engine Oil Filler Cap 6. Brake Fluid Reservoir
7. Windshield Washer Fluid Reser-
voir
8. Air Cleaner Filter
9. Radiator Cap 10.Automatic Transmission Fluid
Level Dipstick (Vehicle With Auto-matic Transmission)
11.Fuel Filter
12.Power Steering Fluid Reservoir
13.Engine Coolant Reservoir Cap G010C01HP
G010C01HP-GAT Diesel Engine (2.9 CRDi)
CAUTION:
When inspecting or servic-
ing the engine, you should handle tools and otherheavy objects carefully so that the plastic cover of the engine is not damaged.
!
Page 227 of 539
6
DO-IT-YOURSELF MAINTENANCE
5GENERAL CHECKS
G020A01HP-GAT
Engine Compartment
The following should be checked regu- larly:
o Engine oil level and condition
o Transmission fluid level and condi- tion
o Brake fluid level
o Clutch fluid level
o Engine coolant level
o Windshield washer fluid level
o Accessory drive belt condition
o Engine coolant hose condition
o Fluid leaks
(on or below components)
o Power steering fluid level
o Battery condition
o Air filter condition G020B01A-AAT
Vehicle Exterior
The following should be checked
monthly:
o Overall appearance and condition
o Wheel condition and wheel nut
torque
o Exhaust system condition
o Light condition and operation
o Windshield glass condition
o Wiper blade condition
o Paint condition and body corrosion
o Fluid leaks
o Door and hood lock condition
o Tire pressure and condition (including spare tire) o Defroster, heating system opera-
tion (and air conditioning, if in- stalled)
o Steering operation and condition
o Mirror condition and operation
o Turn signal operation
o Accelerator pedal operation
o Brake operation, including parking brake
o Manual transmission operation, in-
cluding clutch operation
o Automatic transmission operation, including "Park" mechanism opera-tion
o Seat control condition and opera-
tion
o Seat belt condition and operation
o Sun visor operation If you notice anything that does not operate correctly or appears to be functioning incorrectly, inspect it care- fully and seek assistance from yourHyundai dealer if service is needed.
G020C01HP-GAT
Vehicle Interior
The following should be checked each
time when the vehicle is driven:
o Lights operation
o Windshield wiper operation
o Horn operation
Page 232 of 539
6 DO-IT-YOURSELF MAINTENANCE
10CHANGING THE ENGINE OIL AND FILTER
!
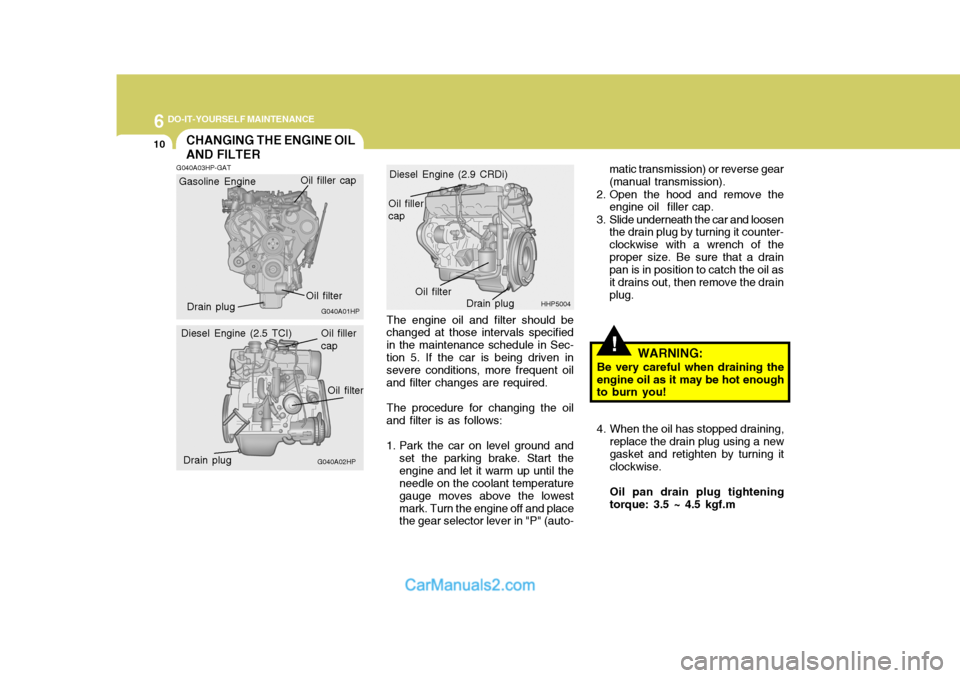
The engine oil and filter should be changed at those intervals specified in the maintenance schedule in Sec- tion 5. If the car is being driven in severe conditions, more frequent oiland filter changes are required. The procedure for changing the oil and filter is as follows:
1. Park the car on level ground and set the parking brake. Start the engine and let it warm up until the needle on the coolant temperature gauge moves above the lowestmark. Turn the engine off and place the gear selector lever in "P" (auto- WARNING:
Be very careful when draining the engine oil as it may be hot enough to burn you!
4. When the oil has stopped draining, replace the drain plug using a new gasket and retighten by turning itclockwise. Oil pan drain plug tightening torque: 3.5 ~ 4.5 kgf.m
G040A03HP-GAT
HHP5004
G040A01HP
G040A02HP matic transmission) or reverse gear (manual transmission).
2. Open the hood and remove the engine oil filler cap.
3. Slide underneath the car and loosen the drain plug by turning it counter-clockwise with a wrench of theproper size. Be sure that a drain pan is in position to catch the oil as it drains out, then remove the drainplug.
Diesel Engine (2.9 CRDi)
Diesel Engine (2.5 TCI)
Gasoline Engine
Oil filter
Drain plug Oil filler cap
Oil filler cap
Oil filter
Drain plug Oil filler cap
Oil filter
Drain plug
Page 233 of 539
6
DO-IT-YOURSELF MAINTENANCE
11CHECKING AND CHANGING THE ENGINE COOLANT
!
G050A01A-AAT
WARNING:
Do not remove the radiator cap when the engine is hot. When the engine is hot, the engine coolantis under pressure and may erupt through the opening if the cap is removed. You could be seriouslyburned if you do not observe this precaution. Do not remove the radiator cap until the radiator iscool to touch.
!
5. Remove the oil filter by turning it counterclockwise with a oil filter wrench of the proper size. A cer- tain amount of oil will come out when you remove the filter. So besure to have your drain pan in place underneath it.
6. Install a new oil filter in accordance with the instructions on the cartonor on the filter itself. Do not over- tighten (Tightening torque: Gaso-
line- 1.2 ~ 1.6 kgf.m, Diesel - 2.3 ~ 2.5 kgf.m) . Be sure that the
mounting surface on the engine is clean and that the old gasket is removed completely. Lubricate the new gasket on the filter with cleanengine oil before installation.
7. Remove the engine oil level dip- stick.
8. Refill the crankcase with the rec- ommended engine oil slowly. Referto the specification in chapter 9 for engine oil capacity.
! CAUTION:
Slowly pour the recommended oil by using a funnel. Do not overfill not to damage the engine. 9. Start the engine and check to be
sure no oil is leaking from thedrain plug or oil filter.
10.Shut off the engine and recheck
the oil level.
NOTE: Always dispose of used engine oil
in an environmentally acceptable manner. It is suggested that it be placed in a sealed container andtaken to a service station for recla- mation. Do not pour the oil on the ground or put it into the house-hold trash.
WARNING:
Used motor oil may cause irrita-
tion or cancer of the skin if left incontact with the skin for prolongedperiods of time. Wash your hands thoroughly with soap and warm water as soon as possible afterhandling used oil.