2005 Hyundai H-1 (Grand Starex) tires
[x] Cancel search: tiresPage 18 of 205

1BEFORE DRIVING YOUR VEHICLE
4
B070A01P-GAT MAINTENANCE It is necessary to maintain your vehicle in top operating condition in order to enjoy safe and pleasant driving.Some maintenance items can be done by the owner (Consumer information), while others should be done only by anauthorized dealer (periodic inspection and maintenance). For the maintenance items to be doneby the owner, prepare the appropriate materials and tools and follow the pro- cedures given in the "Consumer infor- mation" section of this manual. However, the periodic inspection andmaintenance should not be attempted by the owner, but should be done by an authorized HYUNDAI dealer.Correct performance of the periodic inspection and maintenance items re- quires specialized knowledge andequipment. Having these items performed by an authorized HYUNDAI dealer with thelatest technology and equipment will ensure that your vehicle is maintained for optimum performance, economy,and safety. In addition, having all periodic inspec-tion and maintenance done by an au-thorized HYUNDAI dealer is a prereq- uisite for validity of the warranty on your vehicle in the event of a claim.Refer to the separate "Service Book- let" for the periodic inspection and maintenance items and intervals. B080A01P-GAT INSTALLATION OF ACCESSO- RIES Consult an authorized HYUNDAI dealer when installing accessories.
o Installation of some accessories
may be restricted by regulations.
o Improper installation of electrical
parts could cause fire.
o Never use tires or wheels which do not meet specifications. For wheel and tire sizes, refer to the"CONSUMER INFORMATION" section of this manual.
VEHICLE IDENTIFICATION NUMBER (VIN)
B050A02P-GAT The vehicle identification plate is at- tached on the fender inner panel asshown in the illustration. The vehicle identification number (VIN) is the num- ber used in registering your car and inall legal matters pertaining to its own- ership, etc. HSRFL049
Page 70 of 205

3 STARTING AND OPERATING
2PRECAUTION FOR EX- HAUST FUMES WHILESTARTING AND DRIVING
D010A01P-GAT
1. Do not breathe exhaust fumes con- taining carbons monoxide when starting or driving. Carbon monox- ide is a colorless, odorless gas and can cause unconsciousness ordeath by asphyxiation.
2. Open all the windows fully and get
the back door closed if you smellexhaust fumes inside the vehicle. Have the cause immediately located and corrected.
3. Check the exhaust system, from time to time, for holes or loose con-nections if you hear a change in theexhaust sound, or if something has hit the exhaust system.
4. Do not race the engine in a garage
or enclosed area any longer than ittakes to start the engine and drive the vehicle in or out. The sealedexhaust fume may make a particu- larly dangerous situation.
!
BEFORE STARTING THE ENGINE
C020A01O-GAT Before you start the engine, you should always:
1. Look around the vehicle to be sure
there are no flat tires, puddles of oil, water or other indications of pos- sible trouble.
2. After entering the car, check to be sure the parking brake is engaged.
3. Check that all windows, and lights are clean.
4. Check that the interior and exterior
mirrors are clean and in position.
5. Check your seat, seatback and headrest to be sure they are in theirproper positions.
6. Lock all the doors.
7. Fasten your seat belt and be sure
that all other occupants have fas- tened theirs.
8. Turn off all lights and accessories
that are not needed. WARNING (DIESEL ENGINE):
To ensure that sufficient vacuum exists within the brake system dur- ing cold weather start-up condi-tions, it is necessary to run the engine at idle for several seconds after starting the engine.
9. When you turn the ignition switch to
"ON", check that all appropriatewarning lights are operating andthat you have sufficient fuel.
10.Check the operation of warning
lights and all bulbs when key is inthe "ON" position.
Page 94 of 205

3 STARTING AND OPERATING
26
o Keep your car in good condition. Forbetter fuel economy and reduced maintenance costs, maintain your car in accordance with the mainte- nance schedule in Section 6. If youdrive your car in severe conditions, more frequent maintenance is re- quired (see Section 6 for details).
o Keep your car clean. For maximum service, your Hyundai should bekept clean and free of corrosivematerials. It is especially important that mud, dirt, ice, etc. not be al- lowed to accumulate on the under-side of the car. This extra weight can result in increased fuel con- sumption and also contribute to cor-rosion.
o Travel lightly. Don't carry unneces-
sary weight in your car. Weight re-duces fuel economy.
o Don't let the engine idle longer than
necessary. If you are waiting (andnot in traffic), turn off your engine and restart only when you're ready to go. o Remember, your Hyundai does not
require extended warm-up. As soonas the engine is running smoothly, you can drive away. In very cold weather, however, give your enginea slightly longer warm-up period.
o Don't "lug" or "over-rev" the engine.
Lugging is driving too slowly in toohigh a gear resulting in the engine bucking. If this happens, shift to a lower gear. Over-revving is racingthe engine beyond its safe limit. This can be avoided by shifting at the recommended speeds.
o Use your air conditioning sparingly. The air conditioning system is oper-ated by engine power so your fueleconomy is reduced when you use it.
o Don't "ride" the brake or clutch pedal.
This can increase fuel consumption and also increase wear on these components. In addition, driving with your foot resting on the brake pedalmay cause the brakes to overheat, which reduces their effectiveness and may lead to more serious con-sequences.
o Take care of your tires. Keep them
inflated to the recommended pres-sure. Incorrect inflation, either too much or too little, results in unnec- essary tire wear. Check the tire pres-sures at least once a month.
o Be sure that the wheels are aligned
correctly. Improper alignment canresult from hitting curbs or driving too fast over irregular surfaces. Poor alignment causes faster tire wearand may also result in other prob- lems as well as greater fuel con- sumption.
Page 98 of 205

3 STARTING AND OPERATING
30
D180J01P-GAT Weather strip To prevent freezing of the weather strip on the doors, the roof, etc., theyshould be treated with silicone grease. D180K01P-GAT Snow tires The use of snow tires is recommended for driving in snow and ice. To pre- serve driving stability, mount snow tires of the same size and tread pattern onall four wheels. Snow tires worn more than 50% are no longer suitable for use as snow tires.Snow tires which do not meet specifi- cations must not be used. NOTE: The laws and regulations concern- ing snow tires (driving speed, re- quired use, type, etc.) vary. Find out and follow the laws and regula-tions in your area.D180L01P-GAT Tire chains If tire chains are to be used, be sure that they are mounted on the rearwheels. Use only tire chains which are de- signed for use with the tires mountedon the vehicle; use of the incorrect size or type of chain could result in damage to the vehicle body.Before driving over long stretches of road which are free of snow, you should remove the chains to avoid damage tothe tires. NOTE: The laws and regulations concern- ing tire chains vary. Find out and follow the laws and regulations in your area.
D180H01P-GAT Parking brake If the atmospheric temperature is be- low freezing, park the vehicle with thegearshift lever in 1st or reverse and do not engage the parking brake. If the parking brake is engaged and there ismoisture on the brake linings, the lin- ings could become frozen to the brake drums, making it impossible to releasethe parking brake. When parking on a steep slope, turn the front wheels in towards the kerband chock the wheels. D180I01P-GAT Washing the vehicle The salt and other chemicals spread on winter roads in some areas can have a detrimental effect on a vehicle body. You should therefore wash thevehicle as often as convenient in ac- cordance with our care-instruction. Have a preservative applied and theunderfloor protection checked at an authorized HYUNDAI dealer before and after the cold weather season.
Page 108 of 205

4
CORROSION PREVENTION AND APPEARANCE CARE
7
4
IN CASE OF EMERGENCY
7CHANGING A FLAT TIRE
D060A01HP-GAT The procedure described on the fol- lowing pages can be used to rotatetires as well as to change a flat tire. When preparing to change a flat tire, check to be sure the gear selectorlever is in "P" (automatic transmission) or reverse gear (manual transmission) and that the parking brake is set, then: HSRFL060D060A01P-GAT 1. Obtain Spare Tire and Tool
E010B01P-3
HSRFL050
Remove the spare tire and take out the jack and tool bag. D060C01A-AAT 2. Block the Wheel Block the wheel that is diagonally op- posite from the flat tire to keep the vehicle from rolling when the car israised on the jack.
HA14009
NOTE: The spare tire is located underneath the car.
Flat tire
Minibus/Van Truck
Page 111 of 205

44IN CASE OF EMERGENCY
10
!
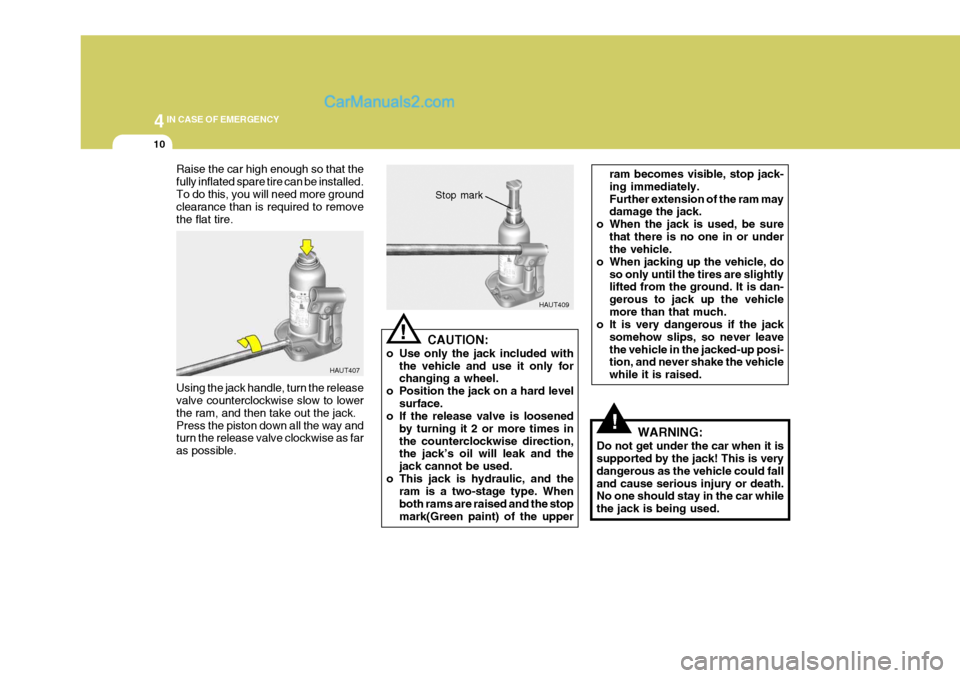
Raise the car high enough so that the fully inflated spare tire can be installed.To do this, you will need more ground clearance than is required to remove the flat tire. Using the jack handle, turn the release valve counterclockwise slow to lower the ram, and then take out the jack.Press the piston down all the way and turn the release valve clockwise as far as possible. HAUT407
HAUT409
CAUTION:
o Use only the jack included with the vehicle and use it only for changing a wheel.
o Position the jack on a hard level
surface.
o If the release valve is loosened
by turning it 2 or more times in the counterclockwise direction, the jack’s oil will leak and the jack cannot be used.
o This jack is hydraulic, and the ram is a two-stage type. Whenboth rams are raised and the stopmark(Green paint) of the upper
! Stop mark
ram becomes visible, stop jack- ing immediately.Further extension of the ram may damage the jack.
o When the jack is used, be sure
that there is no one in or underthe vehicle.
o When jacking up the vehicle, do so only until the tires are slightlylifted from the ground. It is dan- gerous to jack up the vehiclemore than that much.
o It is very dangerous if the jack
somehow slips, so never leavethe vehicle in the jacked-up posi- tion, and never shake the vehicle while it is raised.
WARNING:
Do not get under the car when it is supported by the jack! This is very dangerous as the vehicle could falland cause serious injury or death. No one should stay in the car while the jack is being used.
Page 121 of 205

44IN CASE OF EMERGENCY
20
!WARNING:
o Improperly loading your car and trailer can serious affect its steer- ing and braking performance causing a crash in which youmay be seriously injured.
o For automatic transmission ve-
hicles, the trailer should be towedwith the towing vehicle unloaded, with the exception of the driver. Otherwise, the automatic trans-mission oil temperature may rise to a temperature that may result in serious damage of the auto- matic transmission. C190F02A-GAT Trailer or Vehicle Towing Tips
1. Before towing, check hitch and
safety chain connections as well as proper operation of the trailer run- ning lights, brake lights, and turn signals.
2. Always drive your vehicle at a mod- erate speed (Less than 100 km/h).
3. Trailer towing requires more fuel than normal conditions.
4. To maintain engine braking effi-
ciency and electrical charging per-formance, do not use fifth gear (manual transmission) or overdrive (automatic transmission).
5. Always secure items in the trailer to prevent load shift while driving.
6. Check the condition and air pres- sure of all tires on the trailer and your car. Low tire pressure can se- riously affect the handling. Alsocheck the spare tire.
7. The vehicle/trailer combination is
more affected by crosswind andbuffeting. When being passed by a large vehicle, keep a constant speed and steer straight ahead. If there is too much wind buffeting,slow down to get out of the othervehicle’s air turbulence.
8. When parking your car and trailer,
especially on a hill, be sure to followall the normal precautions. Turn your front wheel into the curb, set the parking brake firmly, and put thetransmission in 1st or "R" (manual transmission) or "P" (automatic transmission). In addition, placewheel chocks at each of the trailer’s tires.
9. If the trailer has electric brakes, start your vehicle and trailer mov-ing, and then apply the trailer brake controller by hand to be sure thebrakes are working. This lets you check your electrical connection at the same time.
10.During your trip, check occasion- ally to be sure that the load issecure, and that the lights and anytrailer brakes are still working.
11.Avoid jerky starts, sudden accel-
eration or sudden stops.
12.Avoid sharp turns and rapid lane changes.
Page 130 of 205

4
CORROSION PREVENTION AND APPEARANCE CARE
29
4
IN CASE OF EMERGENCY
29
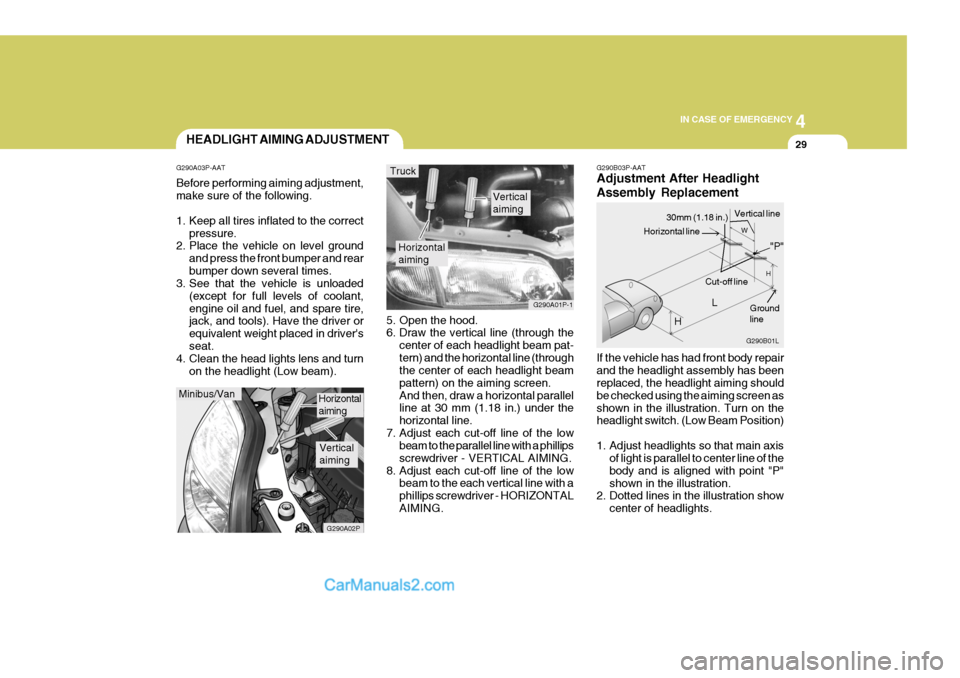
G290B03P-AAT Adjustment After Headlight Assembly Replacement If the vehicle has had front body repair and the headlight assembly has been replaced, the headlight aiming should be checked using the aiming screen asshown in the illustration. Turn on the headlight switch. (Low Beam Position)
1. Adjust headlights so that main axis
of light is parallel to center line of the body and is aligned with point "P"shown in the illustration.
2. Dotted lines in the illustration show
center of headlights.
5. Open the hood.
6. Draw the vertical line (through the
center of each headlight beam pat- tern) and the horizontal line (through the center of each headlight beam pattern) on the aiming screen.And then, draw a horizontal parallel line at 30 mm (1.18 in.) under the horizontal line.
7. Adjust each cut-off line of the low beam to the parallel line with a phillipsscrewdriver - VERTICAL AIMING.
8. Adjust each cut-off line of the low beam to the each vertical line with aphillips screwdriver - HORIZONTALAIMING.
Horizontal aiming
Verticalaiming
G290A01P-1
Truck
G290B01L
LW
H
H Cut-off line
Ground line
"P"
Horizontal line
30mm (1.18 in.) Vertical line
HEADLIGHT AIMING ADJUSTMENT
G290A03P-AAT Before performing aiming adjustment, make sure of the following.
1. Keep all tires inflated to the correct pressure.
2. Place the vehicle on level ground
and press the front bumper and rear bumper down several times.
3. See that the vehicle is unloaded
(except for full levels of coolant,engine oil and fuel, and spare tire, jack, and tools). Have the driver or equivalent weight placed in driver'sseat.
4. Clean the head lights lens and turn
on the headlight (Low beam).
Minibus/Van
G290A02P
Horizontal aiming
Verticalaiming