2005 Hyundai H-1 (Grand Starex) Engine Temperature
[x] Cancel search: Engine TemperaturePage 141 of 205
44IN CASE OF EMERGENCY
40FUSE PANEL DESCRIPTION
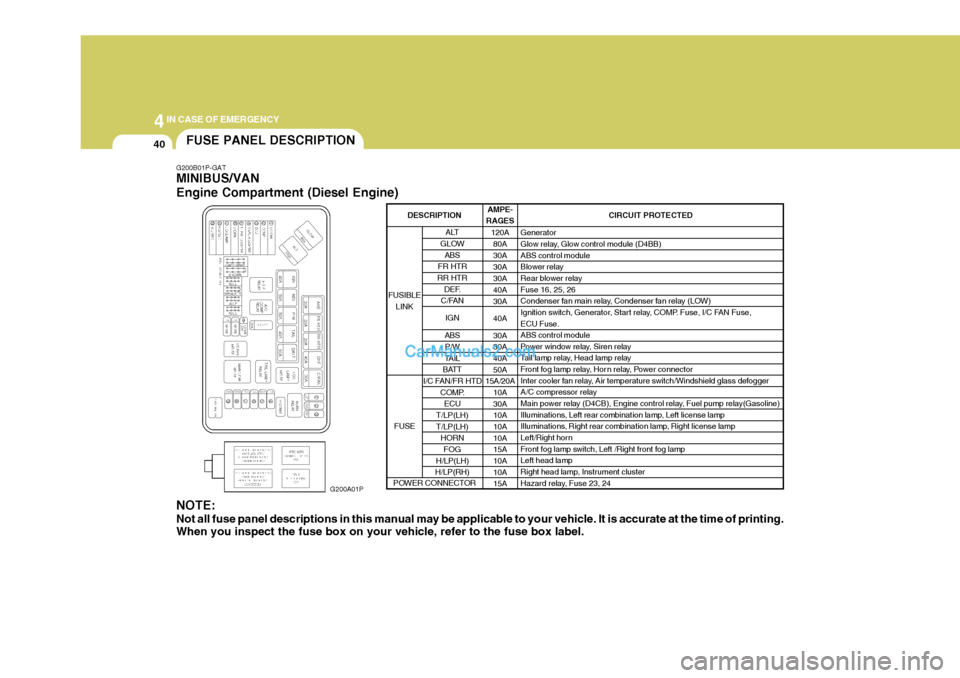
G200B01P-GAT MINIBUS/VAN Engine Compartment (Diesel Engine)
G200A01P
NOTE: Not all fuse panel descriptions in this manual may be applicable to your vehicle. It is accurate at the time of printing. When you inspect the fuse box on your vehicle, refer to the fuse box label. AMPE-
RAGES
120A80A 30A30A30A40A30A 40A30A 30A 40A 50A
15A/20A
10A30A10A 10A 10A15A 10A 10A15A CIRCUIT PROTECTED
Generator
Glow relay, Glow control module (D4BB) ABS control module
Blower relay
Rear blower relay Fuse 16, 25, 26
Condenser fan main relay, Condenser fan relay (LOW)
Ignition switch, Generator, Start relay, COMP. Fuse, I/C FAN Fuse, ECU Fuse. ABS control module
Power window relay, Siren relay
Tail lamp relay, Head lamp relay
Front fog lamp relay, Hor n relay, Power connector
Inter cooler fan relay, Air temperature switch/Windshield glass defogger
A/C compressor relay
Main power relay (D4CB), Engine control relay, Fuel pump relay(Gasoline)
Illuminations, Left rear combination lamp, Left license lamp
Illuminations, Right rear combination lamp, Right license lamp
Left/Right horn
Front fog lamp switch, Left /Right front fog lampLeft head lamp
Right head lamp, Instrument cluster
Hazard relay, Fuse 23, 24
ALT
GLOW ABS
FR HTR
RR HTR DEF.
C/FAN
IGN
ABS P/W
TAIL
BATT
I/C FAN/FR HTD COMP.
ECU
T/LP(LH) T/LP(LH) HORN
FOG
H/LP(LH)
H/LP(RH)
FUSIBLE
LINK
FUSE
DESCRIPTION
POWER CONNECTOR
Page 142 of 205
4
CORROSION PREVENTION AND APPEARANCE CARE
41
4
IN CASE OF EMERGENCY
41
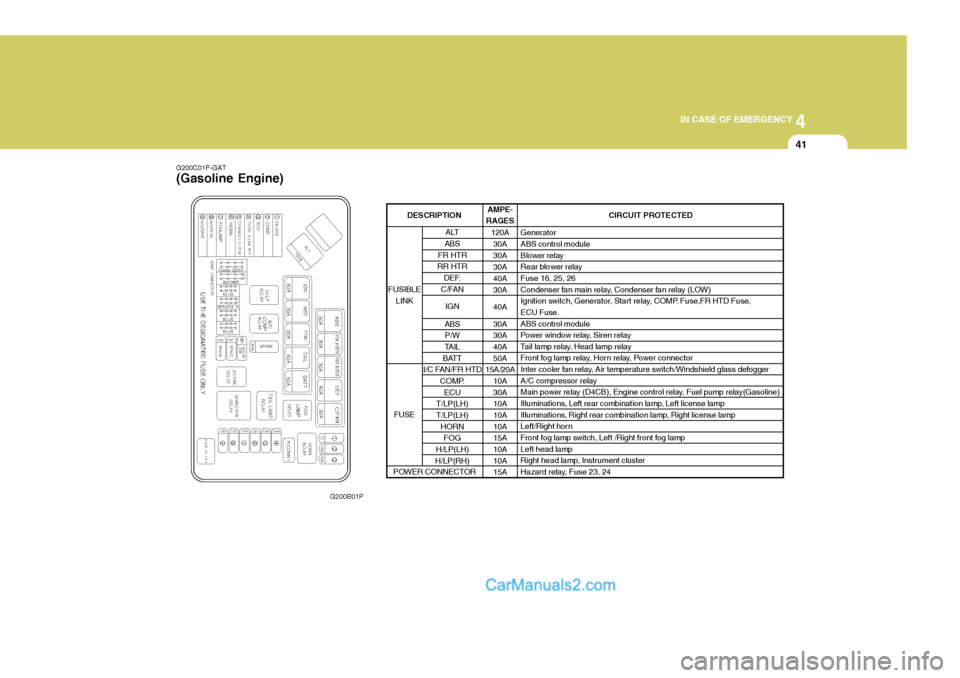
G200C01P-GAT (Gasoline Engine)
G200B01P AMPE-
RAGES
120A30A 30A30A40A30A 40A30A 30A 40A 50A
15A/20A
10A30A10A 10A 10A15A 10A 10A15A CIRCUIT PROTECTED
GeneratorABS control module
Blower relay
Rear blower relayFuse 16, 25, 26
Condenser fan main relay, Condenser fan relay (LOW)
Ignition switch, Generator, Start relay, COMP. Fuse,FR HTD Fuse,ECU Fuse. ABS control module
Power window relay, Siren relay
Tail lamp relay, Head lamp relay
Front fog lamp relay, Horn relay, Power connector
Inter cooler fan relay, Air temperature switch/Windshield glass defogger
A/C compressor relay
Main power relay (D4CB), Engine control relay, Fuel pump relay(Gasoline)
Illuminations, Left rear combination lamp, Left license lamp
Illuminations, Right rear combination lamp, Right license lamp
Left/Right horn
Front fog lamp switch, Left /Right front fog lamp Left head lamp
Right head lamp, Instrument cluster
Hazard relay, Fuse 23, 24
ALT
ABS
FR HTR
RR HTR
DEF.
C/FAN
IGN
ABS P/W
TAIL
BATT
I/C FAN/FR HTD
COMP.ECU
T/LP(LH) T/LP(LH) HORNFOG
H/LP(LH)
H/LP(RH)
FUSIBLE
LINK
FUSE
DESCRIPTION
POWER CONNECTOR
Page 165 of 205

6VEHICLE MAINTENANCE REQUIREMENTS
14
G080N01P-GAT
o Brake Hoses and Lines
Visually check for proper installation,
chafing, cracks, deterioration and any leakage. Replace any deteriorated or damaged parts immediately.
G080O01P-GAT
o Brake Fluid
Check brake fluid level in the brake
fluid reservoir. The level should be between "MIN" and "MAX" marks on the side of the reservoir. Use onlyhydraulic brake fluid conforming SAE J1703.
G080P01P-GAT
o Rear Brake Drums and
Linings
Check for scoring, burning, leaking
fluid, broken parts, and excessive wear. G080Q01P-GAT
o Brake Pads, Calipers and
Rotors
Check the pads for excessive wear, discs for run out and wear, and cali- pers for fluid leakage. G080R01P-GAT
o Parking Brake
Inspect the parking brake system such as parking brake lever, cables, and so on. For detailed service procedures,refer to the Shop Manual.
G080S01P-GAT
o Exhaust Pipe Connections,
Muffler and Suspension Bolts
Check the exhaust pipe, muffler, and
suspension connections for loosenessor damage.
G080L01P-GAT
o Manual Transmission Oil Check manual transmission oil ac- cording to the maintenance schedule. NOTE: If the oil level is low, check for possible leaks before adding oil. Do not overfill. G080M03P-GAT
o Automatic Transmission Fluid The fluid level should be in the "HOT" range of the dipstick, after engine and transmission are at normal operatingtemperature. Check the Automatic Transmission Fluid level with the en- gine running and the transmission inneutral, with the parking brake properly applied. Use MOBIL DEXRON-II or DIAMOND ATF SP-I when adding orchanging fluid.
Page 169 of 205
7
EMISSION CONTROL SYSTEM
3CATALYTIC CONVERTER
H040A01P-GAT Canister While the engine is inoperative, fuel vapors generated inside the fuel tank are absorbed and stored in the canis-ter. When the engine is running, the fuel vapors absorbed in the canister are drawn into the induction systemthrough the purge control solenoid valve. H090A01P-GAT Purge Control Solenoid Valve The purge control solenoid valve is controlled by the ECU; when the en-gine coolant temperature is low, and during idling, it closes, so that evapo- rated fuel is not taken into the surgetank. After engine warm-up, during ordinary driving, it opens so as to introduce evaporated fuel to the surgetank. H050A01P-GAT
3. Exhaust Emission Control
System
The Exhaust Emission Control Sys-
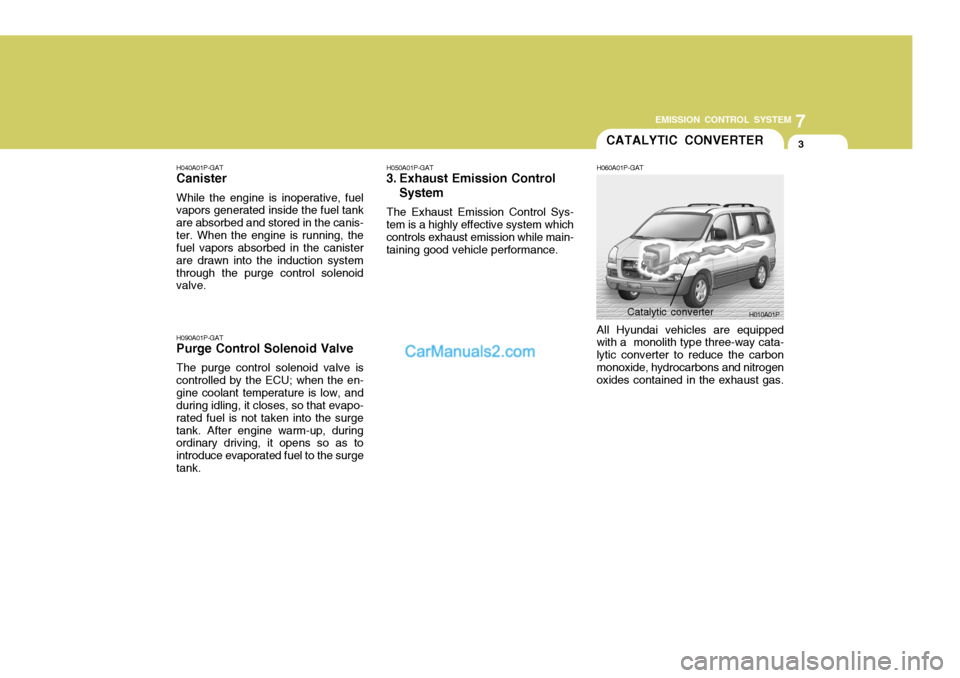
tem is a highly effective system which controls exhaust emission while main-taining good vehicle performance. H060A01P-GAT All Hyundai vehicles are equipped with a monolith type three-way cata- lytic converter to reduce the carbonmonoxide, hydrocarbons and nitrogen oxides contained in the exhaust gas.
H010A01P
Catalytic converter
Page 177 of 205
8DO-IT YOURSELF MAINTENANCE
8
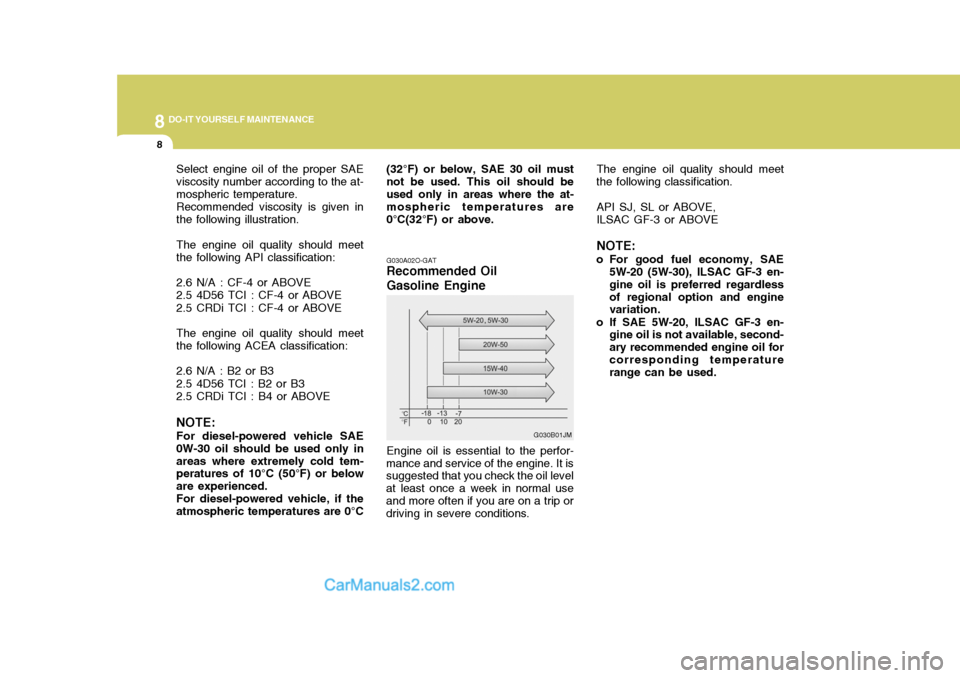
Select engine oil of the proper SAE viscosity number according to the at-mospheric temperature.Recommended viscosity is given inthe following illustration. The engine oil quality should meet the following API classification: 2.6 N/A : CF-4 or ABOVE 2.5 4D56 TCI : CF-4 or ABOVE 2.5 CRDi TCI : CF-4 or ABOVE The engine oil quality should meet the following ACEA classification: 2.6 N/A : B2 or B3 2.5 4D56 TCI : B2 or B3 2.5 CRDi TCI : B4 or ABOVE NOTE: For diesel-powered vehicle SAE 0W-30 oil should be used only inareas where extremely cold tem- peratures of 10°C (50°F) or below are experienced.For diesel-powered vehicle, if theatmospheric temperatures are 0°C
G030A02O-GAT
Recommended Oil Gasoline Engine Engine oil is essential to the perfor-
mance and service of the engine. It is suggested that you check the oil level at least once a week in normal useand more often if you are on a trip or driving in severe conditions. G030B01JMThe engine oil quality should meet
the following classification.
API SJ, SL or ABOVE, ILSAC GF-3 or ABOVE NOTE:
o For good fuel economy, SAE 5W-20 (5W-30), ILSAC GF-3 en- gine oil is preferred regardlessof regional option and engine variation.
o If SAE 5W-20, ILSAC GF-3 en- gine oil is not available, second- ary recommended engine oil forcorresponding temperature range can be used.
(32°F) or below, SAE 30 oil must not be used. This oil should beused only in areas where the at- mospheric temperatures are 0°C(32°F) or above.
Page 180 of 205
8
DO-IT YOURSELF MAINTENANCE
11
A translucent coolant reservoir tank is
in the engine compartment.
The coolant level in this tank should
be kept between the "L" and "F" marks when measured while the engine iswarm and idling.
The cooling system is a closed sys-
tem and normally the loss of coolant should be very slight. A noticeable drop in the coolant level could indi-cate leakage. If this occurs, have the system
checked at an authorized HYUNDAIdealer as soon as possible. If the level should drop below the "L"
level on the reservoir tank, add cool- ant.
Also, if the reservoir tank is com-
pletely empty, remove the radiatorcap and add coolant until the level reaches the filler neck.
!WARNING:
Do not open the reservoir tank lid
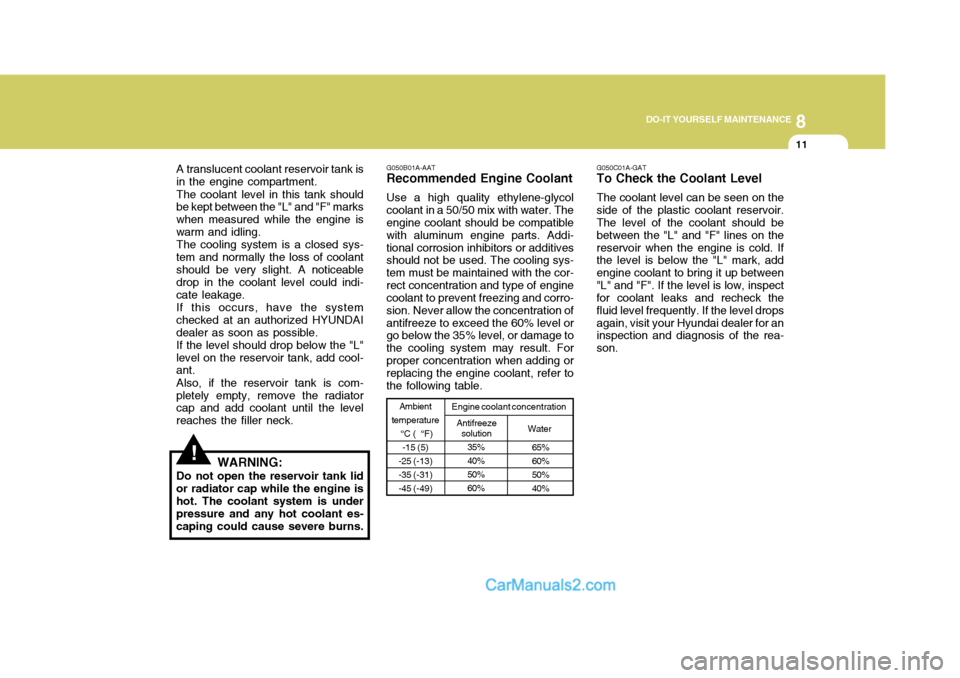
or radiator cap while the engine is hot. The coolant system is under pressure and any hot coolant es-caping could cause severe burns. G050B01A-AAT Recommended Engine Coolant Use a high quality ethylene-glycol coolant in a 50/50 mix with water. The engine coolant should be compatible with aluminum engine parts. Addi-tional corrosion inhibitors or additives should not be used. The cooling sys- tem must be maintained with the cor-rect concentration and type of engine coolant to prevent freezing and corro- sion. Never allow the concentration ofantifreeze to exceed the 60% level or go below the 35% level, or damage to the cooling system may result. Forproper concentration when adding or replacing the engine coolant, refer to the following table.
Water
65% 60%50%40%
35%40%50%60%
Ambient
temperature °C ( °F)-15 (5)
-25 (-13) -35 (-31)-45 (-49) Engine coolant concentration
Antifreezesolution G050C01A-GAT To Check the Coolant Level The coolant level can be seen on the side of the plastic coolant reservoir. The level of the coolant should be between the "L" and "F" lines on thereservoir when the engine is cold. If the level is below the "L" mark, add engine coolant to bring it up between"L" and "F". If the level is low, inspect for coolant leaks and recheck the fluid level frequently. If the level dropsagain, visit your Hyundai dealer for an inspection and diagnosis of the rea- son.
Page 181 of 205

8DO-IT YOURSELF MAINTENANCE
12
!
4. Turn the radiator cap counterclock-
wise without pressing down on it, until it stops. This relieves any pres- sure remaining in the cooling sys- tem. And remove the radiator capby pushing down and turning coun- terclockwise. Now fill the radiator with clean dem- ineralized or distilled water. Con- tinue to add clean demineralized or distilled water in small quantitiesuntil the fluid level stays up in the radiator neck.
5. Start the engine, top off the radia- tor with water and then add engine coolant to the reservoir until thelevel is between "L" and "F".
6. Replace the radiator and reservoir caps and check to be sure thedrain cocks are fully closed and not leaking. WARNING:
The cooling fan is controlled by
engine coolant temperature andmay sometimes operate even when the engine is not running. Useextreme caution when working near the blades of the cooling fan so that you are not injured by a rotat-ing fan blade. As the engine cool- ant temperature decreases, the fan will automatically shut off. This isa normal condition.
G050D02P-AAT To Change the Coolant The coolant should be changed at those intervals specified in the ve- hicle maintenance schedule in Sec- tion 6.
!
CAUTION:
Engine coolant can damage the finish of your car. If you spill en-gine coolant on the car, wash it off thoroughly with clean water.
1. Park the car on level ground, set the parking brake and remove the radiator cap when cool.
2. Be sure your drain receptacle is in
place. Open the drain cock on theradiator. Allow all the engine cool- ant to drain from the cooling sys- tem, then securely close the draincock.
3. Check Section 9 for the capacity of the cooling system in your car.Then, following the manufacturer's directions on the engine coolant container, add the appropriatequantity of coolant to the radiator.
Page 187 of 205

8DO-IT YOURSELF MAINTENANCE
18
1. Open the hood, being careful to
keep hands, long hair and clothing clear of any moving parts.
2. Remove the transmission dipstick, wipe it clean, reinsert the dipstickas far as it will go, then remove it again. Now check the fluid level on the dipstick. It should be in the"HOT" range on the dipstick.
3. If the transmission fluid level is
low, use a funnel to add transmis-sion fluid through the dipstick tube until the level reaches the "HOT" range. Do not overfill, otherwisethe transmission could be dam- aged. Full mark Good
I120D03P-GAT
To Check the transmission Fluid Level
Park the vehicle on level ground with
the parking brake engaged. When the transmission fluid level is checked, the transmission fluid should be atnormal operating temperature and the engine idling.
While the engine is idling, apply the
brakes and move the gear selector lever from "P" to each of its otherpositions-"R", "N", "D", "2", "L"-and then return to "N" or "P" with the engine still idling: HSR3073
I120D02P
!
I120B03P-GAT
Recommended Fluid
Your Hyundai automatic transmission
is specially designed to operate with MOBIL DEXRON-II or DIAMOND ATF SP-I type fluid.
I120C02P-GAT
Automatic transmission fluid capacity
The fluid capacity of the automatic
transmission will be found on page 9-5.
WARNING:
The transmission fluid level should
be checked when the engine is atnormal operating temperature. Thismeans that the engine, radiator, exhaust system etc., are very hot. Exercise great care not to burnyourself during this procedure.