2005 Hyundai Azera power steering
[x] Cancel search: power steeringPage 10 of 297

1. Headlight Leveling Device Switch (If Installed)
2. Rear Fog Light Switch (If Installed)
3. Electronic Stability Program (ESP) Switch(If Installed)
4. Panel Brightness Control Knob (Rheostat Switch)
5. Steering Wheel Tilt & Telescopic Lever
6. Hood Release Lever
7. Cigarette Lighter
CAUTION:
When installing a container of liquid air freshener inside the vehicle, do not place it near the instrument cluster nor on the instrument panel pad surface. If there is any leakage from theair freshener onto these areas (instrument cluster, instrument panel pad or air ventilator), it may damage these parts. If the liquid from air freshener does leak onto these areas, wash them with water immediately.
!
NOTE: Switch arrangements from No. 1 to No. 4 can be changed according to options. 8. Front Ashtray
9. Front Seat Warmer (If Installed)
10. Rear Window Curtain Switch (If Installed)
11. Digital Clock
12. Passenger's Seat Belt Warning Light (If Installed)
13. Hazard Warning Switch
14. Power Outlet
Page 14 of 297

1. Digital Clock
2. Passenger's Seat Belt Warning Light (If Installed)
3. Hazard Warning Switch
4. Electronic Stability Program (ESP) Switch(If Installed)
5. Steering Wheel Tilt & Telescopic Lever
6. Panel Brightness Control Knob (Rheostat Switch)
7. Rear Fog Light Switch (If Installed)
CAUTION:
When installing a container of liquid air freshener inside the vehicle, do not place it near the instrument cluster nor on the instrument panel pad surface. If there is any leakage from the air freshener onto theseareas (instrument cluster, instrument panel pad or air ventilator), it may damage these parts. If the liquid from air freshener does leak onto these areas, wash them with water immediately.
!
NOTE: Switch arrangements from No. 6 to No. 8 can be changed according to options. 8. Headlight Leveling Device Switch (If Installed)
9. Hood Release Lever
10. Front Seat Warmer (If Installed)
11. Front Ashtray
12. Cigarette Lighter
13. Rear Window Curtain Switch (If Installed)
14. Power Outlet
Page 41 of 297

1FEATURES OF YOUR HYUNDAI
24
!
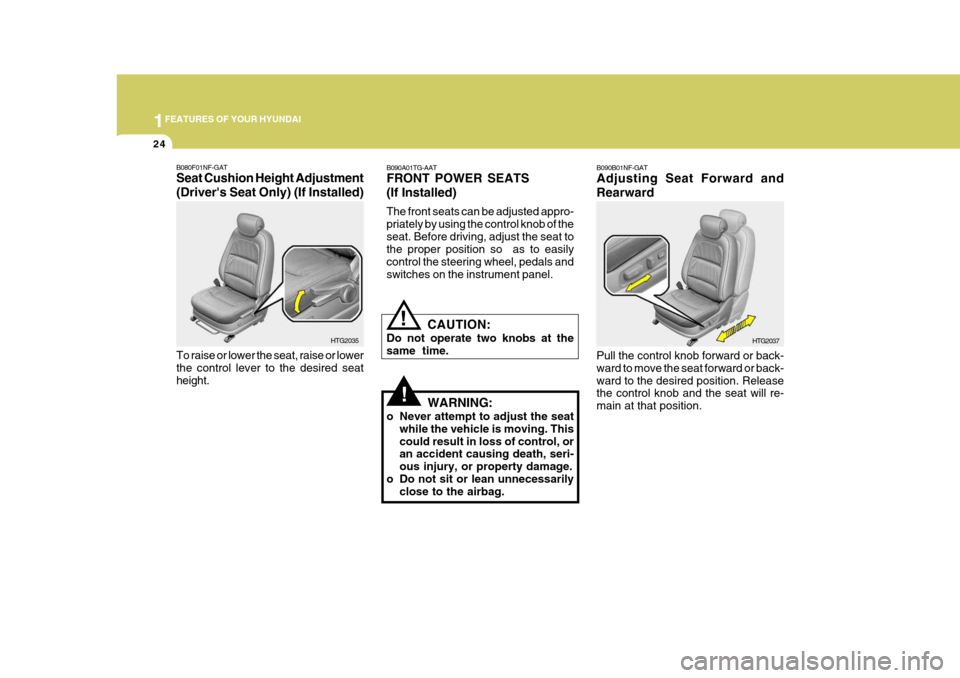
B090B01NF-GAT Adjusting Seat Forward and Rearward Pull the control knob forward or back- ward to move the seat forward or back-ward to the desired position. Release the control knob and the seat will re- main at that position. HTG2037B080F01NF-GAT Seat Cushion Height Adjustment (Driver's Seat Only) (If Installed) To raise or lower the seat, raise or lower the control lever to the desired seatheight.
HTG2035B090A01TG-AAT FRONT POWER SEATS (If Installed) The front seats can be adjusted appro- priately by using the control knob of theseat. Before driving, adjust the seat to the proper position so as to easily control the steering wheel, pedals andswitches on the instrument panel.
CAUTION:
Do not operate two knobs at thesame time.
WARNING:
o Never attempt to adjust the seat while the vehicle is moving. Thiscould result in loss of control, or an accident causing death, seri- ous injury, or property damage.
o Do not sit or lean unnecessarily close to the airbag.
!
Page 232 of 297

5
VEHICLE MAINTENANCE REQUIREMENTS
5
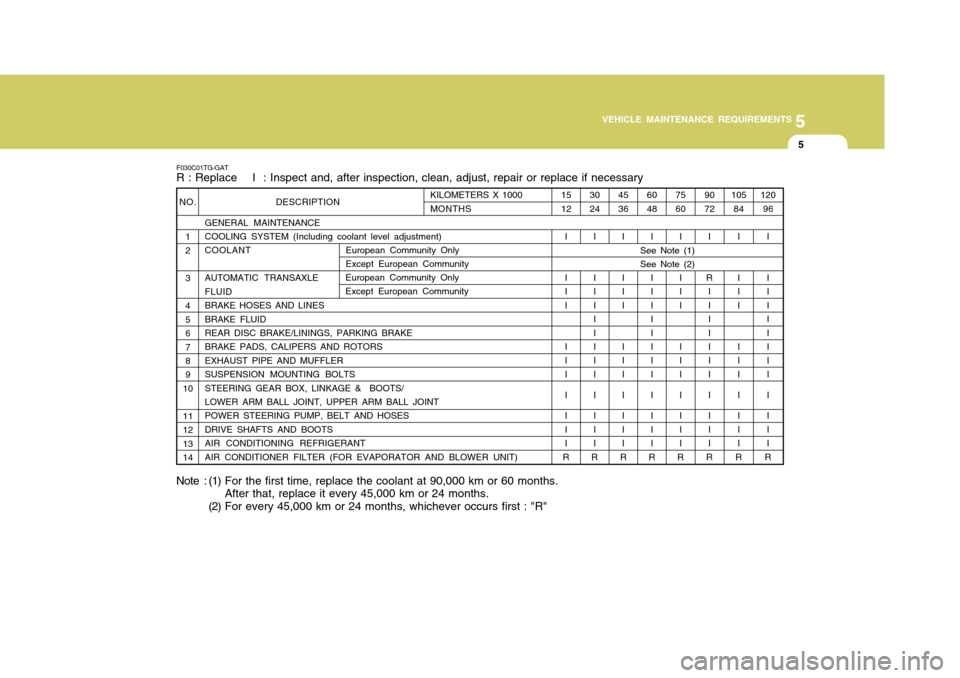
F030C01TG-GAT R : Replace I : Inspect and, after inspection, clean, adjust, repair or replace if necessary
Note : (1) For the first time, replace the coolant at 90,000 km or 60 months. After that, replace it every 45,000 km or 24 months.
(2) For every 45,000 km or 24 months, whichever occurs first : "R"
NO.
1 2 34 567 8 9
10 11 12 1314 DESCRIPTION
GENERAL MAINTENANCECOOLING SYSTEM (Including coolant level adjustment) COOLANT AUTOMATIC TRANSAXLE FLUIDBRAKE HOSES AND LINESBRAKE FLUID REAR DISC BRAKE/LININGS, PARKING BRAKE BRAKE PADS, CALIPERS AND ROTORSEXHAUST PIPE AND MUFFLERSUSPENSION MOUNTING BOLTSSTEERING GEAR BOX, LINKAGE & BOOTS/ LOWER ARM BALL JOINT, UPPER ARM BALL JOINT POWER STEERING PUMP, BELT AND HOSESDRIVE SHAFTS AND BOOTSAIR CONDITIONING REFRIGERANTAIR CONDITIONER FILTER (FOR EVAPORATOR AND BLOWER UNIT)
120 96
I I IIII I II I I II
R
105
84
I I II I II I I II
R
9072
I
R IIII I II I I II
R
7560
I I II I II I I II
R
6048
I I IIII I II I I II
R
4536
I I II I II I I II
R
3024
I I IIII I II I I II
R
1512
I I II I II I I II
R
KILOMETERS X 1000MONTHS
See Note (1) See Note (2)
European Community Only Except European Community
European Community Only Except European Community
Page 236 of 297

5
VEHICLE MAINTENANCE REQUIREMENTS
9
F070G02A-AAT
o Brake Fluid
Check brake fluid level in the brake fluid reservoir. The level should be between "MIN" and "MAX" marks on the side of the reservoir. Use onlyhydraulic brake fluid conforming to DOT 3 or DOT 4. F070H01TG-AAT
o Rear Disc Brake /
Linings, Parking Brake
Check the rear disc brake and linings for scoring, burning, leaking fluid, bro- ken parts, and excessive wear. In-spect the parking brake system in- cluding the parking brake pedal and cables. For detailed service proce-dures, refer to the Shop Manual. F070J01A-AAT
o Brake Pads, Calipers and
Rotors
Check the pads for excessive wear, discs for run out and wear, and cali-pers for fluid leakage. F070K01A-AAT
o Exhaust Pipe and Muffler
Visually inspect the exhaust pipes,
muffler and hangers for cracks, dete- rioration, or damage. Start the engine and listen carefully for any exhaustgas leakage. Tighten connections or replace parts as necessary.
F070L01A-AAT
o Suspension Mounting Bolts
Check the suspension connections for
looseness or damage. Retighten to thespecified torque.
F070M01Y-AAT
o Steering Gear Box, Linkage &
Boots/Lower Arm Ball Joint, Upper Arm Ball Joint
With the vehicle stopped and engine
off, check for excessive free-play in the steering wheel.
Check the linkage for bends or dam-
age. Check the dust boots and ball joints for deterioration, cracks, or dam-age. Replace any damaged parts. F070N01A-AAT
o Power Steering Pump,
Belt and Hoses
Check the power steering pump and hoses for leakage and damage. Re- place any damaged or leaking parts immediately. Inspect the power steer-ing belt for evidence of cuts, cracks, excessive wear, oiliness and proper tension. Replace or adjust it if neces-sary. F070P01A-AAT o Drive Shafts and Boots Check the drive shafts, boots and clamps for cracks, deterioration, ordamage. Replace any damaged parts and, if necessary, repack the grease. F070Q01A-AAT
o Air Conditioning Refrigerant Check the air conditioning lines and connections for leakage and damage. Check air conditioning performanceaccording to the relevant shop manual if necessary.
Page 237 of 297

Engine Compartment .................................................... 6-2
General Checks ........................................................... 6-3
Maintenance Precautions ............................................. 6-4
Checking the Engine Oil .............................................. 6-4
Checking and Changing the Engine Coolant ............... 6-7
Spark Plugs .................................................................. 6-9
Changing the Air Cleaner Filter ...................................6-10
Checking the Transaxle Fluid (Automatic) .................6-14
Checking the Brakes .................................................. 6-16
Air Conditioning Care .................................................. 6-18
Changing the Air Conditioner Filter .............................6-18
Checking Drive Belts .................................................. 6-21
Checking and Replacing Fuses ..................................6-21
Checking the Battery .................................................. 6-23
Checking the Eclectric Cooling Fans .........................6-25
Power Steering Fluid Level ......................................... 6-25
Headlight Aiming Adjustment ...................................... 6-26
Replacement of Light Bulbs ........................................6-28
Bulb Wattage ............................................................... 6-36
Fuse Panel D escription ............................................... 6-37
DO-IT-YOURSELF MAINTENANCE
6
6
Page 238 of 297

6 DO-IT-YOURSELF MAINTENANCE
2
G010A01TG-GATENGINE COMPARTMENT
G010A01TG
CAUTION:
When inspecting or servic- ing the engine, you should handle tools and otherheavy objects carefully so that the plastic cover of the engine is not damaged.
!
1. Coolant reservoir cap
2. Engine oil filler cap
3. Air cleaner
4. Brake fluid reservoir 5. Fuse and relay box
6. Windshield washer fluid reservoir
7. Power steering fluid reservoir
8. Engine oil level dipstick 9. Automatic transaxle oil level dip-
stick
10. Radiator cap
11. Battery
Page 239 of 297

6
DO-IT-YOURSELF MAINTENANCE
3GENERAL CHECKS
G020A01NF-GAT
Engine Compartment
The following should be checked regu- larly:
o Engine oil level and condition
o Transaxle fluid level and condition
o Brake fluid level
o Engine coolant level
o Windshield washer fluid level
o Accessory drive belt condition
o Engine coolant hose condition
o Fluid leaks (on or below compo- nents)
o Power steering fluid level
o Battery condition
o Air filter condition
o Immediate repairing when engine trembling occurs
o Limit to restart more than 3 times when engine cannot start o Defroster, heating system operation
(and air conditioning, If Installed)
o Steering operation and condition
o Mirror condition and operation
o Turn signal operation
o Accelerator pedal operation
o Brake operation, including parking brake
o Automatic transaxle operation, in- cluding "Park" mechanism opera- tion
o Seat control condition and opera- tion
o Seat belt condition and operation
o Sun visor operation If you notice anything that does not operate correctly or appears to befunctioning incorrectly, inspect it care- fully and seek assistance from your Hyundai dealer if service is needed.
G020B01A-AAT
Vehicle Exterior
The following should be checked
monthly:
o Overall appearance and condition
o Wheel condition and wheel nut
torque
o Exhaust system condition
o Light condition and operation
o Windshield glass condition
o Wiper blade condition
o Paint condition and body corrosion
o Fluid leaks
o Door and hood lock condition
o Tire pressure and condition (including spare tire)
G020C01TG-AAT
Vehicle Interior
The following should be checked each
time when the vehicle is driven:
o Lights operation
o Windshield wiper operation
o Horn operation