2005 Hyundai Azera engine oil
[x] Cancel search: engine oilPage 242 of 297

6 DO-IT-YOURSELF MAINTENANCE
6
!
!
CAUTION:
Slowly pour the recommended oil using by a funnel. Do not overfill not to damage engine.
WARNING:
Be very careful not to touch theradiator hose when adding the en- gine oil as it may be hot enough to burn you.! NOTE: Always dispose of used engine oil
in an environmentally acceptable manner. It is suggested that it be placed in a sealed container and taken to a service station for recla-mation. Do not pour the oil on the ground or put it into the household trash.
WARNING:
Used motor oil may cause irritationor cancer of the skin if left in contactwith the skin for prolonged periods of time. Wash your hands thoroughly with soap and warm water as soonas possible after handling used oil.
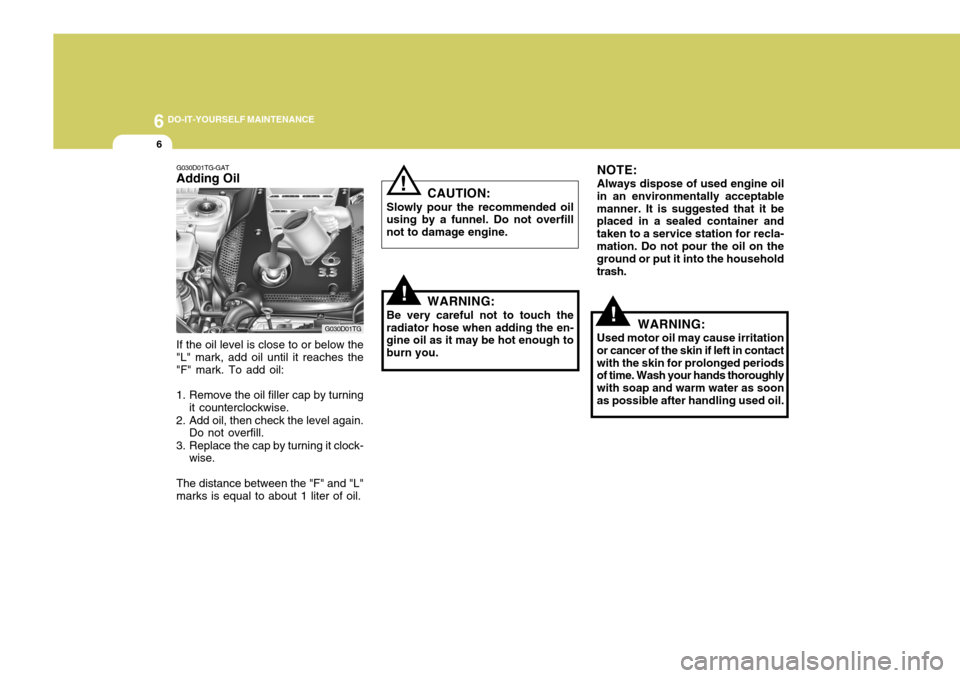
G030D01TG-GAT Adding Oil If the oil level is close to or below the "L" mark, add oil until it reaches the "F" mark. To add oil:
1. Remove the oil filler cap by turning it counterclockwise.
2. Add oil, then check the level again. Do not overfill.
3. Replace the cap by turning it clock- wise.
The distance between the "F" and "L" marks is equal to about 1 liter of oil. G030D01TG
Page 243 of 297

6
DO-IT-YOURSELF MAINTENANCE
7
G350A01A-GAT
ENGINE OIL CONSUMPTION Function of Engine Oil
Engine oil has the primary function of lubricating and cooling the inside of the engine.
Engine oil consumption It is normal that an engine should consume some engine oil while nor- mal driving. The cause of oil con- sumption in a normal engine are asfollows;
o Engine oil is used to lubricate pis- tons, piston rings and cylinders. A thin film of oil is left on the cylinder wall when a piston moves downwards in the cylinder. High negative pressure generated dur-ing engine operation sucks some of the oil into the combustion cham- ber.This oil with some oil of the cylin-der wall is burned by the high tem-perature combustion gases during the combustion process. o The engine oil consumption is
strongly effected by the viscosity and quality of oil, engine rpm and driving condition etc. The engine oil is more consumed under severedriving conditions such as high speeds and frequent acceleration and deceleration than normal driv-ing condition.
!
CHECKING AND CHANGING THE ENGINE COOLANT
G050A01TG-AAT
WARNING:
Do not remove the radiator cap
when the engine is hot. When the engine is hot, the engine coolantis under pressure and may erupt through the opening if the cap is removed. You could be seriouslyburned if you do not observe this precaution. Do not remove the radiator cap until the radiator iscool to the touch.
NOTE: It is recommended that the engine coolant should be changed by an authorized Hyundai dealer.
Page 247 of 297

6
DO-IT-YOURSELF MAINTENANCE
11WINDSHIELD WIPER BLADES
G080A02A-AAT The wiper blades should be carefully
inspected from time to time and cleaned to remove accumulations ofroad film or other debris. To clean the wiper blades and arms, use a clean sponge or cloth with a mild soap ordetergent and water. If the wipers continue to streak or smear the glass, replace them with genuine Hyundaireplacement parts or their equivalent. G080A01TG
CAUTION:
o Do not operate the wipers on dry glass. This can result in morerapid wear of the wiper bladesand may scratch the glass.
o Keep the blade rubber out of contact with petroleum productssuch as engine oil, gasoline etc.
!
G080B01TG-GAT REPLACING THE WIND- SHIELD WIPER BLADES Replacing driver's side wind- shield wiper blade To replace the wiper blades, raise the wiper to the vertical position. To remove the wiper blade
1. Push down the wiper blade with the
locking clip (1) pressed to detach it from the wiper arm. HHR5048
(1)
Page 262 of 297

6 DO-IT-YOURSELF MAINTENANCE
26HEADLIGHT AIMING ADJUSTMENT
G290A01TG-GAT
G290A01NF
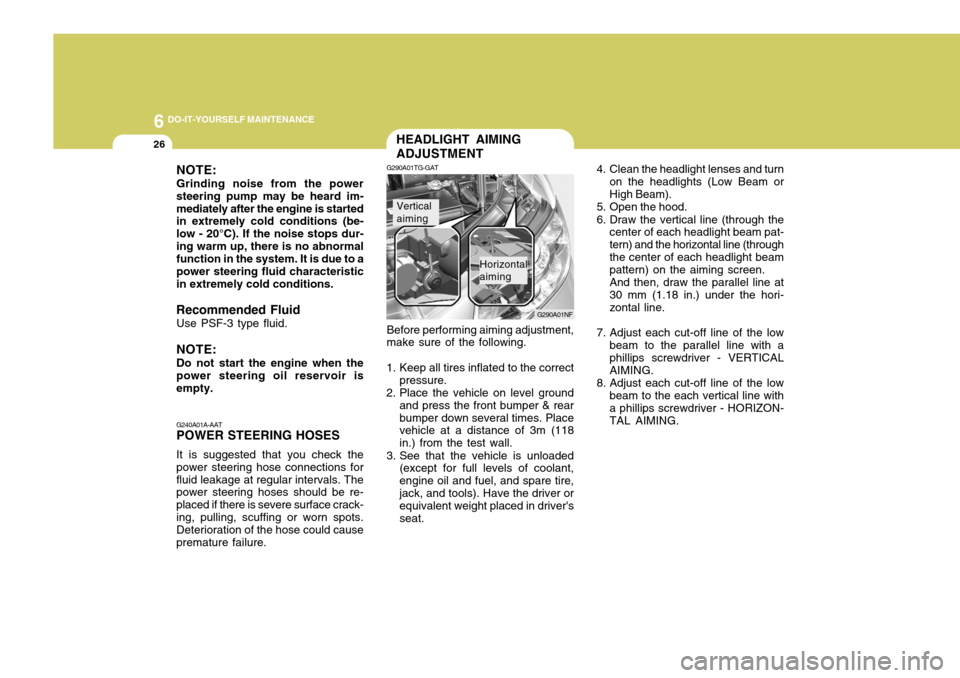
Before performing aiming adjustment, make sure of the following.
1. Keep all tires inflated to the correct pressure.
2. Place the vehicle on level ground and press the front bumper & rear bumper down several times. Place vehicle at a distance of 3m (118 in.) from the test wall.
3. See that the vehicle is unloaded (except for full levels of coolant,engine oil and fuel, and spare tire,jack, and tools). Have the driver or equivalent weight placed in driver's seat.
Vertical aiming
Horizontal aiming 4. Clean the headlight lenses and turn
on the headlights (Low Beam or High Beam).
5. Open the hood.
6. Draw the vertical line (through the center of each headlight beam pat- tern) and the horizontal line (throughthe center of each headlight beam pattern) on the aiming screen. And then, draw the parallel line at 30 mm (1.18 in.) under the hori- zontal line.
7. Adjust each cut-off line of the low beam to the parallel line with a phillips screwdriver - VERTICAL AIMING.
8. Adjust each cut-off line of the low beam to the each vertical line with a phillips screwdriver - HORIZON-TAL AIMING.
NOTE: Grinding noise from the power steering pump may be heard im-mediately after the engine is started in extremely cold conditions (be- low - 20°C). If the noise stops dur-ing warm up, there is no abnormal function in the system. It is due to a power steering fluid characteristicin extremely cold conditions.
Recommended Fluid Use PSF-3 type fluid. NOTE: Do not start the engine when the power steering oil reservoir is empty. G240A01A-AAT POWER STEERING HOSES It is suggested that you check the power steering hose connections forfluid leakage at regular intervals. The power steering hoses should be re- placed if there is severe surface crack-ing, pulling, scuffing or worn spots. Deterioration of the hose could cause premature failure.
Page 264 of 297

6 DO-IT-YOURSELF MAINTENANCE
28
Replacement instructions:
1. Allow the bulb to cool. Wear eye protection.
2. Open the engine hood and discon- nect the negative (-) post of the battery.
3. Always grasp the bulb by its plastic base, avoid touching the glass.
G270A01TG-GAT
HEADLIGHT AND FRONT FOG LIGHT
Headlight (High beam) Headlight(Low beam)
G270A01TG
Front Fog Light
REPLACEMENT OF LIGHT BULBS
G260A01TG-GAT Before attempting to replace a light
bulb, be sure the ignition switch is turned to the "OFF" position.
The next paragraph shows how to
reach the light bulbs so they may bechanged. Be sure to replace theburned-out bulb with one of the same number and wattage rating.
See page 6-36 for the wattage descrip-
tions.
! CAUTION:
o Keep the lights out of contact with petroleum products, such as oil, gasoline, etc.
o Be sure to replace the LED type
equipped bulbs with an assem- bly.
o If you don't have necessary tools, the correct bulbs and the exper-tise, consult your authorized Hyundai dealer. CAUTION:
o The headlight aiming should be checked by an authorized Hyundaidealer after replacing the head-light bulbs.
o If your vehicle is equipped with
HID (High Intensity Discharge) type headlight, you must not replace or inspect the headlight. It has a danger of an electric shock. If the headlight is not work- ing, have your vehicle inspectedby your Hyundai Dealer.
! Headlight
Page 274 of 297

6 DO-IT-YOURSELF MAINTENANCE
38
1 2 3 4 5 6 7 8 9 10 11 12 13 14 15 16 17 18 19 20 21 22 23 24
HORNTAIL
ECU IG1
DRL
FR FOG
A/CON
F/PUMP
DIODE ATM
STOP
H/LP LO RH
S/ROOF
H/LP WASHER
H/LP HI
ECU (B+)
SNSR3 SNSR1 SNSR2B/UP
IGN COIL
ECU (IG1)
H/LP LO ABS PROTECTED COMPONENTS
ABS/ESP Control module, Multipurpose check connectorABS/ESP Control module, Multipurpose check connector Fuse(FR P/SEAT, T/LID, T/SIG, TILT, PEDAL, RR CURTAIN) Defogger relay Blower relay Fuse(P/WDW LH, P/WDW RH) Start relay, Ignition switch(IG2, START) Engine control unit relay Fuse(KEY SOL, ECS/RR FOG), Power connector Ignition switch(ACC, IG1) Fusible link(ABS1, ABS2, RR HTD, BLOWER) Horn relay Tail light relay PCM (Spare) Burglar alarm horn relay Front fog light relay A/C Relay Fuel pump relay (Spare) ATM Control relay Stop light switch HID Relay Overhead console lamp Headlight washer motor Headlight relay (HIGH) PCM Injector#1~#6, A/C Relay, Cooling fan relay Mass air flow sensor, PCM, Immobilizer control module, Oil control valve#1/#2, Variable intake manifold valve Oxygen Sensor#1~#4 Back-up light switch, Stop light switch, Transaxle range switch, Vehicle speed sensor Ignition coil#1~#6, Condenser PCM Headlight relay(LOW) ABS/ESP Control module, Multipurpose check connector
ABS1 ABS2
I/P (B+)1
RR HTD
BLOWER
P/WDW IGN2
ECU RLY I/P (B+)2
IGN1ALT FUSE RATING
40A20A 40A 40A 40A 40A 40A 30A 30A 30A
150A
15A 20A 10A 10A 15A 15A 10A 20A
-
20A 15A 15A 15A 20A 20A 10A 10A 15A 15A 10A 20A 10A 20A 10ADESCRIPTION
FUSIBLE LINK
FUSE
Page 291 of 297

9 VEHICLE SPECIFICATIONS
4
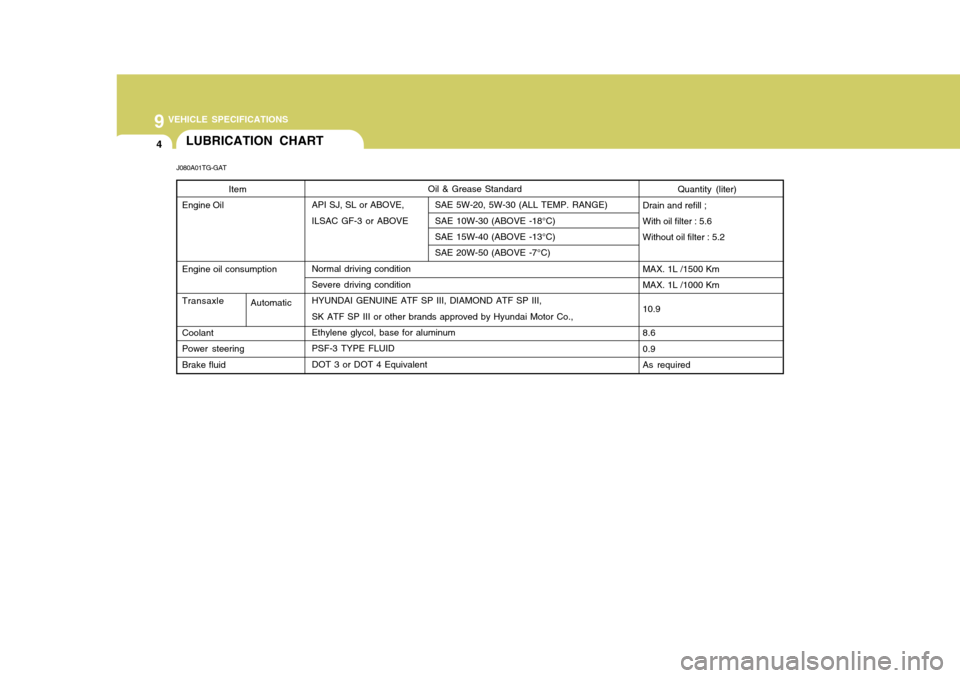
Oil & Grease Standard
API SJ, SL or ABOVE, SAE 5W-20, 5W-30 (ALL TEMP. RANGE)
ILSAC GF-3 or ABOVE SAE 10W-30 (ABOVE -18°C)
SAE 15W-40 (ABOVE -13°C) SAE 20W-50 (ABOVE -7°C)
Normal driving condition Severe driving condition HYUNDAI GENUINE ATF SP III, DIAMOND ATF SP III, SK ATF SP III or other brands approved by Hyundai Motor Co.,Ethylene glycol, base for aluminum PSF-3 TYPE FLUID DOT 3 or DOT 4 EquivalentLUBRICATION CHART
J080A01TG-GAT
Quantity (liter)
Drain and refill ; With oil filter : 5.6 Without oil filter : 5.2 MAX. 1L /1500 Km MAX. 1L /1000 Km 10.98.6 0.9 As required
Item
Engine Oil Engine oil consumption TransaxleCoolant Power steeringBrake fluid
Automatic
Page 294 of 297

10
INDEX
3
Console Box .............................................................. 1-96
Cooling Fans ............................................................. 6-25
Corrosion protection
Cleaning the interior .................................................. 4-5
Protecting your Hyundai from corrosion ................... 4-2
Washing and waxing ................................................. 4-4
Cruise Control .......................................................... 1-109
D Defrosting/Defogging ................................................ 1-119
Door
Central door locks .................................................. 1-12
Door edge warning light ........ ................................1-107
Door locks ................................................................ 1-9
Locking and unlocking front door with a key .......... 1-10
Drink Holder ............................................................... 1-87
Drive Belt ................................................................... 6-21
Driving Driving for economy ............................................... 2-14
Smooth corneri ng .................................................... 2-16
Winter driving .......................................................... 2-16
E Electronic Stability Program (ESP) ...........................2-11
Emission Contro l System ............................................ 7-2
Engine Before starting the engine ........................................ 2-3Compartment ............................................................ 6-2
Coolant ..................................................................... 6-7 Coolant temperature gauge
.....................................1-71
If the engine overheats ............................................. 3-4
Number ..................................................................... 8-2
Oil ............................................................................. 6-4 Starting ..................................................................... 2-5
Engine Exhaust Can Be Dangerous ............................ 2-2
F
Fan Speed Control ............. ...........................1-115, 1-125
Fog Light Switch Front ....................................................................... 1-79
Rear ........................................................................ 1-80
Front Seats
Active headrests ..................................................... 1-23
Adjustable front seats ............................................. 1-21
Adjustable headrests .............................................. 1-22
Adjusting seat forward and rearward .......................1-21
Adjusting seatback angle ....................................... 1-21
Power seat ............................................................. 1-24
Fuel Capacity ................................................................... 9-2
Gauge ..................................................................... 1-70
Recommendations .................................................... 1-2
Fuel Filler Lid Remote release .................................................... 1-103
Fuse Panel Description ............................................. 6-37
Fuses ........................................................................ 6-21