Page 99 of 273

When this switch is in the position:When this switch is in the position: When the switch is in the
position:ON
All the individual map lights come
on.
None of the lights come on when a
door or the tailgate is opened. OFF
The individual map lights in the
f ront can be turned on and of f with
the switches next to the lights. The individual map lights in the
second and third rows cannot be
turned on.
Door
Activated The individual map lights come on
whenanydoororthetailgateis
opened, or when the remote
transmitter is used to unlock the
doors.
The individual map lights in the
second and third rows can be
turned on and of f by pressing the
lens. The tailgate light comes on when
you open the tailgate if the light
switch is in the ON position.
The lights go out about 6 seconds
after all the doors and the tailgate
are closed. With any door or the
tailgate lef t open, the lights stay
on about 3 minutes, then go out.
Lights
L ight Control Switch
Inst rument s and Cont rols
97
ON
DOOR
ACTIVATED
POSITION OFF
Page 100 of 273
Turn on the f ront and second row
individual map lights by pushing the
lens. Push the lens again to turn it
off. You can also operate these lights
with the light control switch (see
page ).
The light in the tailgate has an on-of f
switch to control if the light comes
on when the tailgate is opened.
The courtesy lights in the f ront
doors and around the ignition switch
come on when you open any door.
Af ter you close the door, the ignition
switch light stays on f or several
seconds.97
Lights
Individual Map L ights
Tailgate Light
Individual Interior L ights
98
Page 139 of 273

The security system helps to protect
your vehicle and valuables f rom thef t.
The horn sounds and a combination
of headlights, parking lights, side
marker lights, and taillights f lash if
someone attempts to break into your
vehicle. This alarm continues for two
minutes, then the system resets. To
reset an alarm system bef ore the two
minutes have elapsed, unlock the
driver’s f ront door with the key or
the remote transmitter.Once the security system is set,
opening any door without using the
key or the remote transmitter, or the
hood, will cause it to alarm. It also
alarms if the radio is removed from
the dashboard or the wiring is cut.The security system will not set if
the hood, the tailgate, or any door is
not f ully closed. If the system will not
set, check the Door and Tailgate
Open Monitor on the instrument
panel (see page ) to see if the
doors and the tailgate are f ully
closed. Since it is not part of the
monitor display, manually check the
hood.
Do not attempt to alter this system
or add other devices to it.
The security system automatically
sets 15 seconds after you lock the
doors, hood, and the tailgate. For the
system to activate, you must lock the
doors f rom the outside with the key,
lock tab, door lock switch, or remote
transmitter. The security system
indicator next to the driver’s door
lock starts blinking immediately to
show you the system is setting itself . 62
On EX and EX-L models
Security System
Features
137
SECURITY SYSTEM INDICATOR
Page 157 of 273

Store or secure all items that could
be thrown around and hurt
someone during a crash.
Keep the glove box closed while
driving. If it is open, a passenger
could injure their knees during a
crash or sudden stop.Distribute cargo evenly on the
f loor of the cargo area, placing the
heaviest items on the bottom and
as far forward as possible. Tie
down items that could be thrown
about the vehicle during a crash or
sudden stop.
If you carry large items that
prevent you f rom closing the
tailgate, exhaust gas can enter the
passenger area. To avoid the
possibility of
, f ollow the instructions
on page .
If you carry any items on a roof
rack,besurethetotalweightof
the rack and the items does not
exceed 165 lbs (75 kg). If you use an accessory roof rack,
the roof rack weight limit may be
lower. Ref er to the inf ormation that
came with your roof rack.
Theseparationnetcanbeusedto
hold back sof t, lightweight items
stored in the cargo area. Heavy
items should be properly secured on
the f loor of the cargo area. The net
may not prevent heavy items f rom
being thrown f orward in a crash or a
sudden stop.
The cargo cover can be used over
the cargo area behind the third row
seats. When the third row seats are
f olded down, the cargo cover can be
installed in a f orward position and
extended over the larger cargo area.
Be sure items placed on the f loor
behind the f ront seats cannot roll
under the seats and interf ere with
the pedals or seat operation.
53
Carrying Cargo
Carrying Items in the Passenger
CompartmentCarrying Cargo in the Cargo A rea
or on a Roof Rack
carbon monoxide
poisoning Optional Separation Net
Optional Cargo Cover
Bef ore Driving
155
Page 158 of 273
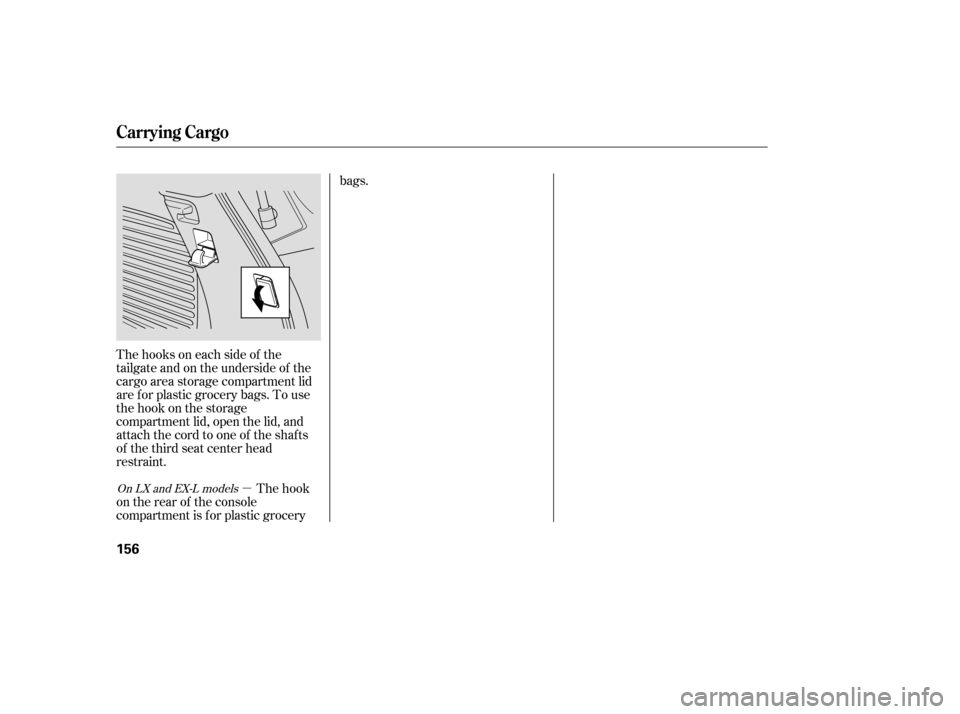
�µ
Thehooksoneachsideof the
tailgate and on the underside of the
cargo area storage compartment lid
are f or plastic grocery bags. To use
the hook on the storage
compartment lid, open the lid, and
attach the cord to one of the shafts
of the third seat center head
restraint.
The hook
on the rear of the console
compartment is f or plastic grocery bags.On LX and EX-L models
Carrying Cargo
156
Page 160 of 273

Your vehicle has a higher ground
clearance that allows you to travel
over bumps, obstacles, and rough
terrain. It also provides good
visibility so you can anticipate
problems earlier.
Because your vehicle rides higher
of f the ground, it has a high center
of gravity that can cause it to roll
over if you make abrupt turns. Utility
vehicles have a signif icantly higher
roll over rate than other types of
vehicles.
To prevent rollovers or loss of
control:Take corners at slower speeds
than you would with a passenger
vehicle.
Avoid sharp turns and abrupt
maneuvers whenever possible. Make sure the doors and the
tailgate are securely closed and
locked. Check the steering wheel
adjustment (see page ). Check the adjustment of the
inside and outside mirrors (see
page ). Check the seat adjustment (see
page ). Check that any items you may be
carrying are stored properly or
f astened down securely.
Visually check the tires. If a tire
looks low, use a gauge to check its
pressure. Make sure all windows, mirrors,
and outside lights are clean and
unobstructed. Remove f rost, snow,
or ice.
Youshoulddothefollowingchecks
and adjustments bef ore you drive
your vehicle. Do not carry heavy cargo on the
roof . Do not modif y your vehicle in any
way that would raise the center of
gravity.
Fasten your seat belt. Check that
your passengers have f astened
their seat belts (see page ).
When you start the engine, check
the gauges and indicators in the
instrument panel (see page ).
3.
2. 1. 4.
5.
6.
7.
8.
9.83
88 74
1557
See page f or additional driving of f -highway guidelines. 183
Driving Guidelines
Preparing to Drive
158
Page 181 of 273

Trailer lights and equipment must
comply with f ederal, state, province,
and local regulations. Check trailer
light requirements f or the areas
where you plan to tow.
To get to your vehicle’s trailer
lighting connector, open the tailgate,
remove the cargo cover, then
remove the rear panel trim. The
connector is on the lef t side.We recommend that you have your
dealer install a Honda wiring harness
and converter. This harness has
been designed f or your vehicle.
If you use a non-Honda trailer
lighting harness and converter, you
cangetthematingconnectorand
pins that mate with the connector in
your vehicle f rom your dealer.
Since lighting and wiring vary with
trailer type and brand, you should
also have a qualif ied mechanic install
a suitable connector between the
vehicleandthetrailer.
T railer L ights
Towing a Trailer
Driving
179
GROUND
(BLACK)
BACK-UP LIGHT
(GREEN/BLACK) LEFT TURN SIGNAL
(GREEN/WHITE)
RIGHT TURN SIGNAL
(GREEN/YELLOW) BRAKE LIGHT
(WHITE/BLACK)
TAILLIGHT
(RED/BLACK)
Page 212 of 273
Open the tailgate.
Remove the two screws, then pull
the rear light assembly straight
back to remove it from the body.
Remove the socket of the burned
out bulb by turning it one-quarter
turn counterclockwise, and pull it
straight out of its socket.Install a new bulb into the socket,
and reinstall the socket into the
light assembly.
Open the tailgate. Place a cloth on
the edge of the cover. Remove the
covers by caref ully prying on the
edge with a small f lat-tipped
screwdriver.
Remove the socket by turning it
one-quarter turn counterclockwise.
1.
1.
2.
3. 2.
4.
Lights
Replacing Rear Bulbs
Replacing a Back-up L ight Bulb
210
.
The light")