Page 158 of 414

CONT INUED
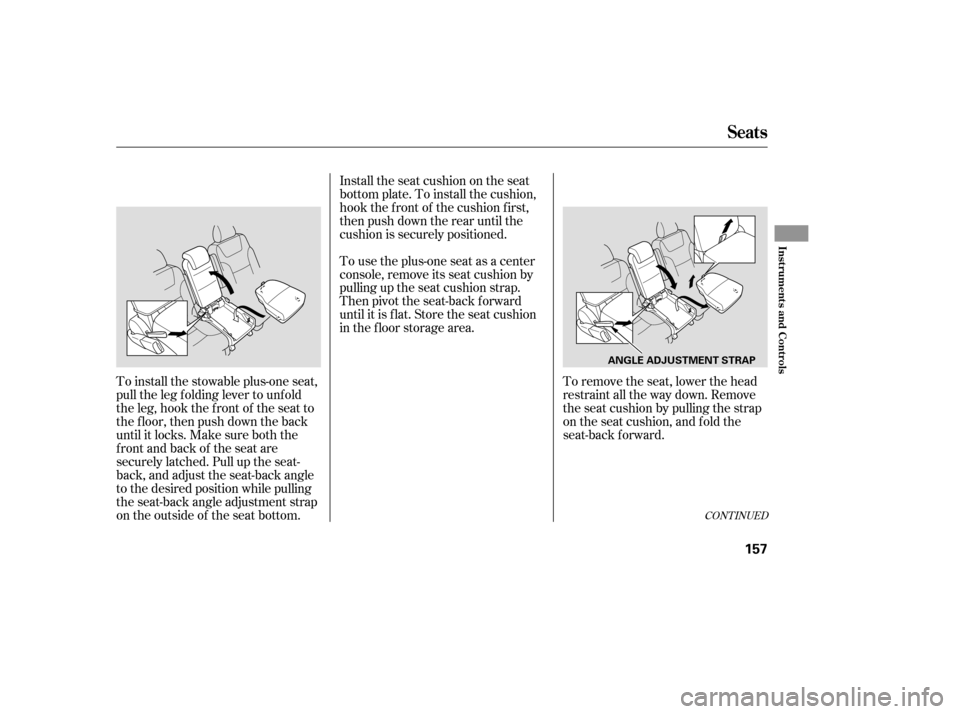
To remove the seat, lower the head
restraint all the way down. Remove
the seat cushion by pulling the strap
on the seat cushion, and f old the
seat-back forward.
To install the stowable plus-one seat,
pull the leg f olding lever to unf old
the leg, hook the front of the seat to
the f loor, then push down the back
until it locks. Make sure both the
f ront and back of the seat are
securely latched. Pull up the seat-
back, and adjust the seat-back angle
to the desired position while pulling
the seat-back angle adjustment strap
on the outside of the seat bottom. Install the seat cushion on the seat
bottom plate. To install the cushion,
hook the f ront of the cushion f irst,
then push down the rear until the
cushion is securely positioned.
To use the plus-one seat as a center
console, remove its seat cushion by
pulling up the seat cushion strap.
Then pivot the seat-back forward
until it is f lat. Store the seat cushion
in the f loor storage area.
Seats
Inst rument s and Cont rols
157
ANGLE ADJUSTMENT STRAP
Page 159 of 414

To create more cargo space, you can
f old the one-motion third row ‘‘Magic
Seat’’ into the floor recess.Unlatch the detachable seat belt
anchor center seat belt, and let the
belt retract all the way into the
ceiling. Place the latch plate and
anchor latch into their holding
slots.
Lower the head restraints f ully.
Always remove an unsecured seat
f rom the vehicle bef ore driving. A
seat that is not locked in place could
be thrown about and cause injury in
a sudden stop or crash.
Thestowableplus-oneseatassembly
canbestoredinthefloorstorage
area between the f ront seats and the
secondrowseats.Todothis,remove
theLazySusanfromthefloor
storage area.
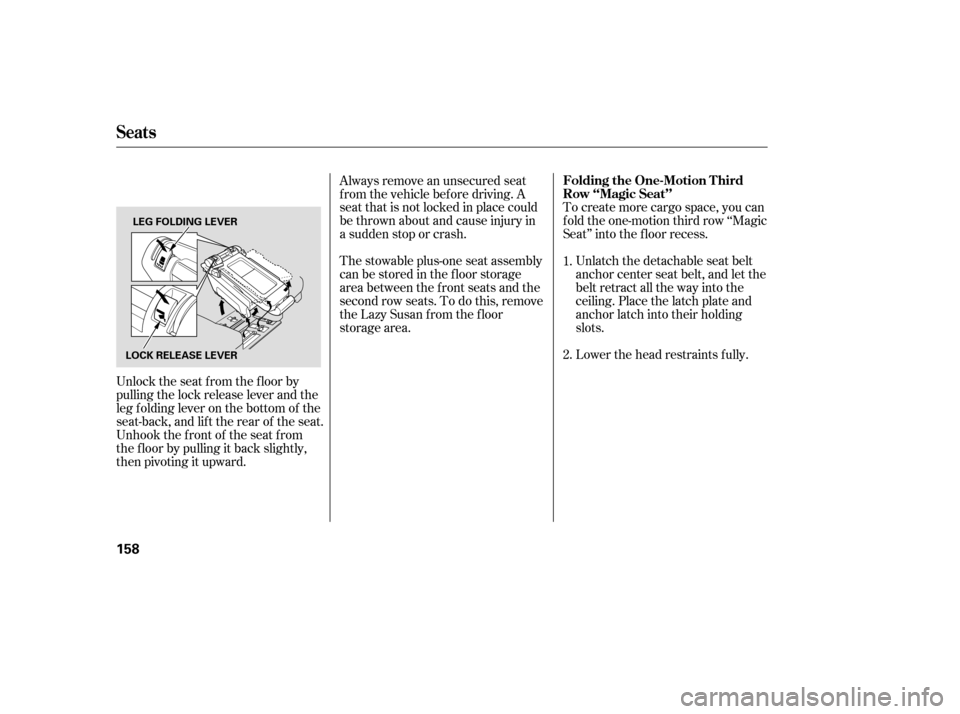
Unlock the seat f rom the f loor by
pulling the lock release lever and the
leg f olding lever on the bottom of the
seat-back, and lift the rear of the seat.
Unhook the f ront of the seat f rom
the f loor by pulling it back slightly,
then pivoting it upward. 1.
2.
Seats
Folding the One-Motion T hird
Row ‘‘Magic Seat’’
158
LOCK RELEASE LEVER
LEG FOLDING LEVER
Page 180 of 414
On EX and Touring models, the f loor
storage area has a Lazy Susan inside
which makes it easier to f ind items
through the small lid.
TheLazySusancanberemoved.
When it is removed, a larger item,
such as the stowable second row
plus-one seat, can be stored.To remove the Lazy Susan, open the
large lid. Attach the hook to the grab
rail on the back of the f ront seat to
keep the lid open. Hold the two
handles on the edge of the Lazy
Susan, and pull it out of the storage
area. Store the removed Lazy Susan
in a saf e place outside the vehicle.
Do not place it on the vehicle f loor or
seat, or in the cargo area. It can f ly
around the interior in a crash.The Lazy Susan can be damaged if it
is kept in a humid place. Always
store the Lazy Susan in a dry place
when it is removed.
Interior Convenience Items
Inst rument s and Cont rols
179
STOWABLE SECOND ROW
PLUS-ONE SEAT
LAZY SUSAN
HANDLE
Page 279 of 414

Help assure your vehicle’s f uture
reliability and perf ormance by paying
extra attention to how you drive
during the f irst 600 miles (1,000 km).
During this period:Avoid full-throttle starts and rapid
acceleration.
Avoidhardbrakingforthefirst
200 miles (300 km).
Do not change the oil until the
scheduled maintenance time.
You should also f ollow these
recommendations with an
overhauled or exchanged engine, or
when the brakes are replaced. Do not tow a trailer. Your vehicle is designed to operate
on unleaded gasoline with a pump
octane number of 86 or higher. Use
of a lower octane gasoline can cause
a persistent, heavy metallic rapping
noise that can lead to engine damage.
We recommend quality gasolines
containing detergent additives that
help prevent f uel system and engine
deposits.
In addition, in order to maintain good
perf ormance, f uel economy, and
emissions control, we strongly
recommend, in areas where it is
available, the use of gasoline that
does NOT contain manganese-based
f uel additives such as MMT.
If you notice any undesirable
operating symptoms, try another
service station or switch to another
brand of gasoline. Some gasoline today is blended with
oxygenates such as ethanol or
MTBE. Your vehicle is designed to
operate on oxygenated gasoline
containing up to 10 percent ethanol
by volume and up to 15 percent
MTBE by volume. Do not use
gasoline containing methanol.
For f urther important f uel-related
inf ormation, please ref er to your
.
Use of gasoline with these additives
may adversely af f ect perf ormance,
and cause the malfunction indicator
lamp on your instrument panel to
come on. If this happens, contact your dealer f or service.
Break-in Period, Gasoline T ype
Break-in Period
Gasoline Type
Quick Start Guide
278
Page 282 of 414
Wait a f ew minutes af ter turning the
engine of f bef ore you check the oil.Remove the dipstick again, and
check the level. It should be
between the upper and lower
marks.
To close the hood, lif t it up slightly to
remove the support rod f rom the
hole. Put the support rod back into
its holding clip. Lower the hood to
about a f oot (30 cm) above the
f ender, then let it drop. Make sure it
is securely latched. Remove the dipstick (orange loop).
Wipe of f the dipstick with a clean
cloth or paper towel.
Insert it all the way back in its hole.
Pull the support rod out of its clip
and insert the end into the hole on
thepassenger’ssideof thehood.
If it is near or below the lower mark,
seeon page .
1.
3.
2.
3.4.
328
Oil Check
A dding Engine Oil
Service Station Procedures
Bef ore Driving
281
DIPSTICK
SUPPORT ROD
UPPER MARK
LOWER MARK
Page 288 of 414

�·�µ
The resulting f igure equals the
available amount of cargo and
luggage load capacity.
If your vehicle will be towing a
trailer, the load f rom your trailer
will be transf erred to your vehicle.
Consult this manual to determine
how this reduces the available
cargo and luggage load capacity of
your vehicle.
The maximum load f or your vehicle
is:
Subtract the combined weight of
the driver and passengers f rom
the maximum load.
For example, If your vehicle is the
Touring model, and if there will be
f ive 150 lbs (70 kg) occupants in
your vehicle, the amount of available
cargo and luggage load capacity is
458 lbs (198 kg).
5 150 lbs (70 kg) = 750 lbs
(350 kg)
1,208 lbs (548 kg) 750 lbs (350 kg)
= 458 lbs (198 kg) Determine the combined weight
of accessories, luggage, and cargo
beingloadedinthevehicle.The
weight may not saf ely exceed the
available cargo and luggage load
capacity calculated in step 4
[458 lbs (198 kg) in this example].
This f igure includes, cargo,
accessories, and the tongue weight if
you are towing a trailer.
To determine the correct cargo and
luggage load limit:
Determine the combined weight
of the driver and passengers that
will be riding in your vehicle. Locate the statement, ‘‘the
combined weight of occupants and
cargo should never exceed 1,208
lbs (548 kg)’’ on your vehicle’s
placard (on the driver’s doorjamb)
if your vehicle is the Touring
model, f or example.
1.
2. 3.
4.
5.
6.
LX model: 1,349 lbs (612 kg)
EX model: 1,388 lbs (630 kg)
EX with Leather: 1,322 lbs (600 kg)
Touring model: 1,208 lbs (548 kg)
Carrying Cargo
Bef ore Driving
287
Overloading or improper
loading can affect handling and
stability and cause a crash in
which you can be hurt or killed.
Follow all load limits and other
loading guidelines in this
manual.
Page 292 of 414
This section gives you tips on
starting the engine under various
conditions, and how to operate the
automatic transmission. It also
includes important inf ormation on
parking your vehicle, the braking
system, the vehicle stability assist
system, the tire pressure monitoring
system, and f acts you need if you are
planning to tow a trailer.........................
Preparing to Drive .292
.......................
Starting the Engine .293
..............
Automatic Transmission . 294
..................................
Parking Tips .298
.............................
Braking System .299
...............
Anti-lock Brakes (ABS) . 300
Vehicle Stability Assist (VSA) ........................................
System .301
Tire Pressure Monitoring System ......................................
(TPMS) .303
...........................
Towing a Trailer .306
Driving
Driving
291
Page 297 of 414

�µ�µ �µ
If you exceed the maximum speed
f or the gear you are in, the engine
speed will enter into the tachometer’s
red zone. If this occurs, you may f eel
the engine cut in and out. This is
caused by a limiter in the engine’s
computer controls. The engine will
run normally when you reduce the
RPM below the red zone.
To use D , press the
D button when the shif t lever is in
the ‘‘D’’ position. This position is simi-
lartoD,exceptonlythefirstthree
gears are selected instead of all f ive.
Use D when towing a trailer in hilly
terrain, or to provide engine braking
when going down a steep hill. D can
also keep the transmission f rom
cycling between third and f ourth
gears in stop-and-go driving.
This position locks
the transmission in second gear. It
does not downshif t to f irst gear
when you come to a stop.
Use Second gear: For more power when climbing.
To increase engine braking when
going down steep hills.
For starting out on a slippery
surf ace or in deep snow.
When driving downhill with a
trailer. This position locks the
transmission in First gear. By upshif t-
ing and downshif ting through 1, 2,
and D, you can operate this
transmission much like a manual
transmission without a clutch pedal.3
3
3 3
Automatic Transmission
Engine Speed L imiter
Drive (D )
Second (2) First (1)3
296