Page 361 of 414

If you have a f lat tire while driving,
stop in a saf e place to change it.
Drive slowly along the shoulder until
you get to an exit or an area that is
far away from the traffic lanes.Turn on the hazard warning lights,
and turn the ignition switch to
LOCK (0). Have all the
passengers get out of the vehicle
while you change the tire. Park the vehicle on f irm, level, and
non-slippery ground. Put the
transmission in Park. Apply the
parking brake. If you are towing a
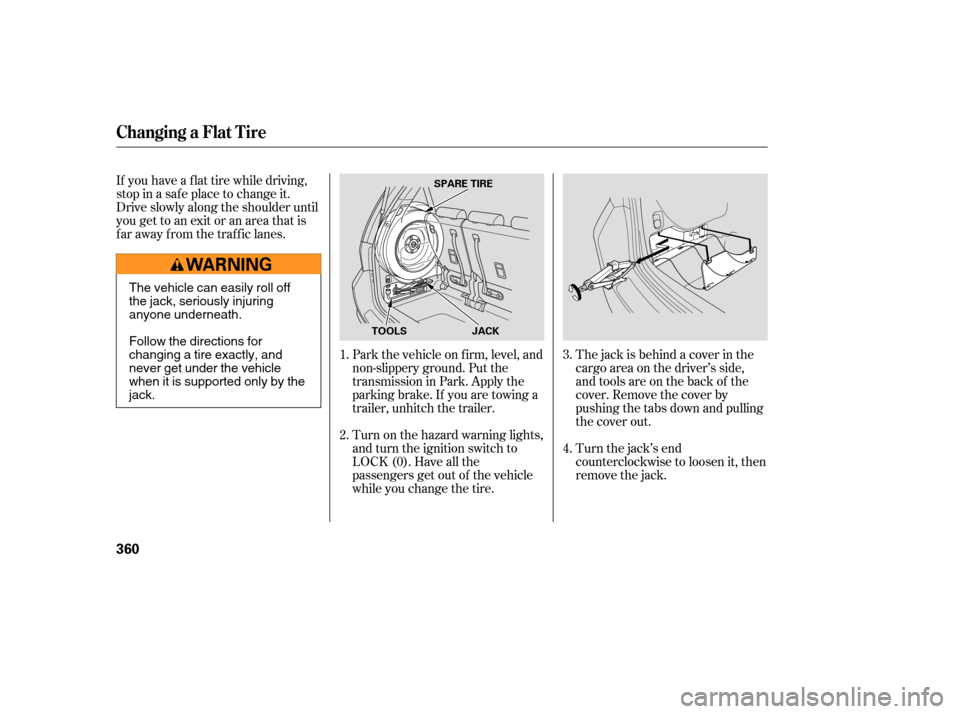
trailer, unhitch the trailer.The jack is behind a cover in the
cargo area on the driver’s side,
and tools are on the back of the
cover. Remove the cover by
pushing the tabs down and pulling
the cover out.
Turn the jack’s end
counterclockwise to loosen it, then
remove the jack.
2. 1.
3.
4.
Changing a Flat T ire
360
JACK
SPARE TIRE
TOOLS
The vehicle can easily roll off
the jack, seriously injuring
anyone underneath.
Follow the directions for
changing a tire exactly, and
never get under the vehicle
when it is supported only by the
jack.
Page 365 of 414

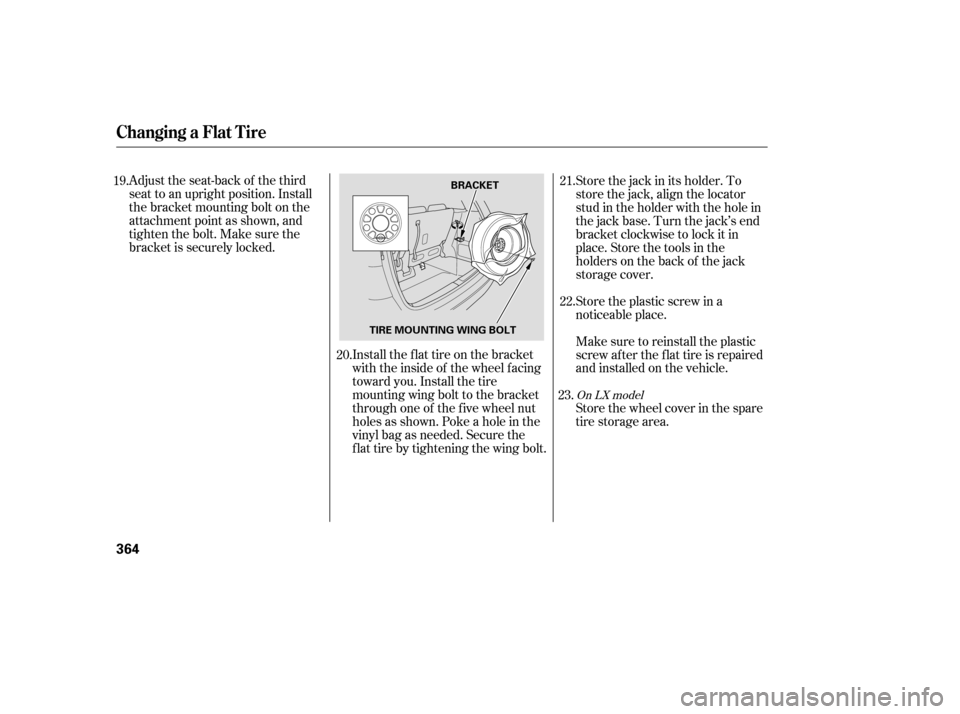
Adjust the seat-back of the third
seat to an upright position. Install
thebracketmountingboltonthe
attachment point as shown, and
tighten the bolt. Make sure the
bracket is securely locked.Install the flat tire on the bracket
with the inside of the wheel facing
toward you. Install the tire
mounting wing bolt to the bracket
through one of the f ive wheel nut
holes as shown. Poke a hole in the
vinyl bag as needed. Secure the
flat tire by tightening the wing bolt.Store the jack in its holder. To
store the jack, align the locator
stud in the holder with the hole in
the jack base. Turn the jack’s end
bracket clockwise to lock it in
place. Store the tools in the
holders on the back of the jack
storage cover.
Store the plastic screw in a
noticeable place.
Make sure to reinstall the plastic
screw af ter the f lat tire is repaired
andinstalledonthevehicle.
Store the wheel cover in the spare
tire storage area.
19.
20.21.
22.
23.
On LX model
Changing a Flat T ire
364
BRACKET
TIRE MOUNTING WING BOLT
Page 368 of 414

Are you using a properly coded
key? An improperly coded key will
cause the immobilizer system
indicator in the instrument panel
to blink rapidly (see page ).
Do you have f uel? Check the f uel
gauge; the low f uel indicator may
not be working.
There may be an electrical
problem, such as no power to the
f uel pump. Check all the f uses
(see page ).
If youfindnothingwrong,youwill
need a qualif ied technician to f ind
the problem. See on page . Although this seems like a simple
procedure, you should take several
precautions.
Open the hood, and check the
physical condition of the battery.
In very cold weather, check the
condition of the electrolyte. If it
seems slushy or f rozen, do not try
jump starting until it thaws.
You cannot start your vehicle by
pushing or pulling it. Turn of f all the electrical acces-
sories: heater, A/C, climate
control, audio system, lights, etc.
Put the transmission in Neutral or
Park, and set the parking brake.
1.
2.
376
381 129
CONT INUED
Emergency
Towing Jump Starting
To Jump Start Your Vehicle:
If the Engine Won’t Start, Jump Starting
T aking Care of t he Unexpect ed
367
A battery can explode if you do
not follow the correct procedure,
seriously injuring anyone
nearby.
Keep all sparks, open flames,
and smoking materials away
from the battery.
If a battery sits in extreme cold, the
electrolyte inside can f reeze.
Attempting to jump start with a f rozen
battery can cause it to rupture.
Page 371 of 414

Look f or any obvious coolant leaks,
such as a split radiator hose.
Everything is still extremely hot,
so use caution. If you f ind a leak, it
must be repaired bef ore you
continue driving (seeon page ).
If you do not f ind an obvious leak,
check the coolant level in the
radiator reserve tank. Add coolant
if the level is below the MIN mark.
If there was no coolant in the
reserve tank, you may need to add
coolant to the radiator. Let the
engine cool down until the pointer
reaches the middle of the tempera-
ture gauge, or lower, bef ore check-
ing the radiator. Using gloves or a large heavy
cloth, turn the radiator cap
counterclockwise, without pushing
down, to the f irst stop. Af ter the
pressure releases, push down on
the cap, and turn it until it comes
off.
If the temperature stays normal,
check the coolant level in the
radiator reserve tank. If it has
gone down, add coolant to the
MAX mark. Put the cap back on
tightly. Put the radiator cap back on
tightly. Run the engine, and watch
the temperature gauge. If it goes
back to the red mark, the engine
needs repair (seeon page ).
Start the engine, and set the
temperature control dial to
maximum (climate control to
FULL AUTO at 90°F/32°C). Add
coolant to the radiator up to the
base of the f iller neck. If you do
not have the proper coolant
mixture available, you can add
plain water. Remember to have
the cooling system drained and
ref illed with the proper mixture as
soon as you can.
5.
6.
7.
8.9.
10.
11.
381
381
Emergency
Towing
Emergency
Towing
If theEngineOverheats
370
Removing the radiator cap
while the engine is hot can
cause the coolant to spray out,
seriously scalding you.
Always let the engine and
radiator cool down before
removing the radiator cap.
Page 374 of 414

However, if the brake pedal does not
f eel normal, you should take
immediate action. A problem in one
part of the system’s dual circuit
design will still give you braking at
two wheels. You will f eel the brake
pedal go down much f arther bef ore
the vehicle begins to slow down, and
you will have to press harder on the
pedal.
Slow down by shif ting to a lower
gear, and pull to the side of the road
when it is saf e. Because of the long
distance needed to stop, it is
hazardous to drive the vehicle. You
should have it towed and repaired as
soon as possible (seeon page ). If you must drive the vehicle a short
distance in this condition, drive
slowly and caref ully.
If the brake system indicator comes
on while driving, the brake f luid level
is probably low. Press lightly on the
brake pedal to see if it f eels normal.
If it does, check the brake f luid level
thenexttimeyoustopataservice
station (see page ).
If the f luid level is low, take your
vehicle to a dealer, and have the
brake system inspected f or leaks or
worn brake pads. The brake system
indicator normally
comesonwhenyou
turn the ignition switch to ON (II),
and as a reminder to check the
parking brake. It will stay on if you
do not f ully release the parking
brake. If the ABS indicator and the VSA
indicator come on with the brake
system indicator, have the vehicle
inspected by your dealer
immediately.
You will also see a ‘‘CHECK BRAKE
SYSTEM’’ message on the multi-
inf ormation display when this
indicator comes on.
335
381
On Touring model
Emergency
Towing
Brake System Indicator
T aking Care of t he Unexpect ed
373
U.S. Canada
Page 382 of 414

�µ�µ
If your vehicle needs to be towed,
call a prof essional towing service or
organization. Never tow your vehicle
with just a rope or chain. It is very
dangerous.
Therearetwowaystotowyour
vehicle.
The operator
loads your vehicle on the back of a
truck. With the f ront wheels on the ground,
it is best to tow the vehicle no farther
than 50 miles (80 km), and keep the
speedbelow35mph(55km/h).
The tow
truck uses two pivoting arms that go
under the tires (f ront or rear) and lif t
them of f the ground. The other two
tires remain on the ground.
If , due to damage, your vehicle must
be towed with the f ront wheels on
the ground, do the f ollowing:
Release the parking brake.
Start the engine.
ShifttoD,thentoN.
Turn of f the engine.
CONT INUED
Flat bed Equipment Wheel-lif t Equipment
T his is the best way to
transport your vehicle, and it is
only way to transport a Touring
model. T his is
an acceptable way to tow your
vehicleexceptfortheTouring
model.
Emergency T owing
T aking Care of t he Unexpect ed
381
Improper towing preparation will
damage the transmission. Follow the
above procedure exactly. If you cannot
shif t the transmission or start the
engine, your vehicle must be
transported with the f ront wheels of f
the ground.
Page 383 of 414
If you decide to tow your vehicle
with all f our wheels on the ground,
make sure you use a properly-
designed and attached tow bar.
Prepare the vehicle for towing as
described previously, and leave the
ignition switched in the
ACCESSORY (I) position so the
steering wheel does not lock. Make
sure the radio and any items plugged
into the accessory power sockets are
turned of f so they do not run down
the battery.
Emergency T owing
382
The steering system can be damaged if
the steering wheel is locked. Leave the
ignition switch in Accessory (I), and
make sure the steering wheel turns
f reely bef ore you begin towing.Trying to lif t or tow your vehicle by the
bumpers will cause serious damage.
The bumpers are not designed to
support the vehicle’s weight.
Page 400 of 414

�µ
�µ �µ
�µ
�µ �µ
�µ
�µ �µ
Your new vehicle is covered by these
warranties:
covers your new vehicle, except f or
the battery, emissions control
systems, and accessories, against
def ects in materials and
workmanship.
these two
warranties cover your vehicle’s
emissions control systems. Time,
mileage, and coverage are
conditional. Please read your
warranty manual f or exact
inf ormation. a seat
belt that f ails to f unction properly is
coveredfortheusefullifeof the
vehicle.
all exterior body panels are
covered f or rust-through f rom the
inside f or the specif ied time period
with no mileage limit.
covers all Honda
replacement parts against defects in
materials and workmanship. provides
coverageforaslongasthepur-
chaser of the muf f ler owns the
vehicle. provides prorated
coverage f or a replacement battery
purchased f rom your dealer.
Restrictions and exclusions apply to
all these warranties. Please read the
2005 Honda Warranty Inf ormation
booklet that came with your vehicle
f or precise inf ormation on warranty
coverages. Your vehicle’s original
tires are covered by their
manuf acturer. Tire warranty inf or-
mation is in a separate booklet.
Please ref er to the 2005 Warranty
Manual that came with your vehicle.
this warranty gives up
to 100 percent credit toward a
replacement battery. Honda accessories are covered
under this warranty. Time and
mileage limits depend on the type of
accessory and other f actors. Please
read your warranty manual f or
details.
Warranty Coverages
U.S. Owners
Canadian Owners
New Vehicle L imit ed Warrant yEmissions Cont rol Syst ems Def ect sWarrant y and EmissionsPerf ormance Warranty Seat Belt Limited Warranty
Rust Perf orat ion L imit ed Warrant y
Replacement Part s L imit edWarranty Replacement Muf f ler L if et ime
Limited Warranty
Replacement Bat t ery L imit ed
Warranty
Original Equipment Bat t ery L imit ed Warranty Accessory Limited WarrantyWarrant y and Cust omer Relat ions
399