Page 41 of 289

A child seat with a tether can be
installed in any seating position in
the back seat, using the anchorage
points shown above.
Since a tether can provide additional
security to the lap/shoulder belt
installation, we recommend using a
tether whenever one is required or
available.Af ter properly securing the child
seat (see page ), lif t the head
restraint, then route the tether
strap over the seat-back and
through the head restraint legs.
Tighten the strap according to the
seat maker’s instructions.
Af ter properly securing the child
seat (see page ), route the
tether strap over the seat-back.
Followsteps2and3fromthe
previous column.
Lift the cover, then attach the
tether strap hook to the anchor,
making sure the strap is not
twisted.
1. 2. 3.
1. 2.
42
42
Installing a Child Seat with a
Tether
Installing a Child Seat
Using t he Cent er A nchor
Using an Out er A nchor
44
COVER
TETHER ANCHORAGE P OINTS ANCHOR
TETHER
STRAP
HOOK TETHER STRAP HOOK
ANCHOR
�����—�����—�����y�
������
������y���
�(���%�������y���������y
Page 57 of 289

with the headlight switch off and the
parking brake set. It should go of f if
youturnontheheadlightsorrelease
the parki")
CONT INUED
This indicator comes on when you
turn the ignition switch to ON (II)
with the headlight switch off and the
parking brake set. It should go of f if
youturnontheheadlightsorrelease
the parking brake. If it comes on at
any other time, it means there is a
problem with the DRL. There may
also be a problem with the high
beam headlights.This indicator comes on when you
set the cruise control. See page
f or inf ormation on operating the
cruise control.
This indicator comes on with the
high beam headlights. For more
inf ormation, see page . This indicator comes on when the
washer f luid level is low. Add washer
f luid when you see this indicator
(see page ).
On Canadian models, this indicator
comes on with reduced brightness
when the daytime running lights
(DRL) are on (see page ). This indicator reminds you that it is
time to take your vehicle in for the
scheduled maintenance. The
indicator does not ref lect severe
maintenance intervals.
Ref er to the maintenance schedule
f or normal and severe driving
conditions on page (4-cylinder
models) or page (6-cylinder
models).
This indicator comes on when you
turn on the cruise control system by
pressing the CRUISE button (see
page ). 152
68 220
69 201
206
152
Canadian models only
Canadian models only
‘‘Daytime Running
Lights’’ Indicator
High Beam IndicatorCruise Main Indicator
Cruise Control Indicator
Washer Level IndicatorMaintenance Required
Indicator
Instrument Panel Indicators
Inst rument s and Cont rols
61
�����—�����—�����y�
�������������y���
�(���%�������y���������y
Page 62 of 289
�Î
�Î
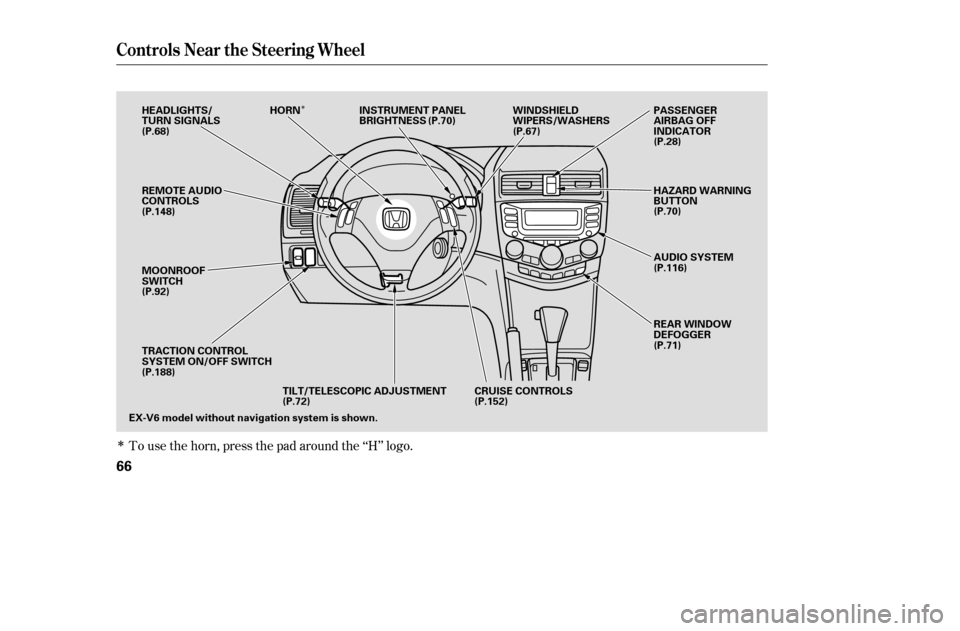
To use the horn, press the pad around the ‘‘H’’ logo.
Controls Near the Steering Wheel
66
EX-V6 model without navigation system is shown.CRUISE CONTROLS
TILT/TELESCOPIC ADJUSTMENT
REMOTE AUDIO
CONTROLS
MOONROOF
SWITCH
TRACTION CONTROL
SYSTEM ON/OFF SWITCH
HEADLIGHTS/
TURN SIGNALS
HORN INSTRUMENT PANEL
BRIGHTNESS WINDSHIELD
WIPERS/WASHERS
REAR WINDOW
DEFOGGER
AUDIO SYSTEM
HAZARD WARNING
BUTTON
PASSENGER
AIRBAG OFF
INDICATOR
(P.68) (P.70)
(P.67)
(P.28)
(P.70)
(P.116)
(P.71)
(P.152)
(P.72)
(P.188)
(P.92)
(P.148)
�����—�����—�����y�
�������������y���
�(���%�������y���������y
Page 64 of 289

�µ
�µ
�µTurning the
switch to the ‘‘ ’’ position turns
on the parking lights, taillights, side-
marker lights, and rear license plate
lights.
Turning the switch to the ‘‘ ’’
position turns on the headlights. If
you leave the lights on with the key
removed f rom the ignition switch,
you will hear a reminder chime when
you open the driver’s door.
Turn signal
Of f
Parking and indicator lights
Headlights on
High beams
Flashhighbeams Push down on the
lef t lever to signal a lef t turn and up
to signal a right turn. To signal a lane
change, push lightly on the lever and
hold it. The lever will return to
center when you release it or
complete a turn.
When the light switch is in the
‘‘ ’’ or the ‘‘ ’’ position, the
Lights On indicator comes on as a
reminder. This indicator stays on if
you leave the light switch on and turn the ignition switch to the
ACCESSORY (I) or LOCK (0)
position.
To f lash the high beams, pull the
lever back lightly, then release it.
The high beams will stay on as long
as you hold the lever back.
Push the lever
f orward until you hear a click to turn
on the high beams. The blue high
beam indicator will come on (see
page ). Pull the lever back to
return to the low beams.
1.2.3.4.5.6. 61
Turn Signal and Headlights
Headlights On
Turn Signal
High Beams
68
�����—�����—�����y�
�������������y���
�(���%�������y�������
�y
Page 65 of 289

This f eature turns of f the headlights,
parking lights, taillights, and license
plate lights within 15 seconds of
removing the key from the ignition
switch and closing the driver’s door.
This feature activates if you leave
the headlight switch in the ‘‘ ’’
or ‘‘ ’’ position, remove the key,
then open and close the driver’s door.
If you remove the key f rom the
ignition switch with the headlight
switch on, but do not open the door
and get out, the lights will turn of f
af ter 10 minutes.The lights will turn on again when
you unlock or open the driver’s door.
With the headlight switch off, the
high beam headlights and the high
beam indicator come on with
reduced brightness when you turn
the ignition switch to ON (II) and
release the parking brake. They
remain on until you turn the ignition
switch of f , even if you set the
parking brake.
If you unlock the door, but do not
open it within 15 seconds, the lights
will go off. With the driver’s door
open, you will hear a lights-on
reminder chime.
The headlights revert to normal
operation when you turn them on
with the switch.Canadian models only
Headlights
Automatic Lighting Of f Feature Daytime Running Lights
Inst rument s and Cont rols
69
�����—�����—�����y�
�������������y���
�(���%�������y���������y
Page 74 of 289
Avoid dropping or throwing the
transmitter.
Protect the transmitter from
extreme temperature.
Do not immerse the transmitter in
any liquid.
If you lose a transmitter, the
replacement needs to be
reprogrammed by your dealer.Remove the screw at the base of
the transmitter with a small
Phillips-head screwdriver.
To replace the battery:
If it takes several pushes on the
button to lock or unlock the doors,
replace the battery as soon as
possible.
Battery type: CR1616 Inside the transmitter, separate
the inner cover f rom the keypad
by releasing the two tabs on the
cover.
Separate the transmitter by prying
its middle seam with your
f ingernail.
1. 2. 3.
Remote Transmitter
Remote Transmitter CareReplacing the Transmitter
Battery
78
SCREW
TAB
BATTERY
�����—�����—�����y�
�������������y���
�(���%�������y�������
�y
Page 82 of 289
See page f or important saf etyinf ormation and a warning about how toproperly position the head restraints. 13
The head restraints help protect you
and your passengers f rom whiplash
and other injuries.
Your vehicle has adjustable head
restraints on the f ront seats. They
are also on the outside positions of
the rear seat.
Theyaremosteffectivewhenyou
adjust them so the back of the
occupant’s head rests against the
center of the restraint.
The head restraints adjust f or height.
You need both hands to adjust the
restraint. Do not attempt to adjust it
while driving. To raise it, pull upward.
To lower the restraint, push the
release button sideways and push
the restraint down.
Seats
Head Restraints
86
RELEASE BUTTON
FRONT
REAR
�����—�����—�����y�
�������������y���
�(���%�������y���������y
Page 89 of 289
Push or pull the adjustment knob
right, left, up, or down to move the
mirror.
When you f inish, turn the
adjustment knob to the center
(of f ) position. This turns of f the
adjustment knob to keep your
settings.
Turn the ignition switch to ON (II).
Turn the adjustment knob to L
(driver’s side) or R (passenger’s
side).
Keeptheinsideandoutsidemirrors
clean and adjusted f or best visibility.
Be sure to adjust the mirrors bef ore
you start driving.
The inside mirror has day and night
positions. The night position reduces
glare f rom headlights behind you.
Flip the tab on the bottom edge of
the mirror to select the day or night
position. 3. 4.
1. 2.
CONT INUED
Mirrors
A djusting the Power Mirrors
Inst rument s and Cont rols
93
ADJUSTMENT KNOB
TAB
�����—�����—�����y�
���������
���y���
�(���%�������y���������y


 position. This turns of f the
adjustment knob to keep")