Page 135 of 286

�µ�µ�µ
The
seek/skip f unction selects the
various categories in XM, such as
Jazz/Blues, Rock, Classical, etc.
Push the to change the
category f orward. Push the to
change the category backward. To
search f or channels within a
category, turn the TUNE knob
clockwiseorpresstheTUNEbar . The scan f unction samples
all channels f or 5 seconds. To
activate the f unction, push the SCAN
button. Push it again to get out of the
sequence.
Each preset icon or button
canstoreonechannelinXM1and
one in XM2.
Use the TUNE, SEEK or SCAN
function to tune the radio to a
desired channel.
Pick a preset icon or button and
hold it until you hear a beep.
Repeat steps 1 to 3 to store a total
of six stations on XM1 and XM2. Once your XM channels are preset,
pressing the CH DISC button will
select your preset channels.
Push the CD/AUX XM button.
(You will see XM1 or XM2.)
1.
2.
3.
4.With Navigation SystemSEEK /SK IP (CA T EGORY) SCA N
Preset
Playing the XM Satellite Radio
134
TM
�����—�
���—���
�y���������������y���
�(���'�������y���
�����y
Page 136 of 286
Satellite radio receives signals f rom
two satellites to produce clear, high-
quality digital reception. It of f ers
many channels in several categories.
Along with a large selection of
dif f erent types of music, satellite
radio also allows you to view channel
and category selections in the audio
display.
The XM satellites are in orbit over
the equator; therefore, objects south
of the vehicle may cause satellite
reception interruptions. To help
compensate f or this, ground-based
repeaters are placed in major
metropolitan areas. Satellite signals
aremorelikelytobeblockedbytall
buildings and mountains the f arther
north you travel f rom the equator. Satellite Radio Signals
Playing the XM Satellite Radio
Features
135
Signal may be
blocked by
mountains or
large obstacles
to the south.
SATELLITE
GROUND
REPEATER
TM
�����—�
���—���
�y���������������y���
�(���'�������y���
�����y
Page 141 of 286

If your vehicle’s battery is
disconnected or goes dead, you will
need to set the clock.You can quickly set the time to the
nearest hour. Pressing and holding
the SOUND button, then pressing
theR(Preset6)sideof thebarsets
the clock back to the previous hour.
If the displayed time is after the half
hour, the clock sets the clock
f orward to the beginning of the next
hour.For example:
1:06 would RESET to 1:00.
1:52 would RESET to 2:00.
Ref er to the Navigation System
Owner’s Manual to set up the time.
Press and hold the SOUND button
until you hear a beep. The displayed
time begins to blink. Press on the H
(Preset 4) side of the bar until the
numbers advance to the desired time.
Change the minutes by pressing the
M (Preset 5) side of the bar until the
numbers advance to the desired time.
When you are f inished, press the
SOUND button again to set the time.
Without Navigation System
With Navigation System
Setting the Clock
140
DIGITAL CLOCKSOUND BUTTON PRESET BARS
Without Navigation System shown
�����—�
���—���
�y���������������y���
�(���'�������y���
�����y
Page 142 of 286
, the
hood, or the trunk will cause it to
sound. It also sounds if the radio is
removed f rom the das")
Once the security system is set,
opening any door (without using the
key or the remote transmitter), the
hood, or the trunk will cause it to
sound. It also sounds if the radio is
removed f rom the dashboard or the
wiring is cut.With the system set, you can still
open the trunk with the master key
or the remote transmitter without
triggering the alarm. The alarm will
sound if the trunk lock is f orced, or
the trunk is opened with the trunk
release handle.
The security system will not set if
the hood, trunk, or any door is not
f ully closed. If the system will not set,
check the Door Monitor on the
instrument panel (see page ), to
see if the doors and trunk are f ully
closed. Since it is not part of the
monitor display, manually check the
hood.
Do not attempt to alter this system
or add other devices to it.
The security system helps to protect
your vehicle and valuables f rom thef t.
The horn sounds and a combination
of headlights, parking lights, side
marker lights and taillights f lashes if
someone attempts to break into your
vehicleorremovetheradio.This
alarm continues f or two minutes,
then the system resets. To reset an
alarming system before the two
minutes have elapsed, unlock either
f ront door with the key or the
remote transmitter.
The security system automatically
sets 15 seconds after you lock the
doors, hood, and trunk. For the
system to activate, you must lock the
doors f rom the outside with the key,
lock tab, door lock switch, or remote
transmitter. The security system
light on the instrument panel starts
blinking immediately to show you
the system is setting itself.
57
Security System
Features
141
SECURITY SYSTEM INDICATOR
�����—�
���—���
�y���������������y���
�(���'�������y���
�����y
Page 147 of 286
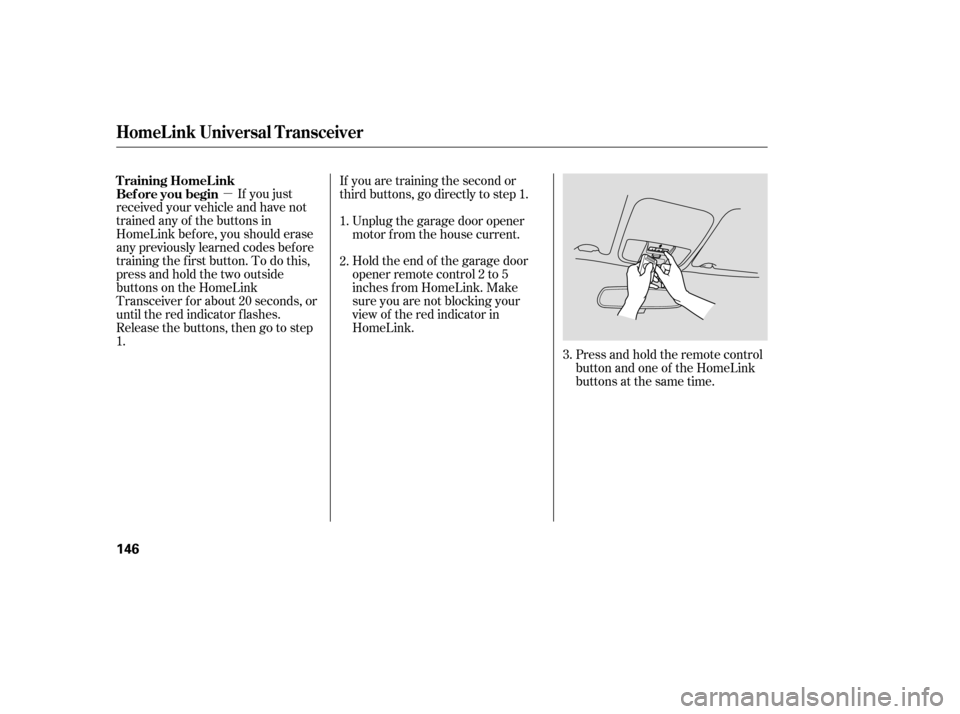
�µPress and hold the remote control
button and one of the HomeLink
buttons at the same time.
If you just
received your vehicle and have not
trained any of the buttons in
HomeLink bef ore, you should erase
any previously learned codes bef ore
training the f irst button. To do this,
press and hold the two outside
buttons on the HomeLink
Transceiver for about 20 seconds, or
until the red indicator f lashes.
Release the buttons, then go to step
1. If you are training the second or
third buttons, go directly to step 1.
Unplug the garage door opener
motor f rom the house current.
Holdtheendof thegaragedoor
opener remote control 2 to 5
inches f rom HomeLink. Make
sure you are not blocking your
view of the red indicator in
HomeLink.
2.
3.
1.
T raining HomeL ink
Bef ore you begin
HomeL ink Universal T ransceiver
146
�����—�
���—���
�y���������������y���
�(���'�������y���
�����y
Page 159 of 286

Bef ore installing any accessory:Make sure the accessory does not
obscure any lights, or interf ere
with proper vehicle operation or
perf ormance.
Be sure electronic accessories do
not overload electrical circuits
(see page ) or interf ere with
proper operation.
When properly installed, cellular
phones, alarms, two-way radios, and
low-powered audio systems should
not interf ere with your vehicle’s
computer controlled systems, such
as your airbags and anti-lock brakes.
Modif ying your vehicle, or installing
some non-Honda accessories, can
make your vehicle unsaf e. Bef ore
you make any modif ications or add
anyaccessories,besuretoreadthe
f ollowing inf ormation.
Your dealer has Honda accessories
that allow you to personalize your
vehicle. These accessories have
been designed and approved f or your
vehicle, and are covered by warranty.
Bef ore installing any electronic
accessory, have the installer
contact your dealer for assistance.
If possible, have your dealer
inspect the f inal installation.
Do not install accessories on the
side pillars or across the rear
windows. In these areas,
accessories may interf ere with
proper operation of the side
curtain airbags.
Although non-Honda accessories
may f it on your vehicle, they may not
meet f actory specif ications, and
could adversely af f ect your vehicle’s
handling and stability. 252
A ccessories
A ccessories and Modif ications
158
Improper accessories or
modifications can affect your
vehicle’s handling, stability, and
performance, and cause a
crash in which you can be hurt
or killed.
Follow all instructions in this
owner’s manual regarding
accessories and modifications.
�����—���
�—�
�
�y�
�
�����������y���
�(���'�������y���
���
�y
Page 160 of 286

Removing parts f rom your vehicle,
or replacing components with
af termarket components could
seriously af f ect your vehicle’s
handling, stability, and reliability.
Some examples are:Lowering the vehicle with an
aftermarket suspension kit that
signif icantly reduces ground
clearance can allow the
undercarriage to hit speed bumps
or other raised objects, which
could cause the airbags to deploy.
Raising your vehicle with an
af termarket suspension kit can
af f ect the handling and stability.
Af termarket wheels, because they
are a universal design, can cause
excessive stress on suspension
components. Larger or smaller wheels and tires
can interf ere with the operation of
your vehicle’s anti-lock brakes and
other systems.
If you plan to modif y your vehicle,
consult your dealer. Modif ying your steering wheel or
any other part of your vehicle’s
safety features can make the
systems inef f ective.
Modif ying Your Vehicle
A ccessories and Modif ications
Bef ore Driving
159
�����—���
�—�����y�
������
������y���
�(���'�������y���
�����y
Page 163 of 286

Store or secure all items that could
be thrown around and hurt
someone during a crash.
If you carry large items that
prevent you f rom closing the trunk
lid, exhaust gas can enter the
passenger area. To avoid the
possibility of
, f ollow the instructions
on page .
If you carry any items on a roof
rack,besurethetotalweightof
the rack and the items does not
exceed 165 lbs (75 kg).
If you use an accessory roof rack,
the roof rack weight limit may be
lower. Ref er to the inf ormation that
came with your roof rack.
In addition, the total weight of the
vehicle, all passengers and
accessories must not exceed the
Gross Vehicle Weight Rating
(GVWR) or the Gross Axle Weight
Rating (GAWR). Both are on a label
on the driver’s doorjamb.
Distribute cargo evenly on the
f loor of the trunk, placing the
heaviest items on the bottom and
as far forward as possible. Tie
down items that could be thrown
about the vehicle during a crash or
sudden stop. Do not put any items on top of the
rear shelf . They can block your
view and be thrown around the
vehicle during a crash.
Be sure items placed on the f loor
behind the f ront seats cannot roll
under the seats and interf ere with
the driver’s ability to operate the
pedals or the seat.
Keep the glove box closed while
driving so that someone in the
passenger seat can avoid injuries
to their knees in a crash or a
sudden stop.
49
Carrying Items in the Passenger
Compartment
carbon monoxide
poisoning
Carrying Cargo in the Trunk or on
a Roof Rack
Carrying Cargo
162
�����—���
�—�����y�
�������������y���
�(���'�������y���
�����y