Page 5 of 286
Your Vehicle at a Glance
4
HEATING/COOLING
CONTROLS
MIRROR CONTROLS
POWER WINDOW
SWITCHES GAUGES
HOOD RELEASE
HANDLE ACCESSORY POWER SOCKETSAUDIO SYSTEM
AUTOMATIC
TRANSMISSION
AIRBAGS
(P.11,23)
INDICATORS
TRUNK RELEASE LEVER FUEL FILL DOOR RELEASE LEVER (P.63)
(P.53)
(P.112)
(P.100)
(P.168)
(P.97)
(P.154)
(P.84)
(P.153)
(P.90) (P.80)
(P.89)
POWER DOOR LOCK
SWITCHES
�����—�
���—�����y���������������y���
�(���'�������y���������y
Page 52 of 286

This section gives inf ormation about
the controls and displays that
contribute to the daily operation of
your vehicle. All the essential
controls are within easy reach............................
Control Locations .52
............................
Instrument Panel .53
................
Instrument Panel Lights .54
.............................................
Gauges .63
Controls Near the Steering
.......................................
Wheel .70
..................
Wipers and Washers .71
.......
Turn Signal and Headlights .72
Automatic Lighting Off
.....................................
Feature .73
............
Daytime Running Lights .74
....
Instrument Panel Brightness .74
..........................
Hazard Warning .74
.............
Rear Window Def ogger .75
......
Steering Wheel Adjustment .76
...............................
Keys and Locks .77
........................
Immobilizer System .78
................................
Ignition Switch .79
......................................
Door Locks .80
..................
Childproof Door Locks .81
.......................
Remote Transmitter .81
................................................
Trunk .84
........
Emergency Trunk Opener .85
............................................
Armrest .85
....................................
Seat Heaters .86 ...................................................
Seat .86
.......
Adjusting the Driver’s Seat .86
...........
Driver’s Lumbar Support .87
Adjusting the Passenger’s
...........................................
Seat .87
..........................
Head Restraints .88
.............................................
Mirrors .89
....
Adjusting the Power Mirrors .89
................
Power Mirror Heaters .90
..............................
Power Windows .90
.................................
Parking Brake .93
..........................................
Sun Visor .94
..................................
Vanity Mirror .94
.................................
Interior Lights .95
...........
Interior Convenience Items .96
.......................
Beverage Holders .96
..........
Accessory Power Sockets .97
...............
Console Compartment .97
.......................
Center CD Pocket .97
......................
Sunglasses Holder .98
....................................
Glove Box .98
Instruments and Controls
Inst rument s and Cont rols
51
�����—���
�—�����y�
����
��������y���
�(���'�������y���������y
Page 53 of 286
Control L ocations
52
POWER DOOR LOCK
SWITCHES
POWER WINDOW
SWITCHESMIRROR CONTROLS
ACCESSORY POWER SOCKETSAUDIO SYSTEM
HEATING/COOLING
CONTROLS HAZARD WARNING
BUTTON
CRUISE CONTROLS
TRUNK RELEASE LEVER HOOD RELEASE HANDLE
INDICATORS
GAUGES
FUEL FILL DOOR RELEASE LEVER (P.53)
(P.63)
(P.89)
(P.80)
(P.90)
(P.153) (P.154)
(P.97)(P.100) (P.112)
(P.142)
(P.84) AUTOMATIC
TRANSMISSION
(P.168)
(P.75)
�����—���
�—�����y�
����
��������y���
�(���'�������y���������y
Page 90 of 286
CONT INUED
Keeptheinsideandoutsidemirrors
clean and adjusted f or best visibility.
Be sure to adjust the mirrors bef ore
you start driving. The outside
mirrors are manually adjustable. The
inside mirror has day and night
positions. The night position reduces
glare f rom headlights behind you.
Flip the tab on the bottom edge of
the mirror to select the day or night
position.Turn the ignition switch to ON (II).
Turn the adjustment knob to L
(driver’s side) or R (passenger’s
side).Push or pull the adjustment knob
right, left, up, or down to move the
mirror.
When you f inish, turn the
adjustment knob to the center
(of f ) position.
1.
2. 3.
4.
Adjusting the Power Mirrors
Mirrors
Inst rument s and Cont rols
89
TAB
ADJUSTMENT KNOB
�����—���
�—�����y�
�������������y���
�(���'�������y���������y
Page 91 of 286

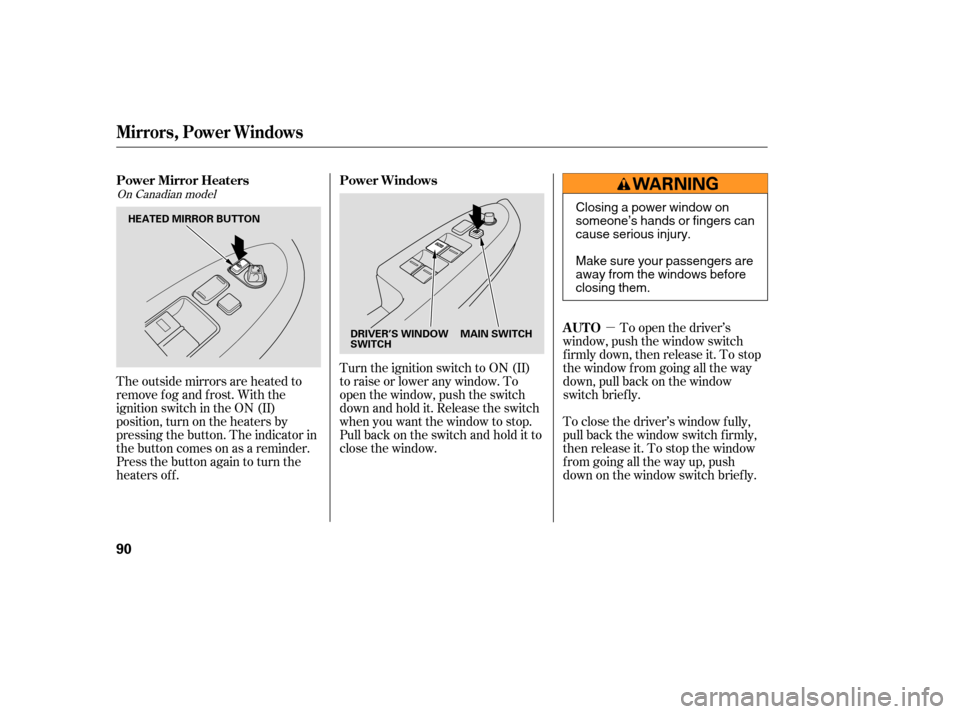
�µTo open the driver’s
window, push the window switch
f irmly down, then release it. To stop
the window f rom going all the way
down, pull back on the window
switch brief ly.
To close the driver’s window f ully,
pull back the window switch f irmly,
then release it. To stop the window
f rom going all the way up, push
down on the window switch brief ly.
Turn the ignition switch to ON (II)
toraiseorloweranywindow.To
open the window, push the switch
downandholdit.Releasetheswitch
when you want the window to stop.
Pull back on the switch and hold it to
close the window.
The outside mirrors are heated to
remove fog and frost. With the
ignition switch in the ON (II)
position, turn on the heaters by
pressing the button. The indicator in
the button comes on as a reminder.
Press the button again to turn the
heaters off.
On Canadian model
Power Windows
AUTO
Power Mirror Heaters
Mirrors, Power Windows
90
DRIVER’S WINDOW
SWITCH
MAIN SWITCH
HEATED MIRROR BUTTON
Closing a power window on
someone’s hands or fingers can
cause serious injury.
Make sure your passengers are
away from the windows before
closing them.
�����—���
�—�����y�
���������
���y���
�(���'�������y���������y
Page 95 of 286
To use the sun visor, pull it down.
You can also use the sun visor at the
side window. Remove the support
rod f rom the clip and swing the sun
visor toward the side window.Touseavanitymirroronthebackof
the sun visor, pull up the cover.The light comes on when you pull up
the cover.
Sun Visor
Vanity Mirror
Sun Visor, Vanit y Mirror
94
�����—�
���—���
�y�������������
�y���
�(���'�������y���������y
Page 167 of 286

Youshoulddothefollowingchecks
and adjustments bef ore you drive
your vehicle.Make sure all windows, mirrors,
and outside lights are clean and
unobstructed. Remove f rost, snow,
or ice.
Make sure the doors are securely
closed and locked.
Fasten your seat belt. Check that
your passengers have f astened
their seat belts (see page ). Check the steering wheel
adjustment (see page ).
Check that the hood is f ully closed.
Check that the trunk is f ully
closed.
Visually check the tires. If a tire
looks low, use a gauge to check its
pressure.
Check that any items you may be
carrying are stored properly or
f astened down securely. Check the seat adjustment (see
pages to ).
Check the adjustment of the
inside and outside mirrors (see
pages and ).
When you start the engine, check
the gauges and indicators in the
instrument panel (see pages to
).
3. 2. 1.
4.
5. 6.
7.
8.
9.
11.
10. 16
89 90
76 54
69
86 88
Preparing to Drive
166
�����—���
�—�����y�
�������������y���
�(���'�������y���
�����y
Page 186 of 286
Trailer lights and equipment must
comply with federal, state, and local
regulations. Check with your local
recreational vehicle dealer f or the
requirements in your area, and use
only equipment designed f or your
vehicle.Many states and Canadian provinces
require special outside mirrors when
towing a trailer. Even if they don’t,
you should install special mirrors if
you cannot clearly see behind you, or
if the trailer creates a blind spot.Askyourtrailersalesorrental
agency if any other items are
recommended or required f or your
towing situation.
Since lighting and wiring vary by
trailer type and brand, you should
have a qualif ied technician install a
suitable connector between the
vehicle and the trailer. Improper
equipment or installation can cause
damage to your vehicle’s electrical
system and af f ect your vehicle
warranty.
T railer L ight s A ddit ional T owing Equipment
Towing a Trailer
Driving
185
�����—�
���—���
�y���������������y���
�(���'�������y���
�����y