Page 238 of 286
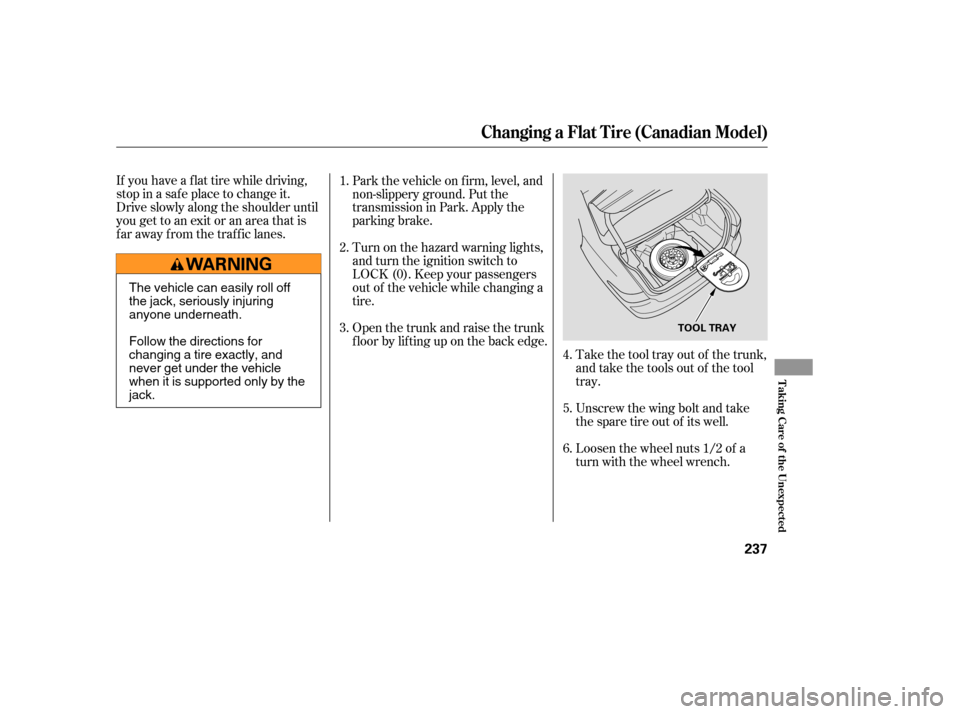
If you have a f lat tire while driving,
stop in a saf e place to change it.
Drive slowly along the shoulder until
you get to an exit or an area that is
far away from the traffic lanes.Loosen the wheel nuts 1/2 of a
turn with the wheel wrench. Unscrew the wing bolt and take
the spare tire out of its well. Take the tool tray out of the trunk,
and take the tools out of the tool
tray.
Park the vehicle on f irm, level, and
non-slippery ground. Put the
transmission in Park. Apply the
parking brake.
Turn on the hazard warning lights,
and turn the ignition switch to
LOCK (0). Keep your passengers
out of the vehicle while changing a
tire.
Open the trunk and raise the trunk
f loor by lif ting up on the back edge.
5. 4.
3. 2. 1.
6.
Changing a Flat Tire (Canadian Model)
T aking Care of t he Unexpect ed
237
TOOL TRAY
The vehicle can easily roll off
the jack, seriously injuring
anyone underneath.
Follow the directions for
changing a tire exactly, and
never get under the vehicle
when it is supported only by the
jack.
�����—�
���—���
�y��������
������y���
�(���'�������y���������y
Page 239 of 286
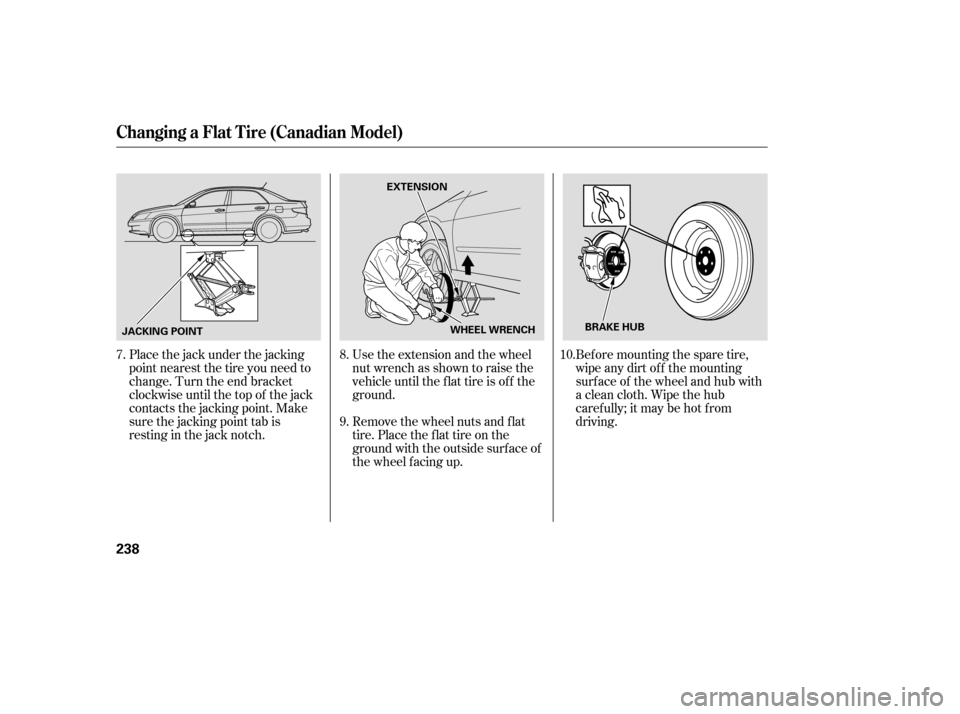
Bef ore mounting the spare tire,
wipe any dirt of f the mounting
surface of the wheel and hub with
a clean cloth. Wipe the hub
carefully;itmaybehotfrom
driving.
Remove the wheel nuts and f lat
tire. Place the f lat tire on the
ground with the outside surf ace of
the wheel f acing up. Use the extension and the wheel
nut wrench as shown to raise the
vehicle until the f lat tire is of f the
ground.
Place the jack under the jacking
point nearest the tire you need to
change. Turn the end bracket
clockwise until the top of the jack
contacts the jacking point. Make
sure the jacking point tab is
restinginthejacknotch. 10.
8.
9.
7.
Changing a Flat Tire (Canadian Model)
238
EXTENSION
BRAKE HUB
WHEEL WRENCH
JACKING POINT
�����—�
���—���
�y��������
��
���y���
�(���'�������y�������
�y
Page 240 of 286

Tighten the wheel nuts securely in
the same crisscross pattern. Have
the wheel nut torque checked at
the nearest automotive service
f acility.
Tighten the wheel nuts to:
Put on the spare tire. Put the
wheel nuts back on f inger-tight,
then tighten them in a crisscross
pattern with the wheel nut wrench
until the wheel is f irmly against
the hub. Do not try to tighten
them f ully.
Lower the vehicle to the ground
and remove the jack. Remove the center cap before
storing the f lat tire in the trunk
well.
Place the flat tire face down in the
spare tire well.
Remove the spacer cone f rom the
wing bolt, turn it over, and put it
back on the bolt.
Securetheflattirebyscrewing
the wing bolt back into its hole.
Store the jack in its holder. Turn
the jack’s end bracket to lock it in
place. Replace the cover. Store the
tools.
11.
12. 13.15.
16.
17.
18. 14.
CONT INUED
Changing a Flat Tire (Canadian Model)
T aking Care of t he Unexpect ed
239
WING BOLT
SPACER CONE
80 lbf·ft (108 N·m , 11 kgf·m)
�����—�
���—���
�y��������
������y���
�(���'�������y���������y
Page 241 of 286

Diagnosing why the engine won’t
start f alls into two areas, depending
on what you hear when you turn the
key to START (III):You hear nothing, or almost
nothing. The engine’s starter
motor does not operate at all, or
operates very slowly.
You can hear the starter motor
operating normally, or the starter
motor sounds like it is spinning
f aster than normal, but the engine
does not start up and run. When you turn the ignition switch to
START (III), you do not hear the
normal noise of the engine trying to
start. You may hear a clicking sound
or series of clicks, or nothing at all.
Check the transmission interlock.
If you have a manual transmission,
the clutch pedal must be pushed
all the way to the f loor or the
starter will not operate. With an
automatic transmission, it must be
in Park or Neutral.
Turn the ignition switch to ON (II).
Turn on the headlights, and check
their brightness. If the headlights
are very dim or do not come on at
all, the battery is discharged. See on page .
Store the wheel cover or center
cap in the trunk. Make sure it does
not get scratched or damaged.
Check these things:
19.
242
If the Engine Won’t Start
Nothing Happens or the Starter
Motor Operates Very Slowly
Jump Starting
Changing a Flat Tire (Canadian Model), If the Engine Won’t Start
240
Loose items can fly around the
interior in a crash and could
seriously injure the occupants.
Store the wheel, jack, and tools
securely before driving.
�����—�
���—���
�y��������
������y���
�(���'�������y���������y
Page 246 of 286

Using gloves or a large heavy
cloth, turn the radiator cap
counterclockwise, without pushing
down, to the f irst stop. Af ter the
pressure releases, push down on
the cap, and turn it until it comes
off.
Start the engine and set the
temperature control dial to
maximum (climate control to
FULL AUTO at 90°F/32°C). Add
coolant to the radiator up to the
base of the f iller neck. If you do
not have the proper coolant
mixture available, you can add
plain water. Remember to have
the cooling system drained and
ref illed with the proper mixture as
soon as you can.Put the radiator cap back on
tightly. Run the engine, and watch
the temperature gauge. If it goes
back to the red mark, the engine
needs repair (see
on page ).
If the temperature stays normal,
check the coolant level in the
radiator reserve tank. If it has
gone down, add coolant to the
MAX mark. Put the cap back on
tightly.
If you do not f ind an obvious leak,
check the coolant level in the
radiator reserve tank. Add coolant
if the level is below the MIN mark.
If there was no coolant in the
reserve tank, you may need to add
coolant to the radiator. Let the
engine cool down until the pointer
reaches the middle of the tempera-
ture gauge, or lower, bef ore check-
ing the radiator.
7. 6.
8.
9.10.
11.
250
Emergency
Towing
If theEngineOverheats
T aking Care of t he Unexpect ed
245
Removing the radiator cap
while the engine is hot can
cause the coolant to spray out,
seriously scalding you.
Always let the engine and
radiator cool down before
removing the radiator cap.
�����—�
���—���
�y�������������
�y���
�(���'�������y���������y
Page 252 of 286
With the f ront wheels on the ground,
it is best to tow the vehicle no farther
than 50 miles (80 km), and keep the
speedbelow35mph(55km/h).If you decide to tow your vehicle
with all f our wheels on the ground,
make sure you use a properly-
designed and attached tow bar.
Prepare the vehicle for towing as
described above, and leave the
ignition switch in Accessory (I) so
the steering wheel does not lock.
Make sure the radio and any items
plugged into the accessory power
socket are turned of f so they do not
rundownthebattery.
If your vehicle is equipped with a
f ront spoiler, remove it bef ore
towing so it is not damaged.
Emergency T owing
T aking Care of t he Unexpect ed
251
The steering system can be damaged if
the steering wheel is locked. Leave the
ignition switch in ACCESSORY (I), and
make sure the steering wheel turns
f reely bef ore you begin towing.
Trying to lif t or tow your vehicle by the
bumpers will cause serious damage.
The bumpers are not designed to
support the vehicle’s weight.
�����—�
���—���
�y�����������
���y���
�(���'�������y���������y
Page 253 of 286
The interior f use box is on the
driver’s lower lef t side. To remove
the f use box lid, pull it toward you
and take it out of its hinges.The under-hood f use box is located
near the back of the engine compart-
ment on the driver’s side. To open it,
pushthetabsasshown.If something electrical in your
vehicle stops working, the first thing
youshouldcheckforisablownfuse.
Determine f rom the chart on pages
and , or the diagram on the
f use box lid, which f use or f uses
control that component. Check those
f uses f irst, but check all the f uses
bef ore deciding that a blown f use is
not the cause. Replace any blown
f uses and check if the device works.
Turn the ignition switch to LOCK
(0). Make sure the headlights and
all other accessories are of f .
Remove the cover f rom the f use
box.
1.
2. 255 256 Checking and Replacing Fuses
Fuses
252
INTERIOR
UNDER-HOOD
TAB
�����—�
���—���
�y���������������y���
�(���'�������y���������y
Page 257 of 286
�Î�µ
�µ�µ
�µ
�µ
�µ
�ΠNo.
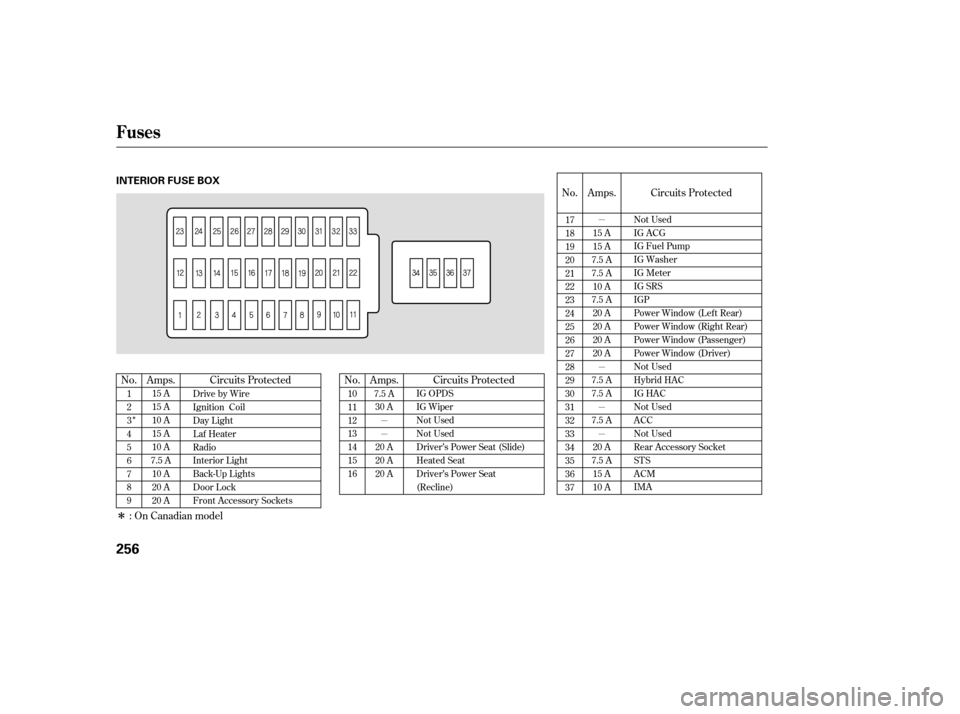
No. Circuits Protected No. Amps. Circuits Protected Amps. Amps. Circuits Protected
: On Canadian model
17
18
19
20
21
22
23
24
25
26
27
28
29
30
31
32
33
34
35
36
37
1
2
3
4
5
6
7
8
9 DrivebyWire
Ignition Coil
Day Light
Laf Heater
Radio
Interior Light
Back-Up Lights
Door Lock
Front Accessory Sockets 10
11
12
13
14
15
16
7.5 A
30 A
20 A
20 A
20 A IG OPDS
IG Wiper
Not Used
Not Used
Driver’s Power Seat (Slide)
Heated Seat
Driver’s Power Seat
(Recline)
15 A
15 A
10 A
15 A
10 A
7.5 A 10 A
20 A
20 A 15 A
15 A
7.5 A
7.5 A 10 A
7.5 A 20 A
20 A
20 A
20 A
7.5 A
7.5 A
7.5 A 20 A
7.5 A 15 A
10 A Not Used
IG ACG
IG Fuel Pump
IG Washer
IG Meter
IG SRS
IGP
Power Window (Lef t Rear)
Power Window (Right Rear)
Power Window (Passenger)
Power Window (Driver)
Not Used
Hybrid HAC
IG HAC
Not Used
ACC
Not Used
Rear Accessory Socket
STS
ACM
IMA
Fuses
256
INTERIOR FUSE BOX
�����—�
�
�—�����y���������������y���
�(���'�������y���������y